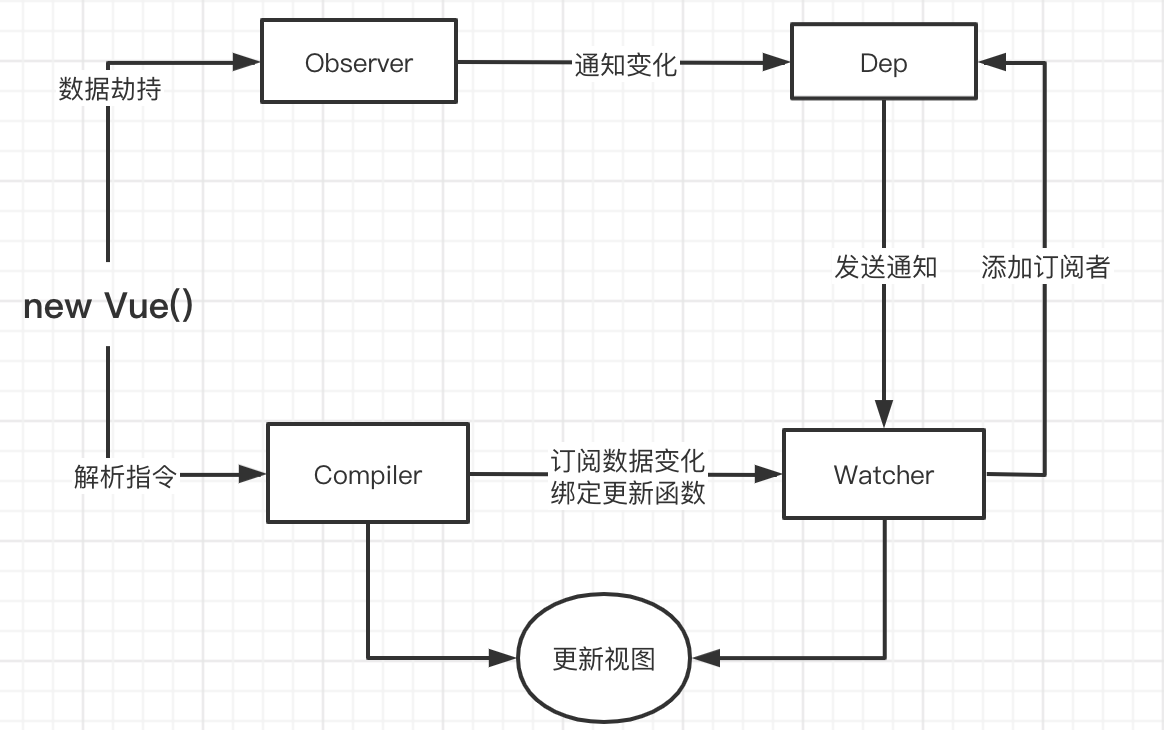
一. 原理
三. 简版Vue响应式代码实现
1. index.html 代码
<!DOCTYPE html><html lang="en"><head><meta charset="UTF-8"><meta http-equiv="X-UA-Compatible" content="IE=edge"><meta name="viewport" content="width=device-width, initial-scale=1.0"><title>mini-vue</title></head><body><div id="app"><p>{{msg}}</p><p>{{count}}</p><p>v-text</p><p v-text="msg"></p><p>v-module</p><input type="text" v-module="msg"><input type="text" v-module="count"></div><script src="./dep.js"></script><script src="./watcher.js"></script><script src="./observer.js"></script><script src="./compiler.js "></script><script src="./vue.js"></script><script>const vm = new Vue({el: "#app",data: {msg: "hello vue",count: 90,info: { height: 170 }}})</script></body></html>
2. Dep.js代码, 观察者模式中的发布者
class Dep {constructor() {// 记录所有的订阅者this.subs = []}// 添加订阅者addSub(sub) {if(sub && sub.update){this.subs.push(sub)}}// 发布通知notify() {this.subs.forEach( sub => {sub.update()})}}
3. Watcher.js代码
class Watcher {constructor(vm, key, cb) {this.vm = vmthis.key = key// 回调函数负责更新视图this.cb = cb// 把watcher对象记录到Dep类到静态属性targetDep.target = this// 触发get方法, 在get方法中会调用addSubthis.oldValue = vm[key]Dep.target = null}// 当数据发生变化的时候更新视图update () {const newValue = this.vm[this.key]if (this.oldValue === newValue) {return}this.cb(newValue)}}
4. Observer.js 代码
class Observer {constructor(data) {this.walk(data)}walk(data) {if (!data || typeof data !== "object") {return}// 遍历data对象的所有属性, 为每一个属性设置getter, setterObject.keys(data).forEach(key => {this.defineReactive(data, key, data[key])})}defineReactive(obj, key, val) {// 负责收集依赖, 并发送通知const dep = new Dep()// 当data的属性值为对象的时候再调用walk为其设置getter和setterthis.walk(val)const that = thisObject.defineProperty(obj, key, {enumerable: true,configurable: true,get() {// 收集依赖Dep.target && dep.addSub(Dep.target)return val},set(newValue) {if (newValue === val) {return}val = newValue// 当将data里当值重新赋值为对象的时候,再次调用walk为其设置getter和setterthat.walk(newValue)// 发送通知dep.notify()}})}}
5. Compiler.js 代码
class Compiler {constructor (vm) {this.el = vm.$elthis.vm = vmthis.compile(this.el)}// 编译模版,处理文本节点和元素节点compile (el) {const childNodes = el.childNodesArray.from(childNodes).forEach(node => {if (this.isElementNode(node)) { // 元素节点this.compileElement(node)} else if (this.isTextNode(node)) { // 文本节点this.compileText(node)}// 如果有子节点,递归调用compileif (node.childNodes && node.childNodes.length) {this.compile(node)}})}// 编译元素节点,处理指令compileElement (node) {Array.from(node.attributes).forEach(attr => {let attrName = attr.nameif (this.isDirective(attrName)) {// v-text ==> textattrName = attrName.substr(2)const key = attr.valuethis.update(node, key, attrName)}})}update (node, key, attrName) {const updateFn = this[attrName + "Updater"]updateFn && updateFn.call(this, node, this.vm[key], key)}// 处理 v-text 指令textUpdater (node, value, key) {node.textContent = valuenew Watcher(this.vm, key, newValue => {node.textContent = newValue})}// 处理v-model指令moduleUpdater (node, value, key) {node.value = valuenew Watcher(this.vm, key, newValue => {node.value = newValue})// 双向绑定node.addEventListener("input", () => {this.vm[key] = node.value})}// 编译文本节点,处理差值表达式compileText (node) {// {{ msg }}const reg = /\{\{(.+?)\}\}/const value = node.textContentif (reg.test(value)) {const key = RegExp.$1.trim()node.textContent = value.replace(reg, this.vm[key])new Watcher(this.vm, key, newValue => {node.textContent = newValue})}}// 判断属性是否是指令isDirective (attrName) {return attrName.startsWith("v-")}// 判断节点是否文本节点isTextNode (node) {return node.nodeType === 3}// 判断是否元素节点isElementNode (node) {return node.nodeType === 1}}
6. Vue.js 代码
class Vue {constructor(options) {// 1 通过属性保存选项的数据this.$options = options || {}this.$el = typeof options.el === "string"? document.querySelector(options.el): options.elthis.$data = options.data || {}// 2 把data中的成员转换成getter和setter, 注入到vue实例中this._proxyData(this.$data)// 3 调用observer对象,监听数据的变化new Observer(this.$data)// 4 解析指令new Compiler(this)}_proxyData(data) {Object.keys(data).forEach(key => {Object.defineProperty(this, key, {enumerable: true,configurable: true,get() {return data[key]},set(newValue){if (newValue === data[key]) {return}data[key] = newValue}})})}}
四. 发布订阅模式, Vue事件(如:自定义事件)处理机制
1. 发布订阅模式的理解
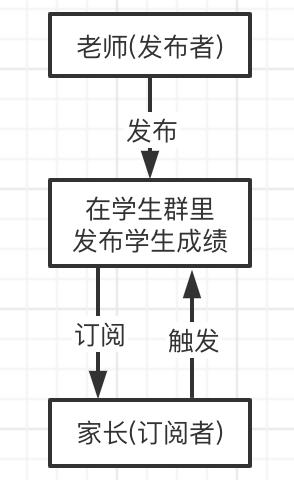
图解: 老师(信息发布者), 家长(信息订阅者, 订阅自己孩子的各科成绩), 学生成绩, 三个对象, 只要老师在同学群里发布学生的学习成绩, 在学生群里的家长(订阅者)就能收到孩子的成绩, 而不用每天追着问孩子
2. Vue自定义事件的实现如下
// 事件触发器class EventEmitter {constructor() {// 学生群this.subs = Object.create(null)}// 注册事件, 学生家长加入群$on(eventType, handler){this.subs[eventType] = this.subs[eventType] || []this.subs[eventType].push(handler)}// 触发事件$emit(eventType) {if(this.subs[eventType]){this.subs[eventType].forEach(handler => {// 每个老师发布成绩这个动作handler()})}}}// test// 先建一个微信群(当然这个群应该是班主任建的,因为只有班主任更熟悉各科任课老师和每位同学的家长)const ee = new EventEmitter()// 第一个同学的家长入群了(订阅孩子成绩)ee.$on("click", () => {console.log("click1")})// 又一个同学的家长入群了(订阅孩子成绩)ee.$on("click", () => {console.log("click2")})// 老师发布成绩ee.$emit("click")
五. 观察者模式
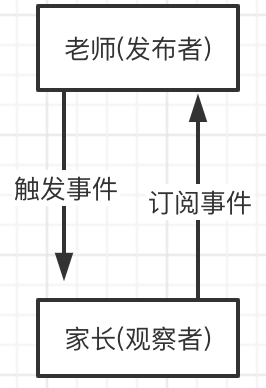
1. 观察者模式的理解
2. 观察者模式与发布订阅模式的区别
- 观察者模式 是由发布者调度, 比如当事件触发, Dep就会去调用观察者的方法, 所以观察者的发布者和观察者之间是存在依赖的.
发布订阅模式 由统一调度中心调用, 因此发布者和订阅者不需要知道对方的存在.
3. 观察者模式的实现如下
```javascript // 发布者 class Dep { constructor() { // 记录所有的观察者 this.subs = [] } // 添加观察者 addSub(sub) { if(sub && sub.update) {
this.subs.push(sub)
} }
// 发布通知 notify() { this.subs.forEach(sub => {
sub.update()
}) } } // 观察者 class Watcher { update() { console.log(“update”) } } // 观察者 class Watcher2 { update() { console.log(“update 2”) } }
// test const dep = new Dep() const watcher = new Watcher() const watcher2 = new Watcher2() dep.addSub(watcher) // 添加观察者 dep.addSub(watcher2) // 添加观察者 dep.notify() // 发布者发布通知 // update update2 ```

若有收获,就点个赞吧
0 人点赞
