课程背景
作者简介
一名普通的一线程序员,从实践的角度给大家分享JUC多线程编程.
学习场景
上班路上看视频,到了公司跟着笔记边写边思考,不知不觉成高手!
课程概要
1.适合人群最好是有一年java编程经验,并不是说这个课程有多难,而是对业务和应用场景的理解;
2.课程面向有一定经验的童鞋,因此课程中不会手把手教你写代码,重点是分析JUC的实际开发应用场景;
3.课程是基于自己的实际开发经验和网络资料学习总结而得出的,必然存在不足,仅供大家学习参考,
如果大家在学习的过程中发现有不足的地方,希望能给予指出;
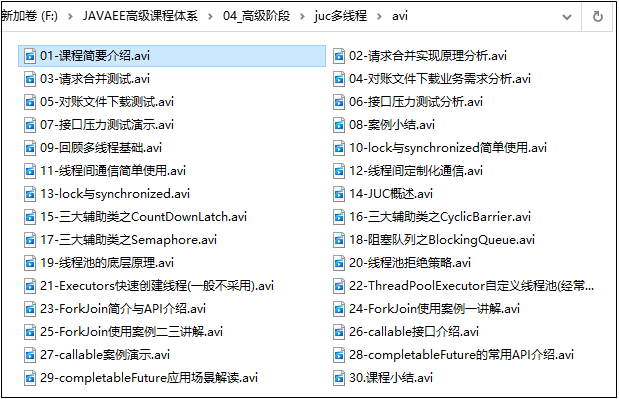
配套视频列表
配套讲解源码
1.实际开发中的多线程场景
为了大家学习不空洞,我们先看几个实际开发中的应用案例!
- 1.请求合并
https://www.yuque.com/java51/avi/murov6
- 2.支付网关的对账单下载
https://www.yuque.com/java51/avi/dymvgd
- 3.接口压力测试
https://www.yuque.com/java51/avi/osh2n2
使用到多线程的核心技术点:
1.减少计数:CountDownLatch 2.CompletableFuture接口 3.阻塞队列 4.ThreadPool线程池
2.回顾多线程基础
没有多线程基础的童鞋请先学习这个基础
课件:https://www.cnblogs.com/newAndHui/p/12748055.html
lock锁扩展

synchronized
public class TicketSynchronized {// 总是量public static Integer num = 100;public synchronized void sale() {String name = Thread.currentThread().getName();ThreadUtil.sleep(1);if (num > 0) {System.out.println(name + " 售出第:" + num);num--;} else {System.out.println(name + " 剩余票为:" + num);}}}
lock
public class TicketLock {// 总是量public static Integer num = 100;//创建可重入锁private final ReentrantLock lock = new ReentrantLock();public void sale() {String name = Thread.currentThread().getName();lock.lock();try {if (num > 0) {ThreadUtil.sleep(1);System.out.println(name + " 售出第:" + num);num--;} else {System.out.println(name + " 剩余票为:" + num);}} finally {lock.unlock();}}}
测试
public class Test01 {public static void main(String[] args) {// TicketSynchronized ticket = new TicketSynchronized();TicketLock ticket = new TicketLock();new Thread(() -> {for (int i = 0; i < 100; i++) {ticket.sale();}}, "窗口01").start();new Thread(() -> {for (int i = 0; i < 100; i++) {ticket.sale();}}, "窗口02").start();new Thread(() -> {for (int i = 0; i < 100; i++) {ticket.sale();}}, "窗口03").start();new Thread(() -> {for (int i = 0; i < 100; i++) {ticket.sale();}}, "窗口04").start();new Thread(() -> {for (int i = 0; i < 100; i++) {ticket.sale();}}, "窗口05").start();}}
线程间通信
普通通信,存钱取钱交互进行
public class Money {public static int num = 0;// 创建可重入锁private ReentrantLock lock = new ReentrantLock();// 创建通知对象private Condition condition = lock.newCondition();/*** 存钱*/public void increase() {String name = Thread.currentThread().getName();lock.lock();try {ThreadUtil.sleep(1);if (num <= 0) {num += 1000;System.out.println(name + " 存入1000,通知其他线程取钱,当前余额:num=" + num);// 通知其他线程取钱condition.signalAll();} else {// 等待System.out.println(name + " 当前不差钱,等待...");condition.await();}} catch (InterruptedException e) {e.printStackTrace();} finally {lock.unlock();}}/*** 取钱*/public void reduce() {String name = Thread.currentThread().getName();lock.lock();try {ThreadUtil.sleep(1);if (num > 0) {num -= 1000;System.out.println(name + " 取走 1000,通知其他线程 存钱,当前余额:" + num);// 通知其他线程存钱condition.signalAll();} else {// 等待System.out.println(name + " 当前余额为零,不能取钱,等待----");condition.await();}} catch (InterruptedException e) {e.printStackTrace();} finally {lock.unlock();}}}
测试:
public class Test01 {public static void main(String[] args) {Money money = new Money();new Thread(() -> {for (int i = 0; i < 30; i++) {money.reduce();}}, "取钱窗口01").start();new Thread(() -> {for (int i = 0; i < 30; i++) {money.reduce();}}, "取钱窗口02").start();new Thread(() -> {for (int i = 0; i < 30; i++) {money.reduce();}}, "取钱窗口03").start();new Thread(() -> {for (int i = 0; i < 30; i++) {money.reduce();}}, "取钱窗口04").start();new Thread(() -> {for (int i = 0; i < 30; i++) {money.increase();}}, "存钱窗口01").start();new Thread(() -> {for (int i = 0; i < 30; i++) {money.increase();}}, "存钱窗口02").start();new Thread(() -> {for (int i = 0; i < 30; i++) {money.increase();}}, "存钱窗口03").start();}}
定制化通信
public class Money {// 存钱窗口 名称 默认为:存钱窗口01public static String windowName = "存钱窗口01";// 创建可重入锁private ReentrantLock lock = new ReentrantLock();// 通知对象 存钱窗口01private Condition condition1 = lock.newCondition();// 通知对象 存钱窗口02private Condition condition2 = lock.newCondition();// 通知对象 存钱窗口03private Condition condition3 = lock.newCondition();/*** 存钱*/public void increase5(int num) {String name = Thread.currentThread().getName();lock.lock();try {ThreadUtil.sleep(1);while (!name.equals(windowName)) {// 等待System.out.println(name + " 等待...,当前:" + windowName + " 正在操作");condition1.await(); // 当前线程被唤醒时会接着 后面的代码执行}// 处理业务for (int i = 1; i <= 5; i++) {System.out.println(name + "--" + i + " 第:" + num + "次循环");}// 通知 存钱窗口02 存钱windowName = "存钱窗口02";condition2.signal();} catch (InterruptedException e) {e.printStackTrace();} finally {lock.unlock();}}/*** 存钱*/public void increase10(int num) {String name = Thread.currentThread().getName();lock.lock();try {ThreadUtil.sleep(1);while (!name.equals(windowName)) {// 等待System.out.println(name + " 等待...,当前:" + windowName + " 正在操作");condition2.await();}// 处理业务for (int i = 1; i <= 10; i++) {System.out.println(name + "--" + i + " 第:" + num + "次循环");}// 通知 存钱窗口02 存钱windowName = "存钱窗口03";condition3.signal();} catch (InterruptedException e) {e.printStackTrace();} finally {lock.unlock();}}/*** 存钱*/public void increase15(int num) {String name = Thread.currentThread().getName();lock.lock();try {ThreadUtil.sleep(1);while (!name.equals(windowName)) {// 等待System.out.println(name + " 等待...,当前:" + windowName + " 正在操作");condition3.await();}// 处理业务for (int i = 1; i <= 15; i++) {System.out.println(name + "--" + i + " 第:" + num + "次循环");}// 通知 存钱窗口01 存钱windowName = "存钱窗口01";condition1.signal();} catch (InterruptedException e) {e.printStackTrace();} finally {lock.unlock();}}}
测试
/*** @Copyright (C) XXXXXXXXXXX科技股份技有限公司* @Author: lidongping* @Date: 2021-09-15 18:30* @Description: <p>* 注意必须依次执行* 需求窗口依次存钱(5轮循环)* 存钱窗口01:每轮,循环5次* 存钱窗口02:每轮,循环10次* 存钱窗口03:每轮,循环15次** </p>*/public class test01 {public static void main(String[] args) {Money money = new Money();// 注意这里的 编写顺序无关new Thread(() -> {for (int i = 1; i <= 5; i++) {money.increase5(i);}}, "存钱窗口01").start();new Thread(() -> {for (int i = 1; i <= 5; i++) {money.increase10(i);}}, "存钱窗口02").start();new Thread(() -> {for (int i = 1; i <= 5; i++) {money.increase15(i);}}, "存钱窗口03").start();}}
lock 与 synchronized 区别
1.synchronized是Java中的关键字,Lock是一个接口;
2.通过 Lock 可以知道有没有成功获取锁,而 synchronized 却无法办到。
3.Lock 可以让等待锁的线程响应中断,而 synchronized 却不行,使用synchronized 时,等待的线程会一直等待下去,不能够响应中断;
4.synchronized 在发生异常时,会自动释放线程占有的锁,因此不会导致死锁现象发生;
而 Lock 在发生异常时,如果没有主动通过 unLock()去释放锁,则很可能造成死锁现象,因此使用 Lock 时需要在 finally 块中释放锁;
5.Lock 可以提高多个线程进行读操作的效率。
在性能上来说,如果竞争资源不激烈,两者的性能是差不多的,而当竞争资源
非常激烈时,此时 Lock 的性能要远远优于synchronized。
3.JUC概述
JUC就是java.util .concurrent工具包的简称。这是一个处理线程的工具包。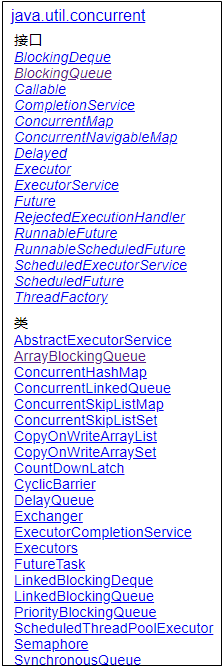
3.1.重要的3大辅助类
减少计数:CountDownLatch
循环栅栏:CyclicBarrier
信号灯:Semaphore
减少计数:CountDownLatch案例与理解
package demo06;import common.ThreadUtil;import org.junit.Test;import java.util.concurrent.CountDownLatch;/*** @author 姿势帝-博客园* @address https://www.cnblogs.com/newAndHui/* @WeChat 851298348* @create 09/25 10:48* @description <p>* 减少计数* CountDownLatch* CountDownLatch 类可以设置一个计数器,然后通过 countDown 方法来进行* 减 1 的操作,使用 await 方法等待计数器不大于 0,然后继续执行 await 方法* 之后的语句。* 特点:* 1.CountDownLatch 主要有两个方法,当一个或多个线程调用 await 方法时,这些线程会阻塞* 2. 其它线程调用 countDown 方法会将计数器减 1(调用 countDown 方法的线程不会阻塞)* 3.当计数器的值变为 0 时,因 await 方法阻塞的线程会被唤醒,继续执行* </p>*/public class CountDownLatchTest {/*** 在前的线程测试中如果使用单元测试,为了让子线程不被中断,我们都要在结束的地方使用线程睡眠* 下面的案例,我们使用CountDownLatch,让所有子线程执行完后,在结束主线程** @throws InterruptedException*/@Testpublic void test01() throws InterruptedException {int num = 10;CountDownLatch countDownLatch = new CountDownLatch(num);for (int i = 0; i < num; i++) {new Thread(() -> {ThreadUtil.sleep(1);System.out.println(Thread.currentThread().getName() + "..执行完成");// 计数器减一countDownLatch.countDown();}, "线程" + i).start();}System.out.println("主线程等待....");// await 方法等待计数器不大于 0,然后继续执行 await 方法之后的语句。countDownLatch.await();System.out.println("子线程已执行完成,可以关闭了");}/*** 模拟并发请求,做压力测试* 在实际开发中我们开发完成接口后,通常会对接口做简单的压力测试* 那么如何自己写一个简单快速的压力单元测试呢?** @throws InterruptedException*/@Testpublic void test02() throws InterruptedException {// 并发请求数int num = 200;CountDownLatch countDownLatch = new CountDownLatch(num);for (int i = 0; i < num; i++) {// 计数器减一countDownLatch.countDown();new Thread(() -> {try {System.out.println(Thread.currentThread().getName() + "..准备中,等待发出请求");ThreadUtil.sleep(5);// 等待计数器归零countDownLatch.await();System.out.println(Thread.currentThread().getName() + "..发出http请求");} catch (InterruptedException e) {e.printStackTrace();}}, "线程" + i).start();}// 等待子线程执行完成,如果使用main方法不需要睡眠ThreadUtil.sleep(20);}}
循环栅栏:CyclicBarrier案例与理解
public class CyclicBarrierTest {/*** 实际在开发中的应用场景我还没遇到,* 若果大家在开发中遇到了可以分享一下* @param args*/public static void main(String[] args) {int num = 5;CyclicBarrier cyclicBarrier = new CyclicBarrier(num, () -> {System.out.println(Thread.currentThread().getName() + "::所有子线程前部分已完成.......");});for (int i = 1; i <= num; i++) {new Thread(() -> {try {ThreadUtil.sleep(1);System.out.println(Thread.currentThread().getName() + "..前部分执行完成");// 等待其他子线程的前部分都执行完成后在执行后面的cyclicBarrier.await();System.out.println(Thread.currentThread().getName() + "..await 后执行");} catch (InterruptedException e) {e.printStackTrace();} catch (BrokenBarrierException e) {e.printStackTrace();}}, "线程" + i).start();}}}
执行结果:
线程1..前部分执行完成 线程4..前部分执行完成 线程2..前部分执行完成 线程5..前部分执行完成 线程3..前部分执行完成 线程3::所有子线程前部分已完成……. (注:特别注意z) 线程3..await 后执行 线程1..await 后执行 线程2..await 后执行 线程4..await 后执行 线程5..await 后执行
信号灯:Semaphore案例与理解
public class SemaphoreTest {/*** 场景 20个线程,抢占3个数据库线程池链接** @param args*/public static void main(String[] args) {int numThread = 50;int numData = 3;Semaphore semaphore = new Semaphore(numData);for (int i = 1; i <= numThread; i++) {new Thread(() -> {try {// 获取到数据库链接semaphore.acquire();System.out.println(Thread.currentThread().getName() + "..获取到数据库链接,正在使用");// 模拟使用时间,随机0到5秒ThreadUtil.sleep(new Random().nextInt(5));System.out.println(Thread.currentThread().getName() + "..使用完成");} catch (InterruptedException e) {e.printStackTrace();} finally {// 释放链接semaphore.release();}}, "线程:" + i).start();}}}
更多的含义和用法大家可以看API文档
https://tool.oschina.net/apidocs/apidoc?api=jdk-zh
4.阻塞队列
package demo08;import org.junit.Test;import java.util.concurrent.ArrayBlockingQueue;import java.util.concurrent.BlockingQueue;/*** @author 姿势帝-博客园* @address https://www.cnblogs.com/newAndHui/* @WeChat 851298348* @create 09/25 6:23* @description <p>* jdk文档:https://tool.oschina.net/apidocs/apidoc?api=jdk-zh* 阻塞队列* <p>* 类别 抛出异常 特殊值 阻塞 超时* 插入 add(e) offer(e) put(e) offer(e, time, unit)* 取出 remove() poll() take() poll(time, unit)* 检查 element() peek() 不可用 不可用* </p>*/public class BlockingQueueTest {/*** add 与 remove 方法测试* 特点超出报错*/@Testpublic void test01() {System.out.println("队列测试开始....");BlockingQueue<String> blockingQueue = new ArrayBlockingQueue<String>(3);// 放入队列blockingQueue.add("AA");blockingQueue.add("BB");blockingQueue.add("CC");// 最多 放3个,多于直接报错 java.lang.IllegalStateException: Queue full//blockingQueue.add("DD");// 取出队列System.out.println(blockingQueue.remove());System.out.println(blockingQueue.remove());System.out.println(blockingQueue.remove());// 最多 取3个,多于直接报错 java.util.NoSuchElementExceptionSystem.out.println(blockingQueue.remove());System.out.println("队列测试结束.");}/*** offer 与 poll 方法测试* 正常放入返回 true;* 无数据时返回 null*/@Testpublic void test02() {System.out.println("队列测试开始....");BlockingQueue<String> blockingQueue = new ArrayBlockingQueue<String>(3);// 放入队列boolean aa = blockingQueue.offer("AA");System.out.println(" aa=" + aa);boolean bb = blockingQueue.offer("BB");System.out.println(" bb=" + bb);boolean cc = blockingQueue.offer("CC");System.out.println(" cc=" + cc);// 最多 放3个,超出返回 falseboolean dd = blockingQueue.offer("DD");System.out.println(" dd=" + dd);// 取出队列System.out.println(blockingQueue.poll());System.out.println(blockingQueue.poll());System.out.println(blockingQueue.poll());// 最多 取3个,超出返回 nullSystem.out.println(blockingQueue.poll());System.out.println("队列测试结束.");}/*** put 与 take 方法测试* 产生阻塞*/@Testpublic void test03() throws InterruptedException {System.out.println("队列测试开始....");BlockingQueue<String> blockingQueue = new ArrayBlockingQueue<String>(3);// 放入队列blockingQueue.put("AA");System.out.println("放入AA完成");blockingQueue.put("BB");System.out.println("放入BB完成");blockingQueue.put("CC");System.out.println("放入CC完成");// 超出后会 阻塞// blockingQueue.put("DD");// System.out.println("放入DD完成");// 取出队列System.out.println(blockingQueue.take());System.out.println(blockingQueue.take());System.out.println(blockingQueue.take());// 超出会阻塞System.out.println(blockingQueue.take());System.out.println("队列测试结束.");}}
5.ThreadPool线程池
5.1.线程池创建
Executors创建线程池
package demo09;import common.ThreadUtil;import java.util.concurrent.ExecutorService;import java.util.concurrent.Executors;/*** @Copyright (C) XXXXXXXXXXX科技股份技有限公司* @Author: lidongping* @Date: 2021-10-02 9:32* @Description: <p>* 创建线程池* api:https://tool.oschina.net/apidocs/apidoc?api=jdk-zh* </p>*/public class ThreadPoolTest01 {/*** 线程池的创建* <p>* 特备注意:以下代码只是学习API练习的,实际生产中都不会这样使用!!!!** @param args*/public static void main(String[] args) {// 一池一线程// 创建一个使用单个 worker 线程的 Executor,以无界队列方式来运行该线程。ExecutorService singleThreadExecutor = Executors.newSingleThreadExecutor();execute(singleThreadExecutor, "一池一线程");// 一池三线程// 创建一个可重用固定线程数的线程池,以共享的无界队列方式来运行这些线程。ExecutorService threadPool01 = Executors.newFixedThreadPool(3);execute(threadPool01, "一池三线程");// 一池无线多线程// 创建一个可根据需要创建新线程的线程池,但是在以前构造的线程可用时将重用它们。ExecutorService newCachedThreadPool = Executors.newCachedThreadPool();execute(newCachedThreadPool, "一池无限多线程");}private static void execute(ExecutorService threadPool, String message) {for (int i = 0; i < 10; i++) {threadPool.execute(() -> {System.out.println(message + " 线程名称 [" + Thread.currentThread().getName() + "] 正在执行.....");ThreadUtil.sleep(2);System.out.println(message + " 线程名称 [" + Thread.currentThread().getName() + "] 执行完成!");});}threadPool.shutdown();}}
ThreadPoolExecutor创建线程池
package demo09;import common.ThreadUtil;import java.util.Random;import java.util.concurrent.*;/*** @Copyright (C) XXXXXXXXXXX科技股份技有限公司* @Author: lidongping* @Date: 2021-09-26 19:04* @Description:*/public class ThreadPoolTest02 {/*** 生产线程池的使用* <p>* 重要结论* 1.当任务来时先创建核心线程数;* 2.当核心线程是使用完后,如果还有需要处理的任务将进入队列;* 3.当队列满了的时候,在增加线程到最大线程数;* 4.当核心线程数满了,队列也满了,最大线程数也满了,这时会使用拒绝策略!** @param args*/public static void main(String[] args) {// 核心线程数,常用线程数int corePoolSize = 3;// 最大线程数int maximumPoolSize = 5;// 释放非核心线程数的空闲时间long keepAliveTime = 5L;// 空闲时间单位TimeUnit unit = TimeUnit.SECONDS;// 待执行任务的队列BlockingQueue<Runnable> workQueue = new ArrayBlockingQueue<>(2000);// 创建线程的工程类ThreadFactory threadFactory = Executors.defaultThreadFactory();// 等队列满后的拒绝策略RejectedExecutionHandler handler = new ThreadPoolExecutor.AbortPolicy();ThreadPoolExecutor poolExecutor = new ThreadPoolExecutor(corePoolSize, maximumPoolSize, keepAliveTime, unit, workQueue, threadFactory, handler);System.out.println("开始多线程执行任务");for (int i = 1; i <= 50; i++) {final int num = i;try {//取一个线程并执行任务poolExecutor.execute(() -> {System.out.println(Thread.currentThread().getName() + "正在执行任务...." + num);ThreadUtil.sleep(new Random().nextInt(5));System.out.println(Thread.currentThread().getName() + "任务完成.." + num);});} catch (Exception e) {System.out.println("任务执行失败:" + num + "--" + e.getMessage());}}// 关闭线程,当所有子线程执行完成后会关闭(异步的)poolExecutor.shutdown();System.out.println("所有任务结束");}}
5.2.线程池实现的底层原理
实现原理图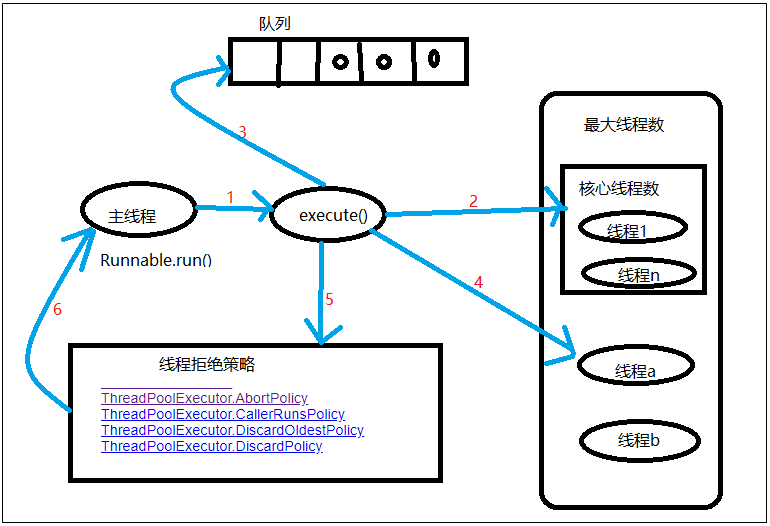
线程池的核心要点
初始化的线程池时,线程数为0;
当调用 execute()方法执行一个新的任务时(获取线程)有如下4种情况: a. 如果正在运行的线程数量小于 corePoolSize(核心线程数),则会立即运行这个任务; b.如果正在运行的线程数量大于或等于 corePoolSize,则会将这个任务放入队列进行排队处理; c.如果这个时候队列满了且正在运行的线程数量还小于maximumPoolSize(最大线程数),则会新建线程执行当前任务; d.如果队列满了且正在运行的线程数量大于或等于 maximumPoolSize,那么线程池会启动拒绝策略来执行。
当一个线程完成任务时,它会从队列中取下一个任务来执行
当一个线程无事可做超过一定的时间(keepAliveTime)时: a.如果当前运行的线程数大于 corePoolSize,那么这个线程就会被回收。 b. 线程池的所有任务完成后,线程池中的线程数为corePoolSize。
5.3.线程池的4种拒绝策略
1.ThreadPoolExecutor.AbortPolicy:用于被拒绝任务的处理程序,它将抛出 RejectedExecutionException.
2.ThreadPoolExecutor.CallerRunsPolicy:用于被拒绝任务的处理程序,它直接在 execute 方法的调用线程中运行被拒绝的任务;如果执行程序已关闭,则会丢弃该任务。
3.ThreadPoolExecutor.DiscardOldestPolicy:用于被拒绝任务的处理程序,它放弃最旧的未处理请求,然后重试 execute;如果执行程序已关闭,则会丢弃该任务。
4.ThreadPoolExecutor.DiscardPolicy:用于被拒绝任务的处理程序,默认情况下它将丢弃被拒绝的任务。
6.Fork与Join
6.1.简介
Fork/Join可以将一个大的任务拆分成多个子任务进行并行处理,最后将子任务结果合并在一起;
重点掌握:
1.如何定义一个任务对象;task extends RecursiveTask
2.如何拆分任务;task.fork()
3.如何合并任务;task.join()
4.如何创建执行任务的线程池; forkJoinPool = new ForkJoinPool(20);
5.如何将任务放入线程池运行;forkJoinPool.submit(task);
6.如何获取合并后的结果;task.get();
7.如何释放资源; forkJoinPool.shutdown();
6.2.API介绍
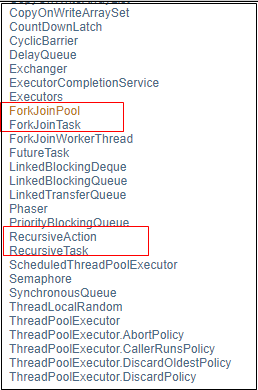
1.有反回的ForkJoinTask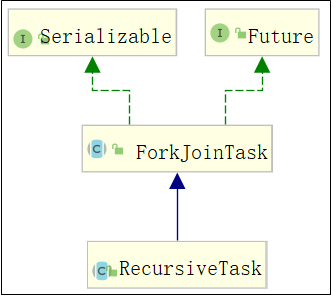
2.无返回的ForkJoinTask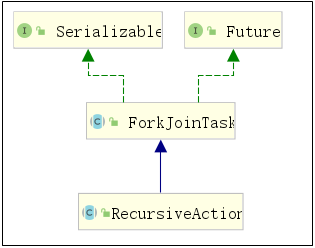
3.线程池对象,ForkJoinPool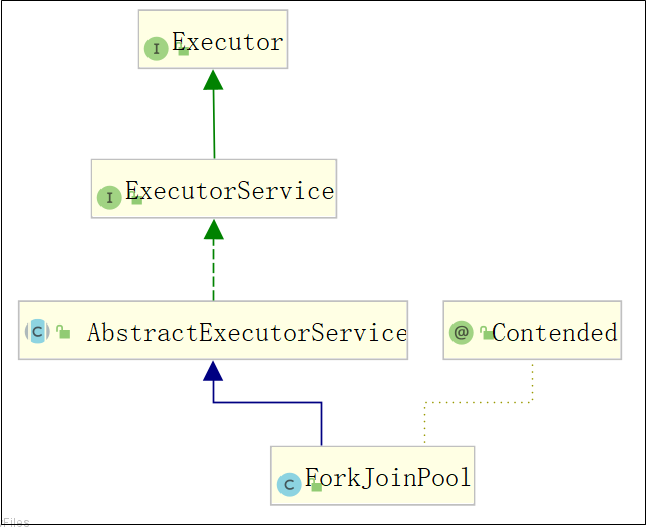
6.3.Fork/Join使用案例
案例1:使用分支合并计算1+2+3…..10000; 案例2:使用分支合并统计支付宝对账文件的差异订单; 案例3:使用分支合并的方式给一个数组中的每个元素乘2;
案例1:使用分支合并计算1+2+3…..10000;
统计对象
package demo10;import java.util.concurrent.RecursiveTask;/*** @Copyright (C) XXXXXXXXXXX科技股份技有限公司* @Author: lidongping* @Date: 2021-10-02 15:06* @Description: <p>* 需求:分开计算1+2+3+4+5.....+10000,每20个作为一组计算,最后合并在一起,得出总的结果;* </p>*/public class StatisticsDemo extends RecursiveTask<Integer> {// 每组计算个数private static final Integer num = 20;// 每组的开始值private Integer startNum;// 每组的结束值private Integer endNum;// 计算结果private Integer result = 0;public StatisticsDemo(Integer startNum, Integer endNum) {this.startNum = startNum;this.endNum = endNum;}@Overrideprotected Integer compute() {if ((endNum - startNum) <= num) {System.out.println(Thread.currentThread().getName() + " -- " + startNum + " 到 " + endNum);// 直接计算for (int i = startNum; i <= endNum; i++) {// 模拟计算用时// ThreadUtil.sleep(1);result = result + i;}} else {// 进行拆分Integer middle = (startNum + endNum) / 2;// System.out.println(Thread.currentThread().getName() + " 进行拆分 " + startNum + " 到 " + endNum + " middle=" + middle);// 左边StatisticsDemo left = new StatisticsDemo(startNum, middle);// 右边StatisticsDemo right = new StatisticsDemo(middle + 1, endNum);// 进行拆分left.fork();right.fork();// 合并结果result = left.join() + right.join();}return result;}}
测试对象
/*** 测试:统计1+2+3...10000** @param args* @throws Exception*/public static void main(String[] args) throws Exception {System.out.println(new Date());// 创建统计对象 统计1+2+3...10000StatisticsDemo statisticsDemo = new StatisticsDemo(1, 10000);// 创建分支合并池 5个线程计算,然后合并ForkJoinPool forkJoinPool = new ForkJoinPool(5);ForkJoinTask<Integer> forkJoinTask = forkJoinPool.submit(statisticsDemo);// 取结果Integer result = forkJoinTask.get();System.out.println("结果值:" + result);forkJoinPool.shutdown();System.out.println(new Date());}
测试结果
………………………. ForkJoinPool-1-worker-2 — 8791 到 8810 ForkJoinPool-1-worker-2 — 8811 到 8829 ForkJoinPool-1-worker-2 — 8771 到 8790 ForkJoinPool-1-worker-1 — 8751 到 8770 结果值:50005000
案例2:使用分支合并统计支付宝对账文件的差异订单;
任务对象
package demo10;import java.util.ArrayList;import java.util.List;import java.util.Map;import java.util.concurrent.ForkJoinTask;import java.util.concurrent.RecursiveTask;/*** @author 姿势帝-博客园* @address https://www.cnblogs.com/newAndHui/* @WeChat 851298348* @create 01/07 2:45* @description <p>* 分支合并计算* 找出支付宝对账文件中多有差异的订单* 为了便于测试作如下假设,实际情况中应到数据库查询* 假设订单尾号为1表示:支付宝中有,但系统中没有的订单,即:支付宝订单多* 假设订单尾号为2表示:系统中有,但支付宝中没有的订单,即:系统订单多* 假设订单尾号为3表示:收款金额不一致* </p>*/public class ComparisonDemo extends RecursiveTask<List<String>> {// 需要统计的订单List<Map<String, Object>> list;// 统计的类型,1-支付宝订单多,2-系统订单多,3-收款金额不一致private String type;// 每次统计条数(用来判定是否需要拆分任务)int count;public ComparisonDemo(List<Map<String, Object>> list, Integer pageSize, String type) {this.list = list;this.type = type;this.count = pageSize;}@Overrideprotected List<String> compute() {List<String> resultList = new ArrayList<>();int size = list.size();if (size <= count) {// 直接统计for (Map<String, Object> orderMap : list) {//System.out.println("线程名称:" + Thread.currentThread().getName());String orderNo = orderMap.get("orderNo").toString();// 取订单号的最后一位String suffix = orderNo.substring(orderNo.length() - 1);// 如果订单最后一位与类型一致,放入返回的集合if (type.equals(suffix)) {resultList.add(orderNo);}}} else {// 中间值int middle = size / 2;// 拆左边ComparisonDemo left = new ComparisonDemo(list.subList(0, middle), count, type);ForkJoinTask<List<String>> forkLeft = left.fork();// 拆右边ComparisonDemo right = new ComparisonDemo(list.subList(middle, size), count, type);ForkJoinTask<List<String>> forkRight = right.fork();// 合并List<String> joinLeft = forkLeft.join();List<String> joinRight = forkRight.join();resultList.addAll(joinLeft);resultList.addAll(joinRight);}// 返回最后的结果return resultList;}}
测试代码
package demo10;import cn.hutool.core.io.FileUtil;import cn.hutool.core.util.RandomUtil;import cn.hutool.poi.excel.ExcelReader;import cn.hutool.poi.excel.ExcelUtil;import cn.hutool.poi.excel.ExcelWriter;import org.junit.Test;import java.util.ArrayList;import java.util.HashMap;import java.util.List;import java.util.Map;import java.util.concurrent.ExecutionException;import java.util.concurrent.ForkJoinPool;import java.util.concurrent.ForkJoinTask;/*** @author 姿势帝-博客园* @address https://www.cnblogs.com/newAndHui/* @WeChat 851298348* @create 01/07 4:49* @description*/public class ComparisonTest {/*** 模拟生成对账文件*/@Testpublic void crateBillFile() {ExcelWriter writer = ExcelUtil.getWriter("F:\\test\\t40.xlsx");List<Map<String, String>> orderList = new ArrayList<>();for (int i = 0; i < 400000; i++) {Map<String, String> order = new HashMap<>();order.put("orderNo", "ON" + System.currentTimeMillis() + i);order.put("money", RandomUtil.randomInt(1, 999) + "");order.put("state", "0");orderList.add(order);}writer.write(orderList);// 必须加入这行才会真实的写入磁盘writer.flush();System.out.println("模拟生成对账文件结束");}/*** 使用合并框架* 使用合并框架耗时:19** @param args* @throws ExecutionException* @throws InterruptedException*/public static void main(String[] args) throws ExecutionException, InterruptedException {// 读取对账文件ExcelReader reader = ExcelUtil.getReader(FileUtil.file("F:\\test\\t1.xlsx"));List<Map<String, Object>> list = reader.readAll();long startTime = System.currentTimeMillis();// 创建执行任务对象ComparisonDemo comparisonDemo = new ComparisonDemo(list, 1000, "1");// 创建分支合并线程池ForkJoinPool forkJoinPool = new ForkJoinPool(20);// 提交执行任务ForkJoinTask<List<String>> task = forkJoinPool.submit(comparisonDemo);// 获取执行结果List<String> orderList = task.get();// 关闭线程池forkJoinPool.shutdown();long endTime = System.currentTimeMillis();System.out.println("使用合并框架耗时:" + (endTime - startTime));System.out.println("orderList:" + orderList);}/*** 普通统计* 普通统计耗时:68*/@Testpublic void test01() {// 读取对账文件ExcelReader reader = ExcelUtil.getReader(FileUtil.file("F:\\test\\t40.xlsx"));List<Map<String, Object>> list = reader.readAll();long startTime = System.currentTimeMillis();List<String> orderList = new ArrayList<>();for (Map<String, Object> orderMap : list) {String orderNo = orderMap.get("orderNo").toString();// 取订单号的最后一位String suffix = orderNo.substring(orderNo.length() - 1);// 如果订单最后一位与类型一致,放入返回的集合if ("1".equals(suffix)) {orderList.add(orderNo);}}long endTime = System.currentTimeMillis();System.out.println("普通统计耗时:" + (endTime - startTime));System.out.println("orderList:" + orderList);}}
案例3:使用分支合并的方式给一个数组中的每个元素乘2;
请自己完成!
7.Callable与Future接口
7.1.结构关系
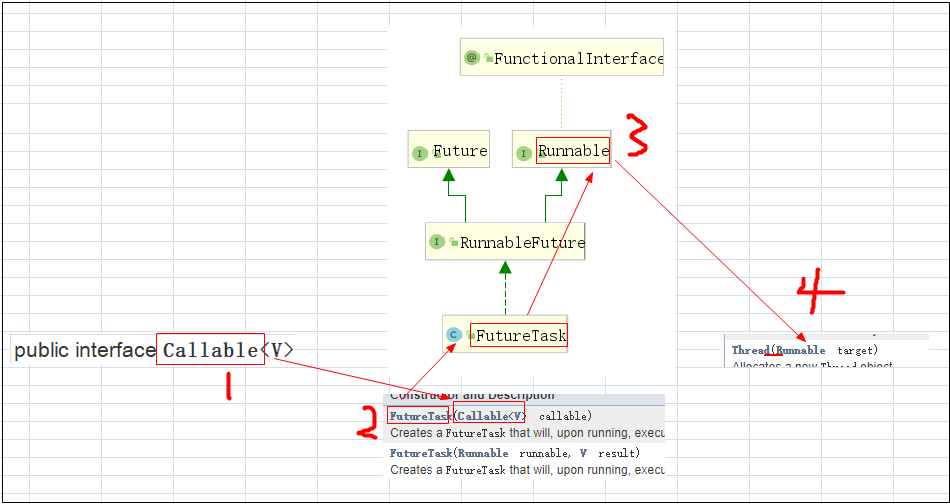
之前我们学习了创建线程的2中方式
1.继承Thread类
2.实现Runnable接口
这两种方式都无法获取到线程执行的结果
今天我们学习第三种方式:
Java 中提供的Callable接口,线程执行完成后可以获取到执行结果
7.2.Callable与Runnable接口特点:

1.实现Callable接口的 call()方法。
2.call()方法可以引发异常,而 run()则不能。
3.不能直接替换 runnable,因为 Thread 类的构造方法根本没有 Callable
7.3.应用场景与特点
1.在主线程中需要执行比较耗时的操作时,但又不想阻塞主线程时,可以把这些
作业交给 Future 对象在后台完成
2.当主线程将来需要时,就可以通过 Future 对象获得后台作业的计算结果或者执
行状态
3.一般 FutureTask 多用于耗时的计算,主线程可以在完成自己的任务后,再去
获取结果。
4.仅在计算完成时才能检索结果;如果计算尚未完成,则阻塞 get 方法
5.一旦计算完成,就不能再重新开始或取消计算
6.get 方法而获取结果只有在计算完成时获取,否则会一直阻塞直到任务转入完
成状态,然后会返回结果或者抛出异常
7.get 只计算一次,因此 get 方法放到最后
注意:以上来自网络与个人经验总结的几个要点,其实还有很多很多知识点,这些大家不需要背诵, 大家可以先写代码,体会一下,然后在结合自己的业务场景或者看看API、网络搜索一下,毕竟自己总结的才是自己的
7.4.案例演示
1.创建无返回结果的线程
public class ThreadRunnable implements Runnable {@Overridepublic void run() {System.out.println(Thread.currentThread().getName() + ".." + "无返回的run()方法");}}
2.创建有返回结果的线程
public class ThreadCallable implements Callable<String> {@Overridepublic String call() throws Exception {System.out.println(Thread.currentThread().getName() + ".." + "有返回的call()方法");ThreadUtil.sleep(5);return "我有结果";}}
3.测试
package demo05;import common.ThreadUtil;import org.junit.Test;import java.util.concurrent.ExecutionException;import java.util.concurrent.FutureTask;/*** @author 姿势帝-博客园* @address https://www.cnblogs.com/newAndHui/* @WeChat 851298348* @create 09/25 10:15* @description <p>* Callable&Future 接口 演示* </p>*/public class CallableTest {/*** 调用 runnable 的多线程*/@Testpublic void test01() {ThreadRunnable threadRunnable = new ThreadRunnable();new Thread(threadRunnable, "runnable线程").start();// 避免线程结束ThreadUtil.sleep(5);}/*** 调用 callable 的多线程*/@Testpublic void test02() throws ExecutionException, InterruptedException {// 声明线程对象ThreadCallable threadCallable = new ThreadCallable();// 中间对象(与runnable的区别1)FutureTask<String> futureTask = new FutureTask<>(threadCallable);// 启动线程new Thread(futureTask, "callable线程").start();// 取线程的结果值 (与runnable的区别2)// 1. futureTask.get() 方法而获取结果只有在计算完成时获取,否则会一直阻塞直到任务转入完成状态,然后会返回结果或者抛出异常// 2. 只计算一次(重复调用的情况下,call方法只执行一次)for (int i = 0; i < 5; i++) {String s = futureTask.get();System.out.println("线程结果值:" + s);}// 避免线程结束ThreadUtil.sleep(5);}}
7.5.核心总结
大家就把上面的内容它作为一个知识点了解就可以了,实际生产中不会直接这样使用的!
8.CompletableFuture接口
重点归纳:
1.CompletableFuture.runAsync 没有返回值的异步阻塞
2.有返回值的异步任务
3.thenApply 有返回值的线程依赖 当一个线程依赖另一个线程时,可以使用 thenApply 方法来把这两个线程串行化。
4.thenAccept 消费处理结果 接收任务的处理结果,并消费处理,无返回结果。
5.exceptionally 异常处理,出现异常时触发
6.handle 最终结果处理 thenAccept/thenRun 方法,是最后一步的处理调用,但是同时可以处理异常
7.thenCompose 合并两个有依赖关系的 CompletableFutures 的执行结果
8.thenCombine 合并两个没有依赖关系的 CompletableFutures 执行结果
案例代码如下:
package demo11;import common.ThreadUtil;import org.junit.Test;import java.util.concurrent.CompletableFuture;public class CompletableTest01 {/*** CompletableFuture.runAsync* 没有返回值的异步阻塞** @throws Exception*/@Testpublic void test01() throws Exception {System.out.println("测试开始...");System.out.println("线程名称:" + Thread.currentThread().getName());// 异步执行CompletableFuture<Void> runAsync = CompletableFuture.runAsync(() -> {System.out.println("线程名称:" + Thread.currentThread().getName());System.out.println(Thread.currentThread().getName() + " 异步执行正在执行.....");ThreadUtil.sleep(3);System.out.println(Thread.currentThread().getName() + " 异步执行结束");});ThreadUtil.sleep(3);System.out.println("获取异步执行结果....");// 该方法会阻塞(不论你是否调用,子线程都会执行)// runAsync.get();System.out.println("测试结束...");}/*** 有返回值的异步任务** @throws Exception*/@Testpublic void test02() throws Exception {System.out.println(Thread.currentThread().getName() + " 测试开始...");CompletableFuture<String> future = CompletableFuture.supplyAsync(() -> {System.out.println(Thread.currentThread().getName() + " 异步执行正在执行.....");ThreadUtil.sleep(2);System.out.println(" 异步执行结束");return "OK";});System.out.println("开始获取子线程结果...");// 该方法 只计算一次,会产生阻塞(不论你是否调用,子线程都会执行)String result = future.get();System.out.println("result::" + result);System.out.println("多次获取测试");String result2 = future.get();System.out.println("result2::" + result2);System.out.println("测试结束...");}/*** thenApply* 有返回值的线程依赖* 当一个线程依赖另一个线程时,可以使用 thenApply 方法来把这两个线程串行化。** @throws Exception*/@Testpublic void test03() throws Exception {System.out.println(Thread.currentThread().getName() + " 测试开始...");CompletableFuture<String> future = CompletableFuture.supplyAsync(() -> {System.out.println(" 正在操作数据库");ThreadUtil.sleep(2);System.out.println("数据库操作完成");return "操作数据库->";}).thenApply((str) -> {System.out.println(" 正在关闭数据库");ThreadUtil.sleep(2);System.out.println("数据库关闭完成");return str + "关闭数据库";});System.out.println("开始获取子线程结果...");// 该方法 只计算一次,会产生阻塞(不论你是否调用,子线程都会执行)String result = future.get();System.out.println("result::" + result);System.out.println("测试结束...");}/*** thenAccept* 消费处理结果* 接收任务的处理结果,并消费处理,无返回结果。* 思考这种情况与 test03 的区别: 结果也是在子线程中处理** @throws Exception*/@Testpublic void test03_01() throws Exception {System.out.println(Thread.currentThread().getName() + " 测试开始...");CompletableFuture.supplyAsync(() -> {System.out.println(" 正在操作数据库");ThreadUtil.sleep(2);System.out.println("数据库操作完成");return "操作数据库->";}).thenApply((str1) -> {System.out.println(" 正在关闭数据库");ThreadUtil.sleep(2);System.out.println("数据库关闭完成");return str1 + "关闭数据库";}).thenAccept((str2) -> {System.out.println("数据库操作流程:" + str2);});// future.get();System.out.println("测试结束...");ThreadUtil.sleep(5);}/*** exceptionally* 异常处理,出现异常时触发** @throws Exception*/@Testpublic void test03_02() throws Exception {System.out.println(Thread.currentThread().getName() + " 测试开始...");CompletableFuture<String> future = CompletableFuture.supplyAsync(() -> {System.out.println(" 正在操作数据库");ThreadUtil.sleep(2);// 模拟错误//int i = 2 / 0;System.out.println("数据库操作完成");return "操作数据库->";}).thenApply((str) -> {System.out.println(" 正在关闭数据库");// 模拟错误int i = 2 / 0;ThreadUtil.sleep(2);System.out.println("数据库关闭完成");return str + "关闭数据库";}).exceptionally((exception) -> {String message = exception.getMessage();return "数据库操作错误:" + message;});System.out.println("开始获取子线程结果...");// 该方法 只计算一次,会产生阻塞(不论你是否调用,子线程都会执行)String result = future.get();System.out.println("result::" + result);System.out.println("测试结束...");}/*** handle* 最终结果处理* thenAccept/thenRun 方法,是最后一步的处理调用,但是同时可以处理异常** @throws Exception*/@Testpublic void test03_03() throws Exception {System.out.println(Thread.currentThread().getName() + " 测试开始...");CompletableFuture<String> future = CompletableFuture.supplyAsync(() -> {System.out.println(" 正在操作数据库");ThreadUtil.sleep(2);// 模拟错误//int i = 2 / 0;System.out.println("数据库操作完成");return "操作数据库->";}).thenApply((str) -> {System.out.println(" 正在关闭数据库");// 模拟错误int i = 2 / 0;ThreadUtil.sleep(2);System.out.println("数据库关闭完成");return str + "关闭数据库";}).handle((result, exception) -> {if (exception != null) {System.out.println("异常:" + exception.getMessage());// 如果是异常 result是nullreturn result + "..exception";} else {System.out.println("正常的结果");// 如果没有发送异常,exception 是nullreturn result + "..success";}});String result = future.get();System.out.println("result::" + result);System.out.println("测试结束...");}/*** thenCompose* 合并两个有依赖关系的 CompletableFutures 的执行结果** @throws Exception*/@Testpublic void test04() throws Exception {System.out.println(Thread.currentThread().getName() + " 测试开始...");// 第一步CompletableFuture<String> future1 = CompletableFuture.supplyAsync(() -> {ThreadUtil.sleep(2);return "操作数据库->";});// 第二步 合并两个有依赖关系的 CompletableFutures 的执行结果CompletableFuture<String> future2 = future1.thenCompose((str) ->CompletableFuture.supplyAsync(() -> {return str + "操作完毕";}));String result1 = future1.get();String result2 = future2.get();System.out.println("result1::" + result1);System.out.println("result2::" + result2);System.out.println("测试结束...");}/*** thenCombine* 合并两个没有依赖关系的 CompletableFutures 执行结果** @throws Exception*/@Testpublic void test05() throws Exception {System.out.println(Thread.currentThread().getName() + " 测试开始...");// 第一步CompletableFuture<String> future1 = CompletableFuture.supplyAsync(() -> {ThreadUtil.sleep(2);return "操作数据库->";});// 第二步CompletableFuture<String> future2 = CompletableFuture.supplyAsync(() -> {ThreadUtil.sleep(2);return "操作完毕";});// henCombine 合并两个没有依赖关系的 CompletableFutures 任务CompletableFuture<String> future3 = future1.thenCombine(future2, (str1, str2) -> {return str1 + "|" + str2;});String result1 = future1.get();String result2 = future2.get();String result3 = future3.get();System.out.println("result1::" + result1);System.out.println("result2::" + result2);System.out.println("result3::" + result3);System.out.println("测试结束...");}}
9.小结
课程已讲完,感谢各位童鞋的观看!
