1.背景
2.AOP的概念
AOP:用鸟语解释就是 面向切面编程,详细的解释大家可以看百度百科,
百度百科:https://baike.baidu.com/item/AOP/1332219?fr=aladdin
不过估计看了后还是一头雾水…
通俗的理解是:假设有方法M1、M2、M3….,现在需要在这些方法中增加新的业务逻辑(如:打印方法名称、方法参数、执行结果),但是不把这些新的业务逻辑写到这些方法(M1、M2、M3….)中,这就是AOP的思想;
简单一句话说就是:在方法中增加新的业务逻辑,但是不修改方法中的代码。
3.AOP的底层原理
实现方式一:有接口的情况下,使用JDK动态代理
实现方式二:没有接口情况,使用 CGLIB 动态代理
3.1.JDK动态代理实现AOP思想
需求:假设有方法M1、M2、M3….,现在需要在这些方法中增加新的业务逻辑(如:打印方法名称、方法参数、执行结果),但是不把这些新的业务逻辑写到这些方法(M1、M2、M3….)中,这就是AOP的思想;
步骤一:准备一个dao接口、dao实现、测试
dao接口
package com.ldp.dao;/*** @Copyright (C) XXXXXXXXXXX科技股份技有限公司* @Author: lidongping* @Date: 2021-01-12 10:44* @Description:*/public interface IProductDao {/*** 保存产品** @param name* @param price* @return*/int saveProduct(String name, Integer price);/*** 根据id删除产品** @param id* @return*/int deleteProduct(Integer id);/*** 根据id修改产品** @param id* @param name* @param price* @return*/int updateProduct(Integer id, String name, Integer price);/*** 根据id查询产品** @return*/String queryProduct(Integer id);}
dao实现
package com.ldp.dao.impl;import com.ldp.dao.IProductDao;/*** @Copyright (C) XXXXXXXXXXX科技股份技有限公司* @Author: lidongping* @Date: 2021-01-12 10:51* @Description:*/public class ProductDaoImpl implements IProductDao {@Overridepublic int saveProduct(String name, Integer price) {System.out.println("模拟 saveProduct---------------");return 1;}@Overridepublic int deleteProduct(Integer id) {System.out.println("模拟 deleteProduct---------------");return 1;}@Overridepublic int updateProduct(Integer id, String name, Integer price) {System.out.println("模拟 updateProduct---------------");return 1;}@Overridepublic String queryProduct(Integer id) {System.out.println("模拟 queryProduct---------------");return "模拟返回产品数据";}}
dao测试
/*** 没有代理的测试*/@Testpublic void test01() {// 创建到dao实例对象IProductDao productDao = new ProductDaoImpl();// 测试增加int saveProduct = productDao.saveProduct("苹果", 3);System.out.println(saveProduct);// 测试删除int deleteProduct = productDao.deleteProduct(12);System.out.println(deleteProduct);// 测试修改int updateProduct = productDao.updateProduct(11, "修改苹果", 4);System.out.println(updateProduct);// 测试查询String queryProduct = productDao.queryProduct(11);System.out.println(queryProduct);}
步骤二:编写一个InvocationHandler的实例对象,编写需要增强的具体功能
package com.ldp.proxy;import java.lang.reflect.InvocationHandler;import java.lang.reflect.Method;import java.util.Arrays;/*** @Copyright (C) XXXXXXXXXXX科技股份技有限公司* @Author: lidongping* @Date: 2021-01-12 11:01* @Description:*/public class MyDaoProxy implements InvocationHandler {private Object object;/*** 定义一个有参数的构造方法*/public MyDaoProxy(Object object) {this.object = object;}/*** 这里使用了反射的机制** @param proxy* @param method* @param args* @return* @throws Throwable*/@Overridepublic Object invoke(Object proxy, Method method, Object[] args) throws Throwable {// 方法执行前System.out.println("方法执行前执行.....请求方法名:" + method.getName() + ",请求参数:" + Arrays.toString(args));// 执行固有的方法(被增强的方法)Object result = method.invoke(object, args);// 方法执行后System.out.println("方法执行后.....方法执行结果:" + result);return result;}}
步骤三:使用代理对象生成dao实现
// 使用动态代理 创建到dao实例对象 TestProxy.class.getClassLoader()中的TestProxy为当前测试类对象// IProductDao productDao = new ProductDaoImpl();Class[] interfaces = {IProductDao.class};IProductDao productDao = (IProductDao) Proxy.newProxyInstance(TestProxy.class.getClassLoader(), interfaces, new MyDaoProxy(new ProductDaoImpl()));
步骤四:测试代理对象生成的dao
/*** 代理对象的测试* newProxyInstance(ClassLoader loader, 类<?>[] interfaces, InvocationHandler h)* 返回指定接口的代理类的实例,该接口将方法调用分派给指定的调用处理程序。*/@Testpublic void test02() {// 使用动态代理 创建到dao实例对象 TestProxy.class.getClassLoader()中的TestProxy为当前测试类对象// IProductDao productDao = new ProductDaoImpl();Class[] interfaces = {IProductDao.class};IProductDao productDao = (IProductDao) Proxy.newProxyInstance(TestProxy.class.getClassLoader(), interfaces, new MyDaoProxy(new ProductDaoImpl()));// 测增加int saveProduct = productDao.saveProduct("苹果", 3);System.out.println(saveProduct);// 测试删除int deleteProduct = productDao.deleteProduct(12);System.out.println(deleteProduct);// 测试修改int updateProduct = productDao.updateProduct(11, "修改苹果", 4);System.out.println(updateProduct);// 测试查询String queryProduct = productDao.queryProduct(11);System.out.println(queryProduct);}
参考资料
jdk8Api:https://www.matools.com/api/java8
3.2.cglib动态代理实现aop思想
步骤一:引入jar包
步骤二:编写一个普通的需要被增强的方法
package com.ldp.controller;/*** @Copyright (C) XXXXXXXXXXX科技股份技有限公司* @Author: lidongping* @Date: 2021-01-12 12:07* @Description:*/public class ProductController {/*** 产品查询** @param name* @param price* @return*/public String queryProduct(String name, Integer price) {System.out.println("模拟查询中............");return "香蕉";}}
步骤三:编写一个cglib动态代理类
package com.ldp.proxy;import net.sf.cglib.proxy.Enhancer;import net.sf.cglib.proxy.MethodInterceptor;import net.sf.cglib.proxy.MethodProxy;import java.lang.reflect.Method;import java.util.Arrays;/*** @Copyright (C) XXXXXXXXXXX科技股份技有限公司* @Author: lidongping* @Date: 2021-01-12 11:50* @Description:*/public class MyDaoCglibProxy implements MethodInterceptor {private Object target;public Object getInstance(Object target) {this.target = target;Enhancer enhancer = new Enhancer();enhancer.setSuperclass(this.target.getClass());// 设置回调方法enhancer.setCallback(this);// 创建代理对象return enhancer.create();}/*** 实现MethodInterceptor接口中重写的方法* <p>* 回调方法*/@Overridepublic Object intercept(Object object, Method method, Object[] args, MethodProxy proxy) throws Throwable {// 方法执行前System.out.println("方法执行前执行.....请求方法名:" + method.getName() + ",请求参数:" + Arrays.toString(args));// 执行固有的方法(被增强的方法)Object result = proxy.invokeSuper(object, args);// 方法执行后System.out.println("方法执行后.....方法执行结果:" + result);return result;}}
步骤四:测试
/*** CGLIB 代理对象的测试*/@Testpublic void test03() {// 创建动态代理MyDaoCglibProxy cglibProxy = new MyDaoCglibProxy();// 获取代理的实例对象ProductController productController = (ProductController) cglibProxy.getInstance(new ProductController());System.out.println(productController.queryProduct("香蕉", 100));}
测试结果如下:
方法执行前执行.....请求方法名:queryProduct,请求参数:[香蕉, 100]模拟查询中............方法执行后.....方法执行结果:香蕉香蕉
4.AOP的几个专业术语
AOP的基本概念
1、连接点:可以被增强的方法
2、切入点:实际被增强的方法
3、通知(增强):
3.1.实际增强的逻辑部分叫做通知
3.2.通知类型包括
- 前置通知(执行方法前执行,通常用作参数日志输出、权限校验等)
- 后置通知(逻辑代码执行完,准备执行return的代码时通知,通常用作执行结果日志输出、结果加密等)
- 环绕通知(是前置通知和后置通知的综合,方法执行前和方法执行后都要执行,通常用作方法性能统计、接口耗时、统一加密、解密等)
- 异常通知(相当于try{}catch ()中catch执行的部分,程序抛出异常时执行,通常用作告警处理、事务回滚等)
- 最终通知(相当于try{}catch (Exception e){}finally { }中的finally执行的部分,通常用在关闭资源、清理缓存等业务逻辑中)
5.AOP实现技术
1、Spring 框架一般都是基于 AspectJ 实现 AOP 操作
(1)AspectJ 不是 Spring 组成部分,独立 AOP 框架,一般把 AspectJ 和 Spirng 框架一起使 用,进行 AOP 操作
2、基于 AspectJ 实现 AOP 操作
(1)基于 xml 配置文件实现
(2)基于注解方式实现(使用)
3、在项目工程里面引入 AOP 相关依赖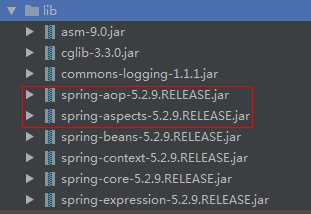
4、切入点表达式
(1)切入点表达式作用:知道对哪个类里面的哪个方法进行增强
(2)语法结构: execution([权限修饰符] [返回类型] [类全路径] 方法名称 )
说明: 号表示通配符,.. 符号表示一个或多个参数
举例 1:对 com.ldp.controller.ProductController 类里面的 queryProduct 进行增强 execution( com.ldp.controller.ProductController.queryProduct (..))
举例 2:对 com.ldp.controller.ProductController 类里面的所有的方法进行增强 execution( com.ldp.controller.ProductController . (..))
举例 3:对 com.ldp.controller 包里面所有以controller结尾的类里面所有方法进行增强 execution( com.ldp.controller.Controller .* (..))
6.AOP案例
6.1.AOP 操作(AspectJ 注解)
这里使用spring中的aop实现对controller里日志输出来加深对aop的理解
实现步骤:
准备工作:
步骤一:创建一个controller类并定义方法
public class UserController {/*** 查询用户*/public Object queryUser(String name, Integer age) {System.out.println("数据查询中模拟...........");return "张无忌,18岁";}}
步骤二:创建一个增强类,编写增强逻辑,也就是说建立一个切面
public class LogAop {public void method01() {System.out.println("method01-前置通知-增强逻辑-------------");}public void method02() {System.out.println("method02-后置通知-增强逻辑-------------");}public void method03() {System.out.println("method03-环绕通知-增强逻辑-------------");}public void method04() {System.out.println("method04-异常通知-增强逻辑-------------");}public void method05() {System.out.println("method05-最终通知-增强逻辑-------------");}}
AOP配置
步骤一:在 spring 配置文件中,开启注解扫描
<?xml version="1.0" encoding="UTF-8"?><beans xmlns="http://www.springframework.org/schema/beans"xmlns:xsi="http://www.w3.org/2001/XMLSchema-instance"xmlns:context="http://www.springframework.org/schema/context"xsi:schemaLocation="http://www.springframework.org/schema/beans http://www.springframework.org/schema/beans/spring-beans.xsdhttp://www.springframework.org/schema/context https://www.springframework.org/schema/context/spring-context.xsd"><!-- 开启注解扫描 --><context:component-scan base-package="com.ldp.aop"></context:component-scan></beans>
步骤二:增强类上加上注解,以及在方法加不同类型的通知
类上加注解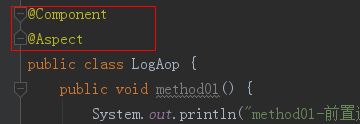
方法上加不同类型的通知
package com.ldp.aop;import org.aspectj.lang.annotation.*;import org.springframework.stereotype.Component;/*** @Copyright (C) XXXXXXXXXXX科技股份技有限公司* @Author: lidongping* @Date: 2021-01-14 9:52* @Description: <p>* 前置通知(执行方法前执行,通常用作参数日志输出、权限校验等)* 后置通知(逻辑代码执行完,准备执行return的代码时通知,通常用作执行结果日志输出、结果加密等)* 环绕通知(是前置通知和后置通知的综合,方法执行前和方法执行后都要执行,通常用作方法性能统计、接口耗时、统一加密、解密等)* 异常通知(相当于try{}catch ()中catch执行的部分,程序抛出异常时执行,通常用作告警处理、事务回滚等)* 最终通知(相当于try{}catch (Exception e){}finally { }中的finally执行的部分,通常用在关闭资源、清理缓存等业务逻辑中)* </p>* 语法结构: execution([权限修饰符] [返回类型] [类全路径] [方法名称]([参数列表]) )*/@Component@Aspectpublic class LogAop {/*** 前置通知*/@Before(value = "execution(* com.ldp.controller.*Controller.*(..))")public void method01() {System.out.println("method01-前置通知-增强逻辑-------------");}/*** 后置通知*/@AfterReturning(value = "execution(* com.ldp.controller.*Controller.*(..))")public void method02() {System.out.println("method02-后置通知-增强逻辑-------------");}/*** 环绕通知*/@Around(value = "execution(* com.ldp.controller.*Controller.*(..))")public void method03() {System.out.println("method03-环绕通知-增强逻辑-------------");}/*** 异常通知*/@AfterThrowing(value = "execution(* com.ldp.controller.*Controller.*(..))")public void method04() {System.out.println("method04-异常通知-增强逻辑-------------");}/*** 最终通知*/@After(value = "execution(* com.ldp.controller.*Controller.*(..))")public void method05() {System.out.println("method05-最终通知-增强逻辑-------------");}}
步骤三:controller类上加上注解
步骤四:测试
package com.ldp.test;import com.ldp.controller.UserController;import org.junit.Test;import org.junit.runner.RunWith;import org.springframework.beans.factory.annotation.Autowired;import org.springframework.test.context.ContextConfiguration;import org.springframework.test.context.junit4.SpringJUnit4ClassRunner;/*** @Copyright (C) XXXXXXXXXXX科技股份技有限公司* @Author: lidongping* @Date: 2021-01-14 10:19* @Description:*/@RunWith(SpringJUnit4ClassRunner.class)@ContextConfiguration("classpath:bean01.xml")public class TestAop {@Autowiredprivate UserController userController;/*** 测试*/@Testpublic void test01() {Object queryUser = userController.queryUser("张无忌", 18);System.out.println("queryUser=" + queryUser);}}
注意:当前测试需要关闭环绕通知
当没有异常的时候,执行结果
method01- @Before-前置通知-增强逻辑-------------数据查询中模拟...........method02- @AfterReturning-后置通知-增强逻辑-------------method05- @After-最终通知-增强逻辑-------------queryUser=张无忌,18岁
当有异常的时候
method01- @Before-前置通知-增强逻辑-------------数据查询中模拟...........method04- @AfterThrowing-异常通知-增强逻辑-------------method05- @After-最终通知-增强逻辑-------------
6.2.XML实现AOP配置(现在很少使用,了解)
步骤一:创建一个普通的增强类和增强方法
public class LogAop03 {public void method01() {System.out.println("-----xml的方式-----------");}}
步骤二:xml中配置aop
<?xml version="1.0" encoding="UTF-8"?><beans xmlns="http://www.springframework.org/schema/beans"xmlns:xsi="http://www.w3.org/2001/XMLSchema-instance"xmlns:context="http://www.springframework.org/schema/context"xmlns:aop="http://www.springframework.org/schema/aop"xsi:schemaLocation="http://www.springframework.org/schema/beans http://www.springframework.org/schema/beans/spring-beans.xsdhttp://www.springframework.org/schema/context https://www.springframework.org/schema/context/spring-context.xsd http://www.springframework.org/schema/aop https://www.springframework.org/schema/aop/spring-aop.xsd"><!-- 开启注解扫描 --><context:component-scan base-package="com.ldp.*"></context:component-scan><!-- 开启 Aspect 生成代理对象--><aop:aspectj-autoproxy></aop:aspectj-autoproxy><bean id="logAop03" class="com.ldp.aop.LogAop03"></bean><!--配置 aop 增强--><aop:config><!--切入点--><aop:pointcut id="p" expression="execution(* com.ldp.controller.*Controller.*(..))"/><!--配置切面--><aop:aspect ref="logAop03"><!--增强作用在具体的方法上--><aop:before method="method01" pointcut-ref="p"/></aop:aspect></aop:config></beans>
7.AOP优化与扩展
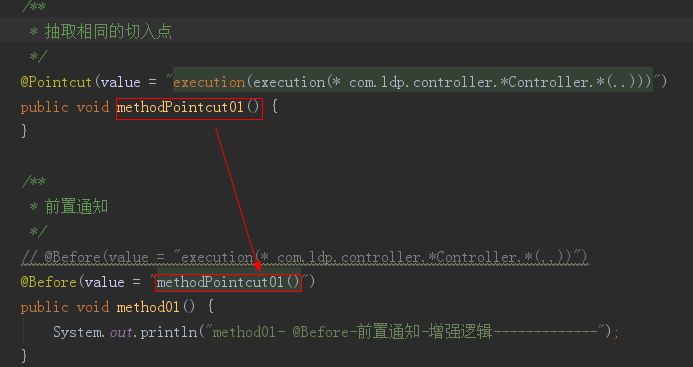
1.抽取相同的切入点
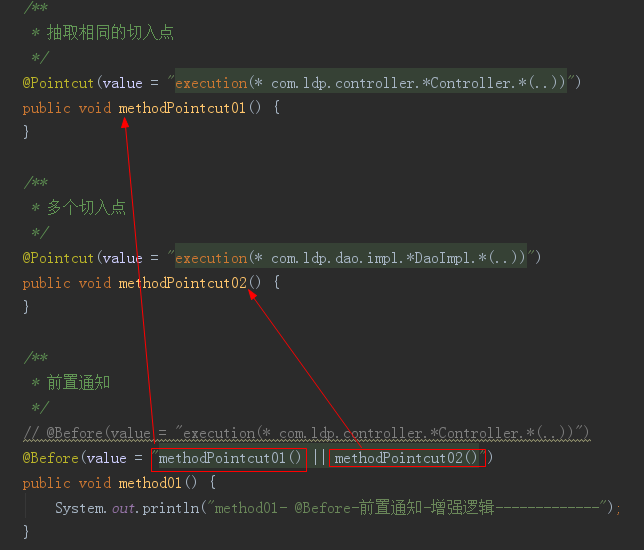
2.同一个通知有多个切入点
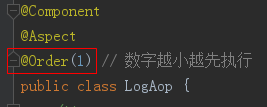
3.同一个方法有多个通知
4.使用全注解开发
删除之前的配置文件,添加一个Aop的配置对象
@Configuration@ComponentScan(basePackages = {"com.ldp"})@EnableAspectJAutoProxy(proxyTargetClass = true)public class AopConfig {}
8.ProceedingJoinPoint 与 JoinPoint 的使用
二者的关系
作用:
1、用来获取被增强方法的参数、方法名、权限命名、注解等,实际上能获取到这些在结合反射可以实现很强大的功能;
2、在环绕通知时让代理执行方法, proceedingJoinPoint.proceed();
上面的日志实际实现案例
案例一:不使用环绕通知的情况
package com.ldp.aop;import org.aspectj.lang.JoinPoint;import org.aspectj.lang.Signature;import org.aspectj.lang.annotation.*;import org.springframework.stereotype.Component;import java.util.Arrays;import java.util.List;/*** @Copyright (C) XXXXXXXXXXX科技股份技有限公司* @Author: lidongping* @Date: 2021-01-14 9:52* @Description: <p>*/@Component@Aspectpublic class LogAop04 {/*** 抽取相同的切入点*/@Pointcut(value = "execution(* com.ldp.controller.*Controller.*(..))")public void methodPointcut01() {}/*** 前置通知*/@Before(value = "methodPointcut01()")public void method01(JoinPoint joinPoint) {// 获取请求参数Object[] args = joinPoint.getArgs();Signature pointSignature = joinPoint.getSignature();// 获取包+类名String declaringTypeName = pointSignature.getDeclaringTypeName();// 获取方法名String name = pointSignature.getName();System.out.println("参数:" + Arrays.toString(args));System.out.println("类权限命名:" + declaringTypeName);System.out.println("方法名:" + name);}/*** 后置通知*/@AfterReturning(returning = "result", value = "methodPointcut01()")public void method02(Object result) {System.out.println("方法执行结果:" + result);}/*** 异常通知*/@AfterThrowing(throwing = "ex", value = "methodPointcut01()")public void method04(JoinPoint joinPoint, Exception ex) {String methodName = joinPoint.getSignature().getName();List<Object> args = Arrays.asList(joinPoint.getArgs());System.out.println("连接点方法为:" + methodName + ",参数为:" + args + ",异常为:" + ex.getMessage());}/*** 最终通知*/@After(value = "methodPointcut01()")public void method05() {System.out.println("method05- @After-最终通知-增强逻辑-------------");}}
案例二:使用环绕通知的情况
package com.ldp.aop;import org.aspectj.lang.ProceedingJoinPoint;import org.aspectj.lang.annotation.Around;import org.aspectj.lang.annotation.Aspect;import org.springframework.stereotype.Component;import java.util.Arrays;/*** @Copyright (C) XXXXXXXXXXX科技股份技有限公司* @Author: lidongping* @Date: 2021-01-14 9:52* @Description: <p>*/@Component@Aspectpublic class LogAop04Around {/*** 环绕通知*/@Around(value = "execution(* com.ldp.controller.*Controller.*(..))")public Object method03(ProceedingJoinPoint proceedingJoinPoint) throws Throwable {// 获取开始时间long start = System.currentTimeMillis();System.out.println("方法参数:" + Arrays.toString(proceedingJoinPoint.getArgs()));//让代理方法执行Object result = proceedingJoinPoint.proceed();// 获取结束执行时间long end = System.currentTimeMillis();System.out.println("方法返回:" + result);System.out.println("方法执行时间:" + (end - start) + " millisecond");return result;}}


