PWM(脉冲宽度调制)是控制电机、LED等设备的常用技术。本文将详细介绍如何在树莓派 Pico 上使用 C/C++ SDK 实现 PWM 控制。
前言
PWM 基础知识
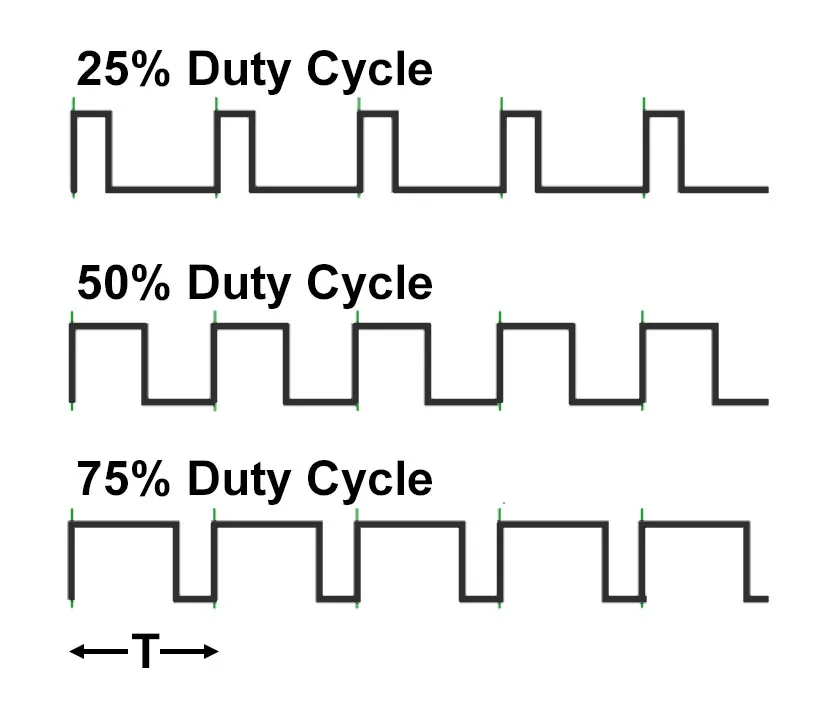
PWM 通过调节信号的占空比(Duty Cycle)来控制输出功率。占空比是指信号在一个周期内为高电平的时间比例。通过改变占空比,可以控制负载的功率。
PWM 功能函数
树莓派 Pico 的 C/C++ SDK 提供了丰富的 PWM 函数:
- pwm_set_gpio_level(gpio, level): 设置指定 GPIO 引脚的 PWM 输出电平。
- pwm_set_wrap(slice_num, wrap): 设置 PWM 切片的最大计数值。
- pwm_set_clkdiv(slice_num, div): 设置 PWM 时钟分频值。
示例
基础功能使用
一般使用 PWM 的基本流程如下:
(1) 将 GPIO 引脚设置为 PWM 功能(2) 编辑 PWM 配置
(3) 初始化 PWM 配置
(4) 设置电平值(占空比值)
#include "pico/stdlib.h"#include "hardware/pwm.h"#define PIN_PWM0 ( 12 )int main() {static pwm_config pwm0_slice_config;uint pwm0_slice_num;{ /* 将指定的 GPIO 引脚设置为 PWM 功能 */gpio_set_function( PIN_PWM0, GPIO_FUNC_PWM );pwm0_slice_num = pwm_gpio_to_slice_num( PIN_PWM0 );}{/* 获取 PWM 默认配置 */pwm0_slice_config = pwm_get_default_config();}{pwm_init( pwm0_slice_num, &pwm0_slice_config, true );/* PWM计时器、计数器、电平值(占空比计数值)被清除0 */}{ /* 通过 pwm_set_gpio_level 函数实时调整 PWM 输出的占空比 */pwm_set_gpio_level( PIN_PWM0, ( pwm0_slice_config.top * 0.20 ) );/* 占空比20% */}while ( true ){}}
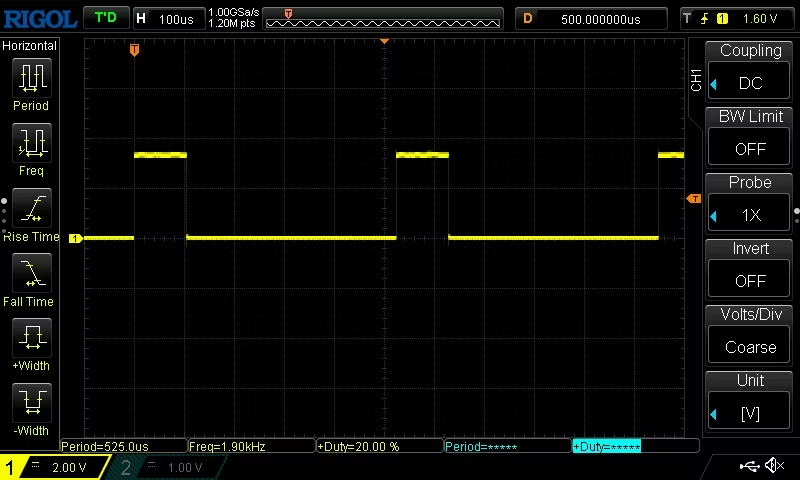
以上代码将在 GPIO 为 12 的引脚输出占空比为 20% 的 PWM。从下图的方波图我们可以看到,在一个周期内高电平占了1/5 。
设置周期
周期可以通过分频比和最大计数值进行调整。时钟频率越高,精度越好,因此请调整最大计数值,使其尽可能大。
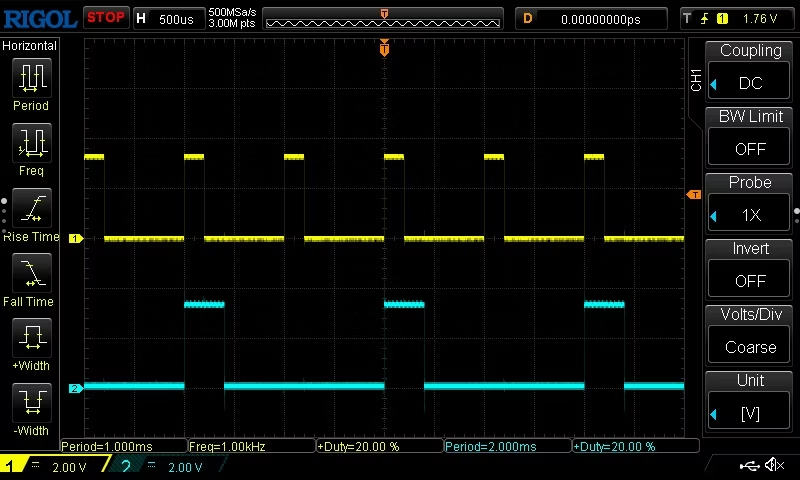
以下代码将其调整为 1ms 和 2ms。
#include "pico/stdlib.h"#include "hardware/pwm.h"#define PIN_PWM0 ( 0 )#define PIN_PWM1 ( 2 )void main( void ){static pwm_config pwm0_slice_config;uint pwm0_slice_num;static pwm_config pwm1_slice_config;uint pwm1_slice_num;{gpio_set_function( PIN_PWM0, GPIO_FUNC_PWM );pwm0_slice_num = pwm_gpio_to_slice_num( PIN_PWM0 );gpio_set_function( PIN_PWM1, GPIO_FUNC_PWM );pwm1_slice_num = pwm_gpio_to_slice_num( PIN_PWM1 );}{pwm0_slice_config = pwm_get_default_config();// 设置最大计数值pwm_config_set_wrap( &pwm0_slice_config, 62500 );// 设置时钟分频值pwm_config_set_clkdiv( &pwm0_slice_config, 2 );pwm1_slice_config = pwm_get_default_config();// 设置最大计数值pwm_config_set_wrap( &pwm1_slice_config, 62500 );// 设置时钟分频值pwm_config_set_clkdiv( &pwm1_slice_config, 4 );}{pwm_init( pwm0_slice_num, &pwm0_slice_config, true );pwm_init( pwm1_slice_num, &pwm1_slice_config, true );}{ // 设置初始占空比为 20%pwm_set_gpio_level( PIN_PWM0, ( pwm0_slice_config.top * 0.20 ) );pwm_set_gpio_level( PIN_PWM1, ( pwm1_slice_config.top * 0.20 ) );}while ( true ){}}
除了基本的 PWM 设置,还可以使用以下功能:
- 相位校正:通过
pwm_set_phase_correct函数设置相位校正模式。 - 输出极性:通过
pwm_set_output_polarity函数设置输出极性。 - 计数器:通过
pwm_set_counter函数设置计数器的初始值。
实现 LED 呼吸灯
#include "pico/stdlib.h"#include <stdio.h>#include "pico/time.h"#include "hardware/irq.h"#include "hardware/pwm.h"#define PICO_DEFAULT_LED_PIN 4#ifdef PICO_DEFAULT_LED_PINvoid on_pwm_wrap() {static int fade = 0;static bool going_up = true;// Clear the interrupt flag that brought us herepwm_clear_irq(pwm_gpio_to_slice_num(PICO_DEFAULT_LED_PIN));if (going_up) {++fade;printf("%d\n", fade);if (fade > 255) {fade = 255;going_up = false;}} else {--fade;printf("%d\n", fade);if (fade < 0) {fade = 0;going_up = true;}}// Square the fade value to make the LED's brightness appear more linear// Note this range matches with the wrap valuepwm_set_gpio_level(PICO_DEFAULT_LED_PIN, fade * fade);}#endifint main() {#ifndef PICO_DEFAULT_LED_PIN#warning pwm/led_fade example requires a board with a regular LED#else// Tell the LED pin that the PWM is in charge of its value.gpio_set_function(PICO_DEFAULT_LED_PIN, GPIO_FUNC_PWM);// Figure out which slice we just connected to the LED pinuint slice_num = pwm_gpio_to_slice_num(PICO_DEFAULT_LED_PIN);// Mask our slice's IRQ output into the PWM block's single interrupt line,// and register our interrupt handlerpwm_clear_irq(slice_num);pwm_set_irq_enabled(slice_num, true);irq_set_exclusive_handler(PWM_IRQ_WRAP, on_pwm_wrap);irq_set_enabled(PWM_IRQ_WRAP, true);// Get some sensible defaults for the slice configuration. By default, the// counter is allowed to wrap over its maximum range (0 to 2**16-1)pwm_config config = pwm_get_default_config();// Set divider, reduces counter clock to sysclock/this valuepwm_config_set_clkdiv(&config, 4.f);// Load the configuration into our PWM slice, and set it running.pwm_init(slice_num, &config, true);// Everything after this point happens in the PWM interrupt handler, so we// can twiddle our thumbswhile (1)tight_loop_contents();#endif}
总结
通过本文,您应该能够在树莓派 Pico 上使用 C/C++ SDK 实现基本的 PWM 控制。PWM 是一种强大的控制技术,广泛应用于电机控制、LED 调光等领域。希望本文能帮助您更好地理解和使用树莓派 Pico 的 PWM 功能。
参考资料
通过这些参考资料,您可以进一步深入了解树莓派 Pico 和 C/C++ SDK 的更多高级功能。

若有收获,就点个赞吧
0 人点赞
