1.Mybatis框架简述
:::tips
MyBatis 是一款优秀的持久层框架,它支持自定义 SQL、存储过程以及高级映射。MyBatis 免除了几乎所有的 JDBC 代码以及设置参数和获取结果集的工作。是一个半自动的ORM持久层框架。
:::
优点:
1、与JDBC相比,减少了50%的代码量
2、 最简单的持久化框架,简单易学
3、SQL代码从程序代码中彻底分离出来,可以重用
4、提供XML标签,支持编写动态SQL
5、提供映射标签,支持对象与数据库的ORM字段关系映射
支持缓存、连接池、数据库移植….
缺点:
1、SQL语句编写工作量大,熟练度要高
2、数据库移植性比较差,如果需要切换数据库的话,SQL语句会有很大的差异
同类产品Hibenate框架相比,具有学习成本低,灵活性高等特点。
2.Mybatis框架使用
2.1.引入依赖 :::tips 创建maven项目并添加mybatis所需依赖 :::
<?xml version="1.0" encoding="UTF-8"?><project xmlns="http://maven.apache.org/POM/4.0.0"xmlns:xsi="http://www.w3.org/2001/XMLSchema-instance"xsi:schemaLocation="http://maven.apache.org/POM/4.0.0 http://maven.apache.org/xsd/maven-4.0.0.xsd"><modelVersion>4.0.0</modelVersion><groupId>org.example</groupId><artifactId>mybatis-study</artifactId><version>1.0-SNAPSHOT</version><dependencies><!--mybatis依赖--><dependency><groupId>org.mybatis</groupId><artifactId>mybatis</artifactId><version>3.5.4</version></dependency><!--mysql驱动依赖--><dependency><groupId>mysql</groupId><artifactId>mysql-connector-java</artifactId><version>8.0.19</version></dependency></dependencies><build><!--这个元素描述了项目相关的所有资源路径列表,例如和项目相关的属性文件,这些资源被包含在最终的打包文件里。--><resources><resource><!-- 描述存放资源的目录,该路径相对POM路径--><directory>src/main/java</directory><includes><include>**/*.xml</include></includes></resource></resources></build></project>
2.2.创建配置类 :::tips 分别创建mybatis-config.xml与config.properties,如下所示: :::
driver=com.mysql.cj.jdbc.Driverurl=jdbc:mysql://localhost:3306/spring_db?serverTimezone=GMT%2B8username=rootpassword=123456
<?xml version="1.0" encoding="UTF-8" ?><!DOCTYPE configurationPUBLIC "-//mybatis.org//DTD Config 3.0//EN""http://mybatis.org/dtd/mybatis-3-config.dtd"><configuration><!--引入外部配置--><properties resource="config.properties"/><settings><!--开启自动驼峰命名规则(camel case)映射,即从经典数据库列名 A_COLUMN 到经典 Java 属性名 aColumn 的类似映射。--><setting name="mapUnderscoreToCamelCase" value="true"/></settings><environments default="development"><environment id="development"><transactionManager type="JDBC"/><dataSource type="POOLED"><property name="driver" value="${driver}"/><property name="url" value="${url}"/><property name="username" value="${username}"/><property name="password" value="${password}"/></dataSource></environment></environments><mappers><mapper resource="UserMapper.xml"/></mappers></configuration>
2.3.创建实体与mapper接口
@Datapublic class ProductEntity {private String productId;private String productName;private BigDecimal productPrice;private BigDecimal productDisPrice;private String originAddress;private String orderId;}
import java.util.List;public interface UserMapper {List<ProductEntity> selectAll();}
2.4.测试类
import org.apache.ibatis.session.SqlSession;import org.apache.ibatis.session.SqlSessionFactory;import org.apache.ibatis.session.SqlSessionFactoryBuilder;import java.io.IOException;import java.io.InputStream;import java.util.List;public class MybatisApp {public static void main(String[] args) throws IOException {String resource = "mybatis-config.xml";InputStream inputStream = MybatisApp.class.getClassLoader().getResourceAsStream(resource);// InputStream inputStream = Resources.getResourceAsStream(resource);SqlSessionFactory sqlSessionFactory = new SqlSessionFactoryBuilder().build(inputStream);try (SqlSession session = sqlSessionFactory.openSession()) {UserMapper mapper = session.getMapper(UserMapper.class);List<ProductEntity> blog = mapper.selectAll();System.out.println(blog);}}}
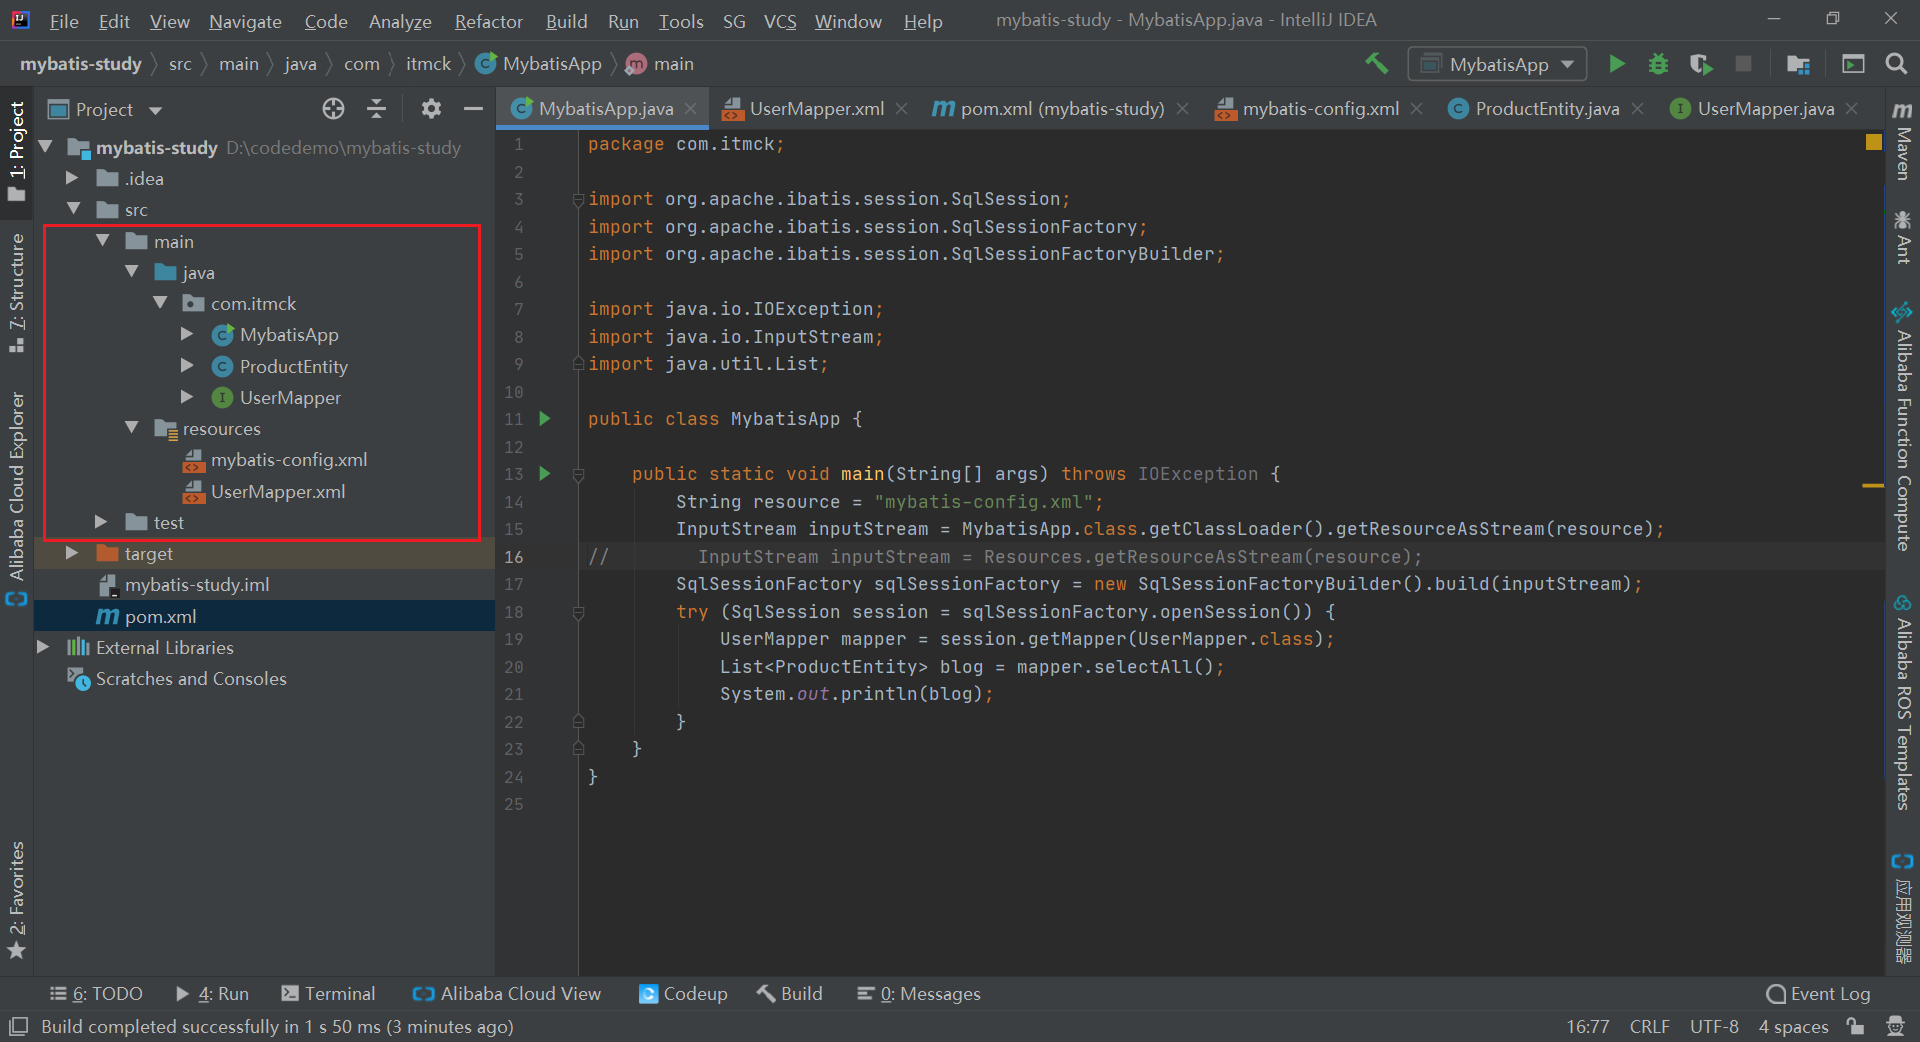
2.5.包结构如下
以上就是mybatis初体验,mybatis是不是用起来很方便?
3.Mybatis进阶使用
mybatis的强大特性之一还是其动态sql。如果你使用过 JDBC 或其它类似的框架,你应该能理解根据不同条件拼接 SQL 语句有多痛苦,例如拼接时要确保不能忘记添加必要的空格,还要注意去掉列表最后一个列名的逗号。利用动态 SQL,可以彻底摆脱这种痛苦。
- if
- choose (when, otherwise)
- trim (where, set)
- foreach
if
使用动态 SQL 最常见情景是根据条件包含 where 子句的一部分。比如:
<select id="findActiveBlogWithTitleLike"resultType="Blog">SELECT * FROM BLOGWHERE state = ‘ACTIVE’<if test="title != null">AND title like #{title}</if></select>
如果希望通过 “title” 和 “author” 两个参数进行可选搜索该怎么办呢?首先,我想先将语句名称修改成更名副其实的名称;接下来,只需要加入另一个条件即可。
<select id="findActiveBlogLike"resultType="Blog">SELECT * FROM BLOG WHERE state = ‘ACTIVE’<if test="title != null">AND title like #{title}</if><if test="author != null and author.name != null">AND author_name like #{author.name}</if></select>
choose、when、otherwise
有时候,我们不想使用所有的条件,而只是想从多个条件中选择一个使用。针对这种情况,MyBatis 提供了 choose 元素,它有点像 Java 中的 switch 语句。
还是上面的例子,但是策略变为:传入了 “title” 就按 “title” 查找,传入了 “author” 就按 “author” 查找的情形。若两者都没有传入,就返回标记为 featured 的 BLOG(这可能是管理员认为,与其返回大量的无意义随机 Blog,还不如返回一些由管理员挑选的 Blog)。
<select id="findActiveBlogLike"resultType="Blog">SELECT * FROM BLOG WHERE state = ‘ACTIVE’<choose><when test="title != null">AND title like #{title}</when><when test="author != null and author.name != null">AND author_name like #{author.name}</when><otherwise>AND featured = 1</otherwise></choose></select>
trim、where、set
前面几个例子已经合宜地解决了一个臭名昭著的动态 SQL 问题。现在回到之前的 “if” 示例,这次我们将 “state = ‘ACTIVE’” 设置成动态条件,看看会发生什么。
<select id="findActiveBlogLike"resultType="Blog">SELECT * FROM BLOGWHERE<if test="state != null">state = #{state}</if><if test="title != null">AND title like #{title}</if><if test="author != null and author.name != null">AND author_name like #{author.name}</if></select>
如果没有匹配的条件会怎么样?最终这条 SQL 会变成这样:
SELECT * FROM BLOGWHERE
这会导致查询失败。如果匹配的只是第二个条件又会怎样?这条 SQL 会是这样:
SELECT * FROM BLOGWHEREAND title like ‘someTitle’
这个查询也会失败。这个问题不能简单地用条件元素来解决。这个问题是如此的难以解决,以至于解决过的人不会再想碰到这种问题。
MyBatis 有一个简单且适合大多数场景的解决办法。而在其他场景中,可以对其进行自定义以符合需求。而这,只需要一处简单的改动:
<select id="findActiveBlogLike"resultType="Blog">SELECT * FROM BLOG<where><if test="state != null">state = #{state}</if><if test="title != null">AND title like #{title}</if><if test="author != null and author.name != null">AND author_name like #{author.name}</if></where></select>
where 元素只会在子元素返回任何内容的情况下才插入 “WHERE” 子句。而且,若子句的开头为 “AND” 或 “OR”,where 元素也会将它们去除。
如果 where 元素与你期望的不太一样,你也可以通过自定义 trim 元素来定制 where 元素的功能。比如,和 where 元素等价的自定义 trim 元素为:
<trim prefix="WHERE" prefixOverrides="AND |OR ">...</trim>
prefixOverrides 属性会忽略通过管道符分隔的文本序列(注意此例中的空格是必要的)。上述例子会移除所有 prefixOverrides 属性中指定的内容,并且插入 prefix 属性中指定的内容。
用于动态更新语句的类似解决方案叫做 set。set 元素可以用于动态包含需要更新的列,忽略其它不更新的列。比如:
<update id="updateAuthorIfNecessary">update Author<set><if test="username != null">username=#{username},</if><if test="password != null">password=#{password},</if><if test="email != null">email=#{email},</if><if test="bio != null">bio=#{bio}</if></set>where id=#{id}</update>
这个例子中,set 元素会动态地在行首插入 SET 关键字,并会删掉额外的逗号(这些逗号是在使用条件语句给列赋值时引入的)。
来看看与 set 元素等价的自定义 trim 元素吧:
<trim prefix="SET" suffixOverrides=",">...</trim>
注意,我们覆盖了后缀值设置,并且自定义了前缀值。
foreach
动态 SQL 的另一个常见使用场景是对集合进行遍历(尤其是在构建 IN 条件语句的时候)。比如:
<select id="selectPostIn" resultType="domain.blog.Post">SELECT *FROM POST PWHERE ID in<foreach item="item" index="index" collection="list"open="(" separator="," close=")">#{item}</foreach></select>
foreach 元素的功能非常强大,它允许你指定一个集合,声明可以在元素体内使用的集合项(item)和索引(index)变量。它也允许你指定开头与结尾的字符串以及集合项迭代之间的分隔符。这个元素也不会错误地添加多余的分隔符,看它多智能!
提示 你可以将任何可迭代对象(如 List、Set 等)、Map 对象或者数组对象作为集合参数传递给 foreach。当使用可迭代对象或者数组时,index 是当前迭代的序号,item 的值是本次迭代获取到的元素。当使用 Map 对象(或者 Map.Entry 对象的集合)时,index 是键,item 是值。
至此,我们已经完成了与 XML 配置及映射文件相关的讨论。下一章将详细探讨 Java API,以便你能充分利用已经创建的映射配置。
script
要在带注解的映射器接口类中使用动态 SQL,可以使用 script 元素。比如:
@Update({"<script>","update Author"," <set>"," <if test='username != null'>username=#{username},</if>"," <if test='password != null'>password=#{password},</if>"," <if test='email != null'>email=#{email},</if>"," <if test='bio != null'>bio=#{bio}</if>"," </set>","where id=#{id}","</script>"})void updateAuthorValues(Author author);
bind
bind 元素允许你在 OGNL 表达式以外创建一个变量,并将其绑定到当前的上下文。比如:
<select id="selectBlogsLike" resultType="Blog"><bind name="pattern" value="'%' + _parameter.getTitle() + '%'" />SELECT * FROM BLOGWHERE title LIKE #{pattern}</select>
多数据库支持
如果配置了 databaseIdProvider,你就可以在动态代码中使用名为 “_databaseId” 的变量来为不同的数据库构建特定的语句。比如下面的例子:
<insert id="insert"><selectKey keyProperty="id" resultType="int" order="BEFORE"><if test="_databaseId == 'oracle'">select seq_users.nextval from dual</if><if test="_databaseId == 'db2'">select nextval for seq_users from sysibm.sysdummy1"</if></selectKey>insert into users values (#{id}, #{name})</insert>
4.MyBatis-Spring
:::tips MyBatis-Spring 会帮助你将 MyBatis 代码无缝地整合到 Spring 中。它将允许 MyBatis 参与到 Spring 的事务管理之中,创建映射器 mapper 和 SqlSession 并注入到 bean 中,以及将 Mybatis 的异常转换为 Spring 的 DataAccessException。 最终,可以做到应用代码不依赖于 MyBatis,Spring 或 MyBatis-Spring。 ::: 引入依赖
<dependency><groupId>org.mybatis</groupId><artifactId>mybatis-spring</artifactId><version>2.0.7</version></dependency>
这里不做赘述,参考我的CSDN文章:SSM整合
5.Mybatis-SpringBoot
:::tips springboot项目集成mybatis,参考我的文章:Springboot之SSM ::: mybatis-spring-boot-starter依赖
<!--mybatis整合springboot必须依赖--><dependency><groupId>org.mybatis.spring.boot</groupId><artifactId>mybatis-spring-boot-starter</artifactId><version>1.3.5</version></dependency><!--使用mysql数据库连接驱动--><dependency><groupId>mysql</groupId><artifactId>mysql-connector-java</artifactId><version>8.0.11</version></dependency>
创建mybatis-config.xml
<?xml version="1.0" encoding="GBK"?><!DOCTYPE configuration PUBLIC "-//mybatis.org//DTD Config 3.0//EN" "http://mybatis.org/dtd/mybatis-3-config.dtd"><configuration></configuration>
创建application.yml
spring:datasource:driver-class-name: com.mysql.cj.jdbc.Driverurl: jdbc:mysql://localhost:3306/spring_db?characterEncoding=utf-8&useSSL=false&serverTimezone=GMT%2B8username: rootpassword: 123456mybatis:mapper-locations: classpath:mybatis/mapper/*.xmltype-aliases-package: com.itmck.microicrrisk.dao.entity
6.Mybatis-plus-SpringBoot
:::tips
Mybatis-plus是mybatis的增强版.引入之后我们就不需要再做基本的CRUD操作。这里详细说一下当前方式。
推荐使用当前的架构:SpringBoot+Mybatis-plus+Mysql/Oracle
:::
mybatis-plus依赖
<!--这里就是主要引入的依赖--><dependency><groupId>com.baomidou</groupId><artifactId>mybatis-plus-boot-starter</artifactId><version>3.2.0</version></dependency><!--如果使用mysql引入如下依赖--><dependency><groupId>mysql</groupId><artifactId>mysql-connector-java</artifactId><scope>runtime</scope></dependency>
application.yml配置
spring:datasource:driver-class-name: com.mysql.cj.jdbc.Driverurl: jdbc:mysql://localhost:3306/spring_db?characterEncoding=utf-8&useSSL=false&serverTimezone=GMT%2B8username: rootpassword: 123456mybatis-plus:mapper-locations: classpath*:mybatis/mapper/*.xmltype-aliases-package: com.itmck.microicrrisk.dao.entityconfiguration:log-impl: org.apache.ibatis.logging.stdout.StdOutImpl
创建sql语句
CREATE TABLE `user` (`id` bigint(20) NOT NULL AUTO_INCREMENT COMMENT '主键ID',`name` varchar(30) DEFAULT NULL COMMENT '姓名',`age` int(11) DEFAULT NULL COMMENT '年龄',`email` varchar(50) DEFAULT NULL COMMENT '邮箱',PRIMARY KEY (`id`)) ENGINE=InnoDB AUTO_INCREMENT=1173113442471559178 DEFAULT CHARSET=utf8;
mybatis-plus中的分页插件
/*** Create by it_mck 2019/9/15 14:50** @Description: 使用mybatis-plus分页的时候要设置此项* @Version: 1.0*/@Configurationpublic class MybatisplusConfig {@Beanpublic PaginationInterceptor paginationInterceptor() {PaginationInterceptor paginationInterceptor = new PaginationInterceptor();// paginationInterceptor.setLimit(你的最大单页限制数量,默认 500 条,小于 0 如 -1 不受限制);paginationInterceptor.setDialectType("mysql");//指定 MySQL 方言,否则它可能不知道怎么写分页函数return paginationInterceptor;}}
测试
@Data@TableName(value = "user")public class User {@TableId(value = "id",type = IdType.AUTO)private Long id;private String name;private Integer age;private String email;}
@Mapperpublic interface UserMapper extends BaseMapper<User> {}
@RunWith(SpringRunner.class)@SpringBootTestpublic class MybatisPlusDemoApplicationTests {@Autowiredprivate UserMapper userMapper;@Testpublic void testSelect() {System.out.println(("----- selectAll method test ------"));List<User> userList = userMapper.selectList(null);Assert.assertEquals(5, userList.size());userList.forEach(System.out::println);}@Testpublic void testSelect2() {System.out.println(("----- selectByPage method test ------"));//使用分页之前,必须先制定分页插件,否则分页无法使用//1-----------制定分页插件PaginationInterceptor paginationInterceptor = new PaginationInterceptor();paginationInterceptor.setDialectType("mysql");//设置使用mysql作为分页//2-----------设置分页参数Page<User> userPage = new Page<>();userPage.setCurrent(1);userPage.setSize(5);//3----------------查询 SELECT id,name,email,age FROM user LIMIT ?,?IPage<User> userIPage = userMapper.selectPage(userPage, null);List<User> records = userIPage.getRecords();for (User record : records) {System.out.println("======================="+record);}}@Testpublic void testInsert() {System.out.println(("----- insert method test ------"));User user = new User();user.setName("wxp123");user.setAge(24);user.setEmail("956411425@qq.com");int i=0;while (i<5){int insert = userMapper.insert(user);//INSERT INTO user ( id, name, email, age ) VALUES ( ?, ?, ?, ? )i++;}}@Testpublic void testUpdate() {System.out.println(("----- update method test ------"));User user = new User();user.setName("mck");user.setAge(24);user.setEmail("347451331@qq.com");QueryWrapper<User> userQueryWrapper = new QueryWrapper<>();userQueryWrapper.eq("id", 1173108471533436929L);/*** 参数1:新的值*/int update = userMapper.update(user, userQueryWrapper);//UPDATE user SET name=?, email=?, age=? WHERE (id = ?)Assert.assertEquals(1, update);if (update == 1){System.out.println("update成功");}else{System.out.println("update失败");}}@Testpublic void testDelete(){System.out.println(("----- delete method test ------"));// int i = userMapper.deleteById(1173113442471559170L);//删除一个 DELETE FROM user WHERE id=?// Assert.assertEquals(1, i);// HashMap<String, Object> map = new HashMap<>();// map.put("name", "wxp");// int i1 = userMapper.deleteByMap(map);//DELETE FROM user WHERE name = ?ArrayList<Long> longs = new ArrayList<>();longs.add(1173108471533436929L);longs.add(1173113442471559171L);int i = userMapper.deleteBatchIds(longs);//批量删除 DELETE FROM user WHERE id IN ( ? , ? )Assert.assertEquals(2, i);}@Testpublic void findAllByPage(){PageParam mySqlPage = new PageParam();mySqlPage.setCurrentPage(2);mySqlPage.setLimit(5);System.out.println("offset:"+mySqlPage.getOffset());List<User> list = userMapper.findAllByPage(mySqlPage);for (User user : list) {System.out.println("------------"+user);}}}

