unplugin-vue-components[1]是一个按需自动引入组件的工具插件。因为有 unplugin[2]的加持,他可以在 vite, rollup, 和 webpack 等多种构建工具中引入使用。
基本使用
// vite.config.tsimport Components from 'unplugin-vue-components/vite'import { ElementPlusResolver } from 'unplugin-vue-components/resolvers'export default defineConfig({plugins: [Components({/* options */resolvers: [ ElementPlusResolver() ]}),],})
element-plus resolver 可以根据具体的命名规则来进行定位,然后完成自动的引入。除此之外,还包括其他的一些常用 UI 库的 resolver,例如 antd, vant, arco 等。
作用流程
- 在 vite 对应的
configResolvedbuild hooks 中查询是否有vite-plugin-vue2若有则设置 vue 版本为2(默认3) - 调用 vite 对应的
transform(code, id)build hooks 来处理代码,code 是转换后的代码,id 为对应的路径 - 使用
fast-glob[3]来获取全局的符合项目后缀的文件路径,即位于 src/components路径下的所有 vue 文件,然后再返回 { fileName, filePath } - 将对应的文件转换成
MagicString[4]便于之后的操作 - 使用 transformComponent 和 transformDirective 对文件中存在的组件和指令名进行修改,并在当前组件的头部添加当前组件内含的第三方组件名和路径
这就是 vue-components 组件自动按需引入的基本流程,结合 vite 的 hmr 功能,当用户对文件进行编辑时,会触发细粒度的文件扫描,并生成新的文件引入代码。这样就实现了按需引入的功能。对应的 UI 库或自定义的 resolver 主要是作用于阶段3,根据 resolver 具体的配置来找到目标文件及其路径。
详情分析
unplugin hooks
unplugin 内层对API进行了封装,我们只需要利用它对外暴露的 API 来进行使用,主要使用到的就是 transform 这个 build hooks,在这里对转换的代码进行二次操作,其中还包括 vite 和 webpack 特有的 hooks,我们可以进行额外的配置。具体内容请看框架相关 hooks.
// unplugin-vue-components/src/core/unplugin.ts// ...return {name: 'unplugin-vue-components',enforce: 'post',transformInclude(id) {return filter(id)},async transform(code, id) {if (!shouldTransform(code))return nulltry {// 利用 code 和 id 对转换的文件进行修改// code 是转换的代码,id 是文件的绝对路径const result = await ctx.transform(code, id)// 针对 TS 文件生成声明文件ctx.generateDeclaration()return result}catch (e) {this.error(e)}},vite: {configResolved(config: ResolvedConfig) {// 设置文件默认的根目录ctx.setRoot(config.root)ctx.sourcemap = trueif (config.plugins.find(i => i.name === 'vite-plugin-vue2'))// 对 plugin 进行查询,若有 vue2 相关的则设置为 vue2 默认为 vue3ctx.setTransformer('vue2')if (options.dts) {// 若深度参数为 true 则直接进行全局搜寻并生成TS声明文件ctx.searchGlob()ctx.generateDeclaration()}if (config.build.watch && config.command === 'build')ctx.setupWatcher(chokidar.watch(ctx.options.globs))},configureServer(server: ViteDevServer) {ctx.setupViteServer(server)},},}// ...
转换器
// src/core/context.ts// ...transform(code: string, id: string) {// 格式化文件路径,并使用 transformer 进行转换const { path, query } = parseId(id)return this.transformer(code, id, path, query)}// ...
// src/core/transformer.tsexport default function transformer(ctx: Context, transformer: SupportedTransformer): Transformer {return async(code, id, path) => {// 使用 fast-glob 进行全局搜寻,获取所有 vue 文件的路径ctx.searchGlob()const sfcPath = ctx.normalizePath(path)// 将文件转换成 MagicString 便于之后的操作const s = new MagicString(code)await transformComponent(code, transformer, s, ctx, sfcPath)if (ctx.options.directives)await transformDirectives(code, transformer, s, ctx, sfcPath)s.prepend(DISABLE_COMMENT)const result: TransformResult = { code: s.toString() }if (ctx.sourcemap)result.map = s.generateMap({ source: id, includeContent: true })return result}}
全局搜索文件路径
// src/core/fs/glob.tsexport function searchComponents(ctx: Context) {// 从 context 中获取根路径const root = ctx.root// 使用fast-glob进行全局搜索,globs 参数见25行代码const files = fg.sync(ctx.options.globs, {ignore: ['node_modules'],onlyFiles: true,cwd: root,absolute: true,})if (!files.length && !ctx.options.resolvers?.length)// eslint-disable-next-line no-consoleconsole.warn('[unplugin-vue-components] no components found')debug(`${files.length} components found.`)// 将所有的文件添加到 context 中的 )_componentsPaths 和 _componentNameMap 中ctx.addComponents(files)}// src/core/options.ts// 根据是否为 deep 选择 **/*.ext 或 *.extresolved.globs = resolved.resolvedDirs.map(i => resolved.deep? slash(join(i, `**/*.${extsGlob}`)): slash(join(i, `*.${extsGlob}`)),)
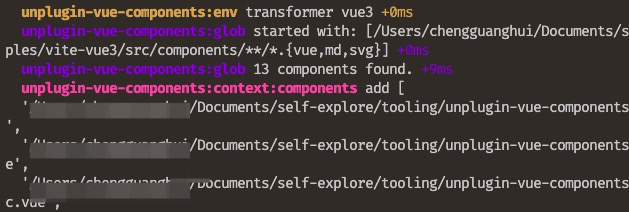
如图示,使用 src/components/**/*.{vue,md,svg}作为参数,在全局找到了13个文件。
组件、指令转换
// src/core/transforms/component.tsexport default async function transformComponent(code: string, transformer: SupportedTransformer, s: MagicString, ctx: Context, sfcPath: string) {let no = 0const results = transformer === 'vue2' ? resolveVue2(code, s) : resolveVue3(code, s)for (const { rawName, replace } of results) {// 名称转换const name = pascalCase(rawName)ctx.updateUsageMap(sfcPath, [name])// 找到对应的组件路径和组件名const component = await ctx.findComponent(name, 'component', [sfcPath])if (component) {// 使用 MagicString 对名字进行修改和添加const varName = `__unplugin_components_${no}`s.prepend(`${stringifyComponentImport({ ...component, name: varName }, ctx)};\n`)no += 1// 将引入文件名和路径添加到文件头部replace(varName)}}}// src/core/context.tx//...async findComponent(name: string, type: 'component' | 'directive', excludePaths: string[] = []): Promise<ComponentInfo | undefined> {// resolve from fslet info = this._componentNameMap[name]if (info && !excludePaths.includes(info.path) && !excludePaths.includes(info.path.slice(1)))return info// custom resolvers// 调用设置的 resolvers,自定义的 resolvers 或 elementPlusResolverfor (const resolver of this.options.resolvers) {if (resolver.type !== type)continueconst result = await resolver.resolve(name)if (result) {if (typeof result === 'string') {info = {name,path: result,}// 添加自定义或者this.addCustomComponents(info)return info}else {info = {name,...result,}this.addCustomComponents(info)return info}}}return undefined}//...

引用

若有收获,就点个赞吧
0 人点赞
