观察者模式的定义:在对象之间定义一个一对多的依赖,当一个对象状态改变的时候,所有依赖的对象都会自动收到通知。可能你会听着比较抽象,现在就拿一个我们常用的生产案例来讲解。
@ApiOperation(value = "注册")@PostMapping("/register")public Tip<String> register(@RequestParam Integer uid){// 注册long start = System.currentTimeMillis();System.out.println("注册开始");LockSupport.parkNanos(1000 * 1000 * 1000);// 发送邮件System.out.println("发送邮件开始");LockSupport.parkNanos(1000 * 1000 * 1000);// 发送优惠券System.out.println("发送优惠券开始");LockSupport.parkNanos(1000 * 1000 * 1000);long end = System.currentTimeMillis();System.out.println("耗时" + (end - start)/1000);return TipUtil.success("注册成功");}注册开始发送邮件开始发送优惠券开始耗时3
这样写会有什么问题呢?
- 方法调用时,同步阻塞导致响应变慢,需要异步非阻塞的解决方案。
- 注册接口此时做的事情:注册,发邮件,优惠券,违反单一职责的原则。当然,如果后续没有拓展和修改的需求,这样子倒可以接受。
- 如果后续注册的需求频繁变更,相应就需要频繁变更register方法,违反了开闭原则。
针对以上的问题,我们想一想解决的方案:
一、异步非阻塞的效果可以新开一个线程执行耗时的发送邮件任务,但频繁地创建和销毁线程比较耗时,并且并发线程数无法控制,创建过多的线程会导致堆栈溢出(使用线程池执行任务解决上述问题)
现在我们对上述代码进行优化
@ApiOperation(value = "注册")@PostMapping("/register")public Tip<String> register(@RequestParam Integer uid){// 注册long start = System.currentTimeMillis();System.out.println("注册开始");LockSupport.parkNanos(1000 * 1000 * 1000);// 发送邮件sendEmail("xxxx");// 发送优惠券coupon("xx");long end = System.currentTimeMillis();System.out.println("耗时" + (end - start)/1000);return TipUtil.success("注册成功");}public void sendEmail(String account){ExecutorService executorService = Executors.newFixedThreadPool(1);String result = "";executorService.submit(() -> {System.out.println("发送邮件开始");LockSupport.parkNanos(1000 * 1000 * 1000);});}public void coupon(String account){ExecutorService executorService = Executors.newFixedThreadPool(1);String result = "";executorService.submit(() -> {System.out.println("发送优惠券开始");LockSupport.parkNanos(1000 * 1000 * 1000);});}注册开始发送邮件开始耗时1发送优惠券开始
观察者模式
这里用户注册事件对【发送短信和优惠券】其实是一对多的关系,可以使用观察者模式进行解耦:
/**
 * @author heian
 * @create 2020-12-22-9:29 上午
 * @description 观察者接口(发邮件和发优惠券就属于观察者)
 */
@Component
public interface IObserver {

    void update(String message);

}

/**
 * @author heian
 * @create 2020-12-22-9:30 上午
 * @description 主题 此处就用到了一个notifyObservers方法
 */
@Component
public interface ISubject {

    //将关联事件加入到容器中
    void registerObserver(IObserver observer);

    //将关联事件移除到容器中
    void removeObserver(IObserver observer);

    //通知容器中的关联事件
    void notifyObservers(String message);
}
/**
 * @author heian
 * @create 2020-12-22-9:36 上午
 * @description 注册主题(一对多触发其事件)
 */
@Component
public class UserRegisterSubject implements ISubject {

    @Autowired
    List<IObserver> observerList;


    @Override
    public void registerObserver(IObserver observer) {
        observerList.add(observer);
    }

    @Override
    public void removeObserver(IObserver observer) {
        observerList.remove(observer);
    }

    @Override
    public void notifyObservers(String message) {
        for (IObserver observer : observerList) {
            observer.update(message);
        }
    }
}
/**
 * @author heian
 * @create 2020-12-22-9:32 上午
 * @description 发送邮件业务类
 */
@Service
public class SendEmailService implements IObserver{

    public void sendEmail (String account){
        new Thread(() -> {
            System.out.println("发送邮件开始");
            LockSupport.parkNanos(1000 * 1000 * 1000);
        }).start();

    }

    @Override
    public void update(String message) {
        sendEmail(message);
    }
}
/**
 * @author heian
 * @create 2020-12-22-9:34 上午
 * @description 添加优惠券
 */
@Component
public class CouponService implements IObserver{

    public void coupon(String account){
        new Thread(() -> {
            System.out.println("发送优惠券开始");
            LockSupport.parkNanos(1000 * 1000 * 1000);
        }).start();
    }

    @Override
    public void update(String message) {
        coupon(message);
    }
}
@RestController
@RequestMapping("/testDemo")
@Api(tags = "调试专用")
public class TestDemoController {
    @Autowired
    private UserRegisterSubject registerSubject;

    @ApiOperation(value = "注册")
    @PostMapping("/register")
    public Tip<String> register(@RequestParam Integer uid){
        // 注册
        long start = System.currentTimeMillis();
        System.out.println("注册开始");
        LockSupport.parkNanos(1000 * 1000 * 1000);
        registerSubject.notifyObservers("xxxxxx");
        long end = System.currentTimeMillis();
        System.out.println("耗时" +  (end - start)/1000);
        return TipUtil.success("注册成功");
    }
}
思路大概就是:
我们要定义一个观察者接口,就是观察者做的一些操作。然后观察者们去实现此接口,实现各自的业务类。并将其加入到spring的容器内,此时容器的 List
然后我们在定义一个主题接口,该主题接口作用就是为了提高代码的扩展性,可以自由添加观察者和移除观察者,然后定义UserRegisterSubject注册主题,当发生注册事件,就去触发各个观察者们的业务事件。
发布订阅模式是什么?
观察者模式和发布订阅模式是有一点点区别的,区别有以下几点:
- 前者:观察者订阅主题,主题也维护观察者的记录,而后者:发布者和订阅者不需要彼此了解,而是在消息队列或代理的帮助下通信,实现松耦合。
- 前者主要以同步方式实现,即某个事件发生时,由Subject调用所有Observers的对应方法,后者则主要使用消息队列异步实现。

尽管两者存在差异,但是他们其实在概念上相似,网上说法很多,不需要过于纠结,重点在于我们需要他们为什么出现,解决了什么问题。
SpringBoot中事件监听机制则通过发布-订阅实现,主要包括以下三部分:
- 事件 ApplicationEvent,继承JDK的EventObject,可自定义事件。
- 事件发布者 ApplicationEventPublisher,负责事件发布。
- 事件监听者 ApplicationListener,继承JDK的EventListener,负责监听指定的事件。
我们通过SpringBoot的方式,能够很容易实现事件监听,所以大致的流程是,首先定义一个事件通道,通道的作用就是承上启下,发布者往指定的事件通道中发布事件,而监听者一旦监听到事件通道中有消息了,立刻做出相应的响应,值得一提的是此事件是同步事件,发生异常也会阻止下面事件的执行,接下来我们改造一下上面的案例:
生命注册某个事件的通道
package com.cloud.ceres.rnp.service;

import org.springframework.context.ApplicationEvent;

/**
 * @author heian
 * @create 2020-12-27-10:24 上午
 * @description 用户注册事件 相当于事件通道,你发生了此事件会通知到各个监听者
 */
public class UserRegisterEvent extends ApplicationEvent {

    private String phone;//注册所需的参数,一般是个json

    public UserRegisterEvent(Object source, String phone) {
        super(source);
        this.phone = phone;
    }

    public String getPhone(){
        return phone;
    }
}
定义发优惠券监听(订阅)者(注解形式)
package com.cloud.ceres.rnp.service;

import org.springframework.context.event.EventListener;
import org.springframework.stereotype.Service;

import java.util.concurrent.locks.LockSupport;

/**
 * @author heian
 * @create 2020-12-27-10:31 上午
 * @description 发送优惠券 注解形式监听注册事件
 */
@Service
public class AddCouponService {

    @EventListener(classes = {UserRegisterEvent.class})//监听哪个通道
    public String addCoupon(UserRegisterEvent userRegisterEvent){
        System.out.println("发放优惠券开始" + userRegisterEvent.getPhone() + "    " + Thread.currentThread().getName());
        LockSupport.parkNanos(1000*1000*1000*1);
        System.out.println("发放优惠券结束" + userRegisterEvent.getPhone());
        return "ok";
    }

}
定义发邮件监听(订阅)者(实现ApplicationListener接口形式)
package com.cloud.ceres.rnp.service;

import org.springframework.context.ApplicationListener;
import org.springframework.stereotype.Service;

import java.util.concurrent.locks.LockSupport;

/**
 * @author heian
 * @create 2020-12-27-10:41 上午
 * @description 发送邮件 实现ApplicationListener的方式定义监听器
 */
@Service
public class SendEmailService implements ApplicationListener<UserRegisterEvent> {
    @Override
    public void onApplicationEvent(UserRegisterEvent event) {
        System.out.println("发放邮件开始" + event.getPhone() +"    " + Thread.currentThread().getName());
        LockSupport.parkNanos(1000*1000*1000*1);
        System.out.println("发放邮件结束" + event.getPhone());
    }
}
定义发布者
package com.cloud.ceres.rnp.service;

import lombok.extern.slf4j.Slf4j;
import org.springframework.beans.factory.annotation.Autowired;
import org.springframework.context.ApplicationContext;
import org.springframework.context.ApplicationEventPublisher;
import org.springframework.context.ApplicationEventPublisherAware;
import org.springframework.stereotype.Service;

import java.util.concurrent.locks.LockSupport;

/**
 * @author heian
 * @create 2020-12-27-10:44 上午
 * @description 用户注册 事件发布者
 */
@Slf4j
@Service
public class UserRegisterService implements ApplicationEventPublisherAware {

    private ApplicationEventPublisher publisher;

    @Override
    public void setApplicationEventPublisher(ApplicationEventPublisher applicationEventPublisher) {
        this.publisher = applicationEventPublisher;
    }

    //@Autowired
  //private ApplicationContext applicationContext;

    /**
     * 发布事件
     */
    public String register(String phone) {
        long start = System.currentTimeMillis();
        System.out.println("执行用户的注册逻辑开始");
        LockSupport.parkNanos(1000*1000*1000*1);
        System.out.println("执行用户的注册逻辑结束");
        //applicationContext.publishEvent(new UserRegisterEvent(this, phone));也可以从容器中直接获取发布者
        publisher.publishEvent(new UserRegisterEvent(this, phone));
        long end = System.currentTimeMillis();
        System.out.println( "耗时:" + (end - start)/1000);
        return "注册成功";
    }

}
测试接口
package com.cloud.ceres.rnp.control.web;

import com.cloud.ceres.rnp.service.UserRegisterService;
import io.swagger.annotations.Api;
import org.springframework.beans.factory.annotation.Autowired;
import org.springframework.web.bind.annotation.GetMapping;
import org.springframework.web.bind.annotation.RequestMapping;
import org.springframework.web.bind.annotation.RestController;


@RequestMapping("/userRegister")
@RestController
@Api(tags = "用户注册")
public class UserRegisterController {

    @Autowired
    private UserRegisterService registerService;

    @GetMapping("/register")
    public String register(){
        return registerService.register("18xxxxx");
    }
}
执行用户的注册逻辑开始
执行用户的注册逻辑结束
发放优惠券开始18xxxxx    http-nio-9002-exec-1
发放优惠券结束18xxxxx
发放邮件开始18xxxxx    http-nio-9002-exec-1
发放邮件结束18xxxxx
耗时:3
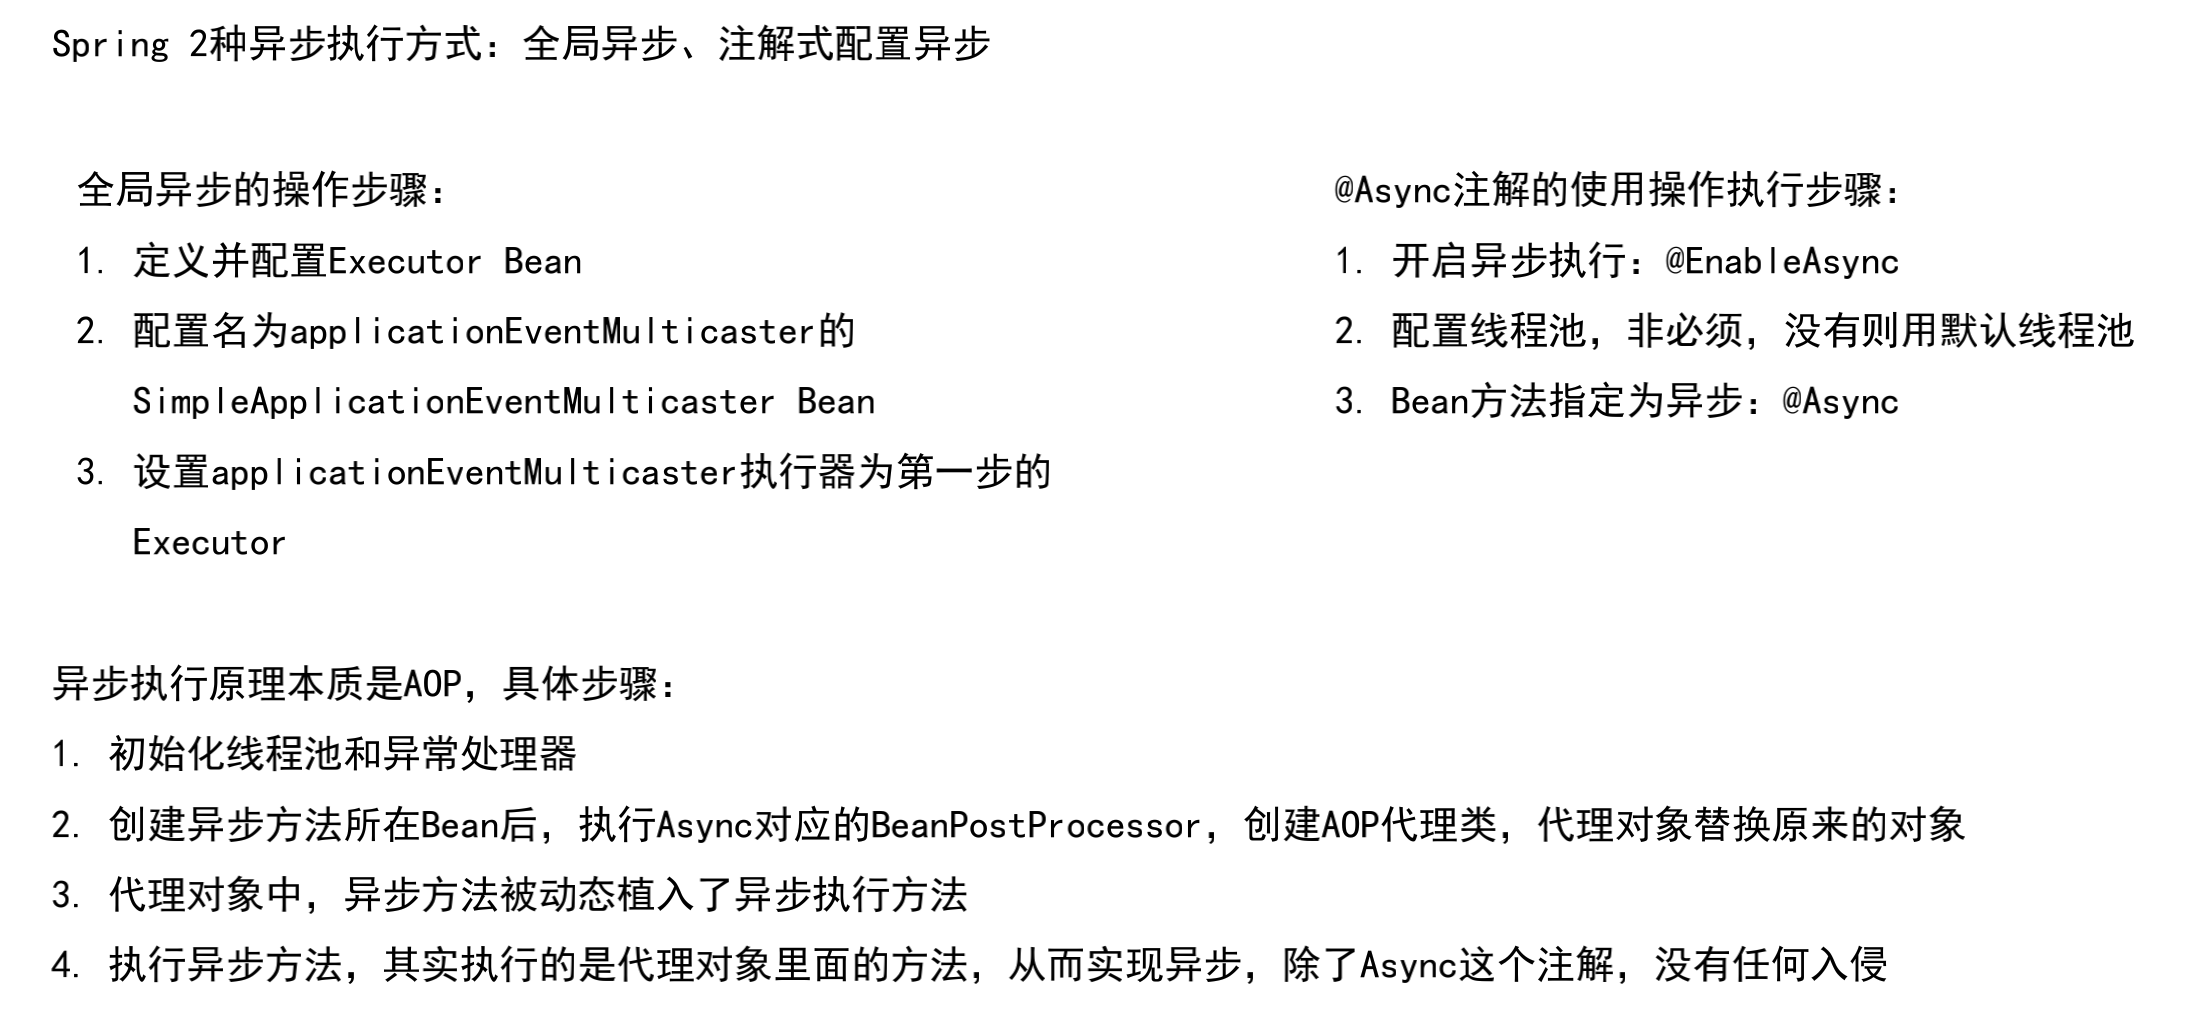
但是由于其实同步的,当我们的增值服务越来越多的阻塞明显是不可取的,spring默认提供的是同步策略,异步策略需要我们自身定义线程池去实现。
package com.cloud.ceres.rnp.configuration;

import org.springframework.context.annotation.Bean;
import org.springframework.context.annotation.Configuration;
import org.springframework.context.event.ApplicationEventMulticaster;
import org.springframework.context.event.SimpleApplicationEventMulticaster;
import org.springframework.core.task.SimpleAsyncTaskExecutor;

/**
 * @author heian
 * @create 2020-12-27-1:14 下午
 * @description 初始化Bean
 */
@Configuration
public class BeanConfig {

    @Bean(name = "applicationEventMulticaster")
    public ApplicationEventMulticaster simpleApplicationEventMulticaster() {
        SimpleApplicationEventMulticaster eventMulticaster = new SimpleApplicationEventMulticaster();
        eventMulticaster.setTaskExecutor(new SimpleAsyncTaskExecutor());
        return eventMulticaster;
    }
}
执行用户的注册逻辑开始
执行用户的注册逻辑结束
耗时:1
发放优惠券开始18xxxxx    SimpleAsyncTaskExecutor-38
发放邮件开始18xxxxx    SimpleAsyncTaskExecutor-39
当然了,最后还是要说一句,项目并发高了以后,也不可能用Spring监听机制的,MQ会更合适些。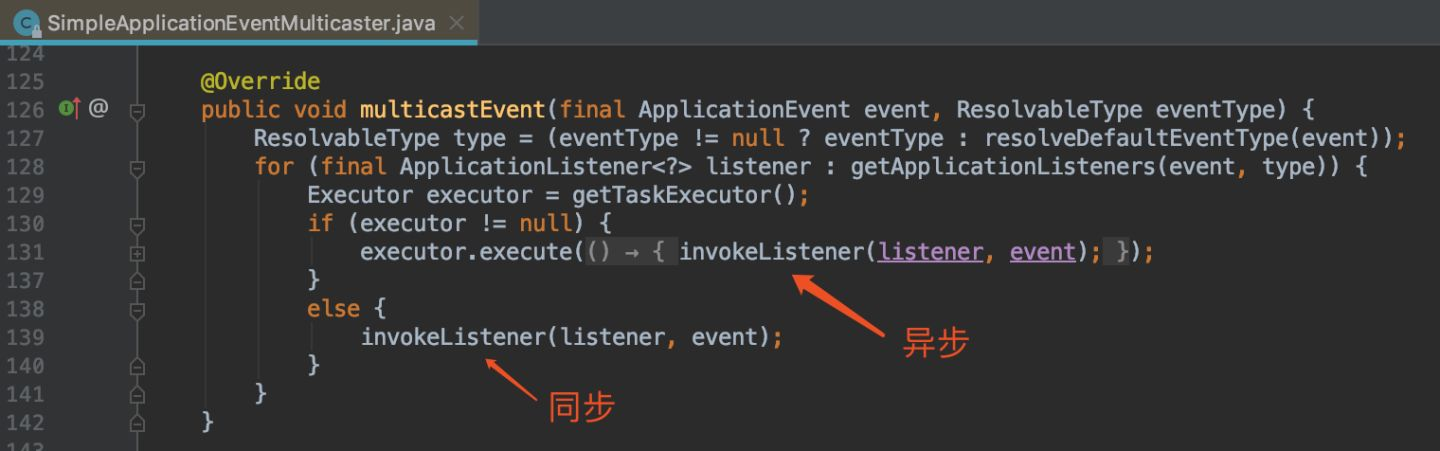
生产实践示例
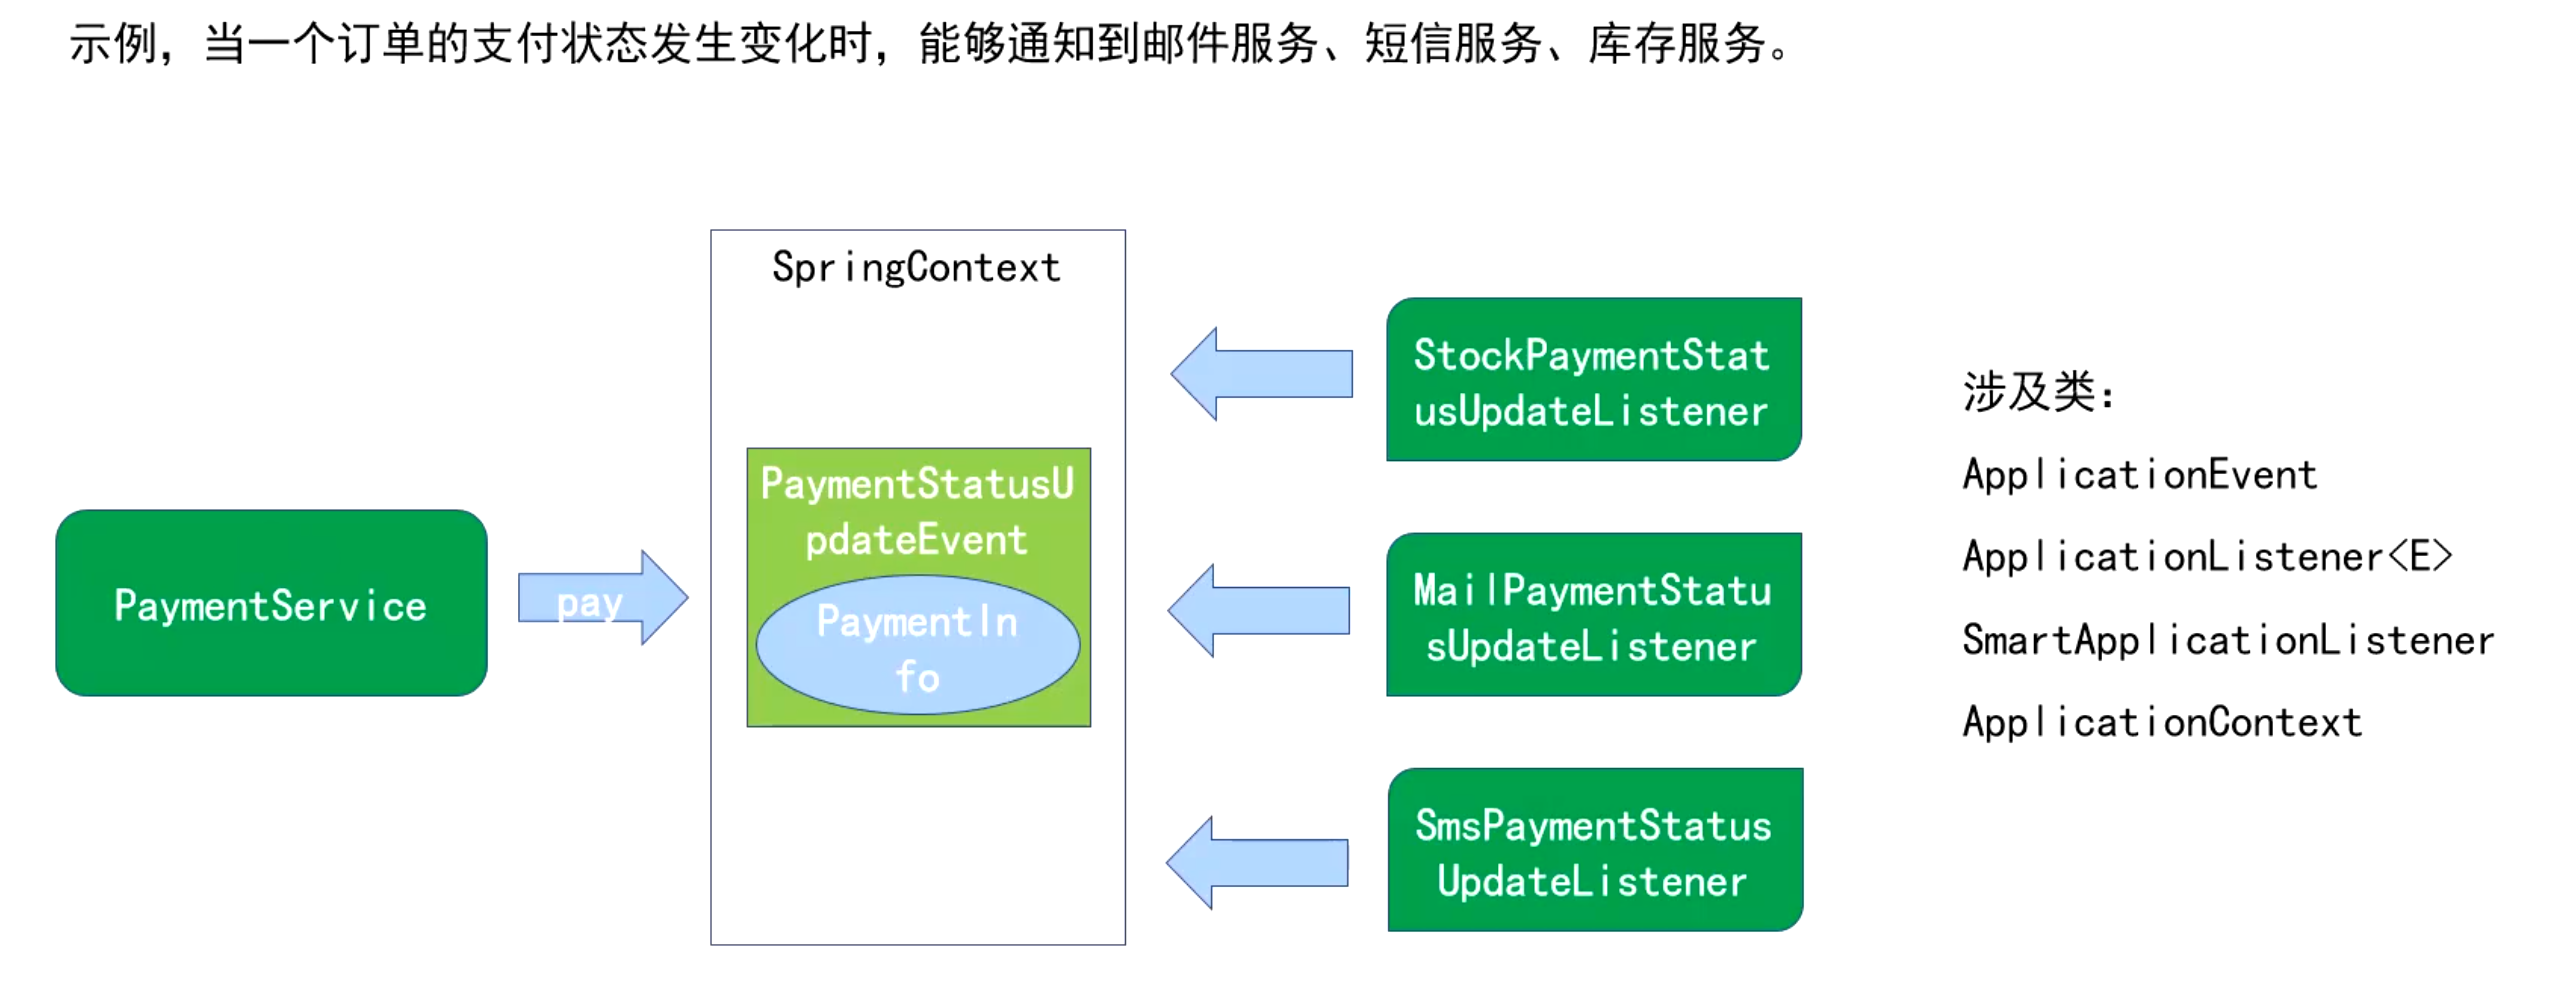
在上面过程中我们已经知道了如何通过事件驱动的使用,但是由于上面是无序的为了实现有序我们将通过支付的成功状态来驱动三个事件,分别是邮件—>短信—>库存
--业务类
@Service
public class PaymentService {

    @Autowired
    private ApplicationContext applicationContext;

    public void pay(int id, String status) {
        // ...... 省略处理业务逻辑代码
        PaymentInfo paymentInfo = new PaymentInfo(id, status);
        // 发布事件
        applicationContext.publishEvent(new PaymentStatusUpdateEvent(paymentInfo));
    }

}

--支付状态变更事件
public class PaymentStatusUpdateEvent extends ApplicationEvent {
    public PaymentStatusUpdateEvent(PaymentInfo source) {
        super(source);
    }
}

--数据源传输对象
@Data
public class PaymentInfo {
    private int id;
    private String status;

    public PaymentInfo(int id, String status) {
        this.id = id;
        this.status = status;
    }
}

/**
 * 有序监听器,抽象类实现事件源以及事件的通用判断
 */
public abstract class AbstractPaymentStatusListener implements SmartApplicationListener {

    //必须满足我们这两个条件才能实现监听

    /**
     * 事件源必须是PaymentStatusUpdateEvent
     */
    @Override
    public boolean supportsEventType(Class<? extends ApplicationEvent> aClass) {
        return aClass == PaymentStatusUpdateEvent.class;
    }

    /**
     * 支持的数据源类型必须是PaymentInfo
     */
    @Override
    public boolean supportsSourceType(Class<?> sourceType) {
        return sourceType == PaymentInfo.class;
    }

}

--邮件服务
@Service
public class MailPaymentStatusUpdateListener extends AbstractPaymentStatusListener implements SmartApplicationListener {
    // 排序,数字越小执行的优先级越高,为了实现有序必须实现SmartApplicationListener接口
    @Override
    public int getOrder() {
        return 1;
    }

    @Override
    @Async//异步多线程
    public void onApplicationEvent(ApplicationEvent applicationEvent) {
        System.out.println("Thread: " + Thread.currentThread().getName()+ " 邮件服务, 收到支付状态更新的通知. " + applicationEvent);
    }
}

--短信服务
@Service
public class SmsPaymentStatusUpdateListener extends AbstractPaymentStatusListener implements SmartApplicationListener {

    @Override
    public int getOrder() {
        return 2;
    }

    @Override
    @Async
    public void onApplicationEvent(ApplicationEvent applicationEvent) {
        System.out.println("Thread: " + Thread.currentThread().getName()+
                " 短信服务, 收到支付状态更新的通知. " + applicationEvent);
    }
}

--无序,库存服务
@Service
public class StockPaymentStatusUpdateListener implements ApplicationListener<PaymentStatusUpdateEvent> {
    @Override
    @Async
    public void onApplicationEvent(PaymentStatusUpdateEvent paymentStatusUpdateEvent) {
        System.out.println("Thread: " + Thread.currentThread().getName() +
                " 库存服务, 收到支付状态更新的事件. " + paymentStatusUpdateEvent);
    }
}
测试类:
@SpringBootTest(classes = Application.class)
class SpringEventTests {

    @Autowired
    PaymentService service;

    @Test
    void test() {
        service.pay(1, "支付成功");
    }
}
Thread: main 邮件服务, 收到支付状态更新的通知. com.dongnaoedu.network.spring.event.PaymentStatusUpdateEvent[source=PaymentInfo(id=1, status=支付成功)]
Thread: main 短信服务, 收到支付状态更新的通知. com.dongnaoedu.network.spring.event.PaymentStatusUpdateEvent[source=PaymentInfo(id=1, status=支付成功)]
Thread: main 库存服务, 收到支付状态更新的事件. com.dongnaoedu.network.spring.event.PaymentStatusUpdateEvent[source=PaymentInfo(id=1, status=支付成功)]
从控制台当中我们看出当先是一个线程同步执行的,似乎@Async我们的注解没生效,因为我们没有在启动类上加上 @EnableAsync springboot全局异步加此注解,但是不建议这样用因为次注解是没有对线程池进行一个限制,所以一般是我们自主配置全局spring的线程
package com.dongnaoedu.network.spring.event.async;

import org.springframework.context.annotation.Bean;
import org.springframework.context.annotation.Configuration;
import org.springframework.context.event.SimpleApplicationEventMulticaster;
import org.springframework.scheduling.annotation.AsyncConfigurer;
import org.springframework.scheduling.concurrent.ThreadPoolTaskExecutor;

import java.util.concurrent.Executor;
import java.util.concurrent.ThreadPoolExecutor;

@Configuration
public class GlobalAsyncConfig {
    /**
     * 线程池维护线程的最小数量
     */
    private int corePoolSize =2;
    /**
     * 线程池维护线程的最大数量
     */
    private int maxPoolSize =2;
    /**
     * 队列最大长度
     */
    private int queueCapacity = 100;

    /**
     * 获取异步线程池执行对象
     */
    @Bean("asyncExecutor")
    public Executor getAsyncExecutor() {
        //spring的线程池
        ThreadPoolTaskExecutor taskExecutor = new ThreadPoolTaskExecutor();
        taskExecutor.setCorePoolSize(corePoolSize);
        taskExecutor.setMaxPoolSize(maxPoolSize);
        taskExecutor.setQueueCapacity(queueCapacity);
        //用于调试
        taskExecutor.setThreadNamePrefix("GlobalAsyncExecutor-");
        taskExecutor.setWaitForTasksToCompleteOnShutdown(true);
        //拒绝策略 CallerRunsPolicy 由调用线程处理该任务
        taskExecutor.setRejectedExecutionHandler(new ThreadPoolExecutor.CallerRunsPolicy());
        taskExecutor.initialize();
        return taskExecutor;
    }

    // 名字必须是applicationEventMulticaster,Spring内部通过这个名字来获取Bean的
    @Bean("applicationEventMulticaster")
    public SimpleApplicationEventMulticaster simpleApplicationEventMulticaster(Executor asyncExecutor这个名字就是我们上一步创建的bean) {
        // Spring 事件多路线程执行器
        SimpleApplicationEventMulticaster multicaster = new SimpleApplicationEventMulticaster();
        multicaster.setTaskExecutor(asyncExecutor);
        return multicaster;
    }
}
Thread: AnnotationAsyncExecutor-1 短信服务, 收到支付状态更新的通知. com.dongnaoedu.network.spring.event.PaymentStatusUpdateEvent[source=PaymentInfo(id=1, status=支付成功)]
Thread: AnnotationAsyncExecutor-2 邮件服务, 收到支付状态更新的通知. com.dongnaoedu.network.spring.event.PaymentStatusUpdateEvent[source=PaymentInfo(id=1, status=支付成功)]
Thread: AnnotationAsyncExecutor-1 库存服务, 收到支付状态更新的事件. com.dongnaoedu.network.spring.event.PaymentStatusUpdateEvent[source=PaymentInfo(id=1, status=支付成功)]
因为是多线程执行,所以排序自然也就无效了,因为我们使用的是自行配置类而非@EnableAsync注解所以在我们方法上也就无需次注解了@Async,或者使用注解的方式来配置也行,但是同时也需要配置对应的配置二选一,就好比我们使用配置的方式必须指定那些线程是需要异步执行的我们这里是事件多路执行器,而是用@Async就好比在方法是表明了此方法必须使用多线程执行。
package com.dongnaoedu.network.spring.event.async;

import org.springframework.context.annotation.Configuration;
import org.springframework.scheduling.annotation.AsyncConfigurer;
import org.springframework.scheduling.annotation.EnableAsync;
import org.springframework.scheduling.concurrent.ThreadPoolTaskExecutor;

import java.util.concurrent.Executor;
import java.util.concurrent.ThreadPoolExecutor;

@Configuration
@EnableAsync
public class AnnotationAsyncConfig implements AsyncConfigurer {
    /**
     * 线程池维护线程的最小数量
     */
    private int corePoolSize =2;
    /**
     * 线程池维护线程的最大数量
     */
    private int maxPoolSize =2;
    /**
     * 队列最大长度
     */
    private int queueCapacity = 100;

    /**
     * 获取异步线程池执行对象
     */
    @Override
    public Executor getAsyncExecutor() {
        ThreadPoolTaskExecutor taskExecutor = new ThreadPoolTaskExecutor();
        taskExecutor.setCorePoolSize(corePoolSize);
        taskExecutor.setMaxPoolSize(maxPoolSize);
        taskExecutor.setQueueCapacity(queueCapacity);
        //用于调试
        taskExecutor.setThreadNamePrefix("AnnotationAsyncExecutor-");
        taskExecutor.setWaitForTasksToCompleteOnShutdown(true);
        //拒绝策略 CallerRunsPolicy 由调用线程处理该任务
        taskExecutor.setRejectedExecutionHandler(new ThreadPoolExecutor.CallerRunsPolicy());
        taskExecutor.initialize();
        return taskExecutor;
    }
}

若有收获,就点个赞吧
0 人点赞
