一、概述
1、什么是springBoot?
官网链接
:::tips
SpringBoot可以非常简单的快速构建独立的、基于Spring应用的生产级应用程序;
SpringBoot基于约定优于配置的思想,可以让开发人员不必在配置与逻辑业务之间进行思维的切换,使我们可以全身心的投入到业务代码开发中,从而大大提高了开发的效率;
:::
:::tips
SpringBoot主要特点:
- SpringBoot可以快速创建独立的Spring应用程序;
- SpringBoot直接嵌入Tomcat、Jetty或Undertow(不需要部署WAR文件)
- SpringBoot提供了大量可供选择的场景依赖starter,大大简化工程配置的工作量;
- SpringBoot提供了Spring应用的自动化配置和常见第三方库的自动化配置;
- SpringBoot提供了大量生产级的特性,比如健康检查、外部化配置等(第二天学习的内容);
- SpringBoot在简化配置的过程中不会生成代码,也不需要XML繁杂的配置
:::
2、什么是约定优于配置?
约定优于配置(convention over configuration),也称按约定编程,是一种软件设计范式,旨在减少软件开发人员需做决定的数量,简化开发流程,说白了就是按照开发人员的通用习惯(约定)进行开发,尽量减少程序员做决策带来的时间成本的开销
二、SpringBoot 配置文件
1、配置文件
1、SpringBoot配置分类
yml和properties 配置文件
2、SpringBoot配置文件入门
- 在resources目录下新建 application.properties 配置文件,添加端口号:
server.port=8081 # 修改tomcat端口
2、实现配置文件自动提示
org.springframework.boot spring-boot-configuration-processor true org.springframework.boot spring-boot-maven-plugin
org.springframework.boot spring-boot-configuration-processor
3、多环境切换
1、多profile文件实现环境配置切换
profile配置方式: 多profile文件方式:提供多个配置文件,每个代表一种环境。 application-dev.properties/yml 开发环境 application-test.properties/yml 测试环境 application-pro.properties/yml 生产环境
2、单个profile文件实现环境配置切换
3、profile激活方式
- 在配置文件中配置:spring.profiles.active=dev
4、YAML基本使用
1、YAML是什么?
YAML是 “YAML Ain’t Markup Language”(YAML不是一种标记语言)的递归缩写; YAML在开发中又有另外一层意思:”Yet Another Markup Language”(仍是一种标记语言); YAML非常适合用来做以数据为中心的配置文件;
2、YAML基本语法
- 大小写敏感。区分大小写
- 数据值前边必须有空格,作为分隔符。
- 使用缩进表示层级关系。
- 缩进时不允许使用Tab键,只允许使用空格(各个系统 Tab对应的 空格数目可能不同,导致层次混乱)。
- 缩进的空格数目不重要,只要相同层级的元素左侧对齐即可。
- ‘’#” 表示注释,从这个字符一直到行尾,都会被解析器忽略。
- 字符串无需加引号,如果要加,””与’’表示字符串内容会被转义/不转义
3、代码演示
对象(map):键值对的集合。person:
name: zhangsan
# 或者行内写法 (了解)
person: {name: zhangsan}
数组:一组按次序排列的值
address:
- beijing
- shanghai
# 或者行内写法
address: [beijing,shanghai]
纯量:单个的、不可再分的值(常量值)
msg1: ‘hello \n world’ # 单引忽略转义字符
msg2: “hello \n world” # 双引识别转义字符
参数引用
name: lisi
person:
name: ${name} # 引用上边定义的name值
课堂代码:
# yml文件: .yml .yaml
server:
port: 8082
company2: itcast
# =========map类型的数据
person:
name: 大幂幂
age: 18
# 行内格式
#person: {name: 大鹏,age: 60}
# =========数组类型的数据
address:
- 北京
- 上海
# 行内格式
#address: [beijing,shanghai]
# =========纯量(字符串)类型的数据
str1: “俗话说:\n情绪是智慧不够的产物!”
str2: ‘俗话说:\n情绪是智慧不够的产物!’
# =========参数引用
data:
name: ${person.name}
使用 @value 读取配置:
@RestController
public class HelloController {
@Value(“${company1}”)
private String company1;
@Value(“${company2}”)
private String company2;
@Value(“${person.name}”)
private String pname;
@Value(“${person.age}”)
private Integer page;
@Value(“${address[0]}”)
private String address;
@Value(“${str1}”)
private String str1;
@Value(“${str2}”)
private String str2;
@Value(“${data.name}”)
private String dname;
@RequestMapping(“/hello”)
public String hello(){
System.out.println(“hello方法执行了…”);
System.out.println(company1+” : “+company2);
System.out.println(pname+” : “+page);
System.out.println(address);
System.out.println(str1);
System.out.println(str2);
System.out.println(dname);
return “Hello SpringBoot!!! “ ;
}
}
4、YAML高级配置
单值数据映射对象属性
1)配置文件添加:man:
userName: laowang
boss: true
birth: 1980/09/09 01:01:01
age: 41
2)定义实体类Man:
package com.itheima.sh.pojo;
import lombok.Data;
import org.springframework.boot.context.properties.ConfigurationProperties;
import java.util.Date;
@Data
@ConfigurationProperties(prefix = “man”)
public class Man {
private String userName;
private Boolean boss;
private Date birth;
private Integer age;
}
3)依赖注入测试:
两种注入属性方式:
方式1:在实体类Man上添加@ConfigurationProperties(prefix = “man”)
然后在启动类上添加@EnableConfigurationProperties(Man.class)
方式2:在实体类Man上添加@ConfigurationProperties(prefix = “man”)
在实体类Man上添加@Component
1.复杂数据映射对象属性
说明:配置数据可以映射数组、集合、Map、List
package com.itheima.sh.pojo;
import lombok.Data;
import org.springframework.boot.context.properties.ConfigurationProperties;
import java.util.Date;
import java.util.List;
import java.util.Map;
@Data
@ConfigurationProperties(prefix = “man”)
public class Man {
private String userName;
private Boolean boss;
private Date birth;
private Integer age;
private String[] address;
private List
private Map
private Woman woman;
private List
}
package com.itheima.sh.pojo;
import lombok.Data;
import java.util.List;
@Data
public class Woman {
private String userName;
private Integer age;
private List
}
2、添加配置文件
server:
port: 8082
company2: itcast
company1: itheima
man:
userName: laowang
boss: true
birth: 1980/09/09 01:01:01
age: 41
address: [beijing, shanghai]
addressList:
- 北京
- 上海
- 深圳
hobbies:
sports:
- badminton
- basketball
musics:
- dj
- 23
woman:
userName: xiaohua
age: 20
addresses:
- 北京
- 上海
wifes:
- userName: xiaosan1
age: 25
addresses:
- 北京
- userName: xiaosan2
age: 20
addresses:
- 上海
5、小结
SpringBoot配置参数封装实体对象的核心注解?
两种注入属性注入实体对象的方式:方式1:在实体类Man上添加@ConfigurationProperties(prefix = “man”)然后在启动类上添加@EnableConfigurationProperties(Man.class)方式2:在实体类Man上添加@ConfigurationProperties(prefix = “man”)在实体类Man上添加@Component
提示
三、拦截器支持
1、自定义拦截器:
/ 定义啦拦截器对象
/
public class MyInterceptor implements HandlerInterceptor {
/
方法执行之前执行
@param request
@param response
@param handler
@return
@throws Exception
/
@Override
public boolean preHandle(HttpServletRequest request, HttpServletResponse response, Object handler) throws Exception {
System.out.println(“MyInterceptor preHandle…….”);
return true;
}
/
方法执行完成之后, 返回值返回给前端之前执行
@param request
@param response
@param handler
@param modelAndView
@throws Exception
*/
@Override
public void postHandle(HttpServletRequest request, HttpServletResponse response, Object handler, ModelAndView modelAndView) throws Exception {
System.out.println(“MyInterceptor postHandle…….”);
}
/
页面渲染之后执行
@param request
@param response
@param handler
@param ex
@throws Exception
/
@Override
public void afterCompletion(HttpServletRequest request, HttpServletResponse response, Object handler, Exception ex) throws Exception {
System.out.println(“MyInterceptor afterCompletion…….”);
}
}
基于配置类注册拦截器
@Configuration
public class SpringMvcConfig implements WebMvcConfigurer {
/**
注册拦截器
@param registry
/
@Autowired
private MyInterceptor myInterceptor
@Override
public void addInterceptors(InterceptorRegistry registry) {
registry.addInterceptor(myInterceptor)
//添加拦截路径 拦截所有
.addPathPatterns(“/“)
//排除被拦截的资源
.excludePathPatterns(Arrays.asList(“//.css”,”/**/.jpg”,”/*/.js”));
}
}
小结: 基于注解实现拦截器注册流程? 1、定义拦截类,实现HandlerInterceptor接口; 2、配置拦截规则: 2.1 定义配置类@Configuration,实现WebMvcConfigurer接口下的addInterceptors方法; 2.2 配置拦截规则
四、SPI 机制
SPI全称ServiceProviderInterface,是Java提供的一套用来被第三方实现或者扩展的接口,它可以用来启用框架扩展和替换组件。SPI的作用就是为这些被扩展的API寻找服务实现。
五、整合Mybatis的分页插件
1、添加mybatis页面插件依赖
2、配置分页插件
配置分页插件
pagehelper:
mysql支持的方言
helperDialect: mysql
sql合理化
reasonable: true
六、SpringBoot自动装配原理
1、什么是自动装配
1.场景启动器starter的底层封装了配置,那么springboot是如何自动加载它们?
Springboot的自动装配,SpringBoot定义了一套接口规范,这套规范规定:SpringBoot 在启动时会扫描外部引用 jar 包中的META-INF/spring.factories文件(类似于SPI机制),将文件中配置的类型信息加载到 Spring 容器,并执行类中定义的各种操作。
2、SpringBoot自动装配原理
SpringBoot启动类:
@SpringBootApplication //SpringBootApplication是SpringBoot的核心注解(复合注解)public class App {public static void main(String[] args) {/*run(Class cls , String[] args)参数1:有@SpringBootApplication注解的类的Class对象目的:为了让SpringBoot底层解析@@SpringBootApplication参数2:命令行启动时传入的参数。最终要给SpringBoot*/SpringApplication.run(App.class, args);}}
:::tips @SpringBootApplication注解属于复合注解,包含:
- @SpringBootConfiguration:标识是一个配置类(是对@Configuration注解的包装)
- 允许在上下文中注册额外的bean或导入其他配置类
- @EnableAutoConfiguration:启用SpringBoot的自动配置机制
- @ComponentScan:组件扫描
- 默认扫描的规则:引导类所在的包及其子包所有带Spring注解的类
- 扫描被@Component(@Service、@Controller)注解的 bean
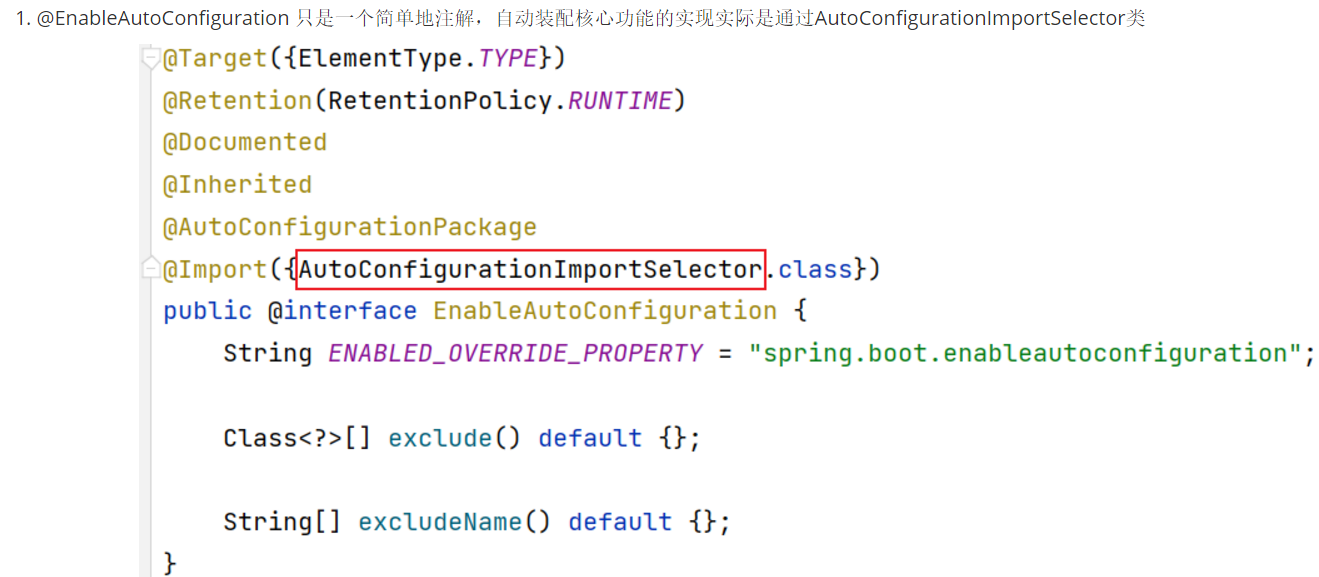
@EnableAutoConfiguration是实现自动装配的重要注解,我们从这个注解入手分析:
2、AutoConfigurationImportSelector的selectImports()方法会读所有SpringBoot Starter下的META-INF/spring.factories文件(SPI机制)
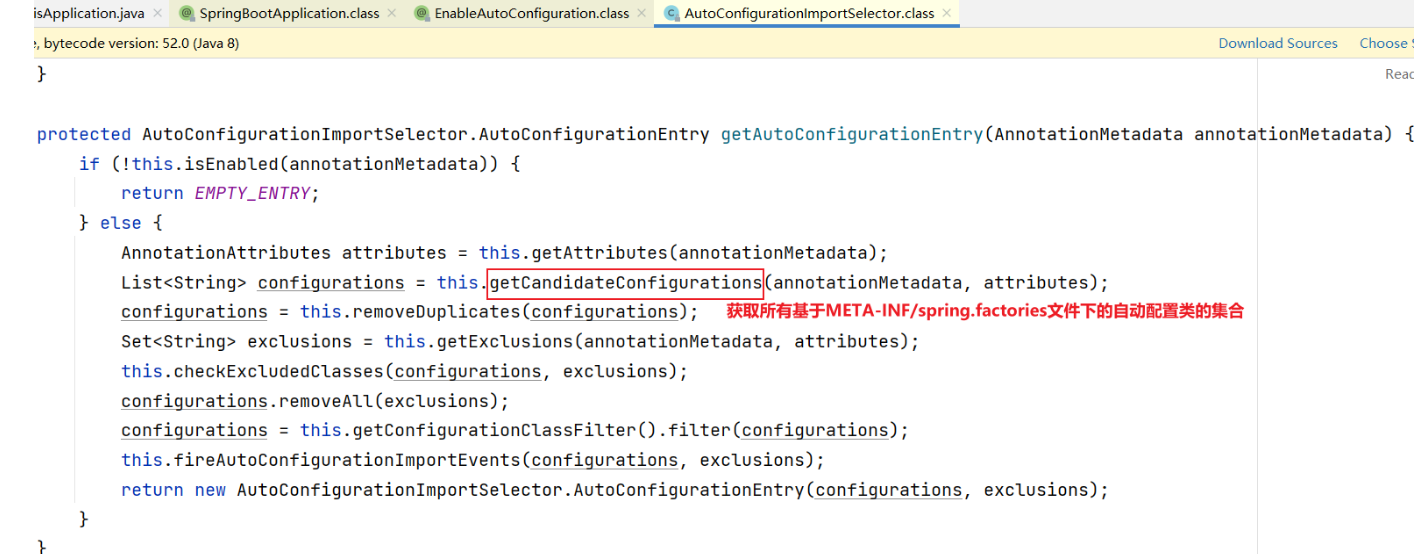
- selectImports()方法底层调用getAutoConfigurationEntry()方法

3、getAutoConfigurationEntry()方法调用getCandidateConfigurations(annotationMetadata, attributes)方法获取所有基于META-INF/spring.factories文件下的自动配置类的集合
4、getCandidateConfigurations方法底层利用Spring工厂加载器调用loadSpringFactories()方法扫描当前系统中所有META-INF/spring.factories文件,并加载获取自动配置类信息
默认扫描当前系统里面所有META-INF/spring.factories位置的文件
说明:在spring.factories中有很多配置,但是只有满足一定条件的配置才会被自动装配
:::
:::tips
问题1:SpringBoot默认自动加载的配置文件路径是哪里?
当前项目系统路径下的所有META-INF/spring.factories文件
问题2:简述SpringBoot自动装配流程?
- 通过@Import注解调用AutoConfigurationImportSelector类中的selectImports方法;
- selectImports方法底层调用getAutoConfigurationEntry()方法获取可自动装配的配置类信息集合;
- getAutoConfigurationEntry()方法调用getCandidateConfigurations(annotationMetadata, attributes)方法获取所有基于META-INF/spring.factories文件下的自动配置类的集合;
- 底层利用Spring工厂加载器调用 loadSpringFactories()方法扫描当前系统中所有META-INF/spring.factories文件,并加载获取自动配置类信息;
5.根据@Conditional条件过滤,获取最终自动装配类,最后被IOC容器加载; :::

