- APP自动化
- implicitly_wait():是 webdirver 提供的一个超时等待。隐的等待一个元素被发现,或一个命令完成。如果超出了设置时间的则抛出异常。
- implicitly_wait():隐式等待
- 当使用了隐士等待执行测试的时候,如果 WebDriver没有在 DOM中找到元素,将继续等待,超出设定时间后则抛出找不到元素的异常
- 换句话说,当查找元素或元素并没有立即出现的时候,隐式等待将等待一段时间再查找 DOM,默认的时间是0
- 一旦设置了隐式等待,则它存在整个 WebDriver 对象实例的声明周期中,隐式的等到会让一个正常响应的应用的测试变慢,
- 它将会在寻找每个元素的时候都进行等待,这样会增加整个测试执行的时间。
- implicitly_wait()方法比 sleep() 更加智能,后者只能选择一个固定的时间的等待,前者可以在一个时间范围内智能的等待。
- 元素操作
- 获取分辨率和截图
- 发送键到设备
- 操作手机通知栏
APP自动化
Appium
环境搭建
windows打开环境变量:rundll32 sysdm.cpl,EditEnvironmentVariables
可以参考下面的文档环境搭建说明
- 安装jdk并配置环境变量
- 安装sdk并配置环境变量
- 安装appium
- 安装夜神模拟器
安装python的appium库 appium-python-client
pip install Appium-Python-Client
自动化配置项
设置参数
platformName:操作系统, 固定写法Android
- automationName:固定写法Appium
- platformVersion: Android版本
- deviceName:设备名称使用模拟器就填写模拟器的地址:127.0.0.1:62001(夜神)
- appPackage:包名通过aapt命令查看aapt dump badging ‘filepath’ | findstr package
- appActivity:入口启动界面
- noReset:true, 每次appium对app进行操作的时候,为了不保存修改的数据和app设置的内容而不影响下次使用
- autoAcceptAlerts:true 默认选择接受弹窗的条款,有些app启动的时候,会有一些权限的弹窗,
- automationName:安卓框架,默认,(UiAutomator1/UiAutomator2)
- unicodeKeyboard:是否支持中文 设置为True
- resetKeyboard:是否支持重置键盘,设置为True
- newCommandTimeout:30 超过设置时间就断开链接
更多可以参考下面的文档appium详细参数
官方参数中心appium详细参数
adb命令
- 连接:adb connect 127.0.0.1:62001
- 查看驱动:adb devices -l
- 查看被测app包名以及入口启动界面:aapt dump badging apk的绝对路径

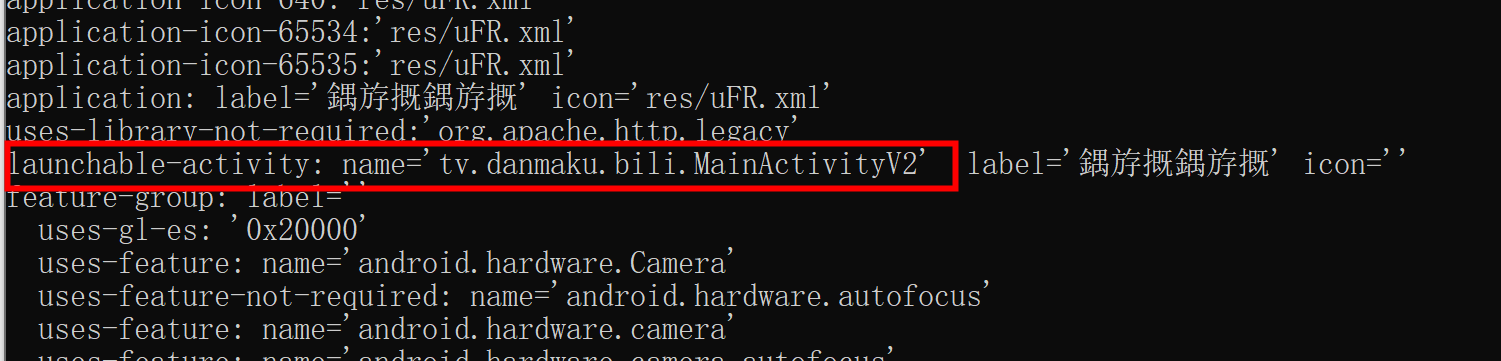
- 获取包名和界面名:
在手机中打开需要测试的程序,输入如下adb命令
adb shell dumpsys window windows |grep mFocusedApp
adb shell dumpsys window windows | findstr mFocusedApp
获取app启动时间
adb shell am start -w 包名/界面名
获取手机日志
adb logcat > test_log.txtadb logcat -c #清除日志
安装/卸载apk
adb install 路径adb uninstall 包名
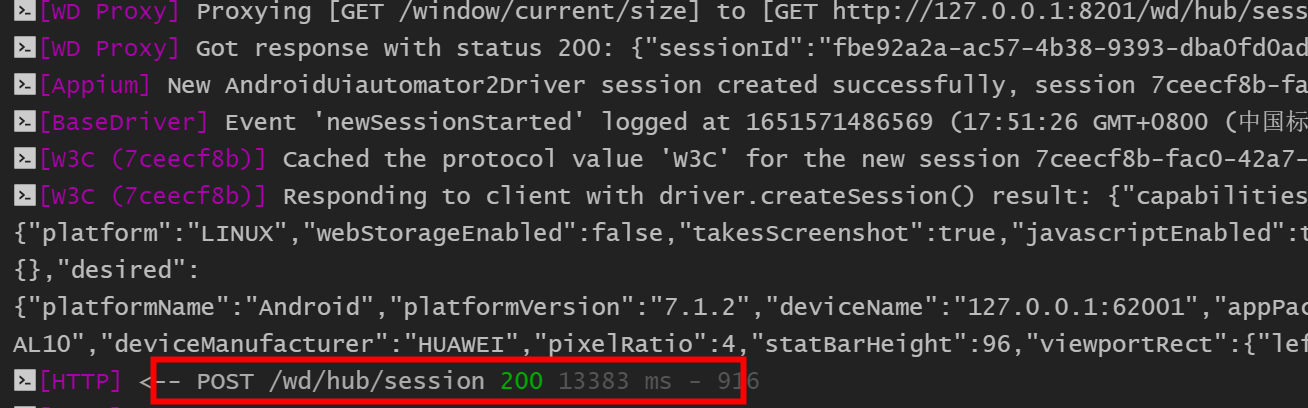
appium日志
可以查看到python自动化脚本如何操作手机终端的过程:
发送http请求
- 创建会话
- 确定设备是否连接,确定安卓版本并确定终端的设置是否一致

- appium推送一个jir包,来操作手机终端

- 响应http请求,返回200
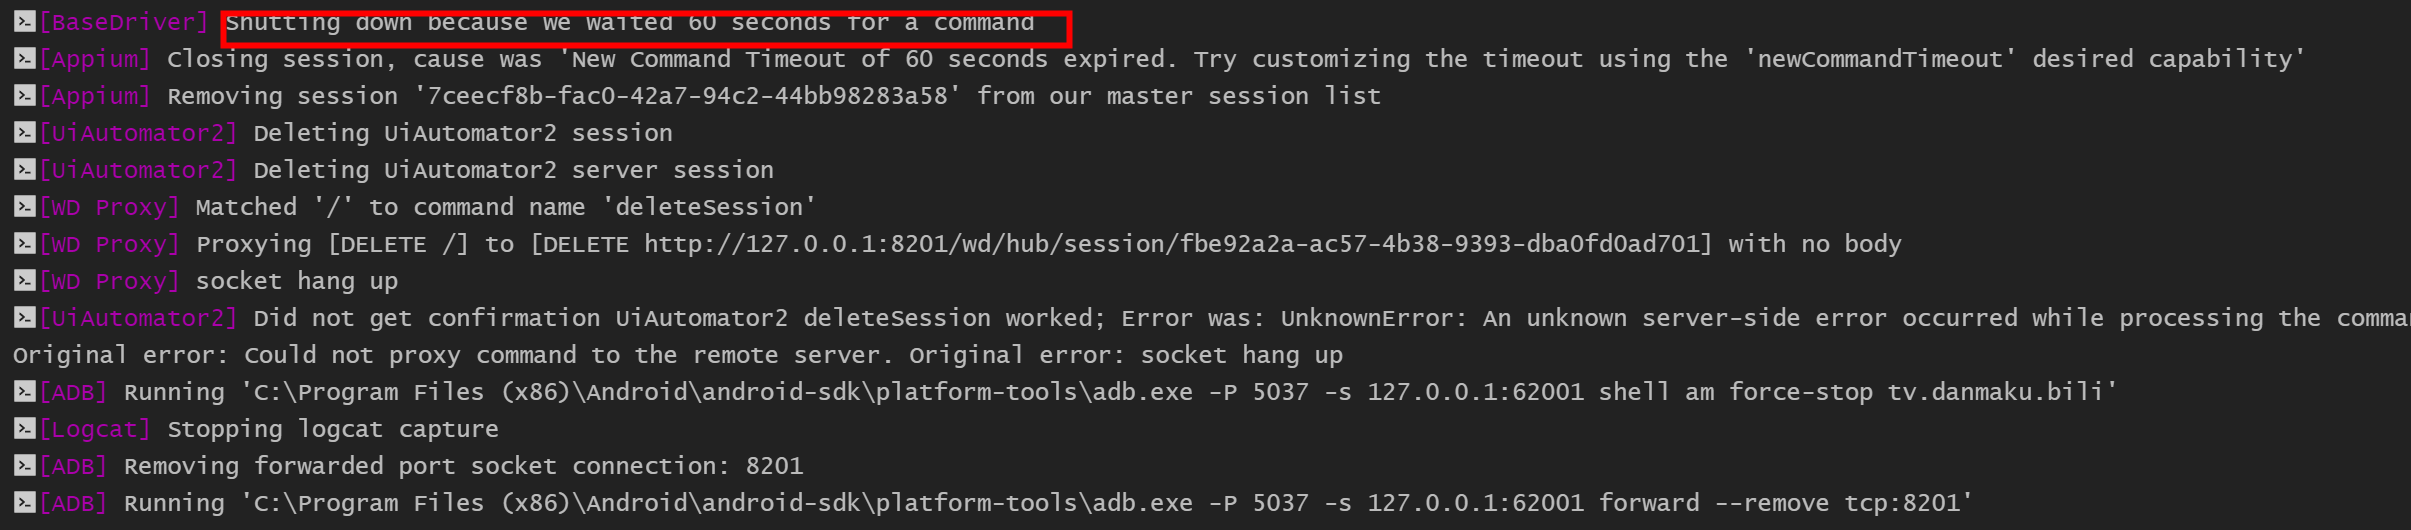
- 超过60s没有指令会中断响应
app状态确认
安装/卸载app
from appium import webdriverdesired_caps = {'platformName':'Android','platformVersion':'7.1.2','deviceName':'127.0.0.1:62001','appPackage':'tv.danmaku.bili','appActivity':'.MainActivityV2','autoAcceptAlerts':True,'noReset':True,'unicodeKeyboard':True,'resetKeyboard':True}#发生指令给appium serverdriver = webdriver.Remote('http://127.0.0.1:4723/wd/hub',desired_caps)if not driver.is_app_installed('tv.danmaku.bili'):driver.install_app('C:\Users\banma-2900\venv\Appium\tv.danmaku.bili_6.72.0_6720300.apk')else:driver.remove_app('tv.danmaku.bili')driver.quit()
卸载app
将app至于后台
模拟热启动
from appium import webdriverdesired_caps = {'platformName':'Android','platformVersion':'7.1.2','deviceName':'127.0.0.1:62001','appPackage':'tv.danmaku.bili','appActivity':'.MainActivityV2','autoAcceptAlerts':True,'noReset':True}#发生指令给appium serverdriver = webdriver.Remote('http://127.0.0.1:4723/wd/hub',desired_caps)#进入后台5s后再回到前台driver.background_app(5)time.sleep(5)driver.quit()
APP元素定位
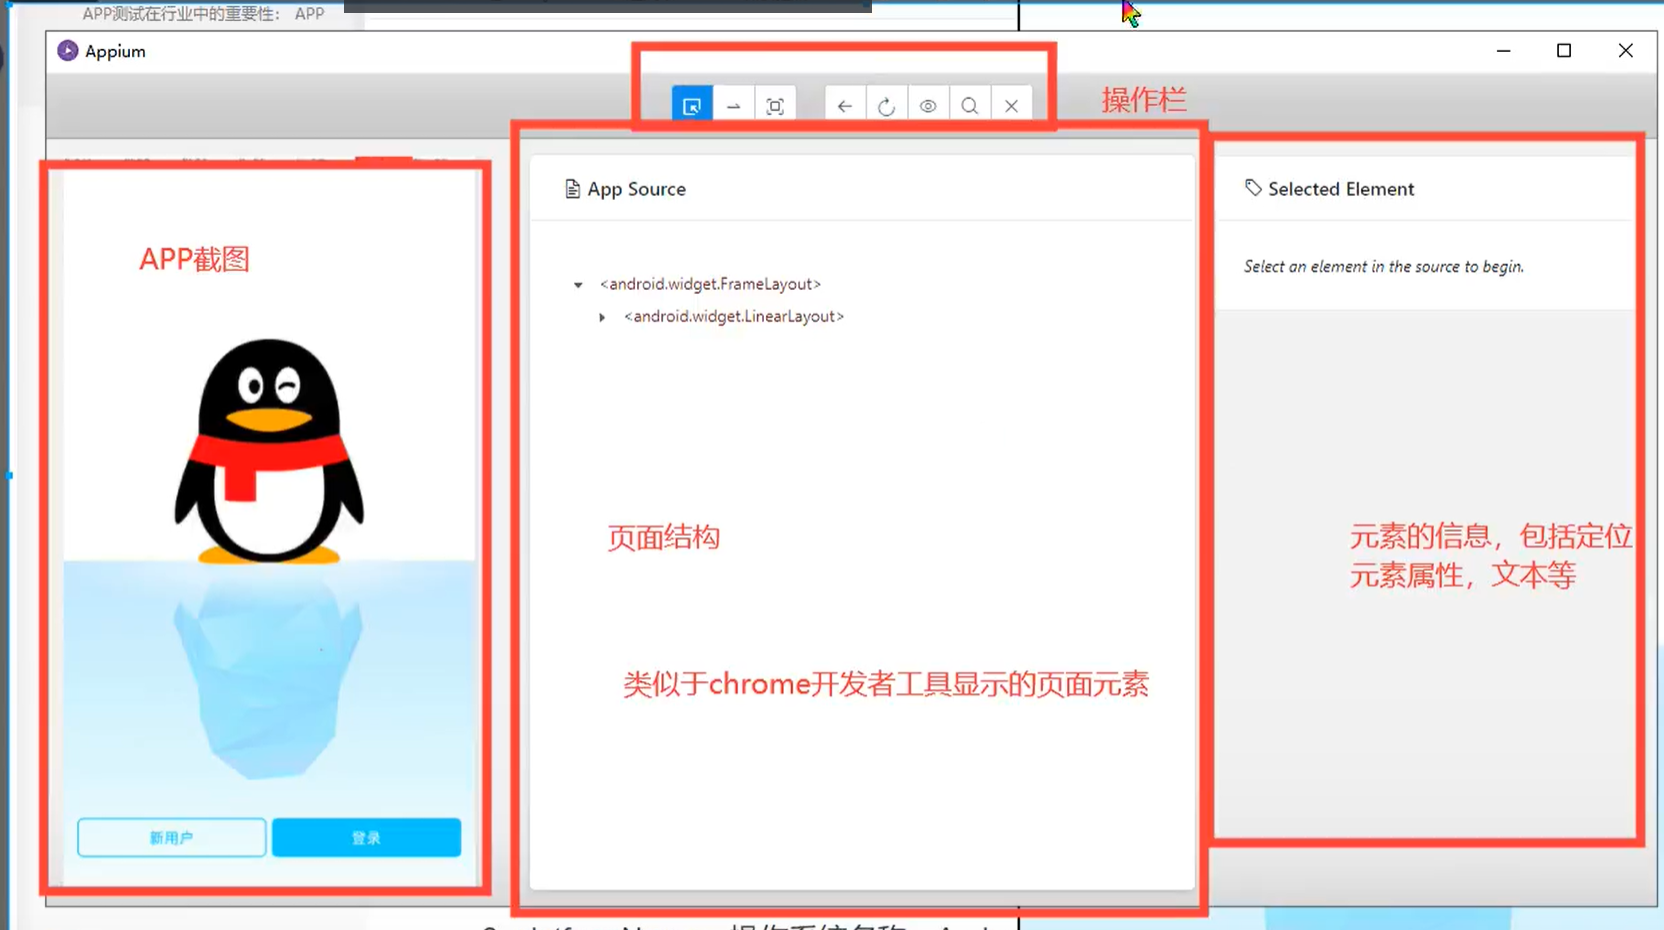
工具介绍
- UIAutomatorView Android sdk自动
支持jdk1.8,不支持java9以上版本,如果有其它进程占用则无法截屏,坑~~
命令行窗口不要关闭
- Appium Desktop Inspector
Weditor:UIautomator2:pythonapp UI自动化测试框架
pip install Uiautomator2python -m uiautomator2 initpip install weditor==0.6.3 #安装weditor,制定版本weditor --helppython -m weditor #启动weditor
如果weditor中xPath是通过resource-id定位,那么代表这个ID是唯一的
元素属性
text
- resourceld
- class:元素标签
content-desc/description:元素功能描述
元素等待
设置元素等待可以更加灵活的制定等待定位元素的时间,从而增强脚本的健壮性,提高执行效率。
元素等待是为了解决如下场景的问题:脚本执行时,脚本的执行速度和页面元素的加载速度未必一致,也就是说,可能出现脚本已经运行到某个元素,但该元素尚未加载到页面,此时脚本会因无法定位到该元素而导致执行失败。元素等待本质是为了解决时序上不匹配的问题。 | 强制等待 | 设置固定的等待时间 | from time import sleep #强制等待5秒 sleep(5) | | —- | —- | —- | | 隐式等待 | 针对全部元素设置的等待时间 | driver.implicitly_wait(5) | | 显示等待 | 针对某个元素来设置的等待时间 | from selenium.webdriver.support.ui import WebDriverWait WebDriverWait(driver, timeout, poll_frequency=0.5, ignored_exceptions=None) |
强制等待
import timetime.sleep(5)
隐式等待 ```python from appium import webdriver
implicitly_wait():是 webdirver 提供的一个超时等待。隐的等待一个元素被发现,或一个命令完成。如果超出了设置时间的则抛出异常。
implicitly_wait():隐式等待
当使用了隐士等待执行测试的时候,如果 WebDriver没有在 DOM中找到元素,将继续等待,超出设定时间后则抛出找不到元素的异常
换句话说,当查找元素或元素并没有立即出现的时候,隐式等待将等待一段时间再查找 DOM,默认的时间是0
一旦设置了隐式等待,则它存在整个 WebDriver 对象实例的声明周期中,隐式的等到会让一个正常响应的应用的测试变慢,
它将会在寻找每个元素的时候都进行等待,这样会增加整个测试执行的时间。

implicitly_wait()方法比 sleep() 更加智能,后者只能选择一个固定的时间的等待,前者可以在一个时间范围内智能的等待。
driver.implicitly_wait(20)
3. 显示等待详细格式如下:<br /> WebDriverWait(driver, timeout, poll_frequency=0.5, ignored_exceptions=None)<br />driver - WebDriver 的驱动程序(Ie, Firefox, Chrome 或远程)<br />timeout - 最长超时时间,默认以秒为单位<br />poll_frequency - 休眠时间的间隔(步长)时间,默认为 0.5 秒<br />ignored_exceptions - 超时后的异常信息,默认情况下抛 NoSuchElementException 异常。<br />WebDriverWai()一般由 until()或 until_not()方法配合使用,下面是 until()和 until_not()方法的说明。<br />until(method, message=’’)<br />调用该方法提供的驱动程序作为一个参数,直到返回值不为 False。<br />until_not(method, message=’’)<br />调用该方法提供的驱动程序作为一个参数,直到返回值为 False。<br />lambda<br />lambda 提供了一个运行时动态创建函数的方法。'''```pythonfrom selenium.webdriver.support.ui import WebDriverWaitwaiter = webDriverWait(driver,10,1)botton = waiter.until(lambda x:x.find_element_by_id("elementID"))botton.click()
- wait_activity
但是这个只是针对安卓手机的哦,要记住了,iPhone不适合的。这个时候我们可以用wait_activity的语法,等到你想点击的页面activity出现了,再点击,可以有效的节省时间。
from appium import webdriverimport sysdesired_caps = {'platformName':'Android','platformVersion':'7.1.2','deviceName':'127.0.0.1:62001','appPackage':'tv.danmaku.bili','appActivity':'.MainActivityV2','autoAcceptAlerts':True,'noReset':True}#发生指令给appium serverdriver = webdriver.Remote('http://127.0.0.1:4723/wd/hub',desired_caps)#获取当前界面activityac = driver.current_activityprint(ac)#等待主界面出现driver.wait_activity(ac, 30)driver.find_element_by_id("com.baidu.yuedu:id/positive").click()
定位方法
- 通过AndroidUIAutomator
调用的是Android自带的UI框架UiAutomator的Api,下面介绍几个常用的定位属性
find_elements_by…返回列表,find_element_by…返回对象
- text文字
- 包含text文字
- 以什么text开始
- 正则匹配text
- className,返回复数列表
- resoucreId resourceIdMatches
- description
多个条件叠加查找from appium import webdriverdriver.find_element_by_android_uiautomator('new UiSelector().text("请输入包含街道的完整地址")')driver.find_element_by_android_uiautomator('new UiSelector().textContains("整地址")')driver.find_element_by_android_uiautomator('new UiSelector().textStartsWith("请")')driver.find_element_by_android_uiautomator('new UiSelector().textMatches("^街道的完整地址.*")')driver.find_elements_by_android_uiautomator('new UiSelector().className("android.widget.EditText")')driver.find_element_by_android_uiautomator('new UiSelector().resourceId("com.syqy.wecash:id/et_content")')driver.find_element_by_android_uiautomator('new UiSelector().description("contenet-des属性")')
from appium import webdriverelment_login = driver.find_element_by_android_uiautomator('new UiSelector().text("登录").resoucreId("tv.danmaku.bili:id/cover_layout")')
通过resoucreId
element = driver.find_element_by_id("tv.danmaku.bili:id/cover_layout")
通过description
driver.find_element_by_accessibility_id('密码 安全').click()
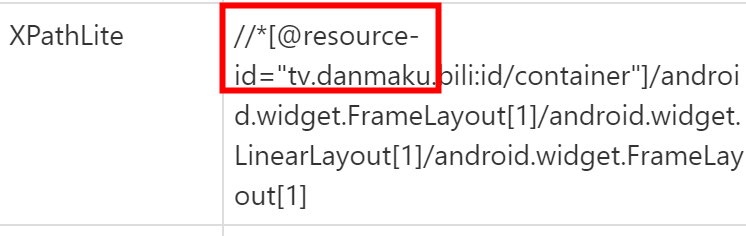
通过xpath,一般不建议使用,主要是效率慢,但是其基本可以定位到全部元素,具体可参考下面的文档:xpath定位介绍 | 定位目标 | XPATH | | —- | —- | | 所有元素 | // | | 所有div元素 | //div | | 所有div元素的子元素 | //div/ | | 根据ID属性获取元素 | //[@id=’’] | | 根据class属性获取元素 | //[@class=’’] | | 拥有某个属性的元素 | //[@herf=’’] | | 所有div元素的第一个子元素 | //div/[1] | | 所有拥有子元素a的div元素 | //div[a] | | input的下一个兄弟元素 | //input/following-sibling::[1] |
driver.find_element_by_xpath('//*[@text="影视"]')
- 定位元素的另一种写法:find_element(by,value)
这个操作的好处是可以直接把操作的by和value放到一个元组里,然后调用通用方法来传参获得元素结果
cateid=(By.ID,“ag2”)
driver.find_element(*cateid).click()
- By.ID 相当于by_id
- By.CLASS_NAME 相当于by_class_name
- By.XPATH 相当于by_xpath
- By.NAME 相当于by_name
- By.TAG_NAME 相当于by_tag_name
- By.CSS_SELECTOR 相当于by_css_selector
- By.LINK_TEXT 相当于by_link_text
cateid=(By.ID,“ag2”)driver.find_element(*cateid).click()
获取元素属性
- text:获取元素属性的text值
- tag_name:获取元素的标签名,原生应用无标签,一般为None
- get_attribute(*name):根据属性名获取元素属性,属性名填写错误会报错
- resource-id使用”resourceID”
- class使用”className”
- content-desc使用”name”
- size:获取元素的宽和高,返回字典{‘height’:xx,’width’:xx}
- location:获取元素左上角的坐标,返回字典{‘x’:坐标,’y’:坐标}
- rect:元素的大小和位置组合字典,返回字典{‘height’:高,’width’:宽,’x’:坐标,’y’:坐标} ```python from appium import webdriver from selenium.webdriver.support.ui import WebDriverWait from selenium.webdriver.common.by import By import time import sys
desired_caps = { ‘platformName’:’Android’, ‘platformVersion’:’7.1.2’, ‘deviceName’:’127.0.0.1:62001’, ‘appPackage’:’tv.danmaku.bili’, ‘appActivity’:’.MainActivityV2’, ‘autoAcceptAlerts’:True, ‘noReset’:True ‘unicodeKeyboard’:True, # 是否支持中文输入 ‘resetKeyboard’:True, # 是否支持重置键盘 ‘newCommandTimeout’:60 # 30秒没发送新命令就断开连接 } driver = webdriver.Remote(‘http://127.0.0.1:4723/wd/hub',desired_caps) ac = driver.current_activity driver.wait_activity(ac, 30) login_element = driver.find_element(By.XPATH,’//*[@resource-id=”tv.danmaku.bili:id/avatar”]/android.widget.ImageView[1]’) login_element.click() driver.wait_activity(‘tv.danmaku.bili.ui.loginv2.LoginOriginalActivityV2’, 30) driver.find_element(By.ID,’ tv.danmaku.bili:id/get_auth_code’).click() auth_codes = driver.find_elements_by_id(‘tv.danmaku.bili:id/get_auth_code’) for code in auth_codes: print(code.text,sep=’;’,end=’\n’) print(code.location,sep=’;’,end=’\n’) print(code.size,sep=’;’,end=’\n’)
<a name="kre3T"></a>#### 滑动和拖拽事件1. swipe从一个坐标滑动到另一个坐标,只能是2个点之间的滑动```python#duration 滑动这个操作一共持续的时间,单位ms#持续时间越长,惯性越小driver.swipe(start_x,start_y,end_x,end_y,duration)
- 滑动会出现误差
scroll从一个元素滑动到另一个元素
begin = driver.find_element_by_id('xxxx')end = driver.find_element_by_id('xxxxx')driver.scroll(begin,end)
drap_and_drop,没有惯性
begin = driver.find_element_by_id('xxxx')end = driver.find_element_by_id('xxxxx')driver.drap_and_drop(begin,end)
高级手势TouchAction
可以实现一些针对手势的操作,比如滑动,长按,短按,手指抬起等复杂手势
使用步骤
创建TouchAction对象
- 通过对象调用对应的手势
- 通过perform()执行动作
轻敲
tap: (element: WebElement |None = None, x: int |None = None, y: int |None = None, count: int = 1)
count表示敲击次数
可以传入元素或者坐标(x=200,y=500)from appium.webdriver.common.touch_action import TouchActionfrom appium import webdriverdesired_caps = {'platformName':'Android','platformVersion':'7.1.2','deviceName':'127.0.0.1:62001','appPackage':'tv.danmaku.bili','appActivity':'.MainActivityV2','autoAcceptAlerts':True,'noReset':True}driver = webdriver.Remote('http://127.0.0.1:4723/wd/hub',desired_caps)phone_number = driver.find_element(By.ID,'tv.danmaku.bili:id/et_phone_number')#TouchAction(driver).tap(phone_number).perform()TouchAction(driver).tap(x=500,y=500,count=2).perform()
按下/抬起
press/release
press: (el: WebElement |None = None, x: int |None = None, y: int |None = None, pressure: float |None = None)
一直按下没有抬起动作from appium.webdriver.common.touch_action import TouchActionfrom appium import webdriverdesired_caps = {'platformName':'Android','platformVersion':'7.1.2','deviceName':'127.0.0.1:62001','appPackage':'tv.danmaku.bili','appActivity':'.MainActivityV2','autoAcceptAlerts':True,'noReset':True}driver = webdriver.Remote('http://127.0.0.1:4723/wd/hub',desired_caps)phone_number = driver.find_element(By.ID,'tv.danmaku.bili:id/et_phone_number')TouchAction(driver).press(phone_number).perform()TouchAction(driver).press(phone_number).release().perform()
等待
wait(time) 单位:msfrom appium.webdriver.common.touch_action import TouchActionfrom appium import webdriverdesired_caps = {'platformName':'Android','platformVersion':'7.1.2','deviceName':'127.0.0.1:62001','appPackage':'tv.danmaku.bili','appActivity':'.MainActivityV2','autoAcceptAlerts':True,'noReset':True}driver = webdriver.Remote('http://127.0.0.1:4723/wd/hub',desired_caps)phone_number = driver.find_element(By.ID,'tv.danmaku.bili:id/et_phone_number')TouchAction(driver).press(phone_number).perform()TouchAction(driver).press(phone_number).wait(2000).release().perform()
长按
long_press() == press().wait().release()from appium.webdriver.common.touch_action import TouchActionfrom appium import webdriverdesired_caps = {'platformName':'Android','platformVersion':'7.1.2','deviceName':'127.0.0.1:62001','appPackage':'tv.danmaku.bili','appActivity':'.MainActivityV2','autoAcceptAlerts':True,'noReset':True}driver = webdriver.Remote('http://127.0.0.1:4723/wd/hub',desired_caps)phone_number = driver.find_element(By.ID,'tv.danmaku.bili:id/et_phone_number')TouchAction(driver).press(phone_number).perform()TouchAction(driver).long_press(phone_number,duration=2000).perform()
移动
模拟手势解锁
(el: WebElement | None = None, x: int | None = None, y: int | None = None) -> TouchActionfrom appium.webdriver.common.touch_action import TouchActionfrom appium import webdriverdesired_caps = {'platformName':'Android','platformVersion':'7.1.2','deviceName':'127.0.0.1:62001','appPackage':'tv.danmaku.bili','appActivity':'.MainActivityV2','autoAcceptAlerts':True,'noReset':True}driver = webdriver.Remote('http://127.0.0.1:4723/wd/hub',desired_caps)touch_action.press(x=244,y=856). \move_to(x=721,y=856). \move_to(x=1203,y=846). \release().perform()
获取分辨率和截图
from pathlib import *current_path = Path(__file__).parentdriver.get_windows_size()返回一个字典driver.get_screenshot_as_file(current_path.joinpath('text.png'))
发送键到设备
查找android的keycode码进行模拟操作driver.press_keycode()
操作手机通知栏
#打开通知栏driver.open_notifications()#关闭通知栏,传统的滑动操作driver.press_keycode(4) #发送返回键driver.swipe(500,1680,100,1680)

若有收获,就点个赞吧
0 人点赞
