简介
python3的版本的话pytest框架独立出来,需要pip进行安装,相对比于unittest框架几个优势:
- fixture前置功能
- 用例标记,用例重跑等功能。
- 用例参数化
- 兼容unittest,nose框架
- 可以和allure相结合,生成测试报告
下载安装
在pytest框架中有如下的约束:pip3 install -U pytestpytest --versionpip3 install pytest-rerunfailurespip3 install pytest-covpip3 install pytest-htmlpip3 install importlib-metadata==2.1.1pip3 install pytest-xdist ->并行插件pip3 install pytest-repeat ->循环运行插件pip3 install pytest-assume ->允许pytest测试用例中执行多个失败的断言的插件
所有的单测文件名都需要满足test.py格式或_test.py格式。
在单测文件中,测试类以Test开头,并且不能带有 init 方法(注意:定义class时,需要以T开头,不然pytest是不会去运行该class的)
在单测类中,可以包含一个或多个test开头的函数。
此时,在执行pytest命令时,会自动从当前目录及子目录中寻找符合上述约束的测试函数来执行引用
主函数模式
import pytest # 引入pytest包def test_a(): # test开头的测试函数print("------->test_a")assert 1 # 断言成功def test_b():print("------->test_b")assert 0 # 断言失败if __name__ == '__main__':pytest.main("-s test_abc.py")
命令行模式
pytest ./test_abc.py
常用参数:
| -x | 出现失败就终止 | | —- | —- | | —maxfail=2 | 出现2次失败就终止 | | -k “MyClass and not method” | 只运行与给定字符串表达式匹配的测试用例,运行TestMyClass下test_用例但是不包括method | | -m slow | 只运行被装饰器修饰@pytest.mark.slow的用例 | | -k args | 关键字args:可以是py文件名,也可以是函数名,若py文件名和函数均包含 则需要严格指定 xx.py 以运行py文件 | | -s | 显示标准输出,列如print()语句 | | -v | 详细报告 | | -q | 显示简洁报告 | | -c file | 从file文件上加载配置文件,pytest的配置文件通常放在测试目录下,名称为pytest.ini,命令行运行时会使用该配置文件中的配置. | | —pdb —maxfail=3 | 出现错误3次后直接跳转到pdb调试 | | —lf (—last-failed) | 仅执行上次失败的用例 | | —ff (—failed-first) | 先执行失败的用例,再执行其他用例 | | —nf (—new-first) | 首先从新文件或新修改的用例开始运行测试; | | —sw | 在测试失败时退出,且下一次在测试失败的用例开始测试 | | —reruns num | 指定失败用例重跑的次数 | | —tb=(‘auto’, ‘long’, ‘short’, ‘no’, ‘line’, ‘native’) | 展示错误的详细程度 | | —durations=3 | 按照用例执行的耗时时长展示最长的3个用例 | | —collect-only | 收集将要执行的用例,但是不执行 | | —count=n | 重复执行指定的用例 | | –repeat-scope=session/module/class/function | 可以用来指定重复运行的范围
- function(默认)范围针对每个用例重复执行,再执行下一个用例
- class 以class为用例集合单位,重复执行class里面的用例,在执行下一个
- module 以模块为单位,重复执行模块里面的用例,再执行下一个
- session 重复整个测试会话,即所有收集的测试执行一次,然后所有这些测试再次执行等等
| | -n num | 指定并发运行的进程数 | | 模块名::类名::函数名 | 运行指定的参数 | | allure参数 | | | —html=./report.html | 执行pytest-html生成测试报告 | | —alluredir | 指定allure结果数据保存的目录 |
pdb参数
| p a(变量名) | #打印出当前函数的所有参数和变量 |
|---|---|
| pp a(变量名) | 美化输出 |
| l | #列出错误,并显示发生错误之前、之后的5行代码 |
| l 1,12 | 列出错误,切片式的指定看哪行开始到哪行结束的代码 |
| u | 移动到上一层 |
| d | 移动到下一层 |
| q | 结束退出 |
1. 前置函数
- setup()/teardown()
函数级别,运行一次测试函数会运行一次setup和teardown,不在类中
import pytest"""只对函数用例生效,不在类中setup_functionteardown_function"""class TestClass(object):def setup_class(self):print "setup_class(self):每个类之前执行一次"def teardown_class(self):print "teardown_class(self):每个类之后执行一次"def add(self,a,b):print "这是加法运算"return a+bdef test_01(self):print "正在执行test1"x = "this"assert 'h' in xdef test_add(self):print "正在执行test_add()"assert self.add(3, 4) == 7if __name__=="__main__":pytest.main(["-s","test_function.py"])
- setup_class()/teardown_class()
类级别,在一个测试类只运行一次,不关心测试类里面有多少个测试函数
class TestMethod(object):def setup_class(self):print "setup_class(self):每个类之前执行一次\n"def teardown_class(self):print "teardown_class(self):每个类之后执行一次"def add(self,a,b):print "这是加法运算"return a+bdef test_01(self):print "正在执行test1"x = "this"assert 'h' in xdef test_add(self):print "正在执行test_add()"assert self.add(3, 4) == 7if __name__=="__main__":pytest.main(["-s","test_function.py"])
- setup_method()/teardown_method()
类里面的方法级,每个测试方法前后执行一次
import pytestclass TestMethod(object):def setup_class(self):print "setup_class(self):每个类之前执行一次\n"def teardown_class(self):print "teardown_class(self):每个类之后执行一次"def setup_method(self):print "setup_method(self):在每个方法之前执行"def teardown_method(self):print "teardown_method(self):在每个方法之后执行\n"def add(self,a,b):print "这是加法运算"return a+bdef test_01(self):print "正在执行test1"x = "this"assert 'h' in xdef test_add(self):print "正在执行test_add()"assert self.add(3, 4) == 7if __name__=="__main__":pytest.main(["-s","test_function.py"])
- setup_module/teardown_module
2. 装饰器
fixture修饰器来标记固定的工厂函数,在其他函数,模块,类或整个工程调用它时会被激活并优先执行,通常会被用于完成预置处理和重复操作。
fixture(scope=”function”, params=None, autouse=False, ids=None, name=None)
- scope:被标记方法的作用域
- params:提供的参数数据,供调用标记方法的函数使用
- autouse:是否自动执行,默认为False
- ids:对参数起别名,和param一起使用
- name:给fixture起别名,一旦使用别名,原来的名称就无法再使用,只能使用别名
引用方法
- 通过参数引用,将被标记函数当函数参数传入测试用例中
使用yield来表示之后执行
class Test_ABC:@pytest.fixture()def before(self):print("------->before")yieldprint("------->after")def test_a(self,before): # ️ test_a方法传入了被fixture标识的函数,已变量的形式print("------->test_a")assert 1if __name__ == '__main__':pytest.main("-s test_abc.py")
通过函数引用,使用usefixtures(“函数名”)
import pytest@pytest.fixture() # fixture标记的函数可以应用于测试类外部def before():print("------->before")@pytest.mark.usefixtures("before")class Test_ABC:def setup(self):print("------->setup")def test_a(self):print("------->test_a")assert 1if __name__ == '__main__':pytest.main("-s test_abc.py")
设置为自动运行,autouse=True,同时设置作用域为函数
import pytest@pytest.fixture(scope='function',autouse=True) # 设置为默认运行def before():print("------->before")class Test_ABC:def setup(self):print("------->setup")def test_a(self):print("------->test_a")assert 1if __name__ == '__main__':pytest.main("-s test_abc.py")
fixture函数有返回值可以直接使用 ```python import pytest @pytest.fixture() def need_data(): return 2 # 返回数字2 class Test_ABC: def test_a(self,need_data):
print("------->test_a")assert need_data != 3 # 拿到返回值做一次断言
if name == ‘main‘: pytest.main(“-s test_abc.py”)
5. fixture里面有param也可以直接传入```pythonimport pytest@pytest.fixture(params=[1, 2, 3])def need_data(request): # 传入参数request 系统封装参数return request.param # 取列表中单个值,默认的取值方式class Test_ABC:def test_a(self,need_data):print("------->test_a")assert need_data != 3 # 断言need_data不等于3if __name__ == '__main__':pytest.main("-s test_abc.py")
3. 跳过某一个测试用例
skipif(condition, reason=None)
import pytestclass Test_ABC:def setup_class(self):print("------->setup_class")def teardown_class(self):print("------->teardown_class")def test_a(self):print("------->test_a")assert 1@pytest.mark.skipif(condition=2>1,reason = "跳过该函数") # 跳过测试函数test_bdef test_b(self):print("------->test_b")assert 0if __name__ == '__main__':pytest.main("-s test_abc.py")>>>>------->setup_class------->test_a #只执行了函数test_a.------->teardown_classs # 跳过函数标记
4.预期为失败的用例
xfail(condition=None, reason=None, raises=None, run=True, strict=False)
import pytestclass Test_ABC:def setup_class(self):print("------->setup_class")def teardown_class(self):print("------->teardown_class")def test_a(self):print("------->test_a")assert 1@pytest.mark.xfail(2 > 1, reason="标注为预期失败") # 标记为预期失败函数test_bdef test_b(self):print("------->test_b")assert 0if __name__ == '__main__':pytest.main("-s test_abc.py")>>>>test_abc.py------->setup_class------->test_a.------->test_b------->teardown_classx # 失败标记
5.失败重跑
flaky(reruns=number, reruns_delay=time)
reruns表示重跑次数,reruns_delay表示失败重跑的间隔时间
import pytest@pytest.mark.flaky(reruns=2, reruns_delay=3)def test_case1():print("执行测试用例1")assert 1 + 1 == 3def test_case2():print("执行测试用例2")assert 1 + 3 == 6def test_case3():print("执行测试用例3")assert 1 + 3 == 4if __name__ == '__main__':pytest.main("-s test_abc.py")>>RRFF.
6. 自定义标记名
@pytest.mark.xxx
个人定义,比如某个接口用例为web端的,某个接口用例为APP端的,那么可以区分标记
如果只需要测试web端的,在命令行通过-m参数就可以指定需要执行的用例:
pytest -q -s -m web test_01.py
7.调整测试用例执行顺序
测试用例通常是按照名称顺序执行的,但是在某些情况下需要对测试用例的顺序做出调整,可以使用第三方的工具,在测试方法上加上装饰器
pip3 install pytest-ordering
import pytest@pytest.mark.run(order=1)def test_01():print('test01')@pytest.mark.run(order=2)def test_02():print('test01')@pytest.mark.last #最后一个执行def test_06():print('test01')def test_04():print('test01')def test_05():print('test01')@pytest.mark.run(order=3)def test_03():print('test01')
8、循环执行用例
import pytest@pytest.mark.repeat(5)def test_q8(begin,open_baidu):print("测试用例test_q8")assert 1def test_q9(begin,open_baidu):print("测试用例test_q9")assert 1if __name__=="__main__":pytest.main(["-s","test_q2.py"])>>不用--count参数,只会让test_q8执行5次
用例参数化
parametrize(argnames, argvalues, indirect=False, ids=None, scope=None)
argnames: 参数名,在后续引用的时候名称必须要跟其保持一致
argvalues:参数对应值,类型必须为list
indirect=True是指用test_users数据fixture进行参数化,虽然装饰器写在测试用例上,但是却是对测试用例使用的fixture进行传递数据,这正是indirect单词的意思
当参数为一个时格式:[value]
当参数个数大于一个时,格式为列表,嵌套列表,嵌套元祖,字典列表或者字典元祖:
[(param_value1,param_value2…..),(param_value1,param_value2…..)]
[[param_value1,param_value2…..],[param_value1,param_value2…..]]
[{‘name1’:’value1’},{‘name2’:’value2’}]
参数为N个时,测试方法会运行N次
pytest在执行前会先去做参数初始化,如果获取参数的有问题会报错。
- 一个参数赋予多个值,多次执行 ```python
@pytest.mark.parametrize(“a”,[3,6]) # a参数被赋予两个值,函数会运行两遍 def test_a(self,a): # 参数必须和parametrize里面的参数一致 print(“test data:a=%d”%a) assert a%3 == 0
> 执行结果: test_abc.py test data:a=3 # 运行第一次取值a=3 . test data:a=6 # 运行第二次取值a=6 .
使用内置的mark.xfail标记为失败的用例就不运行了,直接跳过显示xfailed
@pytest.mark.parametrize(“user”,[“18221124104”,pytest.param(“18200000000”,marks=pytest.mark.xfail)]) def test(user): print(user) assert user == “18221124104” > test03.py 18221124104 . 18200000000 x
使用内置的mark.skip标记为跳过的用例就不运行了,直接跳过显示skipped
@pytest.mark.parametrize(“user”,[“18221124104”,pytest.param(“18200000000”,marks=pytest.mark.skip)]) def test(user): print(user) assert user == “18221124104” > test03.py 18221124104 . 18200000000 s ```
多个参数赋予多个值,列表形式
import pytest@pytest.mark.parametrize("a,b",[(1,2),(0,3)]) # 参数a,b均被赋予两个值,函数会运行两遍def test_a(self,a,b): # 参数必须和parametrize里面的参数一致print("test data:a=%d,b=%d"%(a,b))assert a+b == 3#还可以使用函数返回值:def return_test_data():return [(1,2),(0,3)]@pytest.mark.parametrize("a,b",return_test_data()) # 参数a,b均被赋予两个值,函数会运行两遍def test_a(self,a,b): # 参数必须和parametrize里面的参数一致print("test data:a=%d,b=%d"%(a,b))assert a+b == 3>>执行结果:test_abc.pytest data:a=1,b=2 # 运行第一次取值 a=1,b=2.test data:a=0,b=3 # 运行第二次取值 a=0,b=3.
多个参数多个parametrize输入,pytest将默认将参数进行排列组合传递给测试用例
import pytest@pytest.mark.parametrize("param01", [1, 2, 3])@pytest.mark.parametrize("param02", [4,5])@pytest.mark.parametrize("login", test_login, indirect=True)def test_03(login, param01, param02):print "测试数据:%s,%s"%(param01, param02)>>测试数据:1,4测试数据:2,4测试数据:3,4测试数据:1,5测试数据:2,5测试数据:3,5
conftest文件
conftest文件是pytest 框架默认读取的一个配置文件,不需要import,在运行的时候会自动去找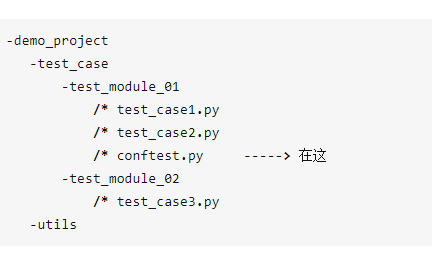

分别执行testcase1.py和testcase2.py , 都输出了demofixture()函数的内容。
再继续,如果testmodule_02模块下的也想用,怎么办?那就把conftest.py再往外提一层,与 test_module_01、test_module_02保持同级即可。
就是这样:
所以需要注意:
1.conftest.py文件的名称是固定的,就叫conftest,不能修改成其他的名称
2.当文件和用例文件在同一个目录下,那么conftest.py作用于整个目录
3.conftest.py文件所在目录中必须存在一个__init.py文件,其中__init.py文件可以为空
4.conftest.py文件不能被其他文件导入
5.所有同目录测试文件运行前都会执行conftest.py文件,相当于一个前置文件
conftest文件实际应用中需要结合fixture来使用,那么fixture中参数scope也适用conftest中fixture的特性,这里再说明一下
1.conftest中fixture的scope参数为session,那么所有的测试文件执行前执行一次
2.conftest中fixture的scope参数为module,那么每一个测试文件执行前都会执行一次conftest文件中的fixture
3.conftest中fixture的scope参数为class,那么每一个测试文件中的测试类执行前都会执行一次conftest文件中的fixture
4.conftest中fixture的scope参数为function,那么所有文件的测试用例执行前都会执行一次conftest文件中的fixture
自定义动态描述
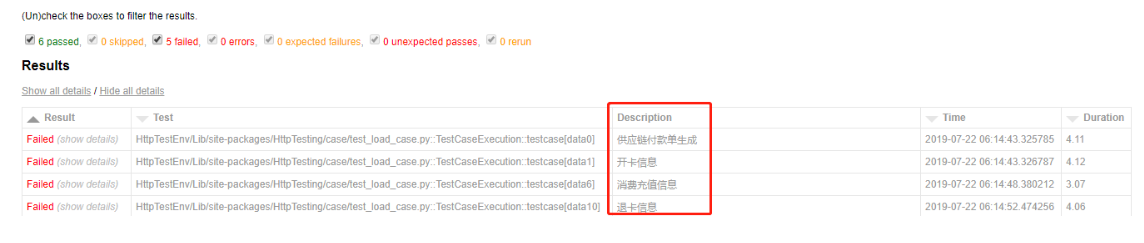
修改confest.py的配置
import pytestfrom py._xmlgen import htmlfrom datetime import datetime"""Results部分在此设置."""@pytest.mark.optionalhookdef pytest_html_results_table_header(cells):cells.insert(2, html.th('Description'))cells.insert(3, html.th('Time', class_='sortable time', col='time'))cells.pop()@pytest.mark.optionalhookdef pytest_html_results_table_row(report, cells):if report.description:cells.insert(2, html.td(report.description))cells.insert(3, html.td(datetime.utcnow(), class_='col-time'))# cells.insert(1,html.td(report.nodeid))cells.pop()@pytest.mark.hookwrapperdef pytest_runtest_makereport(item, call):outcome = yieldreport = outcome.get_result()report.description = str(item.function.__doc__)report.nodeid = report.nodeid.encode("utf-8").decode("unicode_escape")
修改测试用例动态描述部分
pytest-html默认获取的是测试方法的doc属性,也就是,测试函数下的注释 如下的””” “””中的内容.
def test_data(self, request):"""fixture parameters."""
要动态传参doc内容也是可以的.可以通过doc动态修改描述.
- 普通方法: 方法名.doc=’fixture parameters.’
- 实例方法: self.方法名.func.doc=’fixture parameters.’ 实例方法必须加func否则是只读的.
@pytest.mark.parametrize('api_path',get_apipath())def test_sample(api_path):test_sample.__doc__ = 'api:%s 编译检查'%api_path.split('/')[-1]try:print(api_path)subprocess.check_call('make',shell=True,cwd=api_path,universal_newlines=True)time.sleep(2)except Exception:assert Falseelse:assert True

若有收获,就点个赞吧
0 人点赞
