
1. elasticsearch基本操作
docker 安装es 安装elasticsearch:
docker pull elasticsearch:6.8.1 docker run —name elasticsearch6.8.1 -d -e ES_JAVA_OPTS=”-Xms512m -Xmx512m” —net host -e “discovery.type=single-node” -p 9200:9200 -p 9300:9300 elasticsearch:6.8.1 上传ik分词器并解压:unzip elasticsearch-analysis-ik-6.8.1.zip -d ik-analyzer docker cp ./ik-analyzer elasticsearch6.8.1:/usr/share/elasticsearch/plugins docker restart elasticsearch6.8.1 安装kibana:
docker pull kibana:6.8.1 docker run —name kibana6.8.1 -e ELASTICSEARCH_URL=http://172.16.116.100:9200 -p 5601:5601 -d kibana:6.8.1
需要等待一会儿访问:http://172.16.116.100:5601
1.1. 基本概念
Elasticsearch也是基于Lucene的全文检索库,本质也是存储数据,很多概念与MySQL类似的。
对比关系:
索引(indices)----------------------Databases 数据库类型(type)--------------------------Table 数据表文档(Document)----------------------Row 行字段(Field)-------------------------Columns 列
要注意的是:Elasticsearch本身就是分布式的,因此即便你只有一个节点,Elasticsearch默认也会对你的数据进行分片和副本操作,当你向集群添加新数据时,数据也会在新加入的节点中进行平衡。
1.2. 索引操作(indeces)
1.2.1. 查询索引
查看es中有哪些索引库:
GET /_cat/indices?v
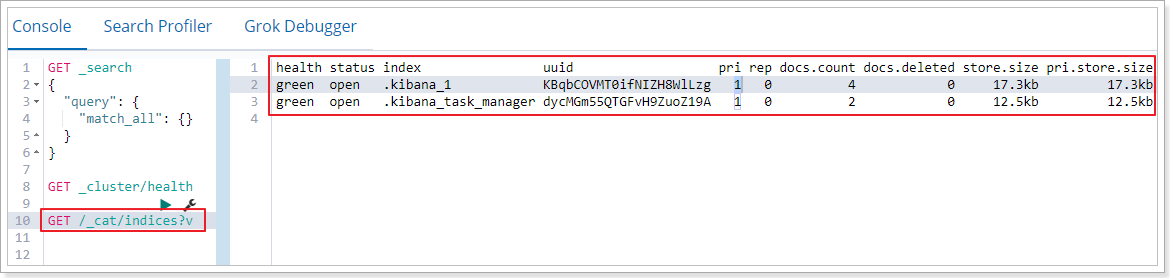
es 中会默认存在一个名为.kibana和.kibana_task_manager的索引
表头的含义
| 字段名 | 含义说明 |
|---|---|
| health | green(集群完整) yellow(单点正常、集群不完整) red(单点不正常) |
| status | 是否能使用 |
| index | 索引名 |
| uuid | 索引统一编号 |
| pri | 主节点几个 |
| rep | 从节点几个 |
| docs.count | 文档数 |
| docs.deleted | 文档被删了多少 |
| store.size | 整体占空间大小 |
| pri.store.size | 主节点占 |
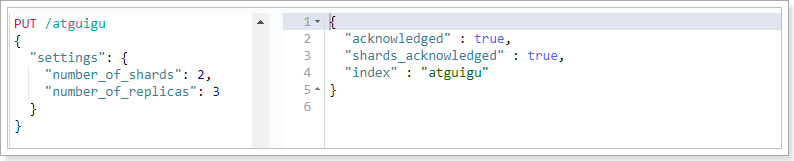
1.2.2. 创建索引
PUT /索引名
参数可选:指定分片及副本,默认分片为3,副本为2。
{
    "settings": {
        "number_of_shards": 3,
        "number_of_replicas": 2
      }
}
演示:说明索引创建成功
再次查询,可以看到刚刚创建的索引:

1.2.3. 查看索引具体信息
GET /索引名
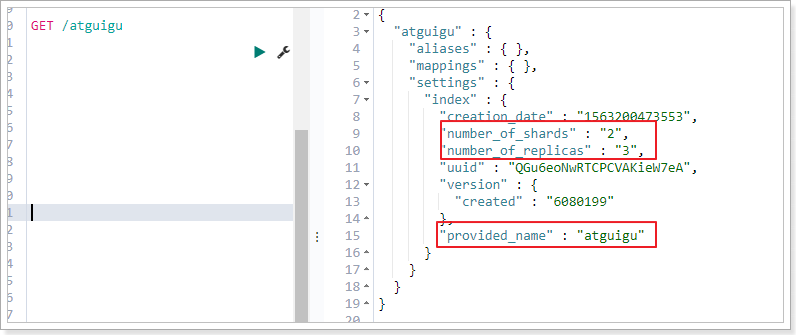
或者,我们可以使用*来查询所有索引具体信息
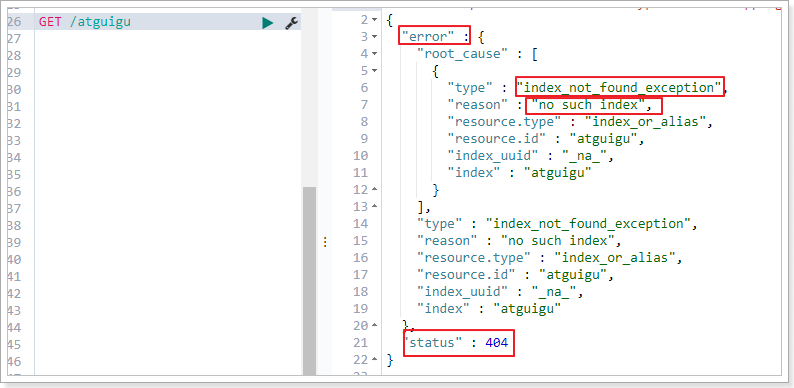
1.2.4. 删除索引
DELETE /索引库名
演示:

查看atguigu:
1.3. 映射配置(_mapping)
索引有了,接下来肯定是添加数据。但是,在添加数据之前必须定义映射。
什么是映射?
映射是定义文档的过程,文档包含哪些字段,这些字段是否保存,是否索引,是否分词等
只有配置清楚,Elasticsearch才会帮我们进行索引库的创建(不一定)
1.3.1. 创建映射字段
PUT /索引库名/_mapping/类型名称
{
  "properties": {
    "字段名": {
      "type": "类型",
      "index": true,
      "store": true,
      "analyzer": "分词器"
    }
  }
}
类型名称:就是前面将的type的概念,类似于数据库中的不同表
字段名:类似于列名,properties下可以指定许多字段。
每个字段可以有很多属性。例如:
- type:类型,可以是text、long、short、date、integer、object等
- index:是否索引,默认为true
- store:是否存储,默认为false
- analyzer:分词器,这里使用ik分词器:
ik_max_word或者ik_smart
示例
发起请求:
PUT atguigu/_mapping/goods
{
  "properties": {
    "title": {
      "type": "text",
      "analyzer": "ik_max_word"
    },
    "images": {
      "type": "keyword",
      "index": "false"
    },
    "price": {
      "type": "long"
    }
  }
}
响应结果:
{
  "acknowledged": true
}
1.3.2. 查看映射关系
语法:
GET /索引库名/_mapping
示例:
GET /atguigu/_mapping
响应:
{
  "atguigu" : {
    "mappings" : {
      "goods" : {
        "properties" : {
          "images" : {
            "type" : "keyword",
            "index" : false
          },
          "price" : {
            "type" : "long"
          },
          "title" : {
            "type" : "text",
            "analyzer" : "ik_max_word"
          }
        }
      }
    }
  }
}
type:字段类型。String(text keyword) Numeric(long integer float double) date boolean
index:是否创建索引
analyzer:分词器(ik_max_word)
1.4. 新增文档(document)
有了索引、类型和映射,就可以对文档做增删改查操作了。
1.4.1. 基本玩法
如果我们想要自己新增的时候指定id,可以这么做:
POST /索引库名/类型/id值
{
    ...
}
演示:
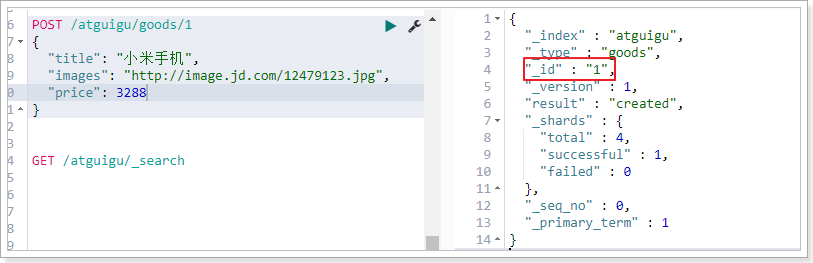
查询得到两条数据:小米手机的id是我们指定的id
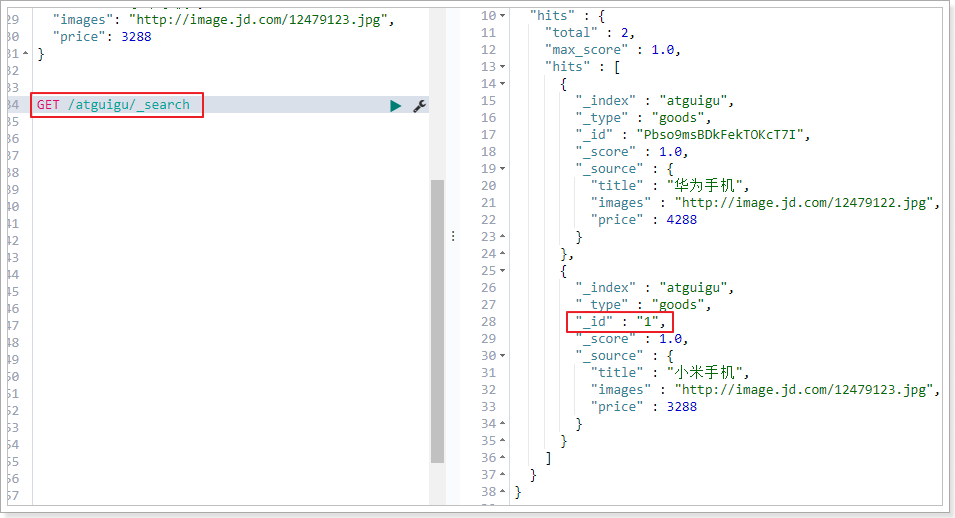
_source:源文档信息,所有的数据都在里面。_id:这条文档的唯一标示,与文档自己的id字段没有关联
1.4.2. 智能判断
事实上Elasticsearch非常智能,你不需要给索引库设置任何mapping映射,它也可以根据你输入的数据来判断类型,动态添加数据映射。
测试一下:
POST /atguigu/goods/2
{
    "title":"小米手机",
    "images":"http://image.jd.com/12479122.jpg",
    "price":2899,
    "stock": 200,
    "saleable":true,
    "attr": {
        "category": "手机",
        "brand": "小米"
    }
}
我们额外添加了stock库存,saleable是否上架,attr其他属性几个字段。
来看结果:GET /atguigu/_search
{
  "took" : 7,
  "timed_out" : false,
  "_shards" : {
    "total" : 2,
    "successful" : 2,
    "skipped" : 0,
    "failed" : 0
  },
  "hits" : {
    "total" : 2,
    "max_score" : 1.0,
    "hits" : [
      {
        "_index" : "atguigu",
        "_type" : "goods",
        "_id" : "1",
        "_score" : 1.0,
        "_source" : {
          "title" : "华为手机",
          "images" : "http://image.jd.com/12479122.jpg",
          "price" : 4288
        }
      },
      {
        "_index" : "atguigu",
        "_type" : "goods",
        "_id" : "2",
        "_score" : 1.0,
        "_source" : {
          "title" : "小米手机",
          "images" : "http://image.jd.com/12479122.jpg",
          "price" : 2899,
          "stock" : 200,
          "saleable" : true,
          "attr" : {
            "category" : "手机",
            "brand" : "小米"
          }
        }
      }
    ]
  }
}
再看下索引库的映射关系: GET /atguigu/_mapping
{
  "atguigu" : {
    "mappings" : {
      "goods" : {
        "properties" : {
          "attr" : {
            "properties" : {
              "brand" : {
                "type" : "text",
                "fields" : {
                  "keyword" : {
                    "type" : "keyword",
                    "ignore_above" : 256
                  }
                }
              },
              "category" : {
                "type" : "text",
                "fields" : {
                  "keyword" : {
                    "type" : "keyword",
                    "ignore_above" : 256
                  }
                }
              }
            }
          },
          "images" : {
            "type" : "keyword",
            "index" : false
          },
          "price" : {
            "type" : "long"
          },
          "saleable" : {
            "type" : "boolean"
          },
          "stock" : {
            "type" : "long"
          },
          "title" : {
            "type" : "text",
            "analyzer" : "ik_max_word"
          }
        }
      }
    }
  }
}
stock,saleable,attr都被成功映射了。
如果是字符串类型的数据,会添加两种类型:text + keyword。如上例中的category 和 brand
1.5. 删除数据
删除使用DELETE请求,同样,需要根据id进行删除:
语法
DELETE /索引库名/类型名/id值
示例:
DELETE /atguigu/goods/3
结果:
{
  "_index" : "atguigu",
  "_type" : "goods",
  "_id" : "3",
  "_version" : 2,
  "result" : "deleted",
  "_shards" : {
    "total" : 4,
    "successful" : 1,
    "failed" : 0
  },
  "_seq_no" : 1,
  "_primary_term" : 1
}
2. 查询
之前已经见识了查询功能
查询所有:
GET /{index}/_search
根据id查询:
GET /{index}/{type}/{id}
除了上述简单查询之外。elasticsearch作为搜索引擎,最复杂最强大的功能就是搜索查询功能。包括:匹配查询、词条查询、模糊查询、组合查询、范围查询、高亮、排序、分页等等查询功能。
基本查询语法如下:
GET /索引库名/_search
{
    "query":{
        "查询类型":{
            "查询条件":"查询条件值"
        }
    }
}
这里的query代表一个查询对象,里面可以有不同的查询属性
- 查询类型:
- 例如:
match_all,match,term,range等等
- 例如:
- 查询条件:查询条件会根据类型的不同,写法也有差异,后面详细讲解
查询结果:
- took:查询花费时间,单位是毫秒
- time_out:是否超时
- _shards:分片信息
- hits:搜索结果总览对象
- total:搜索到的总条数
- max_score:所有结果中文档得分的最高分
- hits:搜索结果的文档对象数组,每个元素是一条搜索到的文档信息
- _index:索引库
- _type:文档类型
- _id:文档id
- _score:文档得分
- _source:文档的源数据
2.1. 数据准备
POST /atguigu/goods/_bulk
{"index":{"_id":1}}
{ "title":"小米手机", "images":"http://image.jd.com/12479122.jpg", "price":1999, "stock": 200, "attr": { "category": "手机", "brand": "小米" } }
{"index":{"_id":2}}
{"title":"超米手机", "images":"http://image.jd.com/12479122.jpg", "price":2999, "stock": 300, "attr": { "category": "手机", "brand": "小米" } }
{"index":{"_id":3}}
{ "title":"小米电视", "images":"http://image.jd.com/12479122.jpg", "price":3999, "stock": 400, "attr": { "category": "电视", "brand": "小米" } }
{"index":{"_id":4}}
{ "title":"小米笔记本", "images":"http://image.jd.com/12479122.jpg", "price":4999, "stock": 200, "attr": { "category": "笔记本", "brand": "小米" } }
{"index":{"_id":5}}
{ "title":"华为手机", "images":"http://image.jd.com/12479122.jpg", "price":3999, "stock": 400, "attr": { "category": "手机", "brand": "华为" } }
{"index":{"_id":6}}
{ "title":"华为笔记本", "images":"http://image.jd.com/12479122.jpg", "price":5999, "stock": 200, "attr": { "category": "笔记本", "brand": "华为" } }
{"index":{"_id":7}}
{ "title":"荣耀手机", "images":"http://image.jd.com/12479122.jpg", "price":2999, "stock": 300, "attr": { "category": "手机", "brand": "华为" } }
{"index":{"_id":8}}
{ "title":"oppo手机", "images":"http://image.jd.com/12479122.jpg", "price":2799, "stock": 400, "attr": { "category": "手机", "brand": "oppo" } }
{"index":{"_id":9}}
{ "title":"vivo手机", "images":"http://image.jd.com/12479122.jpg", "price":2699, "stock": 300, "attr": { "category": "手机", "brand": "vivo" } }
{"index":{"_id":10}}
{ "title":"华为nova手机", "images":"http://image.jd.com/12479122.jpg", "price":2999, "stock": 300, "attr": { "category": "手机", "brand": "华为" } }
2.2. 匹配查询(match)
匹配所有
GET /atguigu/_search
{
    "query":{
        "match_all": {}
    }
}
query:代表查询对象match_all:代表查询所有
条件匹配
GET /atguigu/_search
{
  "query": {
    "match": {
      "title": "小米手机"
    }
  }
}
查询出很多数据,不仅包括小米手机,而且与小米或者手机相关的都会查询到,说明多个词之间是or的关系。
某些情况下,我们需要更精确查找,我们希望这个关系变成and,可以这样做:
GET /atguigu/_search
{
  "query": {
    "match": {
      "title": {
        "query": "小米手机",
        "operator": "and"
      }
    }
  }
}
查询结果:
{
  "took" : 26,
  "timed_out" : false,
  "_shards" : {
    "total" : 2,
    "successful" : 2,
    "skipped" : 0,
    "failed" : 0
  },
  "hits" : {
    "total" : 1,
    "max_score" : 1.7037868,
    "hits" : [
      {
        "_index" : "atguigu",
        "_type" : "goods",
        "_id" : "1",
        "_score" : 1.7037868,
        "_source" : {
          "title" : "小米手机",
          "images" : "http://image.jd.com/12479122.jpg",
          "price" : 1999,
          "stock" : 200,
          "attr" : {
            "category" : "手机",
            "brand" : "小米"
          }
        }
      }
    ]
  }
}
子属性匹配
GET /atguigu/_search
{
  "query": {
    "match": {
      "attr.brand": "小米"
    }
  }
}
多字段匹配
match只能根据一个字段匹配查询,如果要根据多个字段匹配查询可以使用multi_match
GET /atguigu/_search
{
    "query":{
        "multi_match": {
            "query": "小米",
            "fields": ["title", "attr.brand.keyword"]
        }
    }
}
2.3. 词条查询(term)
term 查询被用于精确值 匹配,这些精确值可能是数字、时间、布尔或者那些未分词的字符串。
GET /atguigu/_search
{
    "query":{
        "term":{
            "price": 4999
        }
    }
}
2.4. 范围查询(range)
range 查询找出那些落在指定区间内的数字或者时间
GET /atguigu/_search
{
    "query":{
        "range": {
            "price": {
                "gte":  1000,
                "lt":   3000
            }
        }
    }
}
range查询允许以下字符:
| 操作符 | 说明 |
|---|---|
| gt | 大于 |
| gte | 大于等于 |
| lt | 小于 |
| lte | 小于等于 |
2.5. 布尔组合(bool)
布尔查询又叫组合查询
bool把各种其它查询通过must(与)、must_not(非)、should(或)的方式进行组合
GET /atguigu/_search
{
    "query":{
        "bool":{
            "must": [
              {
                "range": {
                  "price": {
                    "gte": 1000,
                    "lte": 3000
                  }
                }
              },
              {
                "range": {
                  "price": {
                    "gte": 2000,
                    "lte": 4000
                  }
                }
              }
            ]
        }
    }
}
注意:一个组合查询里面只能出现一种组合,不能混用
2.6. 过滤(filter)
所有的查询都会影响到文档的评分及排名。如果我们需要在查询结果中进行过滤,并且不希望过滤条件影响评分,那么就不要把过滤条件作为查询条件来用。而是使用filter方式:
GET /atguigu/_search
{
  "query": {
    "bool": {
      "must": {
        "match": { "title": "小米手机" }
      },
      "filter": {
        "range": {
          "price": { "gt": 2000, "lt": 3000 }
        }
      }
    }
  }
}
注意:filter中还可以再次进行bool组合条件过滤。
2.7. 排序(sort)
sort 可以让我们按照不同的字段进行排序,并且通过order指定排序的方式
GET /atguigu/_search
{
  "query": {
    "match": {
      "title": "小米手机"
    }
  },
  "sort": [
    {
      "price": { "order": "desc" }
    },
    {
      "_score": { "order": "desc"}
    }
  ]
}
2.8. 分页(from/size)
GET /atguigu/_search
{
  "query": {
    "match": {
      "title": "小米手机"
    }
  },
  "from": 2,
  "size": 2
}
from:从那一条开始
size:取多少条
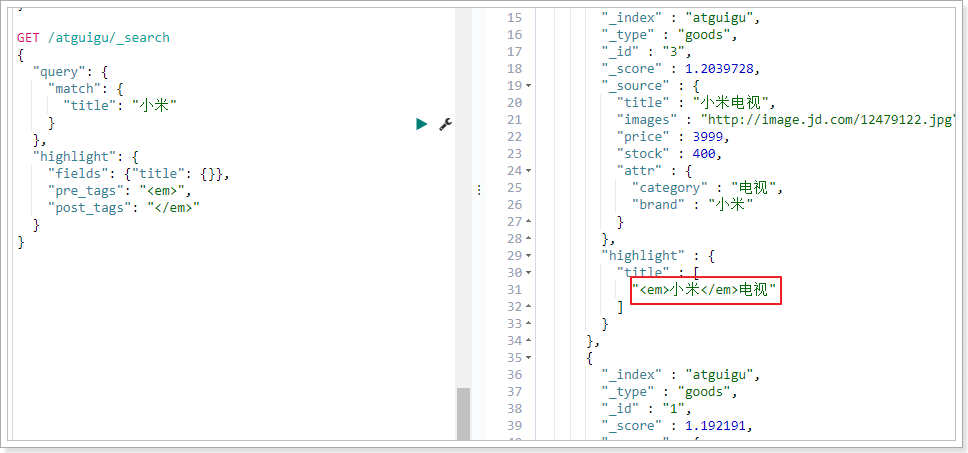
2.9. 高亮(highlight)
查看百度高亮的原理:
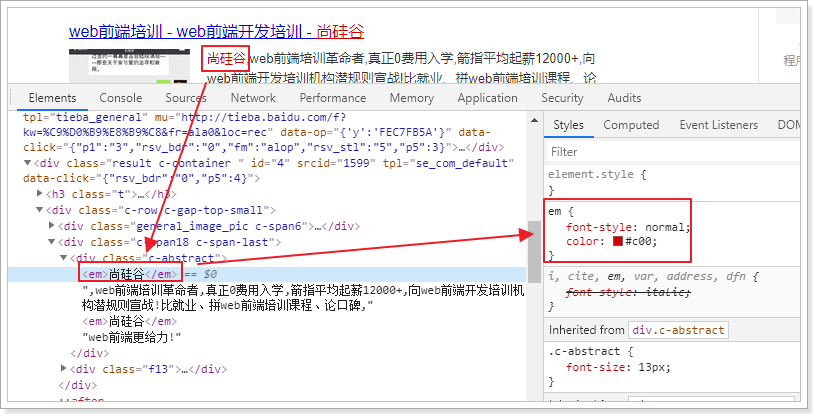
发现:高亮的本质是给关键字添加了标签,在前端再给该标签添加样式即可。
GET /atguigu/_search
{
  "query": {
    "match": {
      "title": "小米"
    }
  },
  "highlight": {
    "fields": {"title": {}},
    "pre_tags": "<em>",
    "post_tags": "</em>"
  }
}
fields:高亮字段
pre_tags:前置标签
post_tags:后置标签
查询结果如下:
2.10. 结果过滤(_source)
默认情况下,elasticsearch在搜索的结果中,会把文档中保存在_source的所有字段都返回。
如果我们只想获取其中的部分字段,可以添加_source的过滤
GET /atguigu/_search
{
  "_source": ["title","price"],
  "query": {
    "term": {
      "price": 2699
    }
  }
}
返回结果,只有两个字段:
{
  "took" : 9,
  "timed_out" : false,
  "_shards" : {
    "total" : 2,
    "successful" : 2,
    "skipped" : 0,
    "failed" : 0
  },
  "hits" : {
    "total" : 1,
    "max_score" : 1.0,
    "hits" : [
      {
        "_index" : "atguigu",
        "_type" : "goods",
        "_id" : "9",
        "_score" : 1.0,
        "_source" : {
          "price" : 2699,
          "title" : "vivo手机"
        }
      }
    ]
  }
}
3. 聚合(aggregations)
聚合可以让我们极其方便的实现对数据的统计、分析。例如:
- 什么品牌的手机最受欢迎?
- 这些手机的平均价格、最高价格、最低价格?
- 这些手机每月的销售情况如何?
实现这些统计功能的比数据库的sql要方便的多,而且查询速度非常快,可以实现实时搜索效果。
3.1 基本概念
Elasticsearch中的聚合,包含多种类型,最常用的两种,一个叫桶,一个叫度量:
桶(bucket)
桶的作用,是按照某种方式对数据进行分组,每一组数据在ES中称为一个桶,例如我们根据国籍对人划分,可以得到中国桶、英国桶,日本桶……或者我们按照年龄段对人进行划分:020,2040等。
Elasticsearch中提供的划分桶的方式有很多:
- Date Histogram Aggregation:根据日期阶梯分组,例如给定阶梯为周,会自动每周分为一组
- Histogram Aggregation:根据数值阶梯分组,与日期类似
- Terms Aggregation:根据词条内容分组,词条内容完全匹配的为一组
- Range Aggregation:数值和日期的范围分组,指定开始和结束,然后按段分组
- ……
bucket aggregations 只负责对数据进行分组,并不进行计算,因此往往bucket中往往会嵌套另一种聚合:metrics aggregations即度量
度量(metrics)
分组完成以后,我们一般会对组中的数据进行聚合运算,例如求平均值、最大、最小、求和等,这些在ES中称为度量
比较常用的一些度量聚合方式:
- Avg Aggregation:求平均值
- Max Aggregation:求最大值
- Min Aggregation:求最小值
- Percentiles Aggregation:求百分比
- Stats Aggregation:同时返回avg、max、min、sum、count等
- Sum Aggregation:求和
- Top hits Aggregation:求前几
- Value Count Aggregation:求总数
- ……
3.2 聚合为桶
首先,我们按照手机的品牌attr.brand.keyword来划分桶
GET /atguigu/_search
{
    "size" : 0,
    "aggs" : {
        "brands" : {
            "terms" : {
              "field" : "attr.brand.keyword"
            }
        }
    }
}
- size: 查询条数,这里设置为0,因为我们不关心搜索到的数据,只关心聚合结果,提高效率
- aggs:声明这是一个聚合查询,是aggregations的缩写
- brands:给这次聚合起一个名字,任意。
- terms:划分桶的方式,这里是根据词条划分
- field:划分桶的字段
- terms:划分桶的方式,这里是根据词条划分
- brands:给这次聚合起一个名字,任意。
结果:
{
  "took" : 124,
  "timed_out" : false,
  "_shards" : {
    "total" : 2,
    "successful" : 2,
    "skipped" : 0,
    "failed" : 0
  },
  "hits" : {
    "total" : 10,
    "max_score" : 0.0,
    "hits" : [ ]
  },
  "aggregations" : {
    "brands" : {
      "doc_count_error_upper_bound" : 0,
      "sum_other_doc_count" : 0,
      "buckets" : [
        {
          "key" : "华为",
          "doc_count" : 4
        },
        {
          "key" : "小米",
          "doc_count" : 4
        },
        {
          "key" : "oppo",
          "doc_count" : 1
        },
        {
          "key" : "vivo",
          "doc_count" : 1
        }
      ]
    }
  }
}
- hits:查询结果为空,因为我们设置了size为0
- aggregations:聚合的结果
- brands:我们定义的聚合名称
- buckets:查找到的桶,每个不同的品牌字段值都会形成一个桶
- key:这个桶对应的品牌字段的值
- doc_count:这个桶中的文档数量
3.3 桶内度量
前面的例子告诉我们每个桶里面的文档数量,这很有用。 但通常,我们的应用需要提供更复杂的文档度量。 例如,每种品牌手机的平均价格是多少?
因此,我们需要告诉Elasticsearch使用哪个字段,使用何种度量方式进行运算,这些信息要嵌套在桶内,度量的运算会基于桶内的文档进行
现在,我们为刚刚的聚合结果添加 求价格平均值的度量:
GET /atguigu/_search
{
    "size" : 0,
    "aggs" : {
        "brands" : {
            "terms" : {
              "field" : "attr.brand.keyword"
            },
            "aggs":{
                "avg_price": {
                   "avg": {
                      "field": "price"
                   }
                }
            }
        }
    }
}
- aggs:我们在上一个aggs(brands)中添加新的aggs。可见
度量也是一个聚合 - avg_price:聚合的名称
- avg:度量的类型,这里是求平均值
- field:度量运算的字段
结果:
{
  "took" : 41,
  "timed_out" : false,
  "_shards" : {
    "total" : 2,
    "successful" : 2,
    "skipped" : 0,
    "failed" : 0
  },
  "hits" : {
    "total" : 10,
    "max_score" : 0.0,
    "hits" : [ ]
  },
  "aggregations" : {
    "brands" : {
      "doc_count_error_upper_bound" : 0,
      "sum_other_doc_count" : 0,
      "buckets" : [
        {
          "key" : "华为",
          "doc_count" : 4,
          "avg_price" : {
            "value" : 3999.0
          }
        },
        {
          "key" : "小米",
          "doc_count" : 4,
          "avg_price" : {
            "value" : 3499.0
          }
        },
        {
          "key" : "oppo",
          "doc_count" : 1,
          "avg_price" : {
            "value" : 2799.0
          }
        },
        {
          "key" : "vivo",
          "doc_count" : 1,
          "avg_price" : {
            "value" : 2699.0
          }
        }
      ]
    }
  }
}
可以看到每个桶中都有自己的avg_price字段,这是度量聚合的结果
3.4 桶内嵌套桶
刚刚的案例中,我们在桶内嵌套度量运算。事实上桶不仅可以嵌套运算, 还可以再嵌套其它桶。也就是说在每个分组中,再分更多组。
比如:我们想统计每个品牌都生产了那些产品,按照attr.category.keyword字段再进行分桶
GET /atguigu/_search
{
    "size" : 0,
    "aggs" : {
        "brands" : {
            "terms" : {
              "field" : "attr.brand.keyword"
            },
            "aggs":{
                "avg_price": {
                   "avg": {
                      "field": "price"
                   }
                },
                "categorys": {
                  "terms": {
                    "field": "attr.category.keyword"
                  }
                }
            }
        }
    }
}
部分结果:
{
  "took" : 19,
  "timed_out" : false,
  "_shards" : {
    "total" : 2,
    "successful" : 2,
    "skipped" : 0,
    "failed" : 0
  },
  "hits" : {
    "total" : 10,
    "max_score" : 0.0,
    "hits" : [ ]
  },
  "aggregations" : {
    "brands" : {
      "doc_count_error_upper_bound" : 0,
      "sum_other_doc_count" : 0,
      "buckets" : [
        {
          "key" : "华为",
          "doc_count" : 4,
          "categorys" : {
            "doc_count_error_upper_bound" : 0,
            "sum_other_doc_count" : 0,
            "buckets" : [
              {
                "key" : "手机",
                "doc_count" : 3
              },
              {
                "key" : "笔记本",
                "doc_count" : 1
              }
            ]
          },
          "avg_price" : {
            "value" : 3999.0
          }
        },
        {
          "key" : "小米",
          "doc_count" : 4,
          "categorys" : {
            "doc_count_error_upper_bound" : 0,
            "sum_other_doc_count" : 0,
            "buckets" : [
              {
                "key" : "手机",
                "doc_count" : 2
              },
              {
                "key" : "电视",
                "doc_count" : 1
              },
              {
                "key" : "笔记本",
                "doc_count" : 1
              }
            ]
          },
          "avg_price" : {
            "value" : 3499.0
          }
        },
        {
          "key" : "oppo",
          "doc_count" : 1,
          "categorys" : {
            "doc_count_error_upper_bound" : 0,
            "sum_other_doc_count" : 0,
            "buckets" : [
              {
                "key" : "手机",
                "doc_count" : 1
              }
            ]
          },
          "avg_price" : {
            "value" : 2799.0
          }
        },
        {
          "key" : "vivo",
          "doc_count" : 1,
          "categorys" : {
            "doc_count_error_upper_bound" : 0,
            "sum_other_doc_count" : 0,
            "buckets" : [
              {
                "key" : "手机",
                "doc_count" : 1
              }
            ]
          },
          "avg_price" : {
            "value" : 2699.0
          }
        }
      ]
    }
  }
}
- 我们可以看到,新的聚合
categorys被嵌套在原来每一个brands的桶中。 - 每个品牌下面都根据
attr.category.keyword字段进行了分组 - 我们能读取到的信息:
- 华为有4中产品
- 华为产品的平均售价是 3999.0美元。
- 其中3种手机产品,1种笔记本产品
4. SpringData-Elasticsearch
目前市面上有两类客户端
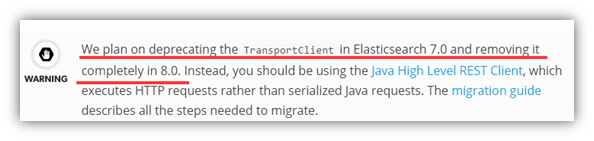
一类是TransportClient 为代表的ES原生客户端,不能执行原生dsl语句必须使用它的Java api方法。
另外一种是以Rest Api为主的missing client,最典型的就是jest。 这种客户端可以直接使用dsl语句拼成的字符串,直接传给服务端,然后返回json字符串再解析。
两种方式各有优劣,但是最近elasticsearch官网,宣布计划在7.0以后的版本中废除TransportClient。以RestClient为主。
由于原生的Elasticsearch客户端API非常麻烦。所以这里直接学习Spring提供的套件:Spring Data Elasticsearch。
spring-data-Elasticsearch 使用之前,必须先确定版本,elasticsearch 对版本的要求比较高。
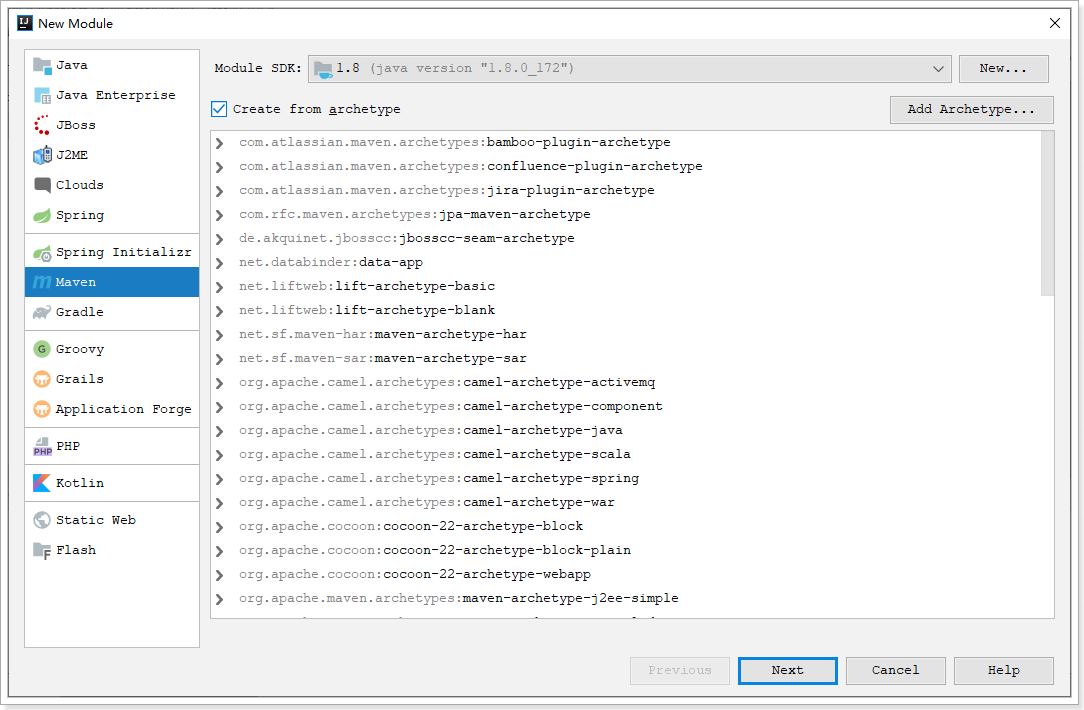
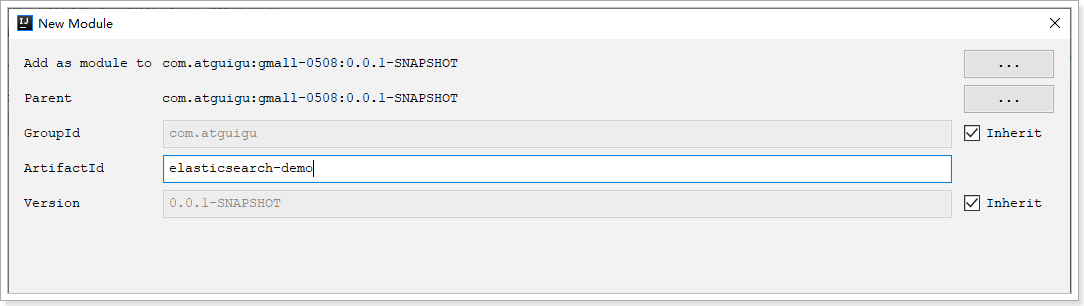
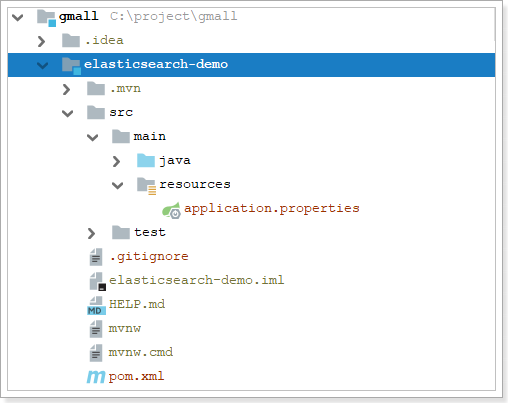
4.1. 创建module
在gmall工程下创建一个模块:
引入依赖:
<dependency>
    <groupId>org.springframework.boot</groupId>
    <artifactId>spring-boot-starter-data-elasticsearch</artifactId>
    <exclusions>
        <exclusion>
            <groupId>org.elasticsearch.client</groupId>
            <artifactId>elasticsearch-rest-high-level-client</artifactId>
        </exclusion>
        <exclusion>
            <groupId>org.elasticsearch.client</groupId>
            <artifactId>transport</artifactId>
        </exclusion>
    </exclusions>
</dependency>
<dependency>
    <groupId>org.elasticsearch.client</groupId>
    <artifactId>elasticsearch-rest-high-level-client</artifactId>
    <version>6.8.1</version>
</dependency>
<dependency>
    <groupId>org.elasticsearch.client</groupId>
    <artifactId>transport</artifactId>
    <version>6.8.1</version>
</dependency>
<dependency>
    <groupId>org.projectlombok</groupId>
    <artifactId>lombok</artifactId>
    <version>1.18.10</version>
</dependency>
在application.properties中添加配置
spring.elasticsearch.rest.uris=http://172.16.116.100:9200
# 集群情况下
spring.elasticsearch.rest.uris[0]=http://172.16.116.100:9200
spring.elasticsearch.rest.uris[1]=http://172.16.116.100:9200
4.2. 实体类
@Data
@AllArgsConstructor
@NoArgsConstructor
@Document(indexName = "user", type = "info", shards = 3, replicas = 2)
public class User {
    @Id
    private Long id;
    @Field(type = FieldType.Text, analyzer = "ik_max_word")
    private String name;
    @Field(type = FieldType.Integer)
    private Integer age;
    @Field(type = FieldType.Keyword)
    private String password;
}
Spring Data通过注解来声明字段的映射属性,有下面的三个注解:
@Document作用在类,标记实体类为文档对象,一般有四个属性- indexName:对应索引库名称
- type:对应在索引库中的类型
- shards:分片数量,默认5
- replicas:副本数量,默认1
@Id作用在成员变量,标记一个字段作为id主键@Field作用在成员变量,标记为文档的字段,并指定字段映射属性:- type:字段类型,取值是枚举:FieldType
- index:是否索引,布尔类型,默认是true
- store:是否存储,布尔类型,默认是false
- analyzer:分词器名称:ik_max_word
4.3. 创建索引及映射
@SpringBootTest
class EsDemoApplicationTests {

    // ElasticsearchTemplate是TransportClient客户端
    // ElasticsearchRestTemplate是RestHighLevel客户端
    @Autowired
    ElasticsearchRestTemplate restTemplate;

    @Test
    void contextLoads() {
        // 创建索引
        this.restTemplate.createIndex(User.class);
        // 创建映射
        this.restTemplate.putMapping(User.class);
        // 删除索引
        // this.restTemplate.deleteIndex("user");
    }

}
4.4. Repository文档操作
Spring Data 的强大之处,就在于你不用写任何DAO处理,自动根据方法名或类的信息进行CRUD操作。只要你定义一个接口,然后继承Repository提供的一些子接口,就能具备各种基本的CRUD功能。
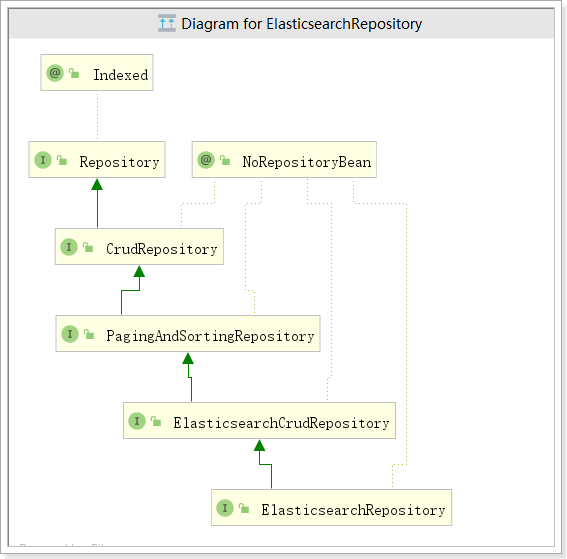
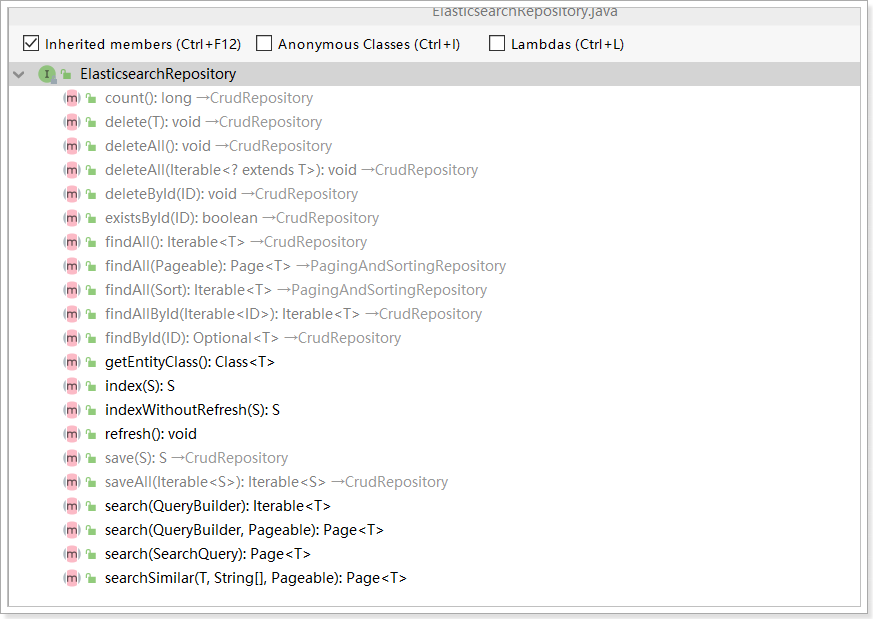
其中ElasticsearchRepository接口功能最强大。该接口的方法包括:
4.4.1. 新增
@Autowired
UserRepository userRepository;

@Test
void testAdd(){
    this.userRepository.save(new User(1l, "zhang3", 20, "123456"));
}
修改和新增是同一个接口,区分的依据就是id,这一点跟我们在页面发起PUT请求是类似的。
4.4.2. 删除
@Test
void testDelete(){
    this.userRepository.deleteById(1l);
}
4.5. 查询
4.5.1. 基本查询
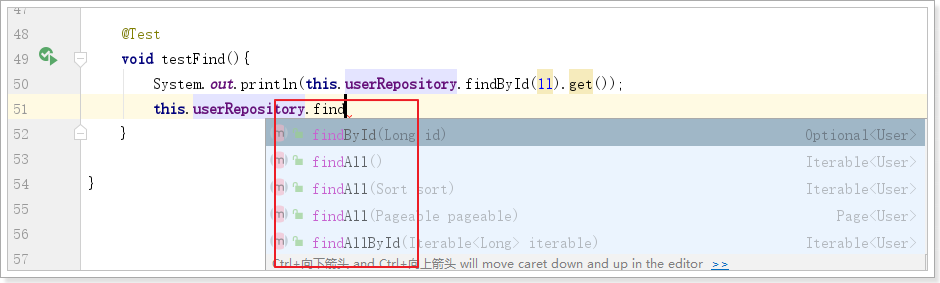
查询一个:
@Test
void testFind(){
    System.out.println(this.userRepository.findById(1l).get());
}
4.5.2. 条件查询
Spring Data 的另一个强大功能,是根据方法名称自动实现功能。
比如:你的方法名叫做:findByTitle,那么它就知道你是根据title查询,然后自动帮你完成,无需写实现类。
当然,方法名称要符合一定的约定:
| Keyword | Sample | Elasticsearch Query String |
|---|---|---|
And |
findByNameAndPrice |
{"bool" : {"must" : [ {"field" : {"name" : "?"}}, {"field" : {"price" : "?"}} ]}} |
Or |
findByNameOrPrice |
{"bool" : {"should" : [ {"field" : {"name" : "?"}}, {"field" : {"price" : "?"}} ]}} |
Is |
findByName |
{"bool" : {"must" : {"field" : {"name" : "?"}}}} |
Not |
findByNameNot |
{"bool" : {"must_not" : {"field" : {"name" : "?"}}}} |
Between |
findByPriceBetween |
{"bool" : {"must" : {"range" : {"price" : {"from" : ?,"to" : ?,"include_lower" : true,"include_upper" : true}}}}} |
LessThanEqual |
findByPriceLessThan |
{"bool" : {"must" : {"range" : {"price" : {"from" : null,"to" : ?,"include_lower" : true,"include_upper" : true}}}}} |
GreaterThanEqual |
findByPriceGreaterThan |
{"bool" : {"must" : {"range" : {"price" : {"from" : ?,"to" : null,"include_lower" : true,"include_upper" : true}}}}} |
Before |
findByPriceBefore |
{"bool" : {"must" : {"range" : {"price" : {"from" : null,"to" : ?,"include_lower" : true,"include_upper" : true}}}}} |
After |
findByPriceAfter |
{"bool" : {"must" : {"range" : {"price" : {"from" : ?,"to" : null,"include_lower" : true,"include_upper" : true}}}}} |
Like |
findByNameLike |
{"bool" : {"must" : {"field" : {"name" : {"query" : "?*","analyze_wildcard" : true}}}}} |
StartingWith |
findByNameStartingWith |
{"bool" : {"must" : {"field" : {"name" : {"query" : "?*","analyze_wildcard" : true}}}}} |
EndingWith |
findByNameEndingWith |
{"bool" : {"must" : {"field" : {"name" : {"query" : "*?","analyze_wildcard" : true}}}}} |
Contains/Containing |
findByNameContaining |
{"bool" : {"must" : {"field" : {"name" : {"query" : "**?**","analyze_wildcard" : true}}}}} |
In |
findByNameIn(Collection<String>names) |
{"bool" : {"must" : {"bool" : {"should" : [ {"field" : {"name" : "?"}}, {"field" : {"name" : "?"}} ]}}}} |
NotIn |
findByNameNotIn(Collection<String>names) |
{"bool" : {"must_not" : {"bool" : {"should" : {"field" : {"name" : "?"}}}}}} |
Near |
findByStoreNear |
Not Supported Yet ! |
True |
findByAvailableTrue |
{"bool" : {"must" : {"field" : {"available" : true}}}} |
False |
findByAvailableFalse |
{"bool" : {"must" : {"field" : {"available" : false}}}} |
OrderBy |
findByAvailableTrueOrderByNameDesc |
{"sort" : [{ "name" : {"order" : "desc"} }],"bool" : {"must" : {"field" : {"available" : true}}}} |
准备一组数据:
@Test
void testAddAll(){
    List<User> users = new ArrayList<>();
    users.add(new User(1l, "柳岩", 18, "123456"));
    users.add(new User(2l, "范冰冰", 19, "123456"));
    users.add(new User(3l, "李冰冰", 20, "123456"));
    users.add(new User(4l, "锋哥", 21, "123456"));
    users.add(new User(5l, "小鹿", 22, "123456"));
    users.add(new User(6l, "韩红", 23, "123456"));
    this.userRepository.saveAll(users);
}
在UserRepository中定义一个方法:
第一种写法:
public interface UserRepository extends ElasticsearchRepository<User, Long> {

    /**
     * 根据年龄区间查询
     * @param age1
     * @param age2
     * @return
     */
    List<User> findByAgeBetween(Integer age1, Integer age2);
}
测试:
@Test
void testFindByAgeBetween(){
    System.out.println(this.userRepository.findByAgeBetween(20, 30));
}
第二种写法:
@Query("{\n" +
       "    \"range\": {\n" +
       "      \"age\": {\n" +
       "        \"gte\": \"?0\",\n" +
       "        \"lte\": \"?1\"\n" +
       "      }\n" +
       "    }\n" +
       "  }")
List<User> findByQuery(Integer age1, Integer age2);
测试:
@Test
void testFindByQuery(){
    System.out.println(this.userRepository.findByQuery(20, 30));
}
4.5.3. 自定义查询
@Test
void testNative(){
    // 初始化自定义查询对象
    NativeSearchQueryBuilder queryBuilder = new NativeSearchQueryBuilder();
    // 构建查询
    queryBuilder.withQuery(QueryBuilders.matchQuery("name", "冰冰"));
    // 排序
    queryBuilder.withSort(SortBuilders.fieldSort("age").order(SortOrder.ASC));
    // 分页
    queryBuilder.withPageable(PageRequest.of(0, 2));
    // 高亮
    queryBuilder.withHighlightBuilder(new HighlightBuilder().field("name").preTags("<em>").postTags("</em>"));
    // 执行查询,获取分页结果集
    Page<User> userPage = this.userRepository.search(queryBuilder.build());
    // 总页数
    System.out.println(userPage.getTotalPages());
    // 总记录数
    System.out.println(userPage.getTotalElements());
    // 当前页数据
    System.out.println(userPage.getContent());
}
NativeSearchQueryBuilder:Spring提供的一个查询条件构建器,帮助构建json格式的请求体
Page<item>:默认是分页查询,因此返回的是一个分页的结果对象,包含属性:
- totalElements:总条数
- totalPages:总页数
- Iterator:迭代器,本身实现了Iterator接口,因此可直接迭代得到当前页的数据

若有收获,就点个赞吧
0 人点赞
