1.组件介绍
官方:https://www.elastic.co/cn/downloads/
1.1Beats
Beats是数据采集的得力工具,将这些采集器安装在服务器中,它们就会把数据汇总到Elasticsearch,如果需要更强大的处理性能,Beats还能将数据输送给Logstash进行转换和解析.
1.2 Beats系列

Packetbeat 搜集网络流量数据
- Topbeat 搜集系统、进程和文件系统级别的CPU和内存使用情况等数据
- Filebeat 搜集文件数据
- Winlogbeat 搜集windows事件数据
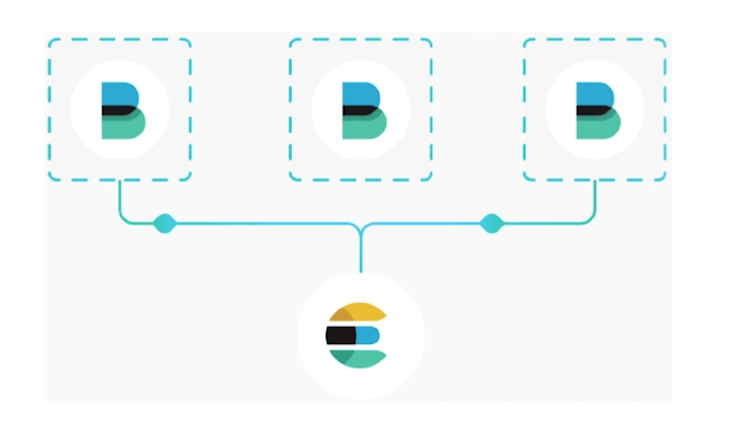
2.Logstash
Logstash 开源的服务端数据处理管道,能够同时从多个来源数据采集,转换数据,将数据发送到存储库中(ES)
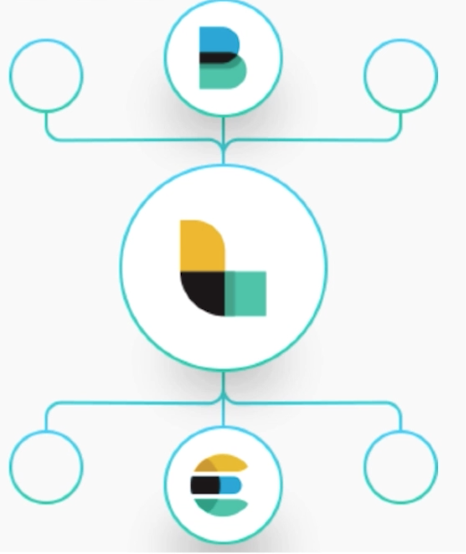
3.Elasticsearch
ES是一个分布式的RESTful风格的搜索和数据分析引擎,能够解决不断涌现的各种用例,作为Elastic stack的
核心,它集中存储数据。

4.Kibana
kibana能够自由的呈现数据。快速定位问题

5.环境准备
es相关服务器
tj1-b2c-b2cback-zkong-log01.kscn   安装ES
tj1-b2c-b2cback-zkong-log02.kscn   安装Kibana

web服务器
root@tj1-b2c-b2cback-zkong-web01    安装filebeat采集器 Nginx代理日志 Nginx业务日志
root@tj1-b2c-b2cback-zkong-web02    安装filebeat采集器 Nginx业务日志

后端服务器
tj1-b2c-b2cback-zkong-app01.kscn    安装filebeat采集器 后端日志采集
tj1-b2c-b2cback-zkong-app02.kscn    安装filebeat采集器
tj1-b2c-b2cback-zkong-app03.kscn    安装filebeat采集器
tj1-b2c-b2cback-zkong-app04.kscn    安装filebeat采集器
tj1-b2c-b2cback-zkong-app05.kscn    安装filebeat采集器


服务器安装JDK
yum install java-1.8.0-openjdk-devel.x86_64
5.1 web服务器安装filebeat
- https://www.elastic.co/guide/en/beats/filebeat/7.15/setup-repositories.html#_yum ```go sudo rpm —import https://packages.elastic.co/GPG-KEY-elasticsearch
cat /etc/yum.repos.d/elk.repo [elastic-7.x] name=Elastic repository for 7.x packages baseurl=https://artifacts.elastic.co/packages/7.x/yum gpgcheck=1 gpgkey=https://artifacts.elastic.co/GPG-KEY-elasticsearch enabled=1 autorefresh=1 type=rpm-md
sudo yum install filebeat
cd /etc/filebeat
cp filebeat.yml{,.bak}
修改filebeat配置文件 vi filebeat.yml
24 enabled: true 29 - /var/log/nginx/proxy_web.log hosts: [“10.38.251.244:9200”] //修改filebeat日志输出地址
curl es服务器9200端口 [root@tj1-b2c-b2cback-zkong-web01 filebeat]# curl 10.38.251.244:9200 { “name” : “es01”, “cluster_name” : “elasticsearch”, “cluster_uuid” : “bs6Wv-XZQSq8jN5bCrWxwA”, “version” : { “number” : “7.15.2”, “build_flavor” : “default”, “build_type” : “rpm”, “build_hash” : “93d5a7f6192e8a1a12e154a2b81bf6fa7309da0c”, “build_date” : “2021-11-04T14:04:42.515624022Z”, “build_snapshot” : false, “lucene_version” : “8.9.0”, “minimum_wire_compatibility_version” : “6.8.0”, “minimum_index_compatibility_version” : “6.0.0-beta1” }, “tagline” : “You Know, for Search” }
<a name="rBgV8"></a>
## 5.2 ES安装
```go
[root@tj1-b2c-b2cback-zkong-log01 ~]# yum -y install elasticsearch
[root@tj1-b2c-b2cback-zkong-log01 ~]# cd /etc/elasticsearch/
[root@tj1-b2c-b2cback-zkong-log01 elasticsearch]# cp elasticsearch.yml{,.bak}
修改配置
node.name: es01
network.host: 0.0.0.0
http.port: 9200
cluster.initial_master_nodes: ["es01"]
5.2.1 NGINX 代理ES
        location /es/ {
                 auth_basic "Please Password!";
                 auth_basic_user_file /etc/nginx/auth_conf;
                 proxy_pass http://10.38.251.244:9200;
                 rewrite ^/es/(.*)$ /$1 break;
                 proxy_http_version 1.1;
                 include proxy_params;
        }
5.3 安装Kibana
yum -y install kibana

[root@tj1-b2c-b2cback-zkong-log02 kibana]# egrep -v "^#|^$" kibana.yml
server.port: 5601
server.host: "0.0.0.0"
server.basePath: "/kibana"
elasticsearch.hosts: ["http://10.38.251.244:9200"]
5.3.1 Nginx代理Kibana
server {
        listen  10000;
        server_name _;

        location /zabbix {

                 proxy_pass   http://10.38.251.111:81;
                 include proxy_params;
        }
        location /kibana/ {
                 auth_basic "Please Password!";
                 auth_basic_user_file /etc/nginx/auth_conf;
                 rewrite ^/kibana/(.*)$ /$1 break;
                 proxy_set_header        Proxy-Connection "Keep-Alive";
                 proxy_set_header X-Real-IP $remote_addr;
                 proxy_set_header Host $host:$server_port;

                 proxy_set_header X-Forwarded-For $proxy_add_x_forwarded_for;
                 proxy_http_version 1.1;
                 proxy_pass http://10.38.251.115:5601/status;
                 include proxy_params;
        }
        location / {
               auth_basic "Please Password!";
               auth_basic_user_file /etc/nginx/auth_conf;

               proxy_pass http://10.38.111.244:8079/;
               include proxy_params;

        }
}
6.filebeat修改索引 采集Nginx日志
filebeat.inputs:
- type: log
  enabled: true
  backoff: "1s"
  tail_files: false
  paths:
    - /var/log/nginx/proxy_web.log
  fields:
    source: proxy
setup.template.name: "web01-Nginx-proxy"
setup.template.pattern: "web_*"
setup.ilm.enabled: auto

setup.ilm.rollover_alias: "web01-Nginx-proxy"
setup.ilm.pattern: "{now/d}"
output.elasticsearch:
  hosts: ["10.38.251.244:9200"]
  index: "web01_%{[fields.source]}-*"
  indices:
    - index: "web01_*%{[beat.version]}-%{+yyyy.MM}"
      when.equals:
        fields:
          source: "proxy"
processors:
  - add_host_metadata: ~
  - add_cloud_metadata: ~
  - add_docker_metadata: ~
  - add_kubernetes_metadata: ~
7.安装Logstash
sudo yum install logstash
ln -s /usr/share/logstash/bin/logstash /bin/
logstash -e 'input { stdin { } } output { stdout {} }'

验证输出

 The stdin plugin is now waiting for input:
{
    "@timestamp" => 2021-12-06T11:32:24.457Z,
          "host" => "tj1-b2c-b2cback-zkong-log02.kscn",
       "message" => "",
      "@version" => "1"
}
{
    "@timestamp" => 2021-12-06T11:32:24.473Z,
          "host" => "tj1-b2c-b2cback-zkong-log02.kscn",
       "message" => "",
      "@version" => "1"
}

若有收获,就点个赞吧
0 人点赞
