maven 的依赖范围
- compile:编译依赖范围。如果没有指定,就会默认使用该依赖范围。使用此依赖范围的Maven依赖,对于编译、测试、运行三种classpath都有效。典型的例子是spring-core,在编译、测试和运行的时候都需要使用该依赖。
- test:测试依赖范围。使用此依赖范围的Maven依赖,只对于测试classpath有效,比如 JUnit。
- provided:已提供依赖范围。使用此依赖范围的Maven依赖,对于编译和测试class-path有效,但在运行时无效。典型的例子是servlet-api,编译和测试项目的时候需要该依赖,但在运行项目的时候,由于容器已经提供,就不需要Maven重复地引入一遍。
- runtime:运行时依赖范围。使用此依赖范围的Maven依赖,对于测试和运行class-path有效,但在编译主代码时无效。典型的例子是JDBC驱动实现,项目主代码的编译只需要JDK提供的JDBC接口,只有在执行测试或者运行项目的时候才需要实现上述接口的具体JDBC驱动。
- system:系统依赖范围。该依赖与三种classpath的关系,和provided依赖范围完全一致。但是,使用system范围的依赖时必须通过systemPath元素显式地指定依赖文件的路径。由于此类依赖不是通过Maven仓库解析的,而且往往与本机系统绑定,可能造成构建的不可移植,因此应该谨慎使用。
- import
约定优于配置
Maven 提倡 “约定优于配置”(Convention Over Configuration),源码目录为 src/main/java,编译输出目录为 target/classes/,打包方式为 jar,包输出目录为 target/ 。
超级 pom
对于 maven3,超级 pom 在 $MAVEN_HOME/lib/maven-modal-builder-x.x.x.jar 中的 org/apache/maven/modal/pom-4.0.0.xml 路径下。
<!-- START SNIPPET: superpom --><project><modelVersion>4.0.0</modelVersion><!-- 关于仓库的定义 --><repositories><repository><id>central</id><name>Central Repository</name><url>https://repo.maven.apache.org/maven2</url><layout>default</layout><snapshots><enabled>false</enabled></snapshots></repository></repositories><!-- 插件仓库的定义 --><pluginRepositories><pluginRepository><id>central</id><name>Central Repository</name><url>https://repo.maven.apache.org/maven2</url><layout>default</layout><snapshots><enabled>false</enabled></snapshots><releases><updatePolicy>never</updatePolicy></releases></pluginRepository></pluginRepositories><!-- 项目结构的定义 --><build><directory>${project.basedir}/target</directory><outputDirectory>${project.build.directory}/classes</outputDirectory><finalName>${project.artifactId}-${project.version}</finalName><testOutputDirectory>${project.build.directory}/test-classes</testOutputDirectory><sourceDirectory>${project.basedir}/src/main/java</sourceDirectory><scriptSourceDirectory>${project.basedir}/src/main/scripts</scriptSourceDirectory><testSourceDirectory>${project.basedir}/src/test/java</testSourceDirectory><resources><resource><directory>${project.basedir}/src/main/resources</directory></resource></resources><testResources><testResource><directory>${project.basedir}/src/test/resources</directory></testResource></testResources><!-- 定义插件的版本 --><pluginManagement><!-- NOTE: These plugins will be removed from future versions of the super POM --><!-- They are kept for the moment as they are very unlikely to conflict with lifecycle mappings (MNG-4453) --><plugins><plugin><artifactId>maven-antrun-plugin</artifactId><version>1.3</version></plugin><plugin><artifactId>maven-assembly-plugin</artifactId><version>2.2-beta-5</version></plugin><plugin><artifactId>maven-dependency-plugin</artifactId><version>2.8</version></plugin><plugin><artifactId>maven-release-plugin</artifactId><version>2.5.3</version></plugin></plugins></pluginManagement></build><reporting><outputDirectory>${project.build.directory}/site</outputDirectory></reporting><profiles><!-- NOTE: The release profile will be removed from future versions of the super POM --><profile><id>release-profile</id><activation><property><name>performRelease</name><value>true</value></property></activation><build><plugins><plugin><inherited>true</inherited><artifactId>maven-source-plugin</artifactId><executions><execution><id>attach-sources</id><goals><goal>jar-no-fork</goal></goals></execution></executions></plugin><plugin><!--inherited标识该插件配置可以被子 POM 继承--><inherited>true</inherited><artifactId>maven-javadoc-plugin</artifactId><executions><execution><id>attach-javadocs</id><goals><goal>jar</goal></goals></execution></executions></plugin><plugin><inherited>true</inherited><artifactId>maven-deploy-plugin</artifactId><configuration><updateReleaseInfo>true</updateReleaseInfo></configuration></plugin></plugins></build></profile></profiles></project><!-- END SNIPPET: superpom -->
在 performRelease 为 true 的情况下,会激活 release-profile,会打包源码和 javadoc,比如:
mvn clean install -DperformRelease=true
maven 有一个 Effective POM 的概念,它表示一个合并整个继承结构所有信息的 POM。假设项目 A 继承自项目 B,B又隐式继承自超级 POM,那么 A 的 Effective POM 就包含了所有 A、B 以及超级 POM 的配置。
mvn help:effective-pom
仓库搜索服务
Nexus 是当前最流行的开源 Maven 仓库管理软件,https://repository.sonatype.org
https://mvnrepository.com
maven 目录
conf:该目录包含了一个非常重要的文件settings.xml。直接修改该文件,就能在机器上全局地定制Maven的行为。一般情况下,我们更偏向于复制该文件至~/.m2/目录下(~表示用户目录),然后修改该文件,在用户范围定制Maven的行为。
推荐使用用户范围的settings.xml,主要是为了避免无意识地影响到系统中的其他用户。
除了影响范围这一因素,配置用户范围settings.xml文件还便于Maven升级。直接修改conf目录下的settings.xml会导致Maven升级不便,每次升级到新版本的Maven,都需要复制settings.xml文件。如果使用~/.m2目录下的settings.xml,就不会影响到Maven安装文件,升级时就不需要触动settings.xml文件。
maven-archetype-plugin 生成项目的骨架
mvn clean install 使用 install 插件将文件复制到本地仓库中。
maven 配置
<!-- localRepository| The path to the local repository maven will use to store artifacts.|| Default: ${user.home}/.m2/repository--><localRepository>/path/to/local/repo</localRepository><!--配置访问远程仓库的用户名和密码--><servers><server><id>deploymentRepo</id><username>repouser</username><password>repopwd</password></server></servers><!-- 配置仓库镜像,所有访问中央仓库的,都访问到该地址 --><!-- mirrorOf 还可以配置 * ,表示该配置是所有 maven 仓库的镜像 --><mirrors><mirror><id>nexus-aliyun</id><mirrorOf>central</mirrorOf><name>Nexus aliyun</name><url>https://maven.aliyun.com/repository/public</url></mirror></mirrors><profiles><profile><id>aliyun-profile</id><repositories><repository><id>aliyunrepo</id><url>https://maven.aliyun.com/repository/public</url></repository></repositories></profile></profiles><activeProfiles><!-- <activeProfile>pic</activeProfile> --><activeProfile>aliyun-profile</activeProfile></activeProfiles>
repositories 仓库地址也可以配置在项目的 pom 中,但是 server 的用户名和密码需要配置在 settings.xml 中。
<project><repositories><repository><id>...</id><url>...</url></repository></repositories></project
部署至远程仓库,仓库的用户名和密码配置在 settings.xml 中,mvn clean deploy 命令部署:
<project><distributionManagement><repository><id>project-release</id><name>project release repository</name><url>....</url></repository><snapshotRepository><id>snapshot-release</id><name>project snapshot release</name><url>....</url></snapshotRepository></distributionManagement></project
快照版本发布后,maven 会在快照版本后面加上时间戳。其他依赖该快照版本构建的时候,就会拉取最新的快照依赖。但如果依赖的是稳定版本,如果本地有的话,就不会重新拉取。
插件
插件仓库
Maven 超级 POM 中插件仓库的配置:
<!-- 插件仓库的定义 --><pluginRepositories><pluginRepository><id>central</id><name>Central Repository</name><url>https://repo.maven.apache.org/maven2</url><layout>default</layout><snapshots><enabled>false</enabled></snapshots><releases><updatePolicy>never</updatePolicy></releases></pluginRepository></pluginRepositories>
插件默认的 groupId 是 org.apache.maven.pulgins
在用户没有提供插件版本的情况下,maven 会自动解析插件版本。
可以在 settings.xml 中配置自己的插件仓库元数据:
<settings><pluginGruops><pluginGroup>com.your.plugins</pluginGroup></pluginGroups></settings>
查看插件的使用
# 也可以不加 -Ddetail,就只返回概要信息$ mvn help:describe -Dplugin=org.apache.maven.plugins:maven-source-plugin:3.2.1 -Ddetail$ mvn help:describe -Dplugin=org.springframework.boot:spring-boot-maven-plugin -Ddetail# 直接只看具体的目标$ mvn help:describe -Dplugin=org.apache.maven.plugins:maven-compiler-plugin -Dgoal=compile# 可以使用插件目标前缀替换坐标(Goal prefix)$ mvn help:describe -Dplugin=compiler -Dgoal=compile#Call mvn surefire:help -Ddetail=true -Dgoal=<goal-name> to display parameter details.
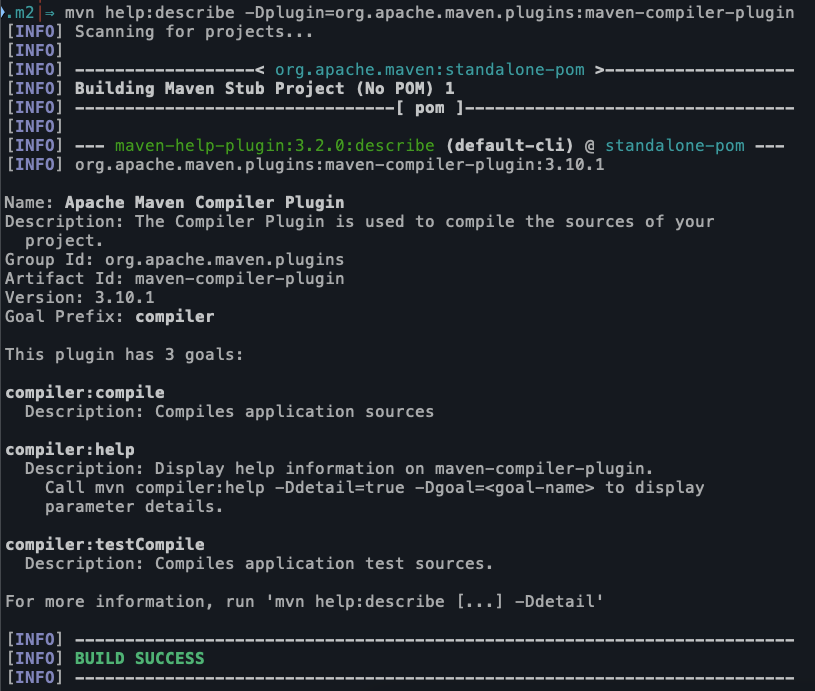
help:describe 的完整格式是 mvn org.apache.maven.plugins:maven-help-plugin:2.1:describe -Dplugin=compiler
help 是 maven-help-plugin 的目标前缀,dependency 是 maven-dependency-plugin 的前缀,使用它们就可以找到对应的 artifactId。
然后再根据默认的 groupId 和 version 就可以获取到对应的插件。
mvn help:system该命令会打印出所有的Java系统属性和环境变量,这些信息对我们日常的编程工作很有帮助。
生命周期
Maven 的生命周期都是由插件来完成。
Maven 有三套相互独立的生命周期,分别是 clean、default、site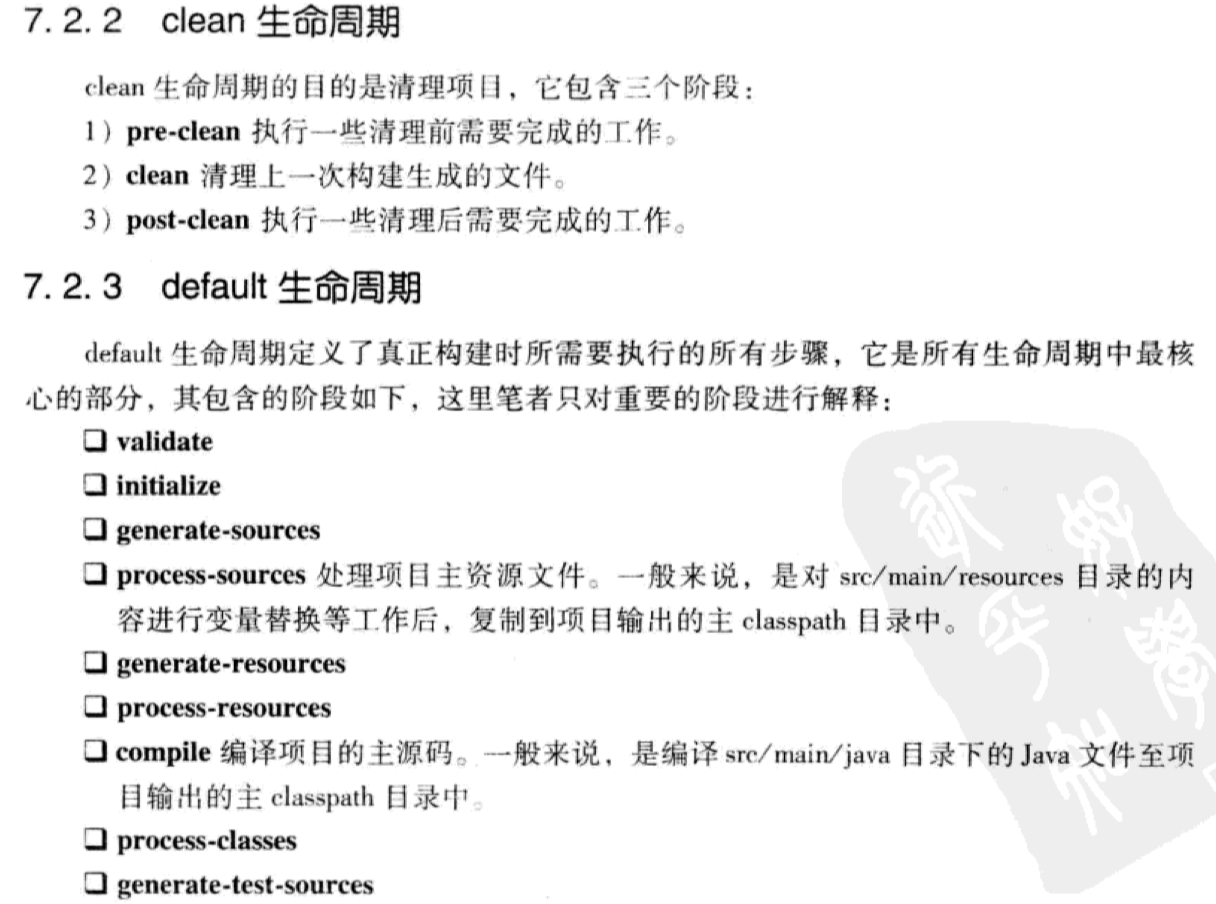
Maven 的生命周期和插件相互绑定。
clean 生命周期阶段与插件目标的绑定关系:
| 生命周期阶段 | 插件目标 |
|---|---|
| pre-clean | maven-clean-plugin:clean |
| clean | |
| post-clean |
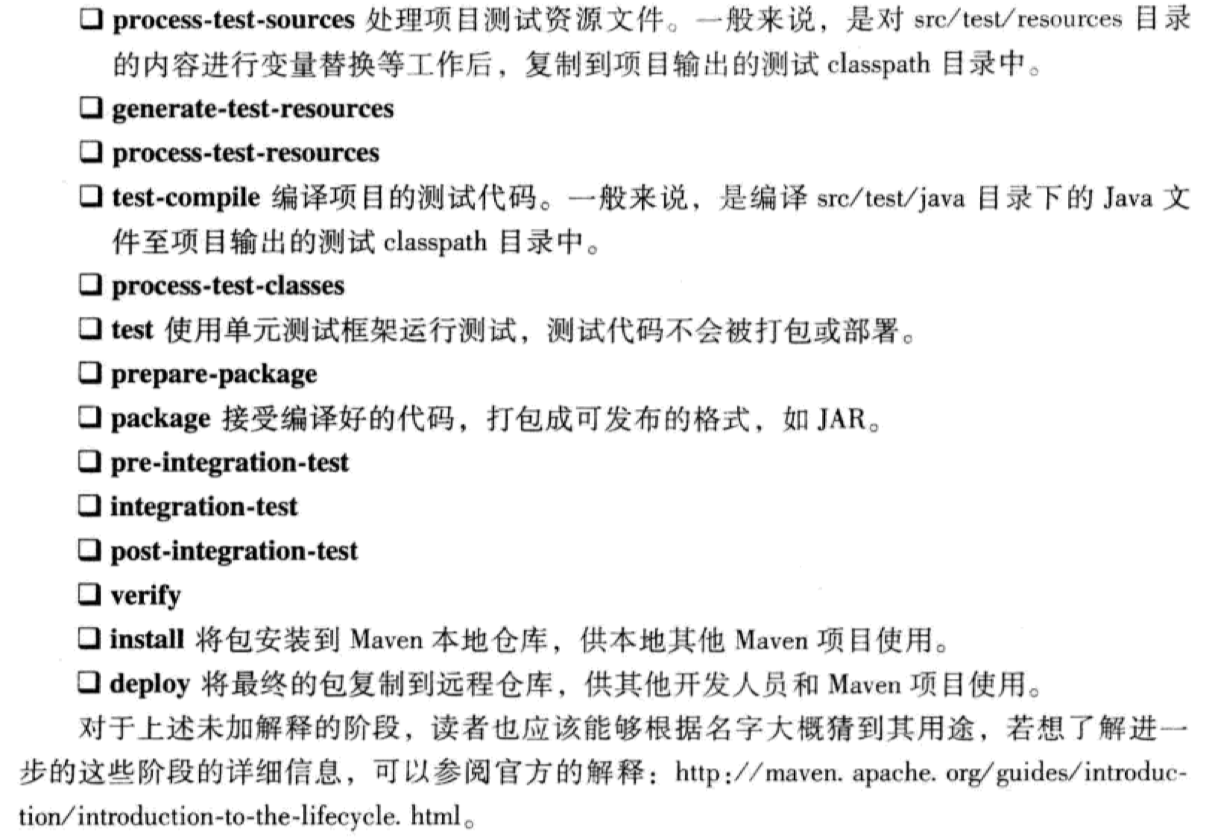
default 生命周期还有很多其他阶段,默认它们没有绑定任何插件,因此也没有任何实际行为。
冒号前面是插件前缀,冒号后面是该插件的目标。
default 生命周期的内置插件绑定关系及具体任务(打包类型:jar):
| 生命周期阶段 | 插件目标 | 执行任务 |
|---|---|---|
| process-resources | maven-resources-plugin:resources | 复制主资源文件至主输出目录 |
| compile | maven-compile-plugin:compile | 编译主代码至输出目录 |
| process-test-resources | maven-resources-plugin:testResources | 复制测试资源文件至测试输出目录 |
| test-compile | maven-compile-plugin:testCompile | 编译测试代码至测试输出目录 |
| test | maven-surefire-plugin:test | 执行测试用例 |
| package | maven-jar-plugin:jar | 创建项目 jar 包 |
| install | maven-install-plugin:install | 将项目输出构件安装到本地仓库 |
| deploy | maven-deploy-plugin:deploy | 将项目输出构件部署到远程仓库 |
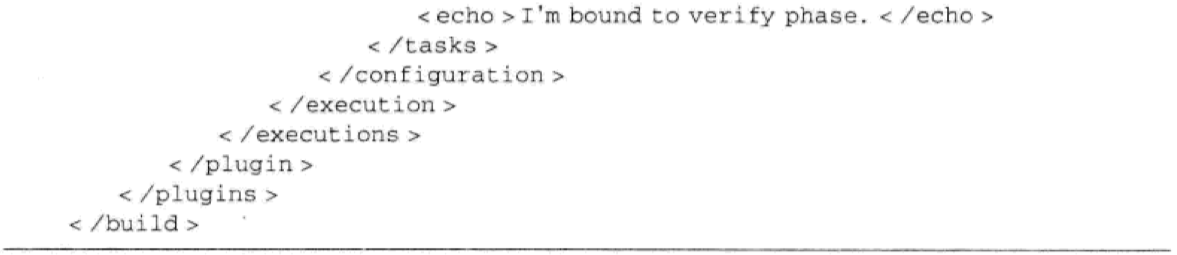
自定义绑定生命周期
<build><plugins><plugin><groupId>org.springframework.boot</groupId><artifactId>spring-boot-maven-plugin</artifactId></plugin><plugin><!--如果是 maven 的官方插件,groupId 可以省略 --><groupId>org.apache.maven.plugins</groupId><artifactId>maven-source-plugin</artifactId><version>3.2.1</version><executions><execution><id>attach-sources</id><!-- 可以省略 phase,因为插件的每个目标都是默认绑定的生命周期 --><phase>verify</phase><goals><goal>jar-no-fork</goal></goals></execution></executions></plugin></plugins></build>
很多插件目标的参数都支持从命令行配置,用户可以在 maven 命令中使用 -D 参数,来配置插件目标的参数。
比如 maven-surefire-plugin 提供了一个 maven.test.skip 参数,当为 true 的时候,可以跳过执行测试:
mvn install -Dmaven.test.skip=true 或者 mvn install -DskipTests
在 POM 中对插件进行全局配置,这样所有基于该插件的任务,都会使用这些配置。
<plugin><groupId>org.apache.maven.plugins</groupId><artifactId>maven-compiler-plugin</artifactId><version>3.10.0</version><configuration><source>1.8</source><target>1.8</target></configuration></plugin>
还可以为某个插件任务配置特定的参数。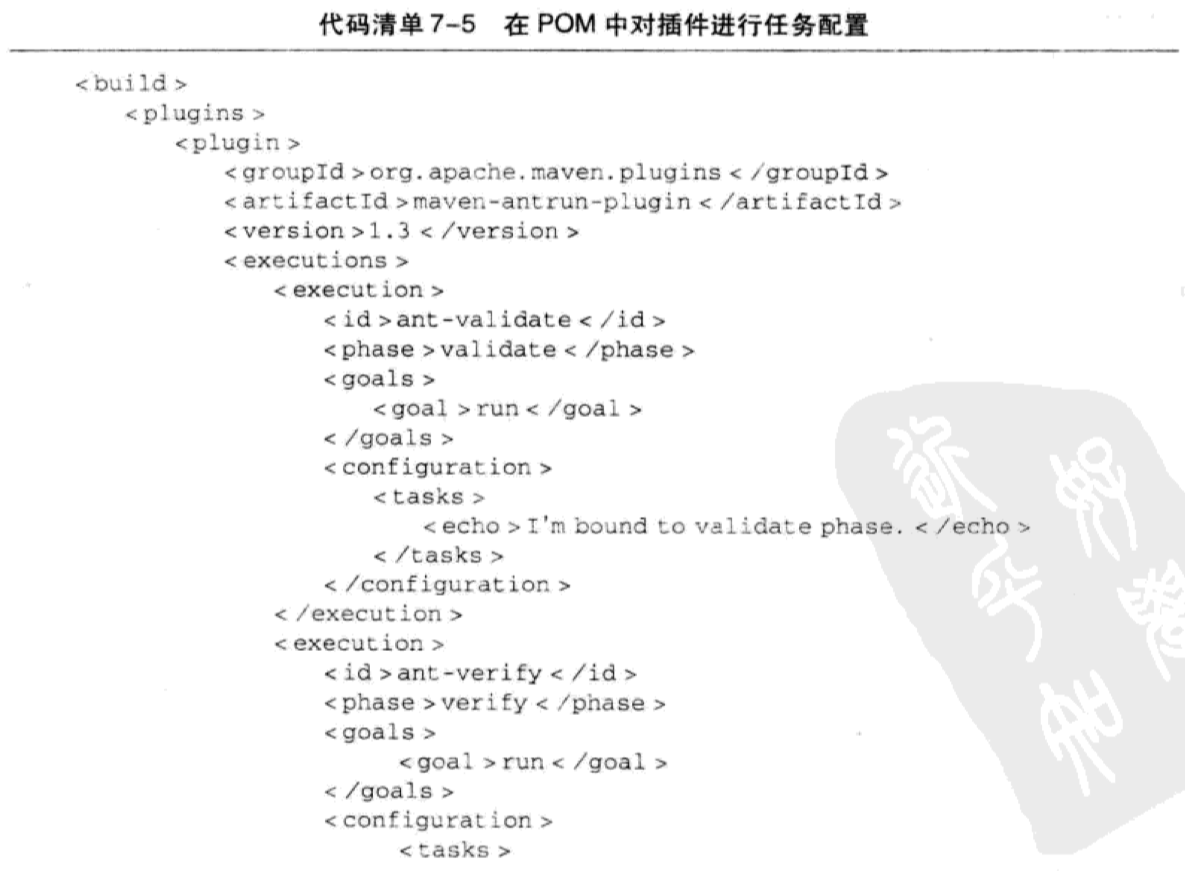
模块聚合及继承
聚合
为了方便快速构建项目。
<modelVersion>4.0.0</modelVersion><groupId>com.xiaocan</groupId><artifactId>account-aggregator</artifactId><!-- 注意聚合多个模块的pom配置 --><packaging>pom</packaging><version>1.0-SNAPSHOT</version><modules><module>account-email</module><module>account-persist</module><module>account-parent</module></modules>
继承
为了消除重复的配置。
<modelVersion>4.0.0</modelVersion><groupId>com.xiaocan</groupId><artifactId>account-parent</artifactId><packaging>pom</packaging><version>1.0-SNAPSHOT</version><properties><java.version>1.8</java.version><spring.version>5.3</spring.version></properties><!--在 dependencyManagement 元素下的依赖生命不会引入实际的依赖--><dependencyManagement><dependencies><dependency><groupId>org.springframework</groupId><artifactId>spring-core</artifactId><version>${spring.version}</version></dependency><dependency><groupId></groupId><artifactId></artifactId></dependency></dependencies></dependencyManagement><!-- 使用 pluginManagement 插件管理 --><build><pluginManagement><plugins><plugin><groupId>org.apache.maven.plugins</groupId><artifactId>maven-source-plugin</artifactId><version>3.2.1</version><executions><execution><id>attach-sources</id><phase>verify</phase><goals><goal>jar-no-fork</goal></goals></execution></executions></plugin></plugins></pluginManagement></build>
其他模块继承它:
<parent><groupId>com.xiaocan</groupId><artifactId>account-parent</artifactId><version>1.0-SNAPSHOT</version><!-- 如果 account-parent 位于它的上一层目录,可以省略 --><relativePath>../account-parent/pom.xml</relativePath></parent><!--groupId 和 version 继承自父模块--><artifactId>account-email</artifactId><name>Account Email</name><dependencies><dependency><groupId>org.springframework</groupId><artifactId>spring-core</artifactId><!-- 不用声明版本号,继承自父模块--></dependency></dependencies><!-- 子模块配置 plugin --><plugins><plugin><groupId>org.apache.maven.plugins</groupId><artifactId>maven-source-plugin</artifactId></plugin></plugins>
import 的依赖范围,在 dependencyManagement 元素下才有效果,使用该范围的的依赖通常指向一个 POM,作用是将目标 POM 的 dependencyManagement 配置导入到当前 POM 的 dependencyManagement 元素中。
<dependencyManagement><dependencies><dependency><groupId>com.xiaocan</groupId><artifactId>account-parent</artifactId><version>1.0-SNAPSHOT</version><type>pom</type><scope>import</scope></dependency></dependencies></dependencyManagement>
聚合和继承目的不同,但是可以组合起来使用,即在一个 pom 中既声明 module,也使用 dependencyManagement 管理依赖。
构建指定模块
正常情况下,模块的构建顺序是:
account aggregator
account parent
account email
account persist
-am,—also-mark 同时构建所列模块的依赖模块
-amd,-also-mak-dependents 同时构建依赖于所列模块的模块
-pl,—projects
-rf,—resume-from
$ mvn clean install -pl account-email,account-persistaccount emailaccount persist$ mvn clean install -pl account-email -amaccount parentaccount email$ mvn clean install -pl account-parent -amdaccount parentaccount emailaccount persist$ mvn clean install -rf account-emailaccount emailaccount persist$ mvn clean install -pl account-parent -amd -rf account-emailaccount emailaccount persist
maven-surefire-plugin
测试范围
surefire 的 test 目标会自动执行测试源码路径(src/test/java)下所有符合一组命令模式的测试类:
- */Test.java ,任何子目录下所有命名以 Test 开头的 java 类。
- */Test.java,任何子目录下所有命名以 Test 以为的 java 类。
- */TestCase.java
<plugin><groupId>org.apache.maven.plugins</groupId><artifactId>maven-surefire-plugin</artifactId><version>3.0.0-M7</version><configuration><includes><include>**/*Tests.java</include></includes><excludes><exclude>**/TempDaoTest.java</exclude></excludes></configuration></plugin>
跳过测试
mvn package -DskipTests
或使用 xml 配置<plugin><groupId>org.apache.maven.plugins</groupId><artifactId>maven-surefire-plugin</artifactId><version>3.0.0-M7</version><configuration><skipTests>true</skipTests></configuration></plugin>
同时跳过测试编译和测试运行:mvn package -Dmaven.test.skip=true (maven-compiler-plugin 的 testCompile 和 maven-surefire-plugin 的 test 都提供了参数 skip 来跳过,这个参数就是 maven.test.skip)
使用 xml 配置:
<plugin><groupId>org.apache.maven.plugins</groupId><artifactId>maven-surefire-plugin</artifactId><version>3.0.0-M7</version><configuration><skip>true</skip></configuration></plugin><plugin><groupId>org.apache.maven.plugins</groupId><artifactId>maven-compiler-plugin</artifactId><version>3.10.1</version><configuration><skip>true</skip></configuration></plugin>
指定要运行的测试用例:
mvn test -Dtest=RandomGeneratorTest
mvn test -Dtest=Random*Test
mvn test -Dtest=RandomGeneratorTest,AccountCaptchaServiceTest
测试报告
maven-surefire-plugin 会在项目的 target/surefire-reports 目录下生成两种格式的报告:
- 简单文本格式;
- 与 JUnit 兼容的 xml 格式
使用 cobertura-maven-plugin 插件获取测试覆盖率
mvn cobertura:cobertura
在 target/site/cobertura/ 下的 index.html 文件就是测试覆盖率报告。
重用测试代码
默认的打包没有测试代码。可以通过 maven-jar-plugin 配置将测试类打包:
<plugin><groupId>org.apache.maven.plugins</groupId><artifactId>maven-jar-plugin</artifactId><version>3.2.2</version><executions><execution><goals><goal>test-jar</goal></goals></execution></executions></plugin>
maven-jar-plugin 有两个目标,分别是 jar 和 test-jar,前者通过 Maven 的内置绑定在 default 生命周期的 package 阶段运行,对项目主代码进行打包,后者没有内置绑定,需要显式声明该目标来打包测试代码。
其他项目依赖该测试代码:
<dependency><groupId>***</groupId><artifactId>account-captcha</artifactId><version>1.1.17</version><type>test-jar</type><scope>test</scope></dependency>
使用 maven 构建 web 应用
一个典型的 war 文件目录结构:
META-INF 包含了一些打包元数据信息。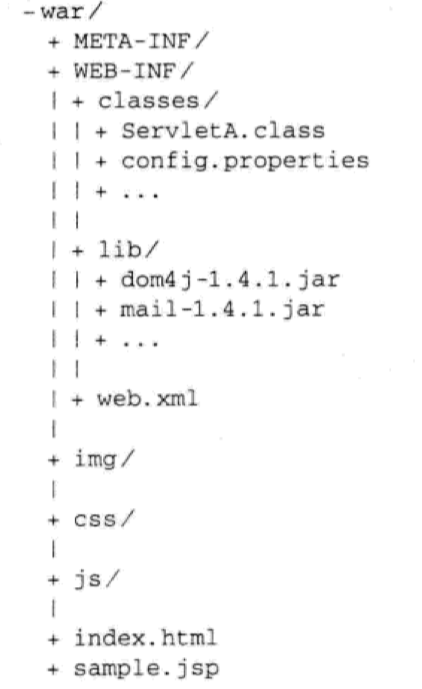
除了 src/main/java 和 src/test/java 目录结构外,web 项目还有一个 web 资源目录,默认位置在 src/main/webapp 目录下。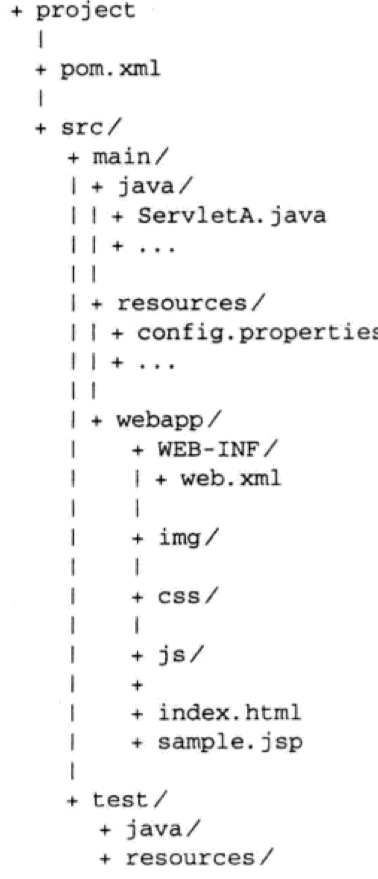
finalName 配置,用来标识项目生成主构件的名称。超级 pom 中的默认配置是:<finalName>${project.artifactId}-${project.version}</finalName>
为了方便 war 的访问,可以指定一个简单的名称:<finalName>account</finalName>
maven-war-plugin 打包 war 包。
生成项目站点
maven-site-plugin
mvn site 就能直接生成一个最简单的站点。
(现在已经过时了吧, 没这样用了。)
里面包含了丰富的项目信息,是由 maven-project-info-plugin 插件生成的,该插件的配置内置在 maven-site-plugin 中。生成的信息报告有: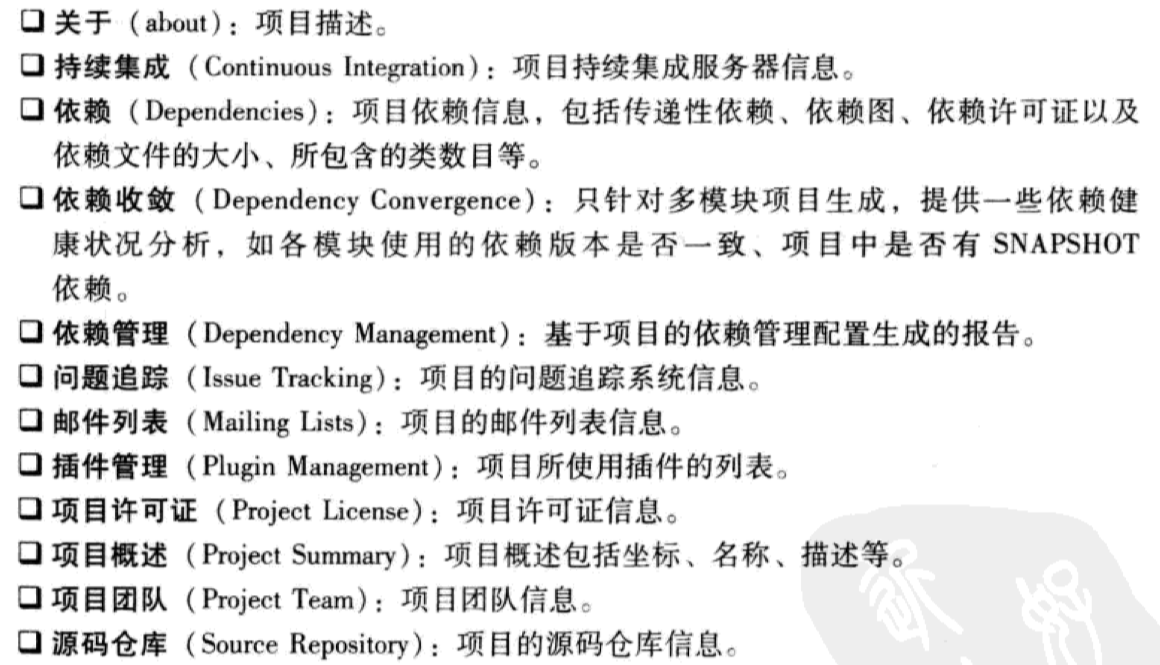
自动版本发布
使用 maven-release-plugin 插件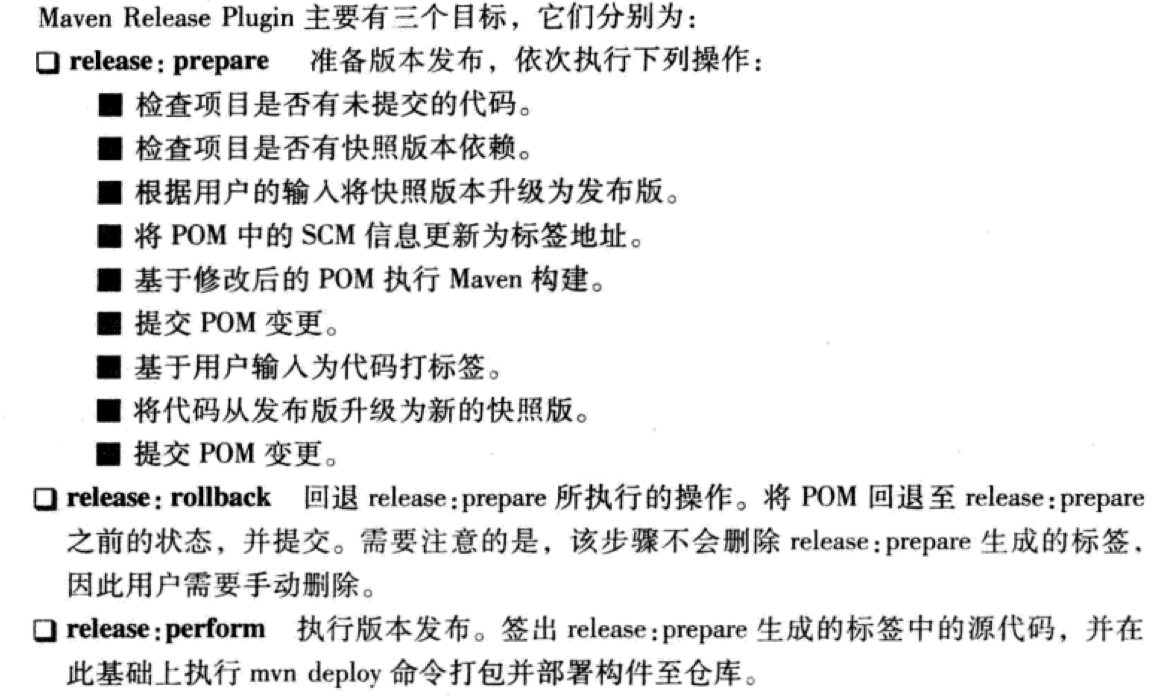
项目发布的时候,默认会生成 -source.jar 和 -javadoc.jar ,也就是超级 pom 中的 performRelease 被激活。
(书中以 svn 为例介绍自动化版本发布,使用 git 的话,自己搜索如何配置。)
maven 的属性使用
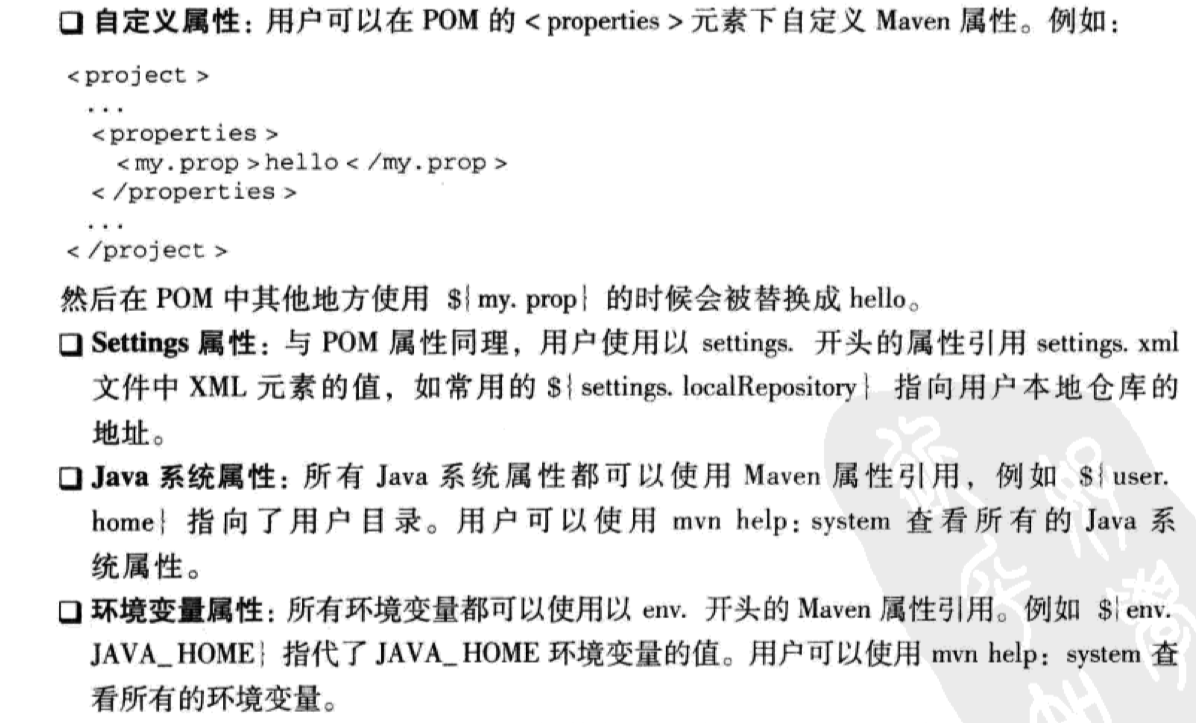
6类 maven 属性

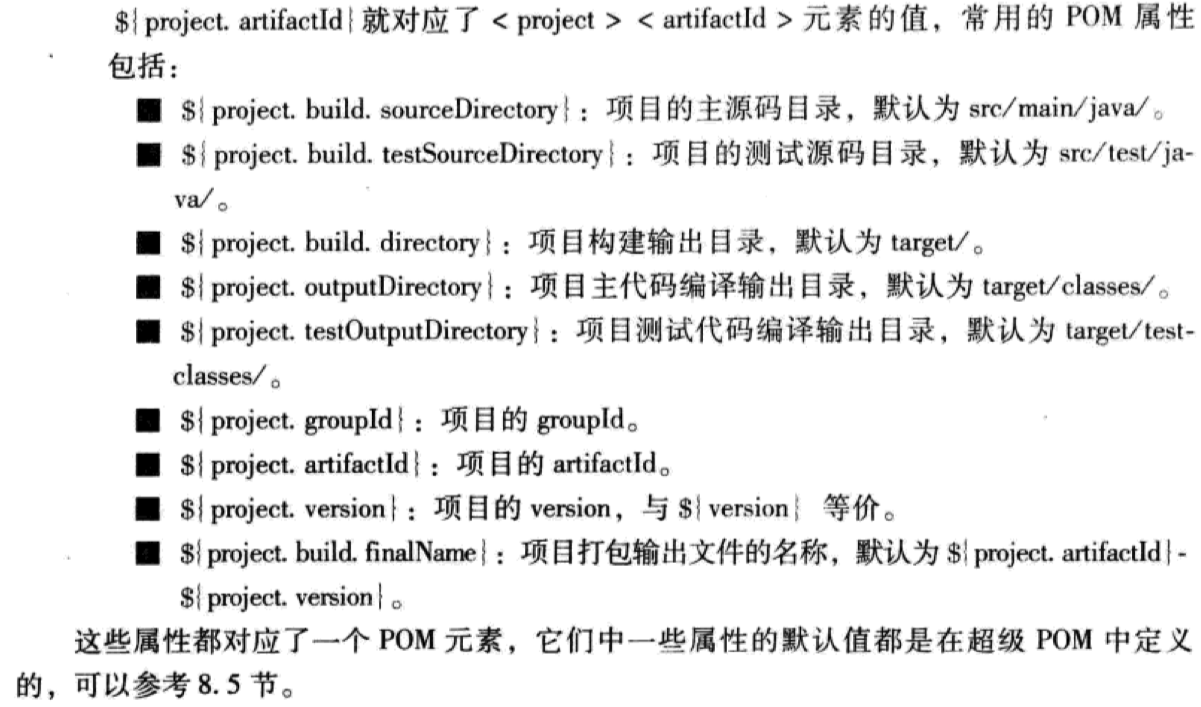
使用 pom 属性配置依赖:
表示依赖的 groupId 和 verison 与当前模块一致。
<dependency><groupId>${project.groupId}</groupId><artifactId>account-email</artifactId><version>${project.version}</version></dependency><dependency><groupId>${project.groupId}</groupId><artifactId>account-persist</artifactId><version>${project.version}</version></dependency>
使用 maven 属性配置插件:
<plugin><groupId>org.apache.maven.plugins</groupId><artifactId>maven-surefire-plugin</artifactId><version>3.0.0-M7</version><configuration><reportsDirectory>${project.build.directory}/test-reports</reportsDirectory></configuration></plugin>
profile 使用
profile 配置:
<profiles><profile><id>dev</id><properties><db.driver>com.mysql.jdbc.Driver</db.driver><db.url>jdbc:mysql://localhost:3306/dev</db.url><db.username>dev</db.username><db.password>dev-pwd</db.password></properties></profile></profiles>
那在配置文件中该怎么使用这些配置呢?
database.jdbc.driverClass=${db.driver}database.jdbc.connectionURL=${db.url}database.jdbc.usernmae=${db.username}database.jdbc.pasword=${db.password}
使用 maven-resources-plugin ,通过下面的配置就能够解析资源文件中的 Maven 属性,即开启资源过滤:
<build>
  <resources>
    <resource>
      <directory>${project.basedir}/src/main/resources</directory>
      <filtering>true</filtering>
    </resource>
  </resources>
  <testResources>
    <testResource>
      <directory>${project.basedir}/src/test/resources</directory>
      <filtering>true</filtering>
    </testResource>
  </testResources>
</build>
在命令行中使用 -P 指定激活的 profile:
mvn clean install -Pdev
如果希望某个 profile 默认一直处于激活状态,就可以配置 settings.xml 中的 activeProfiles 元素。
<activeProfiles>
  <!-- <activeProfile>pic</activeProfile> -->
  <activeProfile>aliyun-profile</activeProfile>
</activeProfiles>
系统属性激活:
<profile>
  <id>env-dev</id>

  <!--存在target-env属性,并且为dev时,该profile被激活-->
  <activation>
    <property>
      <name>target-env</name>
      <value>dev</value>
    </property>
  </activation>

  <properties>
    <tomcatPath>/path/to/tomcat/instance</tomcatPath>
  </properties>
</profile>
还可以从命令行设置 target-env 的值:mvn clean install -Dtarget-env=prod
根据操作系统环境来激活 profile:
family 包括 Windwos、UNIX 和 Mac 等,其他几项可以通过查看环境中的系统属性 os.name、os.arch、os.version 获得。
<activation>
  <os>
    <name>windows7</name>
    <family>Windows</family>
    <version></version>
    <arch>x86</arch>
  </os>
</activation>
根据文件是否存在激活:
<activation>
  <file>
    <exists>xxx</exists>
    <missing>yyy</missing>
  </file>
</activation>
默认激活:
如果 pom 中有任何一个 profile 通过以上其他方式被激活了,所有的默认激活配置都会失效。
<activation>
  <activeByDefault>true</activeByDefault>
</activation>
怎么知道哪些 profile 被激活了呢?
mvn help:active-profiles
列出当前所有的 profile:mvn help:all-profiles
在 profile 中激活集成测试:
TestNG 中可以将测试分组成单元测试和集成测试:@Test(groups={"unit"}@Test(groups={"integration"}
可以配置不同的 profile 来激活:
<project>
  <build>
    <plugins>
      <plugin>
        <groupId>org.apache.maven.plugins</groupId>
        <artifactId>maven-surefire-plugin</artifactId>
        <version>3.0.0-M7</version>
        <configuration>
          <groups>unit</groups>
        </configuration>
      </plugin>
    </plugins>
  </build>

  <profiles>
    <profile>
      <id>full</id>
      <build>
        <plugins>
          <plugin>
            <groupId>org.apache.maven.plugins</groupId>
            <artifactId>maven-surefire-plugin</artifactId>
            <version>3.0.0-M7</version>
            <configuration>
              <groups>unit,integration</groups>
            </configuration>
          </plugin>
        </plugins>
      </build>
    </profile>
  </profiles>
</project>
这样,正常情况下只跑单元测试,只有激活了 full 才会跑集成测试。
在持续集成服务器上,可以配置两个触发器。其中一个,当有代码提交时,只跑单元测试。另外一个,每天凌晨定时跑集成测试。
maven 插件
maven-javadoc-plugin
maven-checkstyle-plugin
maven-pmd-plugin
Java源代码分析工具,能够寻找代码中的问题,包括潜在的 bug、无用代码、可优化代码、重复代码以及过于复杂的表达式等。
maven-changelog-plugin
基于版本控制系统就最近的变更记录生成三份变更报告:
- change log,基于提交的变更报告
- developer activity,基于作者的变更报告
- file activity,基于文件的变更报告
需要配置 scm。
<reporting>
  <plugins>
    <plugin>
      <groupId>org.apache.maven.plugins</groupId>
      <artifactId>maven-changelog-plugin</artifactId>
      <version>2.3</version>
      <configuration>
        <type>range</type>
        <range>60</range>
      </configuration>
    </plugin>
  </plugins>
</reporting>
编写 maven 插件
mvn archetype:generate
然后选择:maven-archetype-plugin
Archetype 使用
maven-archetype-plugin
mvn archetype:help -Ddetail=true
使用交互方式生成:mvn archetype:generate
使用命令行生成:
$ mvn archetype:generate -B \
    -DarchetypeGroupId=org.apache.maven.archetypes \
    -DarchetypeArtifactId=maven-archetype-quickstart \
    -DarchetypeVersion=1.1 \
    -DgroupId=foo \
    -DartifactId=bar \
    -Dversion=1.0-SNAPSHOT \
    -Dpackage=foobar
常用 Archetype:
maven-archetype-quickstart,默认
maven-archetype-webapp
创建自己的 Archetype
Archetype Catalog
当用户不指定 Archetype 坐标的方式使用 maven-archetype-plugin 的时候,会得到一个 Archetype 列表供选择,这个列表的信息来源于一个名为 archetype-catalog.xml 的文件。
该文件的来源有:
- internal,maven-archetype-plugin 内置的 archetype catalog
- local,指向用户本地,位置为 ~/.m2/archetype-catalog.xml
- remote,指向 maven 中央仓库的 archetype catalog
- file://…,用户可以指定本机任何位置的 archetype-catalog.xml 文件
- http://…
mvn archetype:generate -DarchetypeCatalog=file:///tmp/archetype-catlog.xml
生成本地仓库的 archetype catalogmvn archetype:crawl可以用它来便利本地 maven 仓库的内容并自动生成 archetype-catalog.xml 文件。mvn archetype:crawl -Drepository=D:/java/repository -Dcatalog=C:/archetype-catalog.xml

若有收获,就点个赞吧
0 人点赞
