Electron 是一项集成了 NodeJS 和 Webkit 内核且封装了操作系统 API 的桌面软件开发技术,它使得可以用前端技术(HTML、CSS、JS)开发出能运行在 Window、Mac、Linux 等平台的软件。起源于王文睿的 NW.js,但赵成对其做了重大改进(最主要的一点是区分了主进程和渲染进程),并于 2015年4月正式命名为 Electron。
1、基本使用
npm install -g electron// 选用一个项目模版,angular 为例git clone https://github.com/maximegris/angular-electron.gitcd angular-electron && npm i && npm start
- 主进程与渲染进程
1、Electron 运行 package.json 中的 main 指定的入口脚本的进程被称为主进程。
在主进程中运行的脚本通过创建 web 页面来展示用户界面。 一个 Electron 应用总是有且只有一个主进程。
2、由于 Electron 使用了 Chromium(谷歌浏览器)来展示 web 页面,所以 Chromium 的 多进程架构也被使用到。 每个 Electron 中的 web 页面运行在它自己的渲染进程中。
3、主进程使用 BrowserWindow 实例创建页面。每个 BrowserWindow 实例都在自己的渲 染进程里运行页面。 当一个 BrowserWindow实例被销毁后,相应的渲染进程也会被终止
4、渲染进程中通过 Nodejs 读取本地文件
- 打包
1、Electron 只是一个壳子,页面内容都是web技术绘制,所以打包时也是分开打,web打包跟以前没区别,等web打完包后 Electron 再用 electron-builder 将其封装为各平台下的应用
"electron:linux": "npm run build:prod && electron-builder build --linux","electron:windows": "npm run build:prod && electron-builder build --windows","electron:mac": "npm run build:prod && electron-builder build --mac",
2、开发环境下,渲染进程加载的是类似 http://localhost:8081/index.html 这样的网址,这可以方便利用 hot reload;打包时则加载的是类似 file://dist/index.html 的本地文件
3、electron-builder 可通过 electron-builder.json 配置打包详情
4、打包产物:一般而言,dist 目录是web打包结果,release目录则是最终到各平台的app,dist 目录是可以通过浏览器访问的
- 调试
1、webContents.devTool 调试渲染进程脚本
2、Devtron 依赖树、ipc通信等监控
3、主进程调试 electron —inspect=5858 your/app - 常见问题
1、为什么应用的窗口、托盘在一段时间后不见了
这通常是因为用来存放窗口、托盘的变量被垃圾收集了。
app.on('ready', function() {var tray = new Tray('/path/to/icon.png');})// 改为var tray = null;app.on('ready', function() {tray = new Tray('/path/to/icon.png');})
2、在 Electron 中,我为什么不能用 jQuery、RequireJS、Meteor、AngularJS?
因为 Electron 在运行环境中引入了 Node.js,所以在 DOM 中有一些额外的变量,比如 module、exports 和 require。这导致 了许多库不能正常运行,因为它们也需要将同名的变量加入运行环境中。
// 可以这样<head><script>// 重命名 Electron 提供的 requirewindow.nodeRequire = require;delete window.require;delete window.exports;delete window.module;</script><script type="text/javascript" src="jquery.js"></script></head>
2、Electron 模块介绍
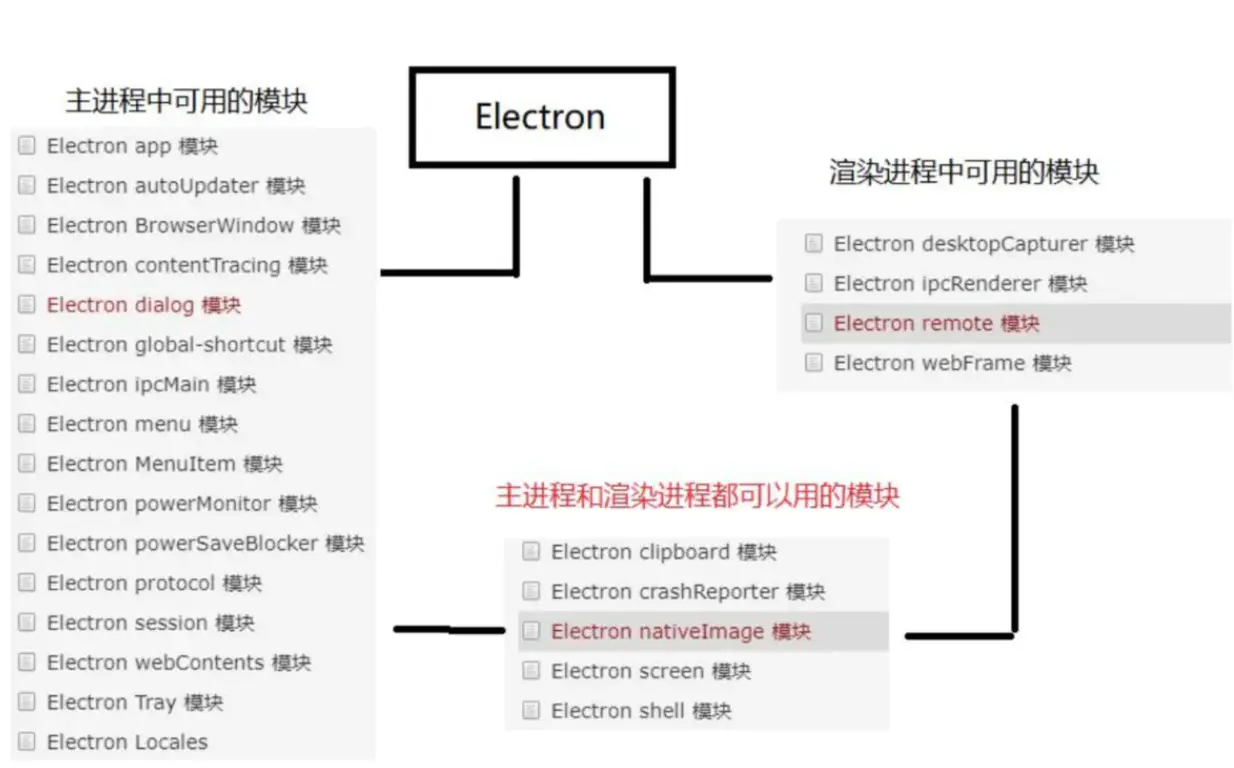
2.1 渲染进程专用
- remote
remote 模块提供了一种在渲染进程(网页)和主进程之间进行进程间通讯(IPC)的简便途径。Electron 中, 与 GUI 相关的模块(如 dialog, menu 等)只存在于主进程,而不在渲染进程中 。为了能从渲染进程中使用它们,需要用ipc模块来给主进程发送进程间消息。使用 remote 模块,可以调用主进程对象的方法,而无需显式地发送进程间消息。
const btn = document.querySelector('#btn');const path = require('path');const BrowerWindow = require('electron').remote.BrowserWindow;btn.onclick = () => {win = new BrowerWindow({width: 300,height: 200,frame: false, // false隐藏关闭按钮、菜单选项 true显示fullscreen:true, // 全屏展示transparent: true})win.loadURL(path.join('file:',__dirname,'news.html'));win.on('close',()=>{win = null});}
注意:
1、可以给主进程传回调函数,但是主进程对回调的执行是异步的
2、传给主进程的回调要注意清理,否则容易造成内存泄露
- ipcRender
模块是一个 EventEmitter 类的实例. 它提供了有限的方法,你可以从渲染进程向主进程发送同步或异步消息. 也可以收到主进程的响应
// In main process.const ipcMain = require('electron').ipcMain;ipcMain.on('asynchronous-message', function(event, arg) {console.log(arg); // prints "ping"event.sender.send('asynchronous-reply', 'pong');});ipcMain.on('synchronous-message', function(event, arg) {console.log(arg); // prints "ping"event.returnValue = 'pong';});// In renderer process (web page).const ipcRenderer = require('electron').ipcRenderer;console.log(ipcRenderer.sendSync('synchronous-message', 'ping')); // prints "pong"ipcRenderer.on('asynchronous-reply', function(event, arg) {console.log(arg); // prints "pong"});ipcRenderer.send('asynchronous-message', 'ping');
- desktopCapture
获取用户电脑当前的桌面或窗口。比如有两个显示器,桌面数量就是2;窗口数就看用户当前打开了几个窗口
this.electronService.desktopCapturer.getSources({ types: ["window", "screen"] }).then(data => {console.log("data", data)})

- webFrame
web-frame 模块允许你自定义如何渲染当前网页 .
例子,放大当前页到 200%.
var webFrame = require('electron').webFrame;webFrame.setZoomFactor(2);
2.2、主进程常用模块
- app
控制整个应用声明周期,可以监听很多事件 - BrowserWindow
用于创建渲染进程 - dialog
dialog 模块提供了api来展示原生的系统对话框,例如打开文件框,alert框,所以web应用可以给用户带来跟系统应用相同的体验. - Menu/MenuItem
menu类可以用来创建原生菜单,它可用作应用菜单和 context 菜单. - Tray
系统托盘 - global-shortcut
自定义操作的快捷键 - ipcMain
与 ipcRender 配合完成主进程和渲染进程的通信 - session
可以操作 cookie , 清缓存数据,设置请求拦截等 - webContents
类似浏览器的资源监控器,负责渲染并控制网页,比如可以获取页面中请求的资源信息等,是一个事件发出者
1、常用属性和事件
crashed事件: 渲染进程崩溃,用于错误收集
did-finish-load 事件:页面加载完毕,onload 也已经触发过
session 属性
2、常用方法
webContents.loadURL(url[, options]) 加载页面,可以是file开头,也可http开头
webContents.downloadURL(url) 下载资源,如pdf文件,字体,图片等
webContents.getTitle() 获取页面标题
webContents.goBack() 回到上一个page,相关的还有 goForward等
webContents.insertCSS(css) 页面内插入CSS
webContents.executeJavaScript(code[, userGesture, callback]) 执行JS
webContents.openDevTools([options]) 打开开发者工具栏
3、进程间通信
webContents.send(channel[, arg1][, arg2][, …]) 向渲染进程发送事件
// 主进程.var window = null;app.on('ready', function() {window = new BrowserWindow({width: 800, height: 600});window.loadURL('file://' + __dirname + '/index.html');window.webContents.on('did-finish-load', function() {window.webContents.send('ping', 'whoooooooh!');});});<!-- index.html --><html><body><script>require('electron').ipcRenderer.on('ping', function(event, message) {console.log(message); // Prints "whoooooooh!"});</script></body></html>
2.3、两个进程都可用模块
- clipboard
剪切板操作 - nativeImage
在 Electron 中, 对所有创建 images 的 api 来说, 你可以使用文件路径或 nativeImage 实例. - screen
screen 模块检索屏幕的 size,显示,鼠标位置等的信息.在 app 模块的ready 事件触发之前不可使用这个模块 - shell
shell 模块提供了集成其他桌面客户端的关联功能.如打开浏览器,打开文件所在文件夹等
var shell = require('shell');// 在用户默认浏览器中打开URL的示例shell.openExternal('https://github.com');
热更新步骤
1、通过本地package.json与远端仓库package.json中的version字段对比看是否有更新
2、请求需要更新的文件,当全部请求成功后,替换本地文件
3、更新本地 package.json 的 version
4、重启应用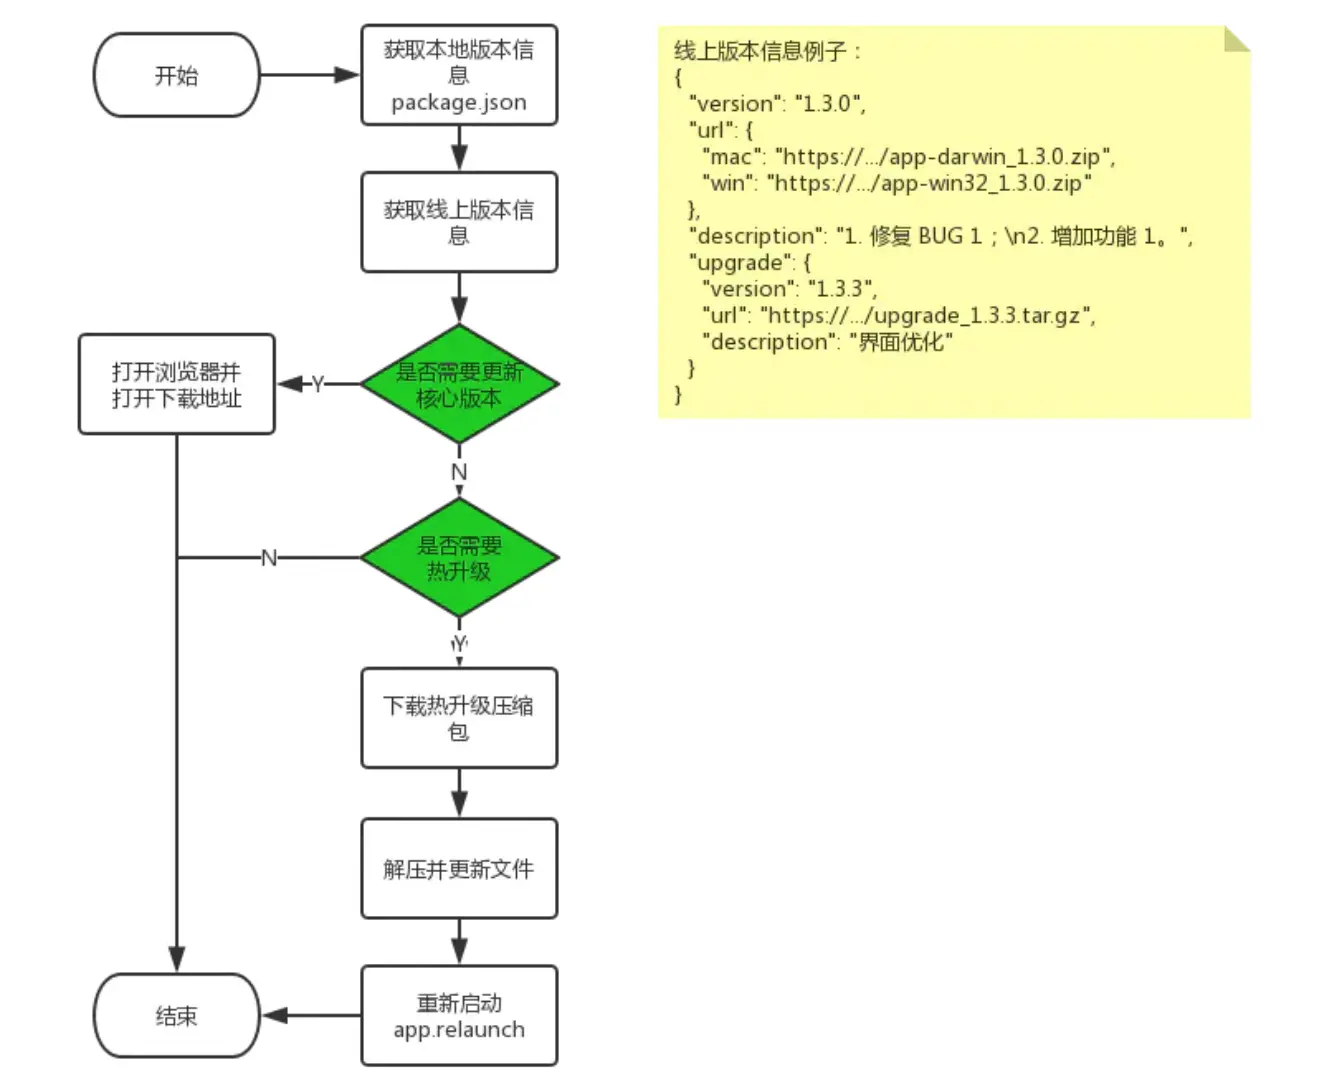
// 获取远端文件var https = require('https');var getHttpsData = function (filepath, success, error) {// 回调缺省时候的处理success = success || function () {};error = error || function () {};var url = 'https://raw.githubusercontent.com/username/project-name/master/' + filepath + '?r=' + Math.random();https.get(url, function (res) {var statusCode = res.statusCode;if (statusCode !== 200) {// 出错回调error();// 消耗响应数据以释放内存res.resume();return;}res.setEncoding('utf8');var rawData = '';res.on('data', function (chunk) {rawData += chunk;});// 请求结束res.on('end', function () {// 成功回调success(rawData);}).on('error', function (e) {// 出错回调error();});});};getHttpsData('index.html', function (data) {// 写入文件fs.writeFileSync('index.html', data);// 然后下一个文件获取并写入...});
优化
- 性能
1、预加载主页面
2、骨架屏
3、不在渲染进程中加载 node 模块
4、打包成 asar 格式 - 包体积
1、yarn autoclean 清理 node_modules 中诸如 readme 这种无用文件
2、双 package.json 架构。开发依赖以及生产依赖,用户使用项目根目录的 package.json 来管理开发依赖,而使用项目的应用文件夹下的 package.json 管理生产依赖。electron-builder 仅会打包应用文件夹下的依赖。
易错点
- getUserMedia、webkitGetUserMedia、mediaDevices
Since version 74 of Chrome navigator.getUserMedia, navigator.webkitGetUserMedia and navigator.mediaDevices can be used only in secure context (https), otherwise they are undefined.
参考
Electron构建跨平台应用Mac/Windows/Linux
我是如何实现electron的在线升级热更新功能的?
分享这半年的 Electron 应用开发和优化经验

若有收获,就点个赞吧
0 人点赞
