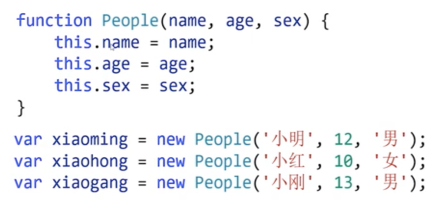
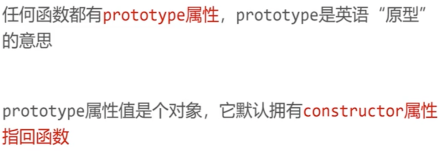
认识对象
1)认识对象
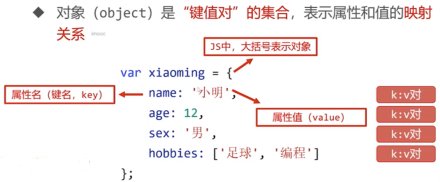
对象的语法
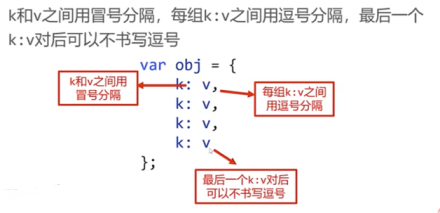
属性是否加引号

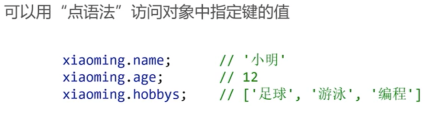
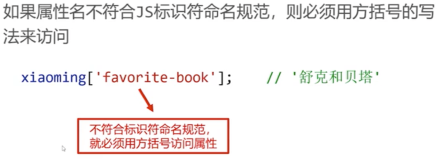
属性的访问

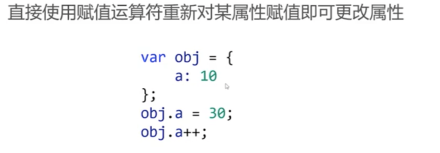
属性的更改
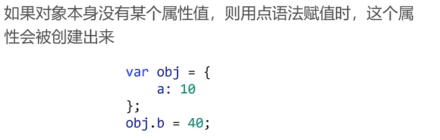
属性的创建
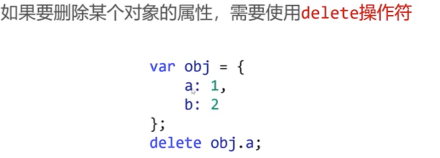
属性的删除
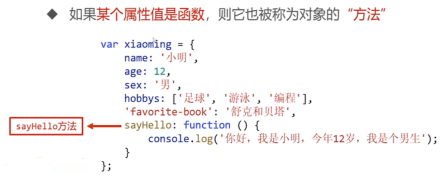
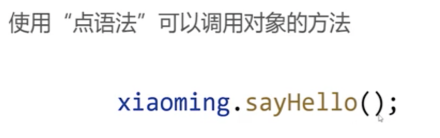
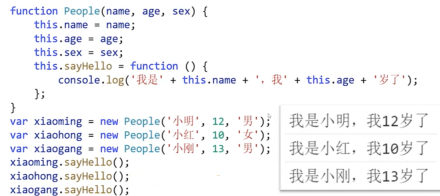
2)对象的方法
方法的调用
方法和函数

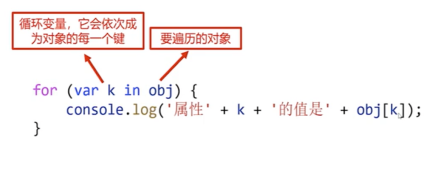
3)对象的遍历
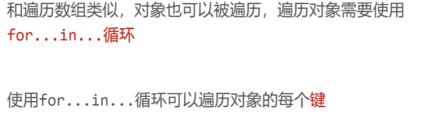
for…in…循环
4)对象的深浅克隆
复习基本类型值和引用类型值
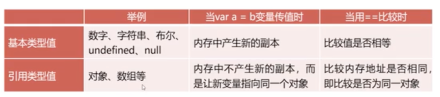
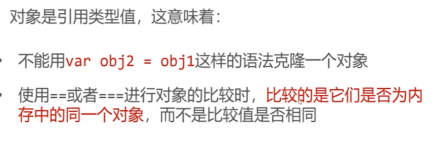
对象是引用类型值
//例1var obj1 = {a: 1,b: 2,c: 3};var obj2 = {a: 1,b: 2,c: 3};console.log(obj1 == obj2);console.log(obj1 === obj2);//例2var obj3={a:10,};var obj4 =obj3;obj3.a++;console.log(obj4.a);
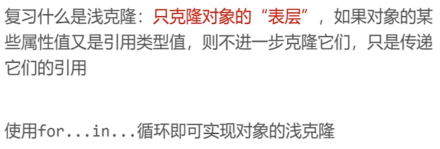
对象的浅克隆
var obj1 = {a: 1,b: 2,c: [11, 233, 4]};var obj2 = {};for (var k in obj1) {//每遍历一个k属性,就给obj2也添加一个同名的k属性//值和的obj1的k属性值相同obj2[k] = obj1[k]};console.log(obj2);//为什么叫浅克隆呢?比如c属性的值是引用类型值,那么本质上obj1和obj2的c属性是内存中的同一个数组,并没有被克隆分开obj1.c.push(99);console.log(obj2);console.log(obj1.c == obj2.c);
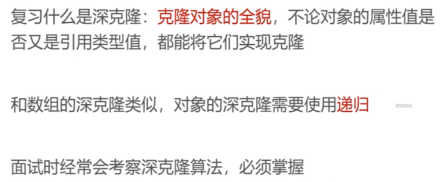
对象的深克隆
var obj1 = {a: 1,b: 2,c: [11, 233, {m: 55,n: 66,p: [77, 88]}]};function deepClone(o) {//要判断o是对象还是数组if (Array.isArray(o)) {//数组var result = [];for (var i = 0; i < o.length; i++) {result.push(deepClone(o[i]));}} else if (typeof o == 'object') {//对象var result = [];for (var k in o) {result[k] = deepClone(o[k]);}} else {//基本类型值var result = o;}return result;}var obj2=deepClone(obj1);console.log(obj2);console.log(obj1.c==obj2.c);
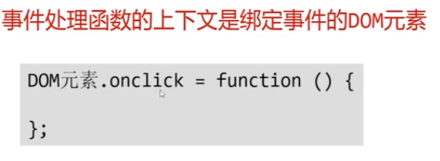
认识函数的上下文

函数的上下文

函数的this
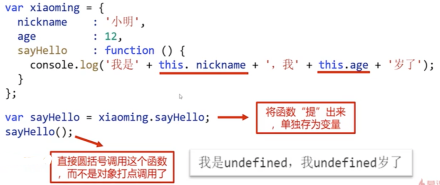
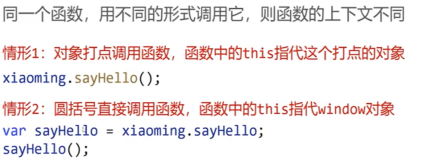
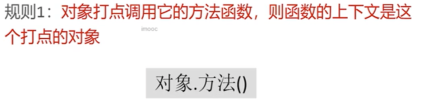
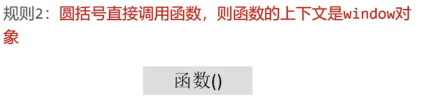
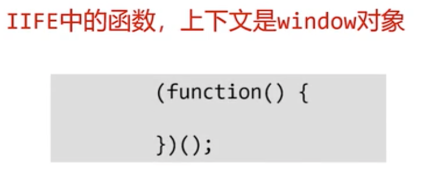
函数的上下文由调用方式决定
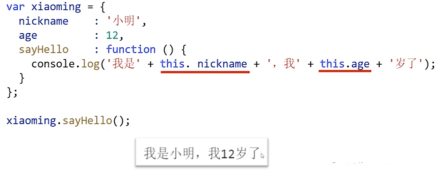
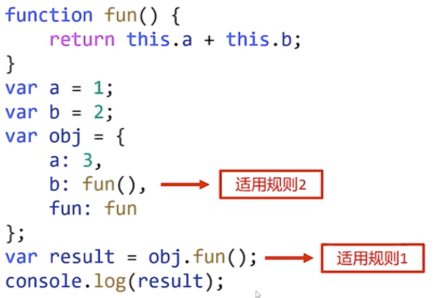
var obj = {a: 1,b: 2,fu: function () {console.log(this.a + this.b);console.log(this===window);console.log(this===window);}}var fu= obj.fu;fu();
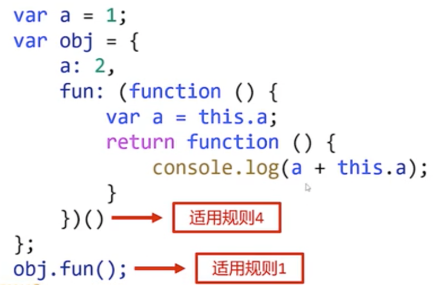
1)上下文规则1
2)上下文规则2
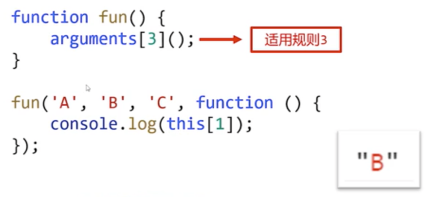
3)上下文规则3
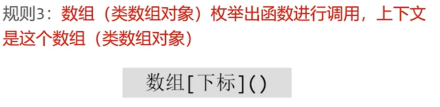
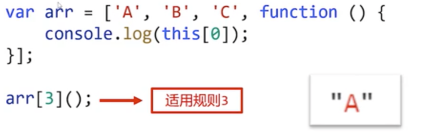
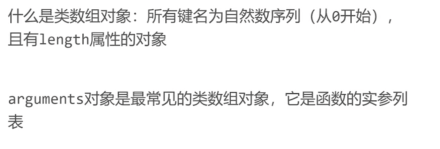
类数组对象
4)上下文规则4
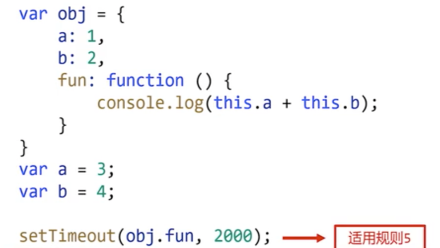
5)上下文规则5

6)上下文规则6
案例1

<!DOCTYPE html><html lang="en"><head><meta charset="UTF-8"><meta http-equiv="X-UA-Compatible" content="IE=edge"><meta name="viewport" content="width=device-width, initial-scale=1.0"><title>Document</title><style>div {width: 200px;height: 200px;float: left;border: 1px solid #000;margin-right: 10px;background-color: #fff;}</style></head><body><div id="box1"></div><div id="box2"></div><div id="box3"></div><script>function setColorToRed(o) {this.style.backgroundColor = 'red';}var box1 = document.getElementById('box1');var box2 = document.getElementById('box2');var box3 = document.getElementById('box3');box1.onclick = setColorToRed;box2.onclick = setColorToRed;box3.onclick = setColorToRed;</script></body></html>
案例2

<!DOCTYPE html><html lang="en"><head><meta charset="UTF-8"><meta http-equiv="X-UA-Compatible" content="IE=edge"><meta name="viewport" content="width=device-width, initial-scale=1.0"><title>Document</title><style>div {width: 200px;height: 200px;float: left;border: 1px solid #000;margin-right: 10px;background-color: #fff;}</style></head><body><div id="box1"></div><div id="box2"></div><div id="box3"></div><script>function setColorToRed(o) {//备份上下文var self=this;setTimeout(function(){self.style.backgroundColor = 'red';},2000)}var box1 = document.getElementById('box1');var box2 = document.getElementById('box2');var box3 = document.getElementById('box3');box1.onclick = setColorToRed;box2.onclick = setColorToRed;box3.onclick = setColorToRed;</script></body></html>
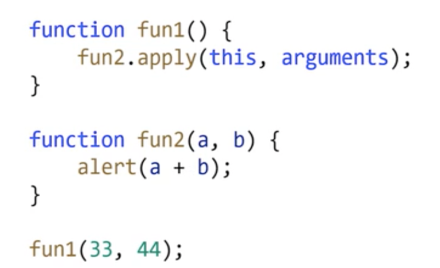
7)call和apply
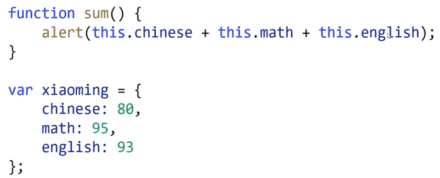
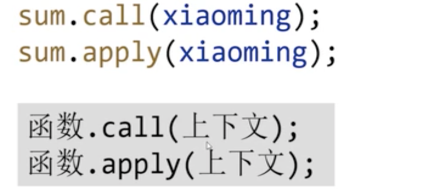
function sum() {console.log(this.c + this.m + this.e);};var xiaoming = {c: 100,m: 90,e: 70,}sum.apply(xiaoming);sum.call(xiaoming);
call和apply的区别
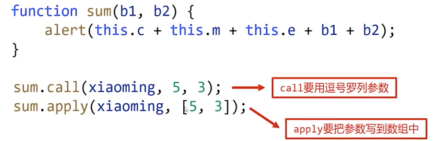
到底是call还是apply?
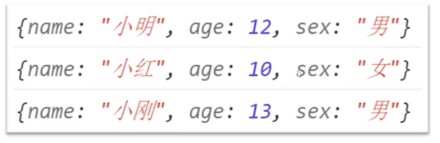
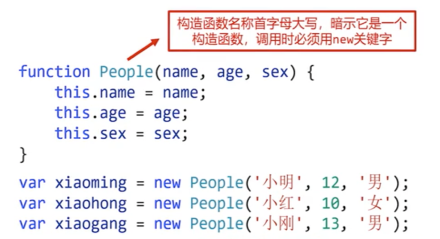
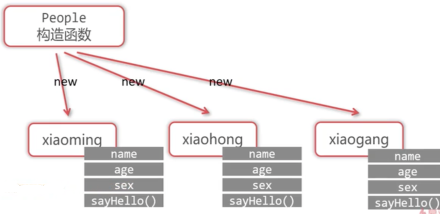
构造函数
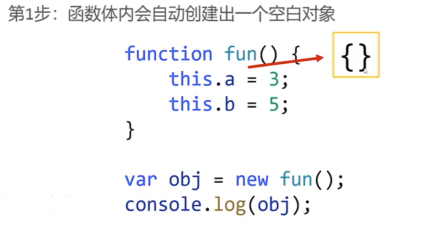
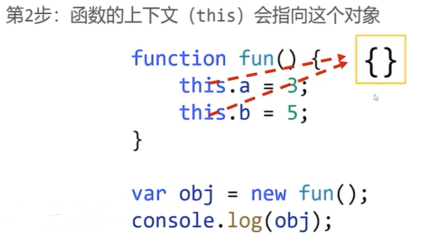
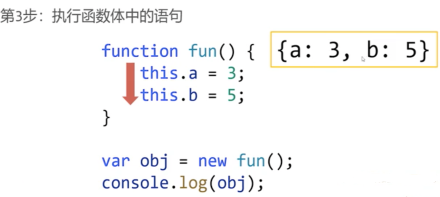
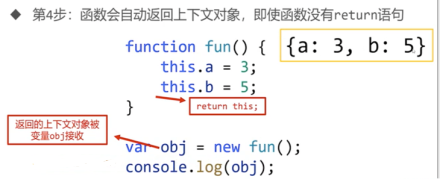
1)用new调用函数的四步走
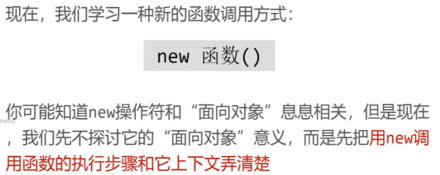
用new操作符调用函数
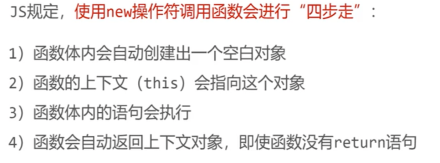
四步走详解
第一步
第二步
第三步
第四步
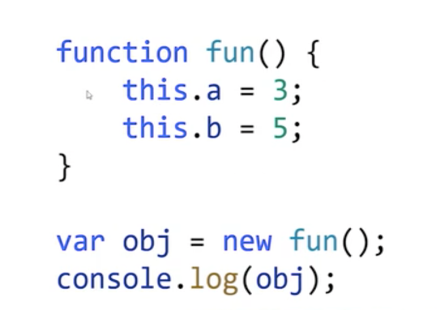
2)构造函数
什么是构造函数
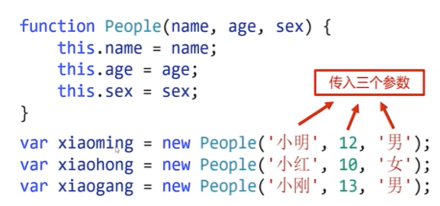
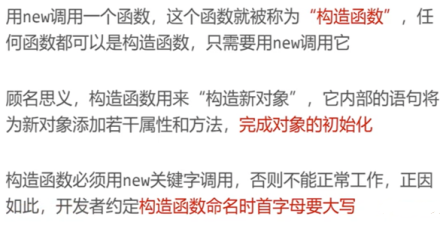
构造函数名称首字母约定大写
构造函数中的this不是函数本身
尝试为对象添加方法
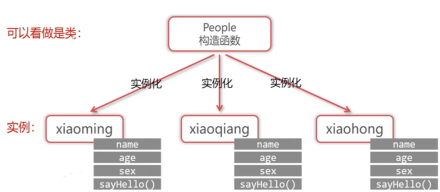
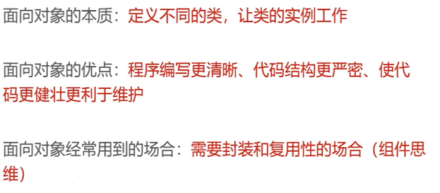
3)类和实例
类好比是“蓝图

实例是具体的对象

构造函数和“类”
原型和原型链
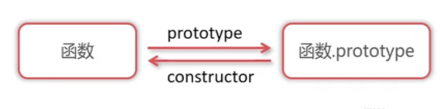
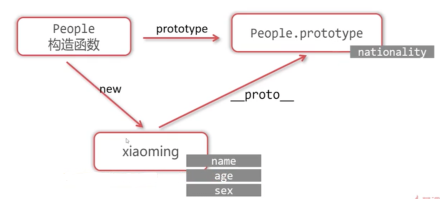
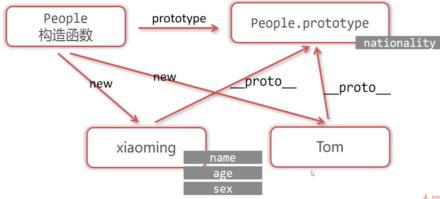
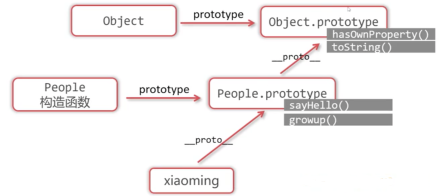
1)prototype和原型链查找
什么是prototype

构造函数的prototype是实例的原型
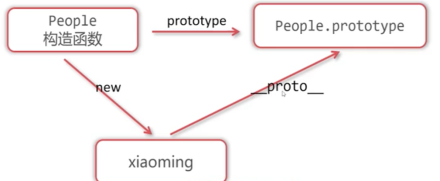
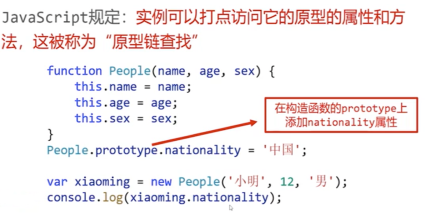
原型链查找
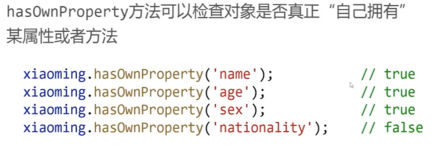
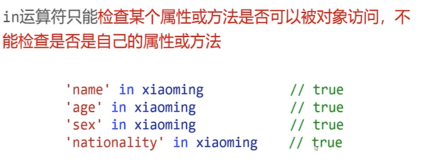
hasOwnProperty
in
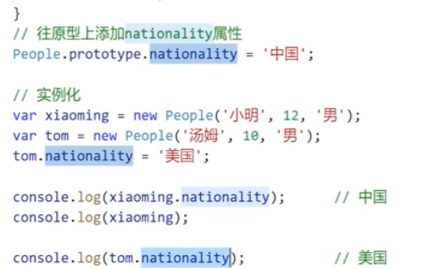
2)在prototype上添加方法
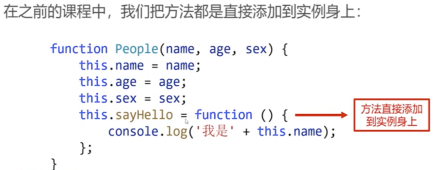
之前,我们将方法写到了对象身上
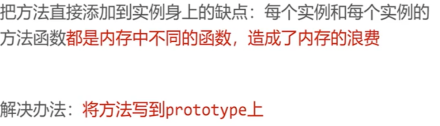
方法要写到prototype上

function People(name, age, sex) {this.name = name;this.age = age;this.sex = sex;}People.prototype.sayHello = function () {console.log('我是' + this.name + '我今年' + this.age + '了');};People.prototype.growup = function () {this.age++;}var xiaoming = new People('小明', 12, '男');var xiaohong = new People('小红', 11, '女');console.log(xiaohong.sayHello === xiaoming.sayHello);xiaoming.sayHello();xiaohong.sayHello();xiaoming.growup();xiaoming.growup();xiaoming.growup();xiaoming.growup();xiaoming.growup();xiaoming.sayHello();
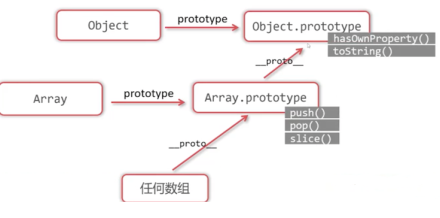
3)原型链的终点
关于数组的原型链
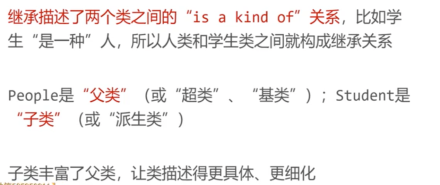
4)继承
两个无关的类
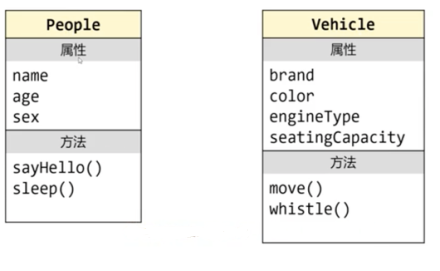
People类和Student类的关系
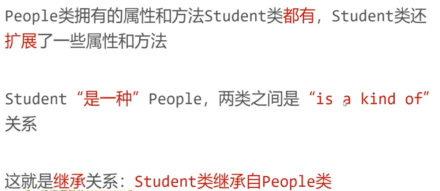
继承
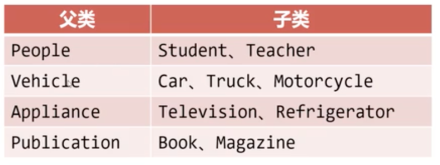
更多的继承关系举例
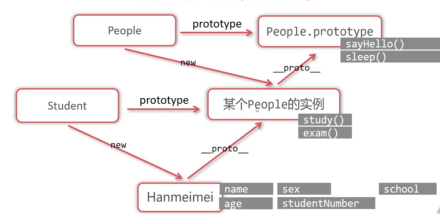
JavaScript中如何实现继承
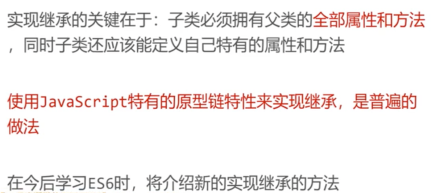
通过原型链实现继承
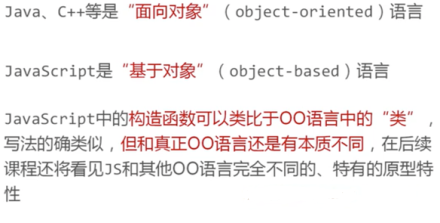
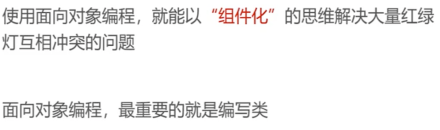
上升到面向对象
1)上升到面向对象小案例1
小案例

TrafficLight类
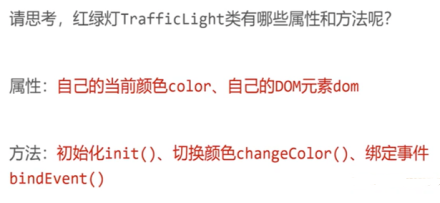
<!DOCTYPE html><html lang="en"><head><meta charset="UTF-8"><meta http-equiv="X-UA-Compatible" content="IE=edge"><meta name="viewport" content="width=device-width, initial-scale=1.0"><title>Document</title><style>#box img {width: 80px;}</style></head><body><div id="box"></div><script>//定义红绿灯类function Trafficlight() {//颜色属性,一开始都是红色//红色1、黄色2,绿色3this.color = 1;//调用自己的初始化方法this.init();//绑定监听this.bindEvant();};//初始化方法Trafficlight.prototype.init = function () {//创建自己的domthis.dom = document.createElement('img');//设置src属性this.dom.src = 'images/' + this.color + '.jpg';box.appendChild(this.dom);};//绑定监听Trafficlight.prototype.bindEvant = function () {//备份上下文,这里的this是js的实例var self = this;//当自己的的dom被点击的时候this.dom.onclick = function () {//当被点击的时候,调用自己的changeColor方法self.changeColor();};}//改变颜色Trafficlight.prototype.changeColor = function () {//改变自己的coloe属性,自己管理自己this.color++;if (this.color == 4) {this.color = 1;};//this.dom.src = 'images/' + this.color + '.jpg';}//得到盒子var box = document.getElementById('box');//实例化100个var count = 10;while (count--) {var s= new Trafficlight();console.log(s);}</script></body></html>
2)上升到面向对象小案例2
Ball类的属性
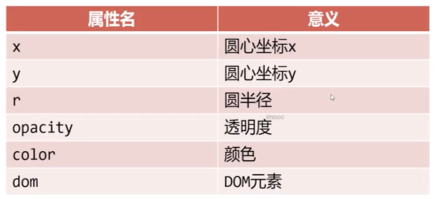
Ball类的方法

如何实现多个小球动画
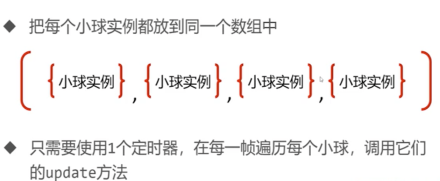
<!DOCTYPE html><html lang="en"><head><meta charset="UTF-8"><meta http-equiv="X-UA-Compatible" content="IE=edge"><meta name="viewport" content="width=device-width, initial-scale=1.0"><title>Document</title><style>body {background-color: rgb(10, 9, 9);}.ball {position: absolute;border-radius: 50%;}</style></head><body><script>//小球类function Ball(x, y) {//属性x、y表示的是圆心的坐标this.x = x;this.y = y;//半径属性this.r = 20;//透明度this.opacity = 1;//小球背景颜色,从颜色数组中随机选择一个颜色this.color = colorArr[parseInt(Math.random() * 6)];//这个小球的x增量和y的增量,使用do while语句,防止dx和dy都是0do {this.dX = parseInt(Math.random() * 20) - 10;this.dY = parseInt(Math.random() * 20) - 10;} while (this.dX == 0 && this.dY == 0);//初始化方法this.init();//把自己推入数组,这里的this不是类本身,而是实例ballArr.push(this);}Ball.prototype.init = function () {//创建自己的domthis.dom = document.createElement('div');this.dom.className = 'ball';this.dom.style.width = this.r * 2 + 'px';this.dom.style.height = this.r * 2 + 'px';this.dom.style.left = this.x - this.r + 'px';this.dom.style.top = this.y - this.r + 'px';this.dom.style.backgroundColor = this.color;//上树document.body.appendChild(this.dom);}//更新Ball.prototype.update = function () {//位置改变this.x += this.dX;this.y -= this.dY;//半径改变this.r += 0.2;//透明度改变this.opacity -= 0.05;this.dom.style.width = this.r * 2 + 'px';this.dom.style.height = this.r * 2 + 'px';this.dom.style.left = this.x - this.r + 'px';this.dom.style.top = this.y - this.r + 'px';this.dom.style.opacity = this.opacity;//当透明度小于0的时候,就需要从数组中删除自己,DOM元素也要删掉自己if (this.opacity < 0) {//从数组中删除自己for (var i = 0; i < ballArr.length; i++) {if (ballArr[i] == this) {ballArr.splice(i, 1);}}//还要删除自己的domdocument.body.removeChild(this.dom);};}//把所有的小球实例都放在同一个数组var ballArr = [];//初始颜色数组var colorArr = ['#66CCCC', '#CCFF66', '#FF99CC', '#FF6666','#CC3399', '#FF6600'];new Ball(200, 200);//定时器,负责更新所有的小球实例setInterval(function () {//遍历数组,调用调用的update方法for (var i = 0; i < ballArr.length; i++) {ballArr[i].update();}}, 20)//鼠标指针的监听document.onmousemove = function (e) {//得到鼠标指针的位置var x = e.clientX;var y = e.clientY;new Ball(x, y);}</script></body></html>
JS的内置对象
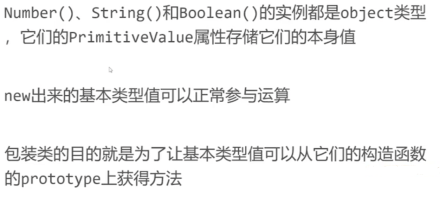
1)包装类
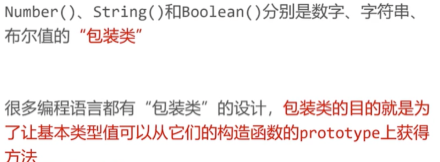
包装类总结
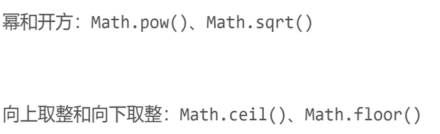
2)Math对象
以学过的方法
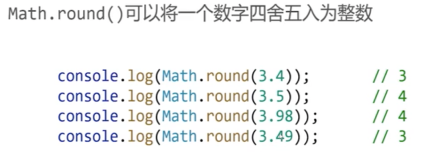
四舍五入Math.round()
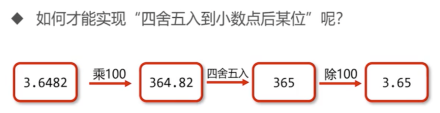
四舍五入到小数点后某位
console.log(Math.round(3.59));var a=3.7554;console.log(Math.round(a*100)/100);
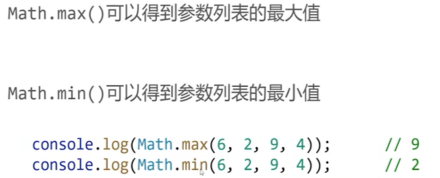
Math.max()和Math.min()
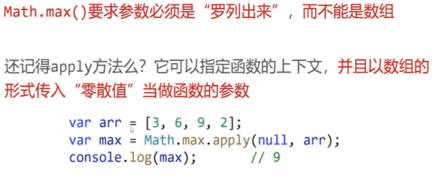
如何利用Math.max()求数组最大值
console.log(Math.max(1,2,3,4));var arr=[2,4,2,4,35,6,356456,24354,25354,4656];console.log(Math.max.apply(null,arr));//在今后学es6之后,求数组最大值可以console.log(Math.max(...arr));
随机数Math.random()
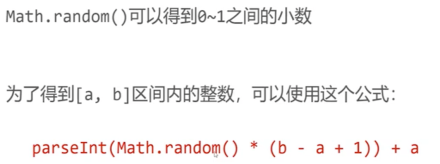
console.log(Math.random());console.log(Math.random());console.log(Math.random());//如果要生成[a.b]之间的整数,就要使用公式console.log(parseInt(Math.random()*6+3));
3)Date对象
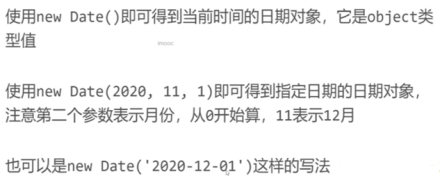
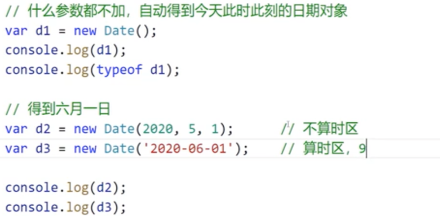
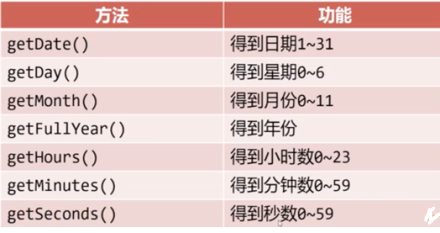
日期对象的常见的方法
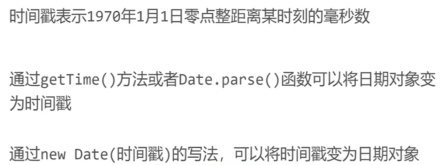
时间戳

小案例:倒计时小程序

<h1>2022年高考倒计时</h1><h2 id="info"></h2><script>var info = document.getElementById('info');setInterval(function () {//现在的日期var nd = new Date();//目标的日期,5表示6月var td = new Date(2022, 5, 7);var s = 9 * 3600 * 1000;//毫秒差var diff = td - nd + s;//把diff换算成天、小时、分钟、秒var day = parseInt(diff / (1000 * 60 * 60 * 24));var hours = parseInt(diff % (1000 * 60 * 60 * 24) / (1000 * 60 * 60));var minutes = parseInt(diff % (1000 * 60 * 60) / (1000 * 60));var seconds = parseInt(diff % (1000 * 60 * 60) % (1000 * 60) / 1000);var se=diff-day*1000*3600*24-hours*3600*1000-minutes*1000*60-seconds*1000;info.innerText = day + '天' + hours + '时' + minutes + '分' + seconds + '秒';}, 100);</script>

若有收获,就点个赞吧
0 人点赞
