1、安装apache
## 先yum list看看有没有你可以的包yum list httpd## 如果有的话,比如我用x86_64版,就可以安装yum install httpd.x86_64
2、配置、启动Apache
1、httpd.conf是主配置文件,你可以按需更改,一般来说可能需要自定义端口,那么就vim修改httpd.conf文件的监听端口,改为你希望的 
2、启动、关闭、重启
[root@localhost bin]# ./apachectl start[root@localhost bin]# ./apachectl stop[root@localhost bin]# ./apachectl restart
3、、Apache设置为Linux系统服务,并开机启动
将链接apachectl 复制到系统启动目录下并命名为httpd
[root@localhost bin]# cp /usr/local/httpd/bin/apachectl /etc/rc.d/init.d/httpd
到此,其实已经可以使用service httpd start等命令,但在linux服务列表还没有注册
- 使用chkconfig来注册apache服务,并其可以在linux的服务列表中看到(chkconfig –list)
- 在init.d的httpd链接文件中第2行添加如下注释,并wq保存退出
[root@localhost bin]# vim /etc/rc.d/init.d/httpd1
- 在init.d的httpd链接文件中第2行添加如下注释,并wq保存退出
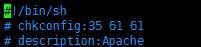
意义如下
35:在3级别和5级别(级别见文末TIPS)启动httpd
61:启动顺序为61号,S61
61:关闭顺序为61号,K61
当进行chkconfig —add httpd操作时,如果没有指定level那么就会来这个注释中取值
将httpd配置自启并加入linux服务监控
[root@localhost bin]# chkconfig --add httpd
此时,就可以在rc.d下的相应的3和5目录下看到S61httpd,并在0、1、2、4、6目录看到K61httpd了
- 这是2步的手动设置方式,不想看可以跳过。可以手动设置自启动:将链接apachectl放一份软链接到rc3.d目录下(和/或rc*.d目录下)
[root@localhost bin]# ln -s /etc/rc.d/init.d/httpd /etc/rc.d/rc3.d/S61httpd
- 这是2步的手动设置方式,不想看可以跳过。可以手动设置自启动:将链接apachectl放一份软链接到rc3.d目录下(和/或rc*.d目录下)
- 这样,已经设置了在“有网络多用户命令行模式下”在61顺序自动启动httpd服务了

若有收获,就点个赞吧
0 人点赞
