1 下载并安装MySQL官方的 Yum Repository
[root@instance ~]# wget -i -c http://dev.mysql.com/get/mysql57-community-release-el7-10.noarch.rpm
使用上面的命令就直接下载了安装用的Yum Repository,大概25KB的样子,然后就可以直接yum安装了。
[root@instance ~]# yum -y install mysql57-community-release-el7-10.noarch.rpm
之后就开始安装MySQL服务器。
[root@instance ~]# yum -y install mysql-community-serverLoaded plugins: langpacks, versionlockmysql-connectors-community | 2.5 kB 00:00:00mysql-tools-community | 2.5 kB 00:00:00mysql57-community | 2.5 kB 00:00:00(1/3): mysql-connectors-community/x86_64/primary_db | 41 kB 00:00:00(2/3): mysql-tools-community/x86_64/primary_db | 58 kB 00:00:00(3/3): mysql57-community/x86_64/primary_db | 177 kB 00:00:01Resolving Dependencies--> Running transaction check---> Package mysql-community-server.x86_64 0:5.7.26-1.el7 will be installed--> Processing Dependency: mysql-community-common(x86-64) = 5.7.26-1.el7 for package: mysql-community-server-5.7.26-1.el7.x86_64--> Processing Dependency: mysql-community-client(x86-64) >= 5.7.9 for package: mysql-community-server-5.7.26-1.el7.x86_64--> Running transaction check---> Package mysql-community-client.x86_64 0:5.7.26-1.el7 will be installed--> Processing Dependency: mysql-community-libs(x86-64) >= 5.7.9 for package: mysql-community-client-5.7.26-1.el7.x86_64---> Package mysql-community-common.x86_64 0:5.7.26-1.el7 will be installed--> Running transaction check---> Package mariadb-libs.x86_64 1:5.5.56-2.el7 will be obsoleted--> Processing Dependency: libmysqlclient.so.18()(64bit) for package: 2:postfix-2.10.1-6.el7.x86_64--> Processing Dependency: libmysqlclient.so.18(libmysqlclient_18)(64bit) for package: 2:postfix-2.10.1-6.el7.x86_64---> Package mysql-community-libs.x86_64 0:5.7.26-1.el7 will be obsoleting--> Running transaction check---> Package mysql-community-libs-compat.x86_64 0:5.7.26-1.el7 will be obsoleting---> Package postfix.x86_64 2:2.10.1-6.el7 will be updated---> Package postfix.x86_64 2:2.10.1-7.el7 will be an update--> Finished Dependency ResolutionDependencies Resolved===============================================================================================================Package Arch Version Repository Size===============================================================================================================Installing:mysql-community-libs x86_64 5.7.26-1.el7 mysql57-community 2.2 Mreplacing mariadb-libs.x86_64 1:5.5.56-2.el7mysql-community-libs-compat x86_64 5.7.26-1.el7 mysql57-community 2.0 Mreplacing mariadb-libs.x86_64 1:5.5.56-2.el7mysql-community-server x86_64 5.7.26-1.el7 mysql57-community 166 MInstalling for dependencies:mysql-community-client x86_64 5.7.26-1.el7 mysql57-community 24 Mmysql-community-common x86_64 5.7.26-1.el7 mysql57-community 274 kUpdating for dependencies:postfix x86_64 2:2.10.1-7.el7 base 2.4 MTransaction Summary===============================================================================================================Install 3 Packages (+2 Dependent packages)Upgrade ( 1 Dependent package)Total download size: 197 MDownloading packages:No Presto metadata available for basewarning: /var/cache/yum/x86_64/7/mysql57-community/packages/mysql-community-common-5.7.26-1.el7.x86_64.rpm: Header V3 DSA/SHA1 Signature, key ID 5072e1f5: NOKEYPublic key for mysql-community-common-5.7.26-1.el7.x86_64.rpm is not installed(1/6): mysql-community-common-5.7.26-1.el7.x86_64.rpm | 274 kB 00:00:05(2/6): mysql-community-client-5.7.26-1.el7.x86_64.rpm | 24 MB 00:00:34(3/6): mysql-community-libs-compat-5.7.26-1.el7.x86_64.rpm | 2.0 MB 00:00:02(4/6): postfix-2.10.1-7.el7.x86_64.rpm | 2.4 MB 00:00:00(5/6): mysql-community-libs-5.7.26-1.el7.x86_64.rpm | 2.2 MB 00:03:08(6/6): mysql-community-server-5.7.26-1.el7.x86_64.rpm | 166 MB 00:02:40---------------------------------------------------------------------------------------------------------------Total 1.0 MB/s | 197 MB 00:03:17Retrieving key from file:///etc/pki/rpm-gpg/RPM-GPG-KEY-mysqlImporting GPG key 0x5072E1F5:Userid : "MySQL Release Engineering <mysql-build@oss.oracle.com>"Fingerprint: a4a9 4068 76fc bd3c 4567 70c8 8c71 8d3b 5072 e1f5Package : mysql57-community-release-el7-10.noarch (installed)From : /etc/pki/rpm-gpg/RPM-GPG-KEY-mysqlRunning transaction checkRunning transaction testTransaction test succeededRunning transactionInstalling : mysql-community-common-5.7.26-1.el7.x86_64 1/8Installing : mysql-community-libs-5.7.26-1.el7.x86_64 2/8Installing : mysql-community-client-5.7.26-1.el7.x86_64 3/8Installing : mysql-community-libs-compat-5.7.26-1.el7.x86_64 4/8Updating : 2:postfix-2.10.1-7.el7.x86_64 5/8Installing : mysql-community-server-5.7.26-1.el7.x86_64 6/8Cleanup : 2:postfix-2.10.1-6.el7.x86_64 7/8Erasing : 1:mariadb-libs-5.5.56-2.el7.x86_64 8/8Verifying : mysql-community-server-5.7.26-1.el7.x86_64 1/8Verifying : mysql-community-client-5.7.26-1.el7.x86_64 2/8Verifying : 2:postfix-2.10.1-7.el7.x86_64 3/8Verifying : mysql-community-libs-5.7.26-1.el7.x86_64 4/8Verifying : mysql-community-common-5.7.26-1.el7.x86_64 5/8Verifying : mysql-community-libs-compat-5.7.26-1.el7.x86_64 6/8Verifying : 1:mariadb-libs-5.5.56-2.el7.x86_64 7/8Verifying : 2:postfix-2.10.1-6.el7.x86_64 8/8Installed:mysql-community-libs.x86_64 0:5.7.26-1.el7 mysql-community-libs-compat.x86_64 0:5.7.26-1.el7mysql-community-server.x86_64 0:5.7.26-1.el7Dependency Installed:mysql-community-client.x86_64 0:5.7.26-1.el7 mysql-community-common.x86_64 0:5.7.26-1.el7Dependency Updated:postfix.x86_64 2:2.10.1-7.el7Replaced:mariadb-libs.x86_64 1:5.5.56-2.el7Complete!
2 MySQL数据库设置
首先启动MySQL
[root@instance ~]# systemctl start mysqld.service
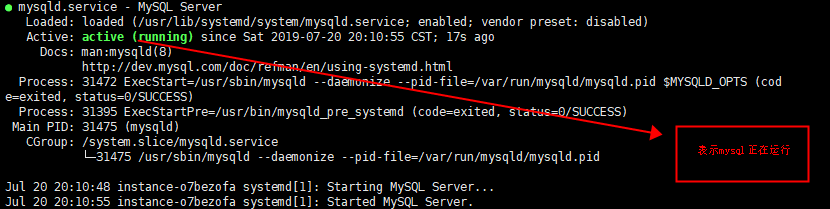
查看MySQL运行状态,运行状态如图:
[root@instance ~]# systemctl status mysqld.service
[root@instance ~]# grep "password" /var/log/mysqld.log

如下命令进入数据库:
[root@localhost ~]# mysql -uroot -p
输入初始密码,此时不能做任何事情,因为MySQL默认必须修改密码之后才能操作数据库:
mysql> ALTER USER 'root'@'localhost' IDENTIFIED BY 'new password';
这里有个问题,新密码设置的时候如果设置的过于简单会报错:
原因是因为MySQL有密码设置的规范,具体是与validate_password_policy的值有关:

mysql> SHOW VARIABLES LIKE 'validate_password%';+--------------------------------------+-------+| Variable_name | Value |+--------------------------------------+-------+| validate_password_check_user_name | OFF || validate_password_dictionary_file | || validate_password_length | 4 || validate_password_mixed_case_count | 1 || validate_password_number_count | 1 || validate_password_policy | LOW || validate_password_special_char_count | 1 |+--------------------------------------+-------+rows in set (0.01 sec)
密码的长度是由validate_password_length决定的,而validate_password_length的计算公式是:
validate_password_length = validate_password_number_count + validate_password_special_char_count + (2 * validate_password_mixed_case_count)
我的是已经修改过的,初始情况下第一个的值是ON,validate_password_length是8。可以通过如下命令修改:
mysql> set global validate_password_policy=0;mysql> set global validate_password_length=1;
设置之后就是我上面查出来的那几个值了,此时密码就可以设置的很简单,例如1234之类的。到此数据库的密码设置就完成了。
但此时还有一个问题,就是因为安装了Yum Repository,以后每次yum操作都会自动更新,需要把这个卸载掉:
[root@localhost ~]# yum -y remove mysql57-community-release-el7-10.noarch
使远程可以连接mysql
GRANT ALL PRIVILEGES ON *.* TO 'root'@'%' IDENTIFIED BY '密码' WITH GRANT OPTION;flush privileges;

若有收获,就点个赞吧
0 人点赞
