File类
File:既可以表示文件,也可以表示文件目录
调用不带参数的list方法,就可以获得此File对象的全部列表
public class DirList {public static void main(String[] args) {File path = new File(".");//代表的是项目的根目录String[] list;if(args.length == 0)list = path.list();//获取指定目录的所有文件信息elselist = path.list(new DirFilter(args[0]));Arrays.sort(list, String.CASE_INSENSITIVE_ORDER);for(String dirItem : list)System.out.println(dirItem);}}class DirFilter implements FilenameFilter {private Pattern pattern;public DirFilter(String regex) {pattern = Pattern.compile(regex);}public boolean accept(File dir, String name) {return pattern.matcher(name).matches();}}
输入输出
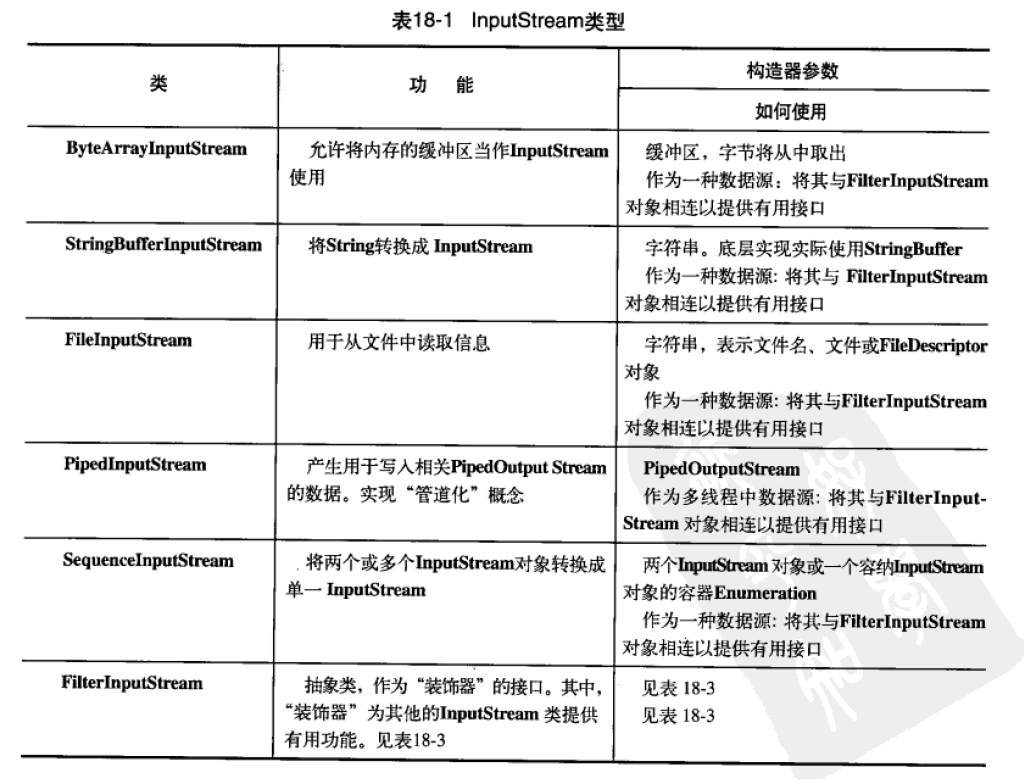
I/O类库中进场使用“流”这个概念,任何来自InputStream或者Reader派生而来的类都有命名为read()的基本方法,用于读取单个字节或者字节数组。
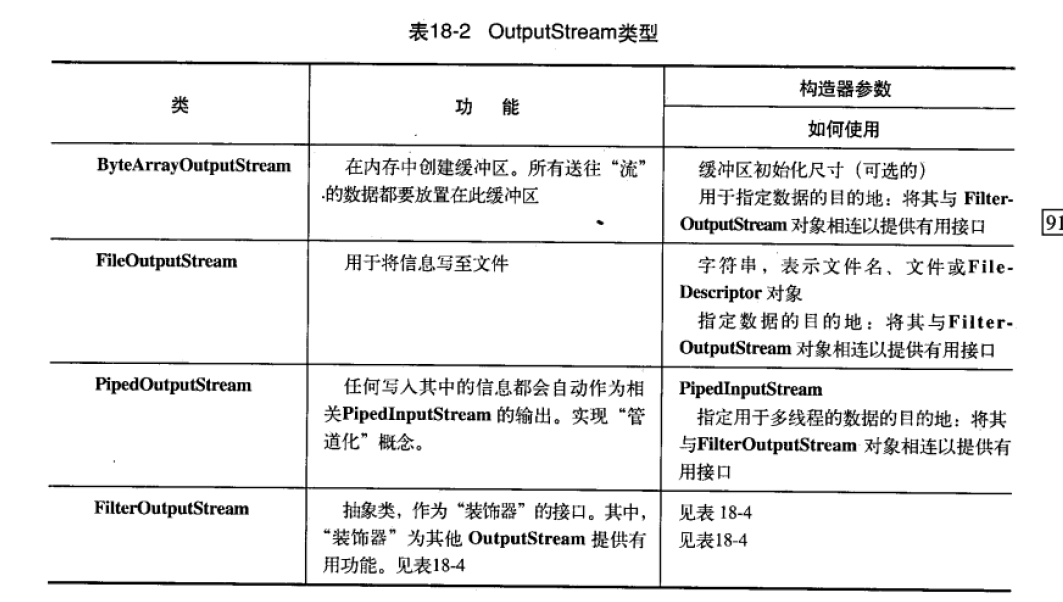
任何来OutputStream或者Writer派生而来的类都有命名为write()的基本方法,用于写单个字节或者字节数组
InputStream类型
OutputStream类型
添加属性和有用的接口
Java I/O类库需要多种不同功能的组合,这也是使用装饰器模式的理由所在,这也是Java类库中存在filter类的原因所在抽象类filter是所有装饰器类的基类
通过FilterInputStream从InputStream读取数据
DataInputStream允许我们读取不同的基本类型数据以及String对象(所有的方法都用read开头)
DataOutputStream可以通过数据流,将基本的数据从一个地方迁移到另一个地方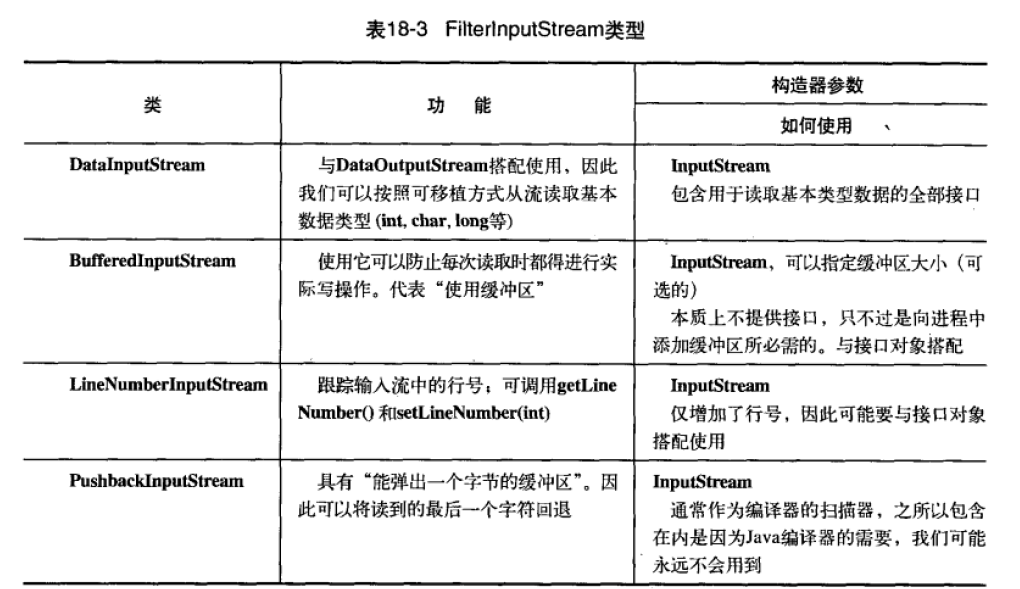
通过FIlterOutputStream向OutputStream写入
BufferedOutputStream是一个修改过的OutputStream,它对数据流使用缓冲技术,因此当每次向流写入时,不必每次都进行实际的物理写入动作。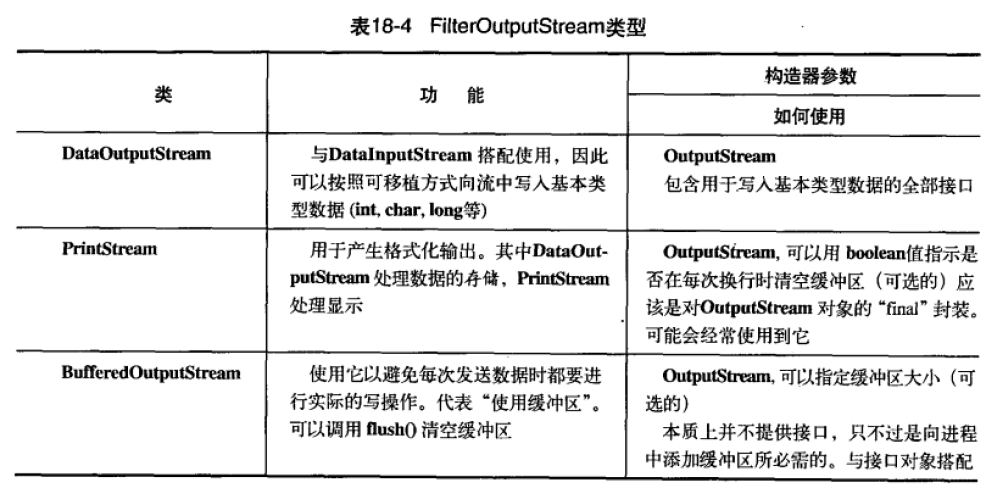
新I/O
新I/O的速度更快,原因是使用的结构更接近于操作系统执行I/O的方式:通道和缓冲器。
唯一直接与通道交互的缓冲器是ByteBuffer,并且还有一个方法选择集,以原始的字节形式或者基本类型输出和读取数据。但是没有办法输出或者读取对象,即使是字符串对象也不行
Reader和Writer这种字符模式不能用于产生通道。
public class GetChannels {public static void main(String[] args) throws IOException {FileChannel fc = new FileOutputStream("data.txt").getChannel();fc.write(ByteBuffer.wrap("Some text".getBytes(StandardCharsets.UTF_8)));fc.close();fc = new RandomAccessFile("data.txt", "rw").getChannel();fc.position(fc.size()); //将指针移动到文件末尾,以便继续写入东西fc.write(ByteBuffer.wrap("Some more".getBytes(StandardCharsets.UTF_8)));//使用ByteBuffer.Wrap方法将已经存在的字节数组包装在ByteBuffer中fc.close();fc = new FileInputStream("data.txt").getChannel();ByteBuffer buffer = ByteBuffer.allocate(1024);fc.read(buffer);fc.close();buffer.flip(); //将指针引动在文件的最后面,这样才可以读取出来,如果没有将他放在最前面,读不出来东西while (buffer.hasRemaining()){System.out.print((char) buffer.get());}}}
转换数据
public class BufferToText {private static final int BSIZE = 1024;public static void main(String[] args) throws IOException {FileChannel fc = new FileOutputStream("data2.txt").getChannel();fc.write(ByteBuffer.wrap("Some Words".getBytes(StandardCharsets.UTF_8)));fc.close();fc = new FileInputStream("data2.txt").getChannel();ByteBuffer buffer = ByteBuffer.allocate(BSIZE);fc.read(buffer);buffer.flip();fc.close();System.out.println(buffer.asCharBuffer()); //这种方式读取出来时乱码,但是使用UTF-16这样打印出来就没事while (buffer.hasRemaining()){System.out.print((char) buffer.get());}System.out.println();buffer.rewind(); //返回到数据开始的部分String encoding = System.getProperty("file.encoding");System.out.println("Decoding using: " + encoding + ": " + Charset.forName(encoding).decode(buffer));fc = new FileOutputStream("data2.txt").getChannel();fc.write(ByteBuffer.wrap("Some Text2".getBytes(StandardCharsets.UTF_16BE)));fc.close();fc = new FileInputStream("data2.txt").getChannel();buffer.clear();fc.read(buffer);buffer.flip();System.out.println(buffer.asCharBuffer());fc = new FileOutputStream("data2.txt").getChannel();buffer = ByteBuffer.allocate(24);//因为分配了24个字节,一个字符占两个字节,所以Some Text占了9个字符,剩下的字符还会输出buffer.asCharBuffer().put("Some Text");//用这样方式也可以在文件中写入内容fc.write(buffer);fc.close();fc = new FileInputStream("data2.txt").getChannel();buffer.clear();fc.read(buffer);buffer.flip();System.out.println(buffer.asCharBuffer());}}
获取基本类型
缓冲器容纳的是普通的字节,为了将他们转换成字符,要么在输入他们时候对其进行编码,要么在缓冲器对其进行输出的时候对其进行解码
public class GetData {private static final int SIZE = 1024;public static void main(String[] args) {ByteBuffer bb = ByteBuffer.allocate(SIZE);int i = 0;while (i++ < bb.limit()){//bb.limit 表示缓冲器的大小if (bb.get() != 0) { //初始值全为零System.out.println("nonzero");}}System.out.println("i = "+ i);bb.rewind(); //将position设置为0;移动到文件开头,bb.asCharBuffer().put("Howdy");//放入数据或者进行rewind操作,对limit都没有影响char c ;while ((c = bb.getChar()) != 0) {System.out.print(c + " ");}System.out.println();bb.rewind();bb.asShortBuffer().put((short) 471142);//short还得强调System.out.println(bb.getShort());bb.rewind();bb.asIntBuffer().put(99471142);System.out.println(bb.getInt());bb.rewind();bb.asLongBuffer().put(99471142);System.out.println(bb.getLong());bb.rewind();bb.asFloatBuffer().put(99471142);System.out.println(bb.getFloat());bb.rewind();bb.asDoubleBuffer().put(99471142);System.out.println(bb.getDouble());}}
视图缓冲器
视图缓冲器可以让我们通过某个特定的基本类型的视窗产看其底层的ByteBuffer。ByteBuffer依旧是存放数据的地方,对视图的修改都会映射成为对ByteBuffer中数据的修改
public class IntBufferDemo {private static final int SIZE = 1024;public static void main(String[] args) {ByteBuffer bb = ByteBuffer.allocate(SIZE);IntBuffer ib = bb.asIntBuffer();ib.put(new int[]{11, 42, 47, 49, 99, 143, 811, 1016});System.out.println(ib.get(3));ib.put(3, 1811);//可以直接进行修改ib.flip();//如果不进行flip操作的话还会读取后面的元素,都是0;while (ib.hasRemaining()) {int i = ib.get();System.out.println(i);}}}
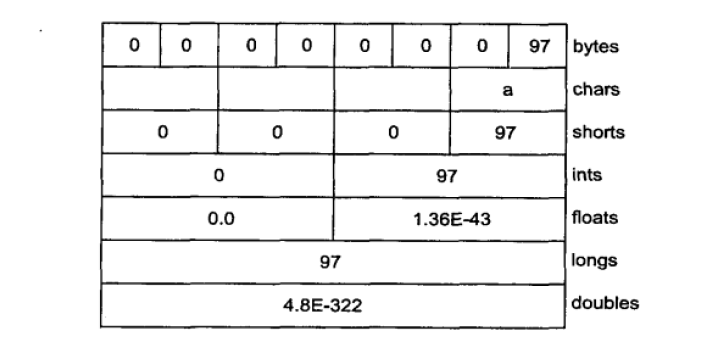
使用视图缓冲器可以把任何数据都转换成某一特定的基本类型
public class ViewBuffers {public static void main(String[] args) {ByteBuffer bb = ByteBuffer.wrap(new byte[]{0, 0, 0, 0, 0, 0, 0, 'a'});bb.rewind();printnb("Byte Buffer ");while (bb.hasRemaining())printnb(bb.position() + " -> " + bb.get() + ", ");print();CharBuffer cb =((ByteBuffer) bb.rewind()).asCharBuffer();printnb("Char Buffer ");while (cb.hasRemaining())printnb(cb.position() + " -> " + cb.get() + ", ");print();FloatBuffer fb =((ByteBuffer) bb.rewind()).asFloatBuffer();printnb("Float Buffer ");while (fb.hasRemaining())printnb(fb.position() + " -> " + fb.get() + ", ");print();IntBuffer ib =((ByteBuffer) bb.rewind()).asIntBuffer();printnb("Int Buffer ");while (ib.hasRemaining())printnb(ib.position() + " -> " + ib.get() + ", ");print();LongBuffer lb =((ByteBuffer) bb.rewind()).asLongBuffer();printnb("Long Buffer ");while (lb.hasRemaining())printnb(lb.position() + " -> " + lb.get() + ", ");print();ShortBuffer sb =((ByteBuffer) bb.rewind()).asShortBuffer();printnb("Short Buffer ");while (sb.hasRemaining())printnb(sb.position() + " -> " + sb.get() + ", ");print();DoubleBuffer db =((ByteBuffer) bb.rewind()).asDoubleBuffer();printnb("Double Buffer ");while (db.hasRemaining())printnb(db.position() + " -> " + db.get() + ", ");}}
字节存放顺序
当存储量大于一个字节时,像int,float等,就要考虑字节的顺序问题了,ByteBuffer是以高位优先的顺序形式存储数据的,并且数据在网上传送时也常常使用高位优先的形式
如何通过字节存放模式设置来改变字符中的字节次序
public class Endians {public static void main(String[] args) {ByteBuffer bb = ByteBuffer.wrap(new byte[12]);bb.asCharBuffer().put("abcdef");print(Arrays.toString(bb.array()));bb.rewind();bb.order(ByteOrder.BIG_ENDIAN);bb.asCharBuffer().put("abcdef");print(Arrays.toString(bb.array()));bb.rewind();bb.order(ByteOrder.LITTLE_ENDIAN);bb.asCharBuffer().put("abcdef");print(Arrays.toString(bb.array()));//Array返回的是自己的成员变量数组}}
用缓冲器操纵数据
如果想把一个字节数组写到文件中去,那么就应该使用ByteBuffer.wrap()方法把字节数组包装起来,然后使用getChannle()方法在FIleOutputStream上打开一个通道,然后将来自于ByteBuffer的数据写到FileChannel中
ByteBuffer是将数据移出通道的唯一方式,并且我们只能创建一个独立的基本类型缓冲器,或者使用“as”方式从ByteBuffer中获得
缓冲器的细节
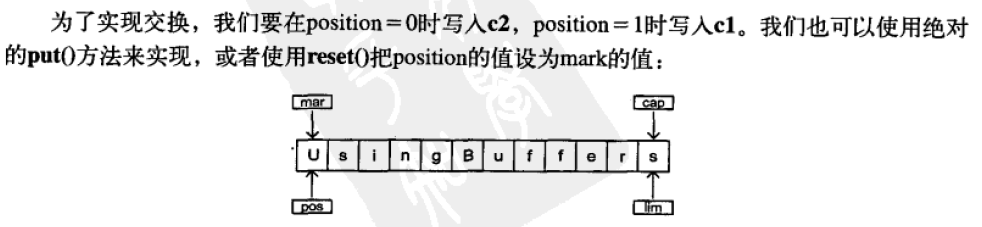
Buffer是由数据和可以高效的访问及操纵这些数据的四个索引组成的:mark(标记),position(位置),limit(界限),和capacity(容量)
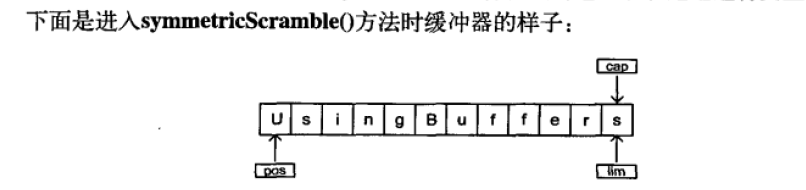
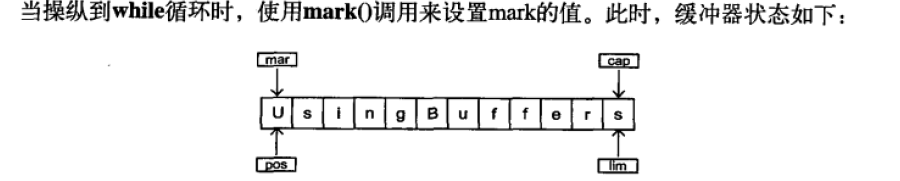
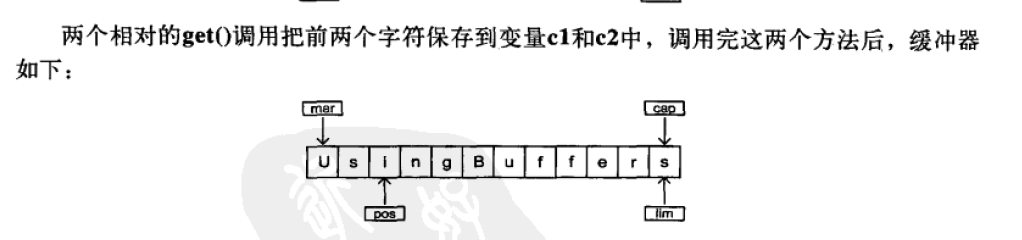
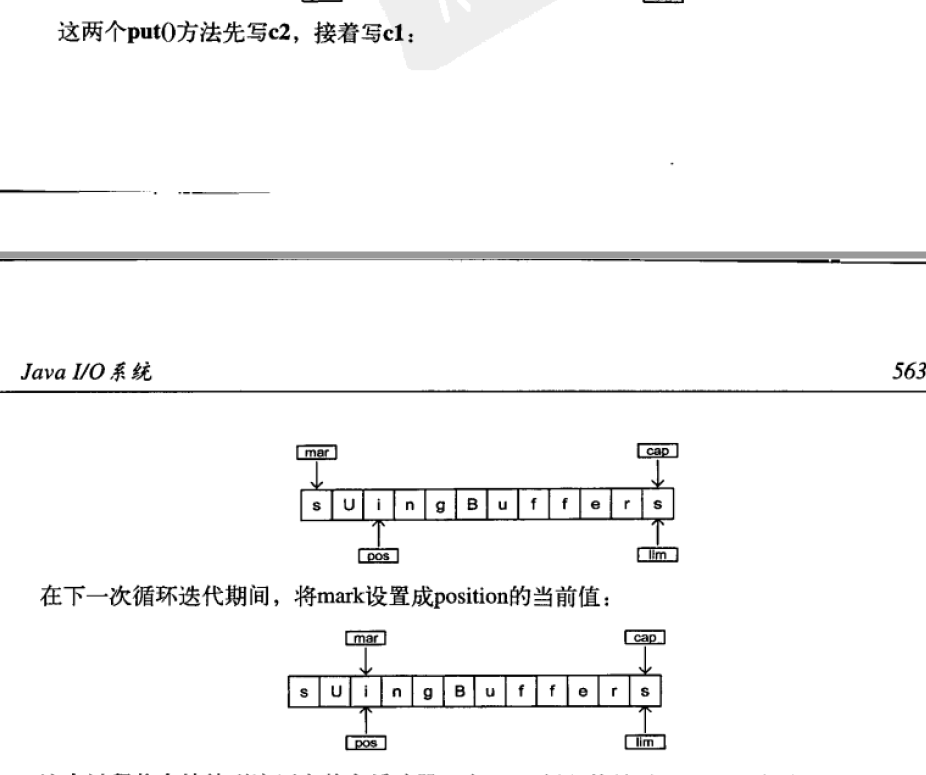
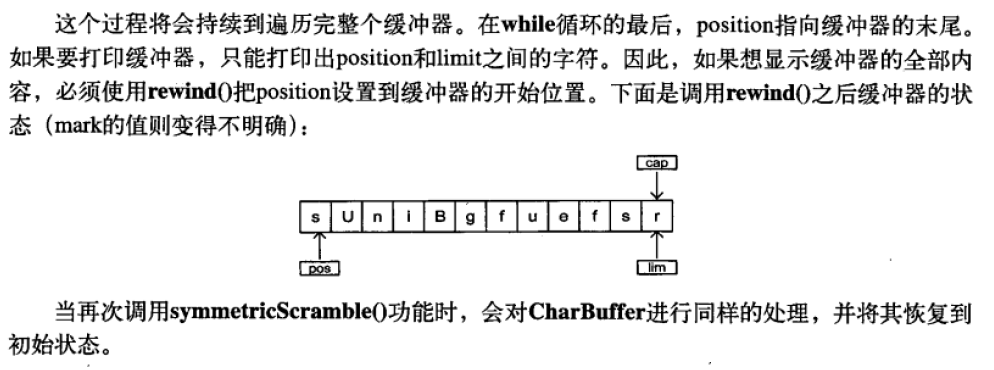
如何交换相邻字符
public class UsingBuffers {private static void symmetricScramble(CharBuffer buffer) {while (buffer.hasRemaining()) {buffer.mark();char c1 = buffer.get();char c2 = buffer.get();buffer.reset();buffer.put(c2).put(c1);}}public static void main(String[] args) {char[] data = "UsingBuffers".toCharArray();ByteBuffer bb = ByteBuffer.allocate(data.length * 2);CharBuffer cb = bb.asCharBuffer();cb.put(data);print(cb.rewind());symmetricScramble(cb);print(cb.rewind());symmetricScramble(cb);print(cb.rewind());}}
内存映射文件
内存映射文件允许我们创建和修改那些因为太大而不能放入内存的文件
public class LargeMappedFiles {static int length = 0x8FFFFFF; // 128 MBpublic static void main(String[] args) throws Exception {MappedByteBuffer out =new RandomAccessFile("test.dat", "rw").getChannel().map(FileChannel.MapMode.READ_WRITE, 0, length);//参数:文件的t映射是只读还是读写还是私有的,文件的起始位置,必须是非负数,映射区域的大小for(int i = 0; i < length; i++)out.put((byte)'x');print("Finished writing");for(int i = length/2; i < length/2 + 6; i++)printnb((char)out.get(i));}}
文件加锁
文件加锁对其他的操作系统进程是可见的,并不是说其他线程可读
public class FileLocking {public static void main(String[] args) throws IOException, InterruptedException {FileOutputStream fos = new FileOutputStream("file.txt");FileLock fl = fos.getChannel().tryLock();//对其进行上锁if (fl != null) {System.out.println("Locked File");TimeUnit.SECONDS.sleep(10);//休眠10sfl.release();//解除上锁状态System.out.println("Release Lock");}fos.close();}}
对象序列化
java的对象序列化将那些实现了Serializable接口的对象转换成一个字节序列,并能够在以后将这个字节序列完全恢复成原来的对象
要序列化一个对象,首先要创建OutputStream对象,然后将其封装在一个ObjectOutputStream对象之内,这是调用wtiteObject就可以将对象序列化,然后将其发送给OutputStream(对象序列化时基于字节的,因要使用InputSteam和OutputStream继承层次结构)
class Data implements Serializable {private int n;public Data(int n) {this.n = n;}public String toString() {return Integer.toString(n);}}public class Worm implements Serializable {private static Random rand = new Random(47);private Data[] d = {new Data(rand.nextInt(10)), //使用随机数初始化new Data(rand.nextInt(10)),new Data(rand.nextInt(10))};private Worm next;private char c;public Worm(int i, char x) {print("Worm constructor: " + i);c = x;if (--i > 0)next = new Worm(i, (char) (x + 1));}public Worm() {print("Default constructor");}public String toString() {StringBuilder result = new StringBuilder(":");result.append(c);result.append("(");for (Data dat : d)result.append(dat);result.append(")");if (next != null)result.append(next);return result.toString();}public static void main(String[] args)throws ClassNotFoundException, IOException {Worm w = new Worm(6, 'a');print("w = " + w);ObjectOutputStream out = new ObjectOutputStream(new FileOutputStream("worm.out"));out.writeObject("Worm storage\n");out.writeObject(w); //将对象序列化out.close();ObjectInputStream in = new ObjectInputStream(new FileInputStream("worm.out"));String s = (String) in.readObject(); //读写文件Worm w2 = (Worm) in.readObject();print(s + "w2 = " + w2);ByteArrayOutputStream bout =new ByteArrayOutputStream();ObjectOutputStream out2 = new ObjectOutputStream(bout);out2.writeObject("Worm storage\n");out2.writeObject(w);out2.flush();ObjectInputStream in2 = new ObjectInputStream(new ByteArrayInputStream(bout.toByteArray()));//读写文件数组s = (String) in2.readObject();Worm w3 = (Worm) in2.readObject();print(s + "w3 = " + w3);}}
序列化的控制
特殊的安全问题:不希望对象的某一部分被序列化,或者一个对象被还原之后,某个子对象需要重新创建,从而不需要将该子对象序列化
可以通过实现Externalizable将其代替Serializable,来对序列化过程进行控制,这个Externalizable继承了Serializable,并且新增了两个方法:writeExternal()和readExternal(),这两个方法会在序列化和反序列化还原的过程中被自动调用。
class Blips1 implements Externalizable{public Blips1(){System.out.println("Blips1 Constructor---");}@Overridepublic void writeExternal(ObjectOutput out) throws IOException {System.out.println("Blips1 writeExternal");}@Overridepublic void readExternal(ObjectInput in) throws IOException, ClassNotFoundException {System.out.println("Blips readExternal");}}class Blips2 implements Externalizable{public Blips2(){System.out.println("Blips2 Constructor -------");}/* Blips2(){ //如果它的构造器不是public,不会恢复成功的System.out.println("Blips2 Constructor -------");}*/@Overridepublic void writeExternal(ObjectOutput out) throws IOException {System.out.println("Blips2 writeExternal");}@Overridepublic void readExternal(ObjectInput in) throws IOException, ClassNotFoundException {System.out.println("Blips2 readExternal");}}public class Blips {public static void main(String[] args) throws IOException, ClassNotFoundException {System.out.println("Constructing");Blips1 blips1 = new Blips1();Blips2 blips2 = new Blips2();ObjectOutputStream o = new ObjectOutputStream(new FileOutputStream("Blips.out"));System.out.println("Saving objects");o.writeObject(blips1);//调用方法对其进行序列化o.writeObject(blips2);o.close();ObjectInputStream in = new ObjectInputStream(new FileInputStream("Blips.out"));System.out.println("Recovering objects");blips1 = (Blips1) in.readObject();//对其进行还原,并且会调用它的默认构造器,必须声明式pubic的//如果不是public会还原不成功blips2 = (Blips2) in.readObject();}}
此外,Externalizable可以控制哪些属性序列化还是不序列化可以控制只写不读,但是不能不写就读相较于父类更灵活
public class Blips3 implements Externalizable {private int i;private String s;public Blips3(){System.out.println("Blips3 constructor-----");}public Blips3(String x,int a){System.out.println("Blips3(String x, int a)");s = x;i = a;}@Overridepublic String toString() {return s + " " + i;}@Overridepublic void writeExternal(ObjectOutput out) throws IOException {System.out.println("Blips3.writeExternal");out.writeObject(s);out.writeInt(i);}@Overridepublic void readExternal(ObjectInput in) throws IOException, ClassNotFoundException {System.out.println("Blips3.readExternal");s = (String) in.readObject(); //如果不进行这两个步骤就会发现S为null,为0;i = in.readInt();}public static void main(String[] args) throws IOException, ClassNotFoundException {System.out.println("Constructing objects");Blips3 b3 = new Blips3("A String", 47);//在参数构造器中对其进行赋值System.out.println(b3);ObjectOutputStream o = new ObjectOutputStream(new FileOutputStream("Blip3.out"));System.out.println("Saving Object");o.writeObject(b3);o.close();ObjectInputStream in = new ObjectInputStream(new FileInputStream("Blip3.out"));System.out.println("Recovering Object");b3 = (Blips3) in.readObject();//此时先走默认构造器,并且跟参数构造器没有关系System.out.println(b3);}}
transiant(瞬时)关键字
使特定对象不让java的序列化机制自动保存和恢复,可以使用transiant关键字对字段逐个关闭序列化
public class Logon implements Serializable {private Date date = new Date();private String username;private transient String password;//使用transient关键字,这样序列化之后被恢复之后发现password为nullpublic Logon(String name, String pwd) {username = name;password = pwd;}@Overridepublic String toString() {return "Logon{" +"date=" + date +", username='" + username + '\'' +", password='" + password + '\'' +'}';}public static void main(String[] args) throws IOException, ClassNotFoundException {Logon a = new Logon("Hulk", "myLittlePony");System.out.println("logon a = " + a);ObjectOutputStream o = new ObjectOutputStream(new FileOutputStream("Logon.out"));o.writeObject(a);o.close();ObjectInputStream in = new ObjectInputStream(new FileInputStream("Logon.out"));System.out.println("Recovering Object at " + new Date());a = (Logon) in.readObject();System.out.println(a);}}
Externalizable的替代方法
实现Serializible接口,添加writeObject和readObject方法(而不是重写),只要提供了这两个方法,就会使用他们而不是默认的序列化机制
public class SerialCtl implements Serializable {private String a;private transient String b;public SerialCtl(String aa, String bb) {a = "Not Transient: " + aa;b = "Transient: " + bb;}public String toString() { return a + "\n" + b; }private void writeObject(ObjectOutputStream stream)throws IOException {stream.defaultWriteObject();//处理的是非transient的序列化stream.writeObject(b);//处理的是transient的序列化}private void readObject(ObjectInputStream stream)throws IOException, ClassNotFoundException {stream.defaultReadObject();b = (String)stream.readObject();}public static void main(String[] args)throws IOException, ClassNotFoundException {SerialCtl sc = new SerialCtl("Test1", "Test2");System.out.println("Before:\n" + sc);ByteArrayOutputStream buf= new ByteArrayOutputStream();ObjectOutputStream o = new ObjectOutputStream(buf);o.writeObject(sc);ObjectInputStream in = new ObjectInputStream(new ByteArrayInputStream(buf.toByteArray()));SerialCtl sc2 = (SerialCtl)in.readObject();System.out.println("After:\n" + sc2);}}
On Java 8
文件和目录,路径
public class PathInfo {static void show(String id, Object p) {System.out.println(id + " " + p);}static void info(Path p){show("toString: ", p);show("Exists: ", Files.isRegularFile(p));//测试文件是否包含不透明内容的常规文件show("Directory: ",Files.isDirectory(p));//判断文件是否使目录show("Absolute: ",p.isAbsolute());//判断是否是绝对路径show("Filename: ",p.getFileName());//获取文件名show("Parent: ", p.getParent());//获取父级目录show("root: ", p.getRoot());System.out.println("----------");}public static void main(String[] args) {System.out.println(System.getProperty("os.name"));//获取操作系统名称Path p = Paths.get("src/stu/chapter18/PathInfo.java");info(p);Path ap = p.toAbsolutePath();//拿到绝对路径info(ap);info(ap.getParent());try {info(p.toRealPath());//返回文件的真实路径} catch (IOException e) {e.printStackTrace();}URI u = p.toUri();System.out.println("URi: " + u);Path puri = Paths.get(u);System.out.println(Files.exists(puri));File f = ap.toFile();//返回此路径的File对象}}
目录
public class RmDir {public static void rmdir(Path dir) throws IOException {Files.walkFileTree(dir,new SimpleFileVisitor<Path>(){//遍历文件树,SimpleFileVisitor:文件访问器@Override//在目录的每个文件上运行public FileVisitResult visitFile(Path file, BasicFileAttributes attrs) throws IOException {Files.delete(file);return FileVisitResult.CONTINUE;}@Override//访问了目录中所有内容之后,及其所有的后代之后,为目录调用public FileVisitResult postVisitDirectory(Path dir, IOException exc) throws IOException {Files.delete(dir);return FileVisitResult.CONTINUE;}//visitFileFailed():调用无法访问的文件//preVisitDirectory():在访问目录中的条目之前为目录调用});}}

若有收获,就点个赞吧
0 人点赞
