- wangEditor官网看了一下,介绍的很详细,下面就来看看再下是如何实现的,由于刚刚开始用,目前功能不太多,只是实现了如何将其渲染出来,以及获取其富文本编辑器的值。(顺便提一下,wangeditor富文本编辑器对html内容支持还是很不错,有兴趣的小伙伴可以去试试)。">在新的后台管理项目中由于需要对文章、商品进行一些相关编辑,于是加入了富文本编辑器,最先是用了vue-quill-editor,发现界面有点难看,后来换ckeditor,试了好几个npm包,后来没有实现:( 全是泪,后来想起之前一个网友推荐的wangEditor这个编辑器,在wangEditor官网看了一下,介绍的很详细,下面就来看看再下是如何实现的,由于刚刚开始用,目前功能不太多,只是实现了如何将其渲染出来,以及获取其富文本编辑器的值。(顺便提一下,wangeditor富文本编辑器对html内容支持还是很不错,有兴趣的小伙伴可以去试试)。
- 1.首先npm install wangeditor安装下wangeditor
在新的后台管理项目中由于需要对文章、商品进行一些相关编辑,于是加入了富文本编辑器,最先是用了vue-quill-editor,发现界面有点难看,后来换ckeditor,试了好几个npm包,后来没有实现:( 全是泪,后来想起之前一个网友推荐的wangEditor这个编辑器,在wangEditor官网看了一下,介绍的很详细,下面就来看看再下是如何实现的,由于刚刚开始用,目前功能不太多,只是实现了如何将其渲染出来,以及获取其富文本编辑器的值。(顺便提一下,wangeditor富文本编辑器对html内容支持还是很不错,有兴趣的小伙伴可以去试试)。
如何应用到自己的项目中去看开发者文档,很详细,这里不多做介绍
为了能够实现组件的复用,我是讲editor封装成了一个独立的组件,
实现如下:
<template><div id="wangeditor"><div ref="editorElem" style="text-align:left"></div></div></template><script>import E from 'wangeditor'export default {name: 'editorElem',data () {return {editor: null,editorContent: ''}},props: ['catchData', 'content'], // 接收父组件的方法watch: {content () {this.editor.txt.html(this.content)}},mounted () {this.editor = new E(this.$refs.editorElem)this.editor.customConfig.onchange = (html) => {this.editorContent = htmlthis.catchData(this.editorContent) // 把这个html通过catchData的方法传入父组件}this.editor.customConfig.uploadImgServer = '你的上传图片的接口'this.editor.customConfig.uploadFileName = '你自定义的文件名'this.editor.customConfig.menus = [ // 菜单配置'head', // 标题'bold', // 粗体'fontSize', // 字号'fontName', // 字体'italic', // 斜体'underline', // 下划线'strikeThrough', // 删除线'foreColor', // 文字颜色'backColor', // 背景颜色'link', // 插入链接'list', // 列表'justify', // 对齐方式'quote', // 引用'emoticon', // 表情'image', // 插入图片'table', // 表格'code', // 插入代码'undo', // 撤销'redo' // 重复]// 下面是最重要的的方法this.editor.customConfig.uploadImgHooks = {before: function (xhr, editor, files) {// 图片上传之前触发// xhr 是 XMLHttpRequst 对象,editor 是编辑器对象,files 是选择的图片文件// 如果返回的结果是 {prevent: true, msg: 'xxxx'} 则表示用户放弃上传// return {// prevent: true,// msg: '放弃上传'// }},success: function (xhr, editor, result) {// 图片上传并返回结果,图片插入成功之后触发// xhr 是 XMLHttpRequst 对象,editor 是编辑器对象,result 是服务器端返回的结果this.imgUrl = Object.values(result.data).toString()},fail: function (xhr, editor, result) {// 图片上传并返回结果,但图片插入错误时触发// xhr 是 XMLHttpRequst 对象,editor 是编辑器对象,result 是服务器端返回的结果},error: function (xhr, editor) {// 图片上传出错时触发// xhr 是 XMLHttpRequst 对象,editor 是编辑器对象},timeout: function (xhr, editor) {// 图片上传超时时触发// xhr 是 XMLHttpRequst 对象,editor 是编辑器对象},// 如果服务器端返回的不是 {errno:0, data: [...]} 这种格式,可使用该配置// (但是,服务器端返回的必须是一个 JSON 格式字符串!!!否则会报错)customInsert: function (insertImg, result, editor) {// 图片上传并返回结果,自定义插入图片的事件(而不是编辑器自动插入图片!!!)// insertImg 是插入图片的函数,editor 是编辑器对象,result 是服务器端返回的结果// 举例:假如上传图片成功后,服务器端返回的是 {url:'....'} 这种格式,即可这样插入图片:let url = Object.values(result.data) // result.data就是服务器返回的图片名字和链接JSON.stringify(url) // 在这里转成JSON格式insertImg(url)// result 必须是一个 JSON 格式字符串!!!否则报错}}this.editor.create() // 创建富文本实例if (!this.content) {this.editor.txt.html('请编辑内容1')}}}</script><style lang="scss" rel="stylesheet/scss">#wangeditor {width: 50rem;}</style>
然后在父组件中import,如下: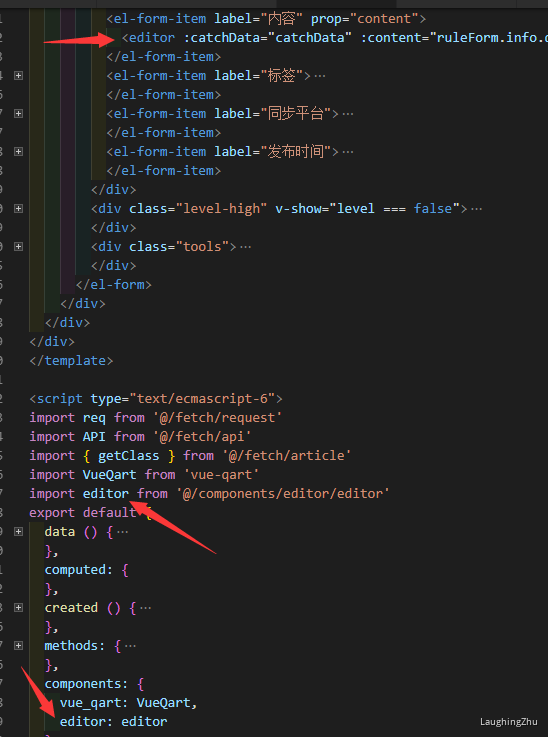
1. import
2. components 中注册组件
3. 在模板中渲染:
<editor :catchData="catchData" :content="ruleForm.info.description"></editor>
这里用props 项子组件editor传了一个catchData函数,在methods中定义,用于在父组件中获取editor中的内容,一个content作为初始化的数据(此处是从服务器获取的文章详情,效果是当请求完成将详情展示到editor中实现可编辑)
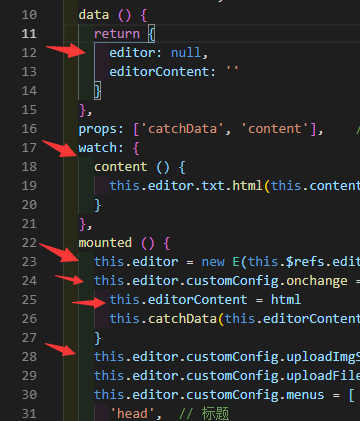
需要注意的是:我遇到是的不知如何在父组件中传值给子组件然后在editor中展示出来,现在用的是props传值到子组件,然后用watch监听content的变化,如果content接收到,则通过editor.txt.html(this.content)来改变editor中的内容,(用watch的原因是由于数据请求可能是延时,子组件不能及时获取到content,通过watch则可以在获取到的时候改变内容)。在查看此文章请与官方文档对比,特别是最后一张图片中红箭头标出的this,这是修改之后的。
望大家工作顺利:) !!!
1.首先npm install wangeditor安装下wangeditor
2、components文件里引用下组件
为了能够实现组件的复用,我是讲editor封装成了一个独立的组件,实现如下:<template><div id="wangeditor"><div ref="editorElem" style="text-align:left"></div></div></template><script>import E from 'wangeditor'export default {name: 'editorElem',data () {return {editor: null,editorContent: ''}},props: ['catchData', 'content'], // 接收父组件的方法props:{content:{type:String,required:false}},watch: {content () {this.editor.txt.html(this.content)}},mounted () {this.editor = new E(this.$refs.editorElem)this.editor.customConfig.onchange = (html) => {this.editorContent = htmlthis.catchData(this.editorContent) // 把这个html通过catchData的方法传入父组件}this.editor.customConfig.uploadImgServer = '你的上传图片的接口'this.editor.customConfig.uploadFileName = '你自定义的文件名'this.editor.customConfig.menus = [ // 菜单配置'head', // 标题'bold', // 粗体'fontSize', // 字号'fontName', // 字体'italic', // 斜体'underline', // 下划线'strikeThrough', // 删除线'foreColor', // 文字颜色'backColor', // 背景颜色'link', // 插入链接'list', // 列表'justify', // 对齐方式'quote', // 引用'emoticon', // 表情'image', // 插入图片'table', // 表格'code', // 插入代码'undo', // 撤销'redo' // 重复]// 下面是最重要的的方法this.editor.customConfig.uploadImgHooks = {before: function (xhr, editor, files) {// 图片上传之前触发// xhr 是 XMLHttpRequst 对象,editor 是编辑器对象,files 是选择的图片文件// 如果返回的结果是 {prevent: true, msg: 'xxxx'} 则表示用户放弃上传// return {// prevent: true,// msg: '放弃上传'// }},success: function (xhr, editor, result) {// 图片上传并返回结果,图片插入成功之后触发// xhr 是 XMLHttpRequst 对象,editor 是编辑器对象,result 是服务器端返回的结果this.imgUrl = Object.values(result.data).toString()},fail: function (xhr, editor, result) {// 图片上传并返回结果,但图片插入错误时触发// xhr 是 XMLHttpRequst 对象,editor 是编辑器对象,result 是服务器端返回的结果},error: function (xhr, editor) {// 图片上传出错时触发// xhr 是 XMLHttpRequst 对象,editor 是编辑器对象},timeout: function (xhr, editor) {// 图片上传超时时触发// xhr 是 XMLHttpRequst 对象,editor 是编辑器对象},// 如果服务器端返回的不是 {errno:0, data: [...]} 这种格式,可使用该配置// (但是,服务器端返回的必须是一个 JSON 格式字符串!!!否则会报错)customInsert: function (insertImg, result, editor) {// 图片上传并返回结果,自定义插入图片的事件(而不是编辑器自动插入图片!!!)// insertImg 是插入图片的函数,editor 是编辑器对象,result 是服务器端返回的结果// 举例:假如上传图片成功后,服务器端返回的是 {url:'....'} 这种格式,即可这样插入图片:let url = Object.values(result.data) // result.data就是服务器返回的图片名字和链接JSON.stringify(url) // 在这里转成JSON格式insertImg(url)// result 必须是一个 JSON 格式字符串!!!否则报错}}this.editor.create() // 创建富文本实例if (!this.content) {this.editor.txt.html('请编辑内容1')}}}</script><style lang="scss" rel="stylesheet/scss">#wangeditor {width: 50rem;}</style>
3、引用
<template><div><div id="toolbar" class="toolbar"></div><div style="padding: 1px 0; background-color: #ccc"></div><div id="editor" class="text" style="min-height:400px;border:1px solid #ddd;"><!--可使用 min-height 实现编辑区域自动增加高度--></div></div></template><script>import E from 'wangeditor'export default {name: 'Editor',data () {return {editorContent: ''}},props:{content:{type:String,required:false}},methods: {getContent: function () {this.content=this.editorContent;}},mounted() {var editor = new E("#toolbar","#editor")editor.customConfig.uploadImgShowBase64 = true ;editor.customConfig.onchange = (html) => {this.editorContent = html}editor.create()editor.txt.html(this.content);}}</script><style scoped></style>
<editor :content="infoForm.articleContent" :getFullText="changeEditor"v-bind:content="editForm.content"></editor>//import Editor from "@/components/Editor";<script>import EditorBar from '../../components/Editor.vue';export default {components: { EditorBar },data() {return {isClear: false,articleContent:''}},methods: {change(val) {// console.log(val)this.goods.detail = val},}}</script>
方法二(夭折)
<template><div id="wangeditor"><div ref="editorElem" style="text-align:left"></div></div></template><script>import E from 'wangeditor'export default {name: 'editorElem',data () {return {editor: null,editorContent: ''}},props: ['catchData', 'content'], // 接收父组件的方法watch: {content () {this.editor.txt.html(this.content)}},mounted () {this.editor = new E(this.$refs.editorElem)this.editor.customConfig.onchange = (html) => {this.editorContent = htmlthis.catchData(this.editorContent) // 把这个html通过catchData的方法传入父组件}this.editor.customConfig.uploadImgServer = '你的上传图片的接口'this.editor.customConfig.uploadFileName = '你自定义的文件名'this.editor.customConfig.menus = [ // 菜单配置'head', // 标题'bold', // 粗体'fontSize', // 字号'fontName', // 字体'italic', // 斜体'underline', // 下划线'strikeThrough', // 删除线'foreColor', // 文字颜色'backColor', // 背景颜色'link', // 插入链接'list', // 列表'justify', // 对齐方式'quote', // 引用'emoticon', // 表情'image', // 插入图片'table', // 表格'code', // 插入代码'undo', // 撤销'redo' // 重复]// 下面是最重要的的方法this.editor.customConfig.uploadImgHooks = {before: function (xhr, editor, files) {// 图片上传之前触发// xhr 是 XMLHttpRequst 对象,editor 是编辑器对象,files 是选择的图片文件// 如果返回的结果是 {prevent: true, msg: 'xxxx'} 则表示用户放弃上传// return {// prevent: true,// msg: '放弃上传'// }},success: function (xhr, editor, result) {// 图片上传并返回结果,图片插入成功之后触发// xhr 是 XMLHttpRequst 对象,editor 是编辑器对象,result 是服务器端返回的结果this.imgUrl = Object.values(result.data).toString()},fail: function (xhr, editor, result) {// 图片上传并返回结果,但图片插入错误时触发// xhr 是 XMLHttpRequst 对象,editor 是编辑器对象,result 是服务器端返回的结果},error: function (xhr, editor) {// 图片上传出错时触发// xhr 是 XMLHttpRequst 对象,editor 是编辑器对象},timeout: function (xhr, editor) {// 图片上传超时时触发// xhr 是 XMLHttpRequst 对象,editor 是编辑器对象},// 如果服务器端返回的不是 {errno:0, data: [...]} 这种格式,可使用该配置// (但是,服务器端返回的必须是一个 JSON 格式字符串!!!否则会报错)customInsert: function (insertImg, result, editor) {// 图片上传并返回结果,自定义插入图片的事件(而不是编辑器自动插入图片!!!)// insertImg 是插入图片的函数,editor 是编辑器对象,result 是服务器端返回的结果// 举例:假如上传图片成功后,服务器端返回的是 {url:'....'} 这种格式,即可这样插入图片:let url = Object.values(result.data) // result.data就是服务器返回的图片名字和链接JSON.stringify(url) // 在这里转成JSON格式insertImg(url)// result 必须是一个 JSON 格式字符串!!!否则报错}}this.editor.create() // 创建富文本实例if (!this.content) {this.editor.txt.html('请编辑内容1')}}}</script><style scoped>#wangeditor {width: 50rem;}</style>

若有收获,就点个赞吧
0 人点赞
