App 开发过程中,肯定希望给用户带来一致的体验,这其中最基础的就是色调、字体保持一致。在 Flutter 中,可以设置全局的主题色调和字体,从而在其他页面引用主色调和字体,实现页面展示层面的一致。
Flutter 的主题色和字体可以在MaterialApp 中设置,即在 main.dart 的入口返回的 MaterialApp 组件统一设置全局的主色调和字体。如下面的代码所示:
class MyApp extends StatelessWidget {@overrideWidget build(BuildContext context) {return MaterialApp(title: 'App 框架',theme: ThemeData(primaryColor: Colors.blue,accentColor: Colors.blue[600],textTheme: TextTheme(headline1: TextStyle(fontSize: 36.0, fontWeight: FontWeight.bold, color: Colors.white),headline2: TextStyle(fontSize: 32.0, fontWeight: FontWeight.w400, color: Colors.white),headline3: TextStyle(fontSize: 28.0, fontWeight: FontWeight.w400, color: Colors.white),headline4: TextStyle(fontSize: 24.0, fontWeight: FontWeight.w400, color: Colors.white),headline6: TextStyle(fontSize: 14.0, fontWeight: FontWeight.w200, color: Colors.white),bodyText1: TextStyle(fontSize: 20.0,fontWeight: FontWeight.w200,),),fontFamily: 'Georgia',),home: AppHomePage(),);}}
通过 MateriaApp 的 theme 属性,构建 ThemeData 来配置全局主题。其中ThemeData常用的属性如下所示:
- brightness:为 Brightness 枚举,包括 dark 和 light 两种模式,其中 dark 对应的是深色模式(即夜间模式),light 对应浅色模式。
- primaryColor:主色调,设置后导航栏就会变成主色调颜色。注意的是导航栏的字体颜色会根据主色调和 brightness 自动计算显示的颜色是偏浅色还是深色。
- accentColor:辅助色,根据需要设置。
- textTheme:文字主体。早期版本的 flutter 设置的比较少,新版本可能是为了支持Web端,字体的属性设置基本和 html 的保持一致了,包括 headline1到 headline6,bodyText1,感觉就是对应 html 中的 h1-h6和 body 的字体。各级字体均可以通过构建 TextStyle 来设置对应的字体参数。
- fontFamily:字体族。
在应用中可以通过 Theme.of(context)获取当前主体,再获取对应的属性来继承主题的色调或字体。如下面的代码的 Text 的样式就继承了主体的bodyText1的字体特性。
@overrideWidget build(BuildContext context) {return Scaffold(body: Center(child: Text('岛',style: Theme.of(context).textTheme.bodyText1,),),);}
而在BottomNavigationBar中的 selectedItemColor(选择颜色)则继承了主色调。
@overrideWidget build(BuildContext context) {return Scaffold(appBar: AppBar(title: Text('岛上码农', style: Theme.of(context).textTheme.headline4),),body: IndexedStack(index: _index,children: _homeWidgets,),bottomNavigationBar: BottomNavigationBar(type: BottomNavigationBarType.fixed,currentIndex: _index,onTap: _onBottomNagigationBarTapped,selectedItemColor: Theme.of(context).primaryColor,items: [_getBottomNavItem('动态', 'images/dynamic.png', 'images/dynamic-hover.png'),_getBottomNavItem(' 消息', 'images/message.png', 'images/message-hover.png'),_getBottomNavItem('分类浏览', 'images/category.png', 'images/category-hover.png'),_getBottomNavItem('个人中心', 'images/mine.png', 'images/mine-hover.png'),],),);}
通过这种方式可以在 main.dart 中的 MaterialApp 中统一配置色调和字体达到全局一致的目的。如果想要调整色调和字体,只需要在一处修改即可。最终结果如下图所示(有图更改了主题色为绿色)。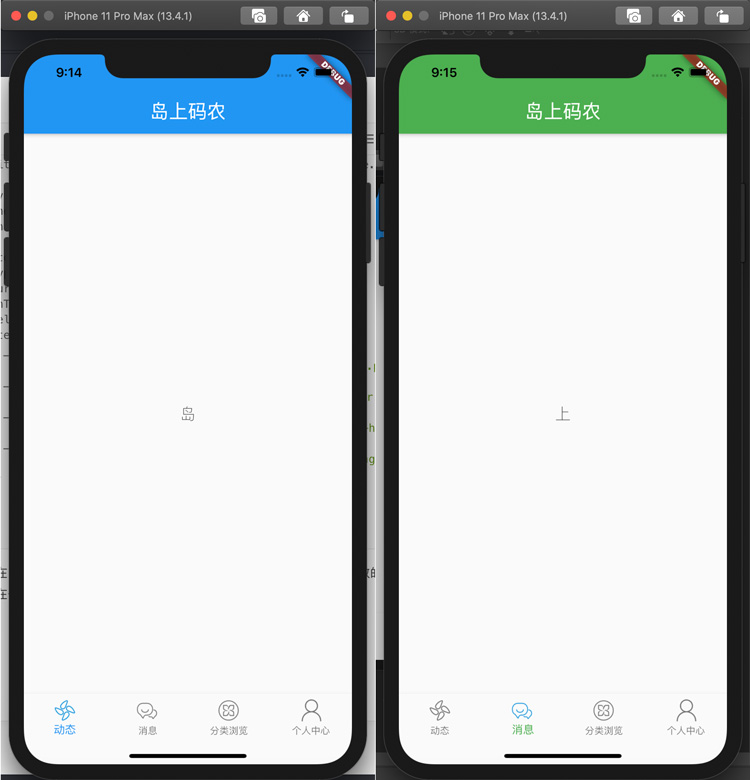
有强迫症的同学可能会发现状态栏的颜色是黑色的,这个该如何修改呢?很简单,对 AppBar的属性设置一下 brightness 属性即可:
return Scaffold(appBar: AppBar(title: Text('岛上码农', style: Theme.of(context).textTheme.headline4),brightness: Brightness.dark,),//...
以上即为 Flutter App 的主题色与字体的设置,实际另一种操作方式也可以使用全局常量的方式,约定好整个工程使用的主色调,辅助色,字体也能达到目的。下一篇介绍如何构建列表,欢迎点赞鼓励!

若有收获,就点个赞吧
0 人点赞
