在开发脚手架之前,我们先了解下脚手架开发的流程图。
脚手架架构图
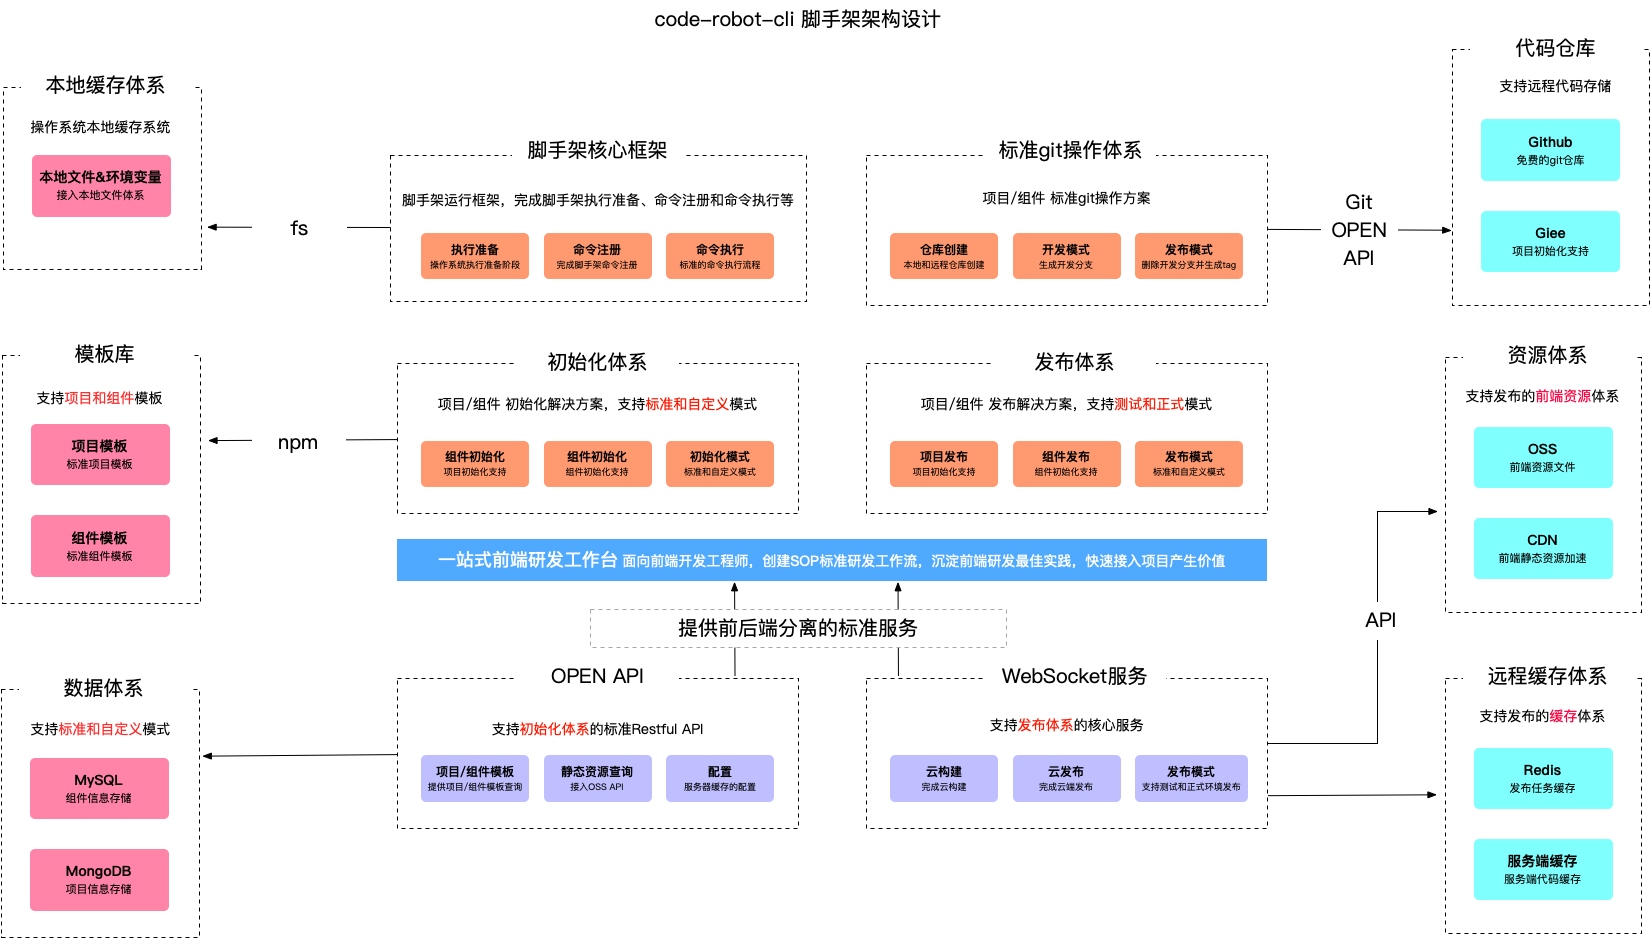
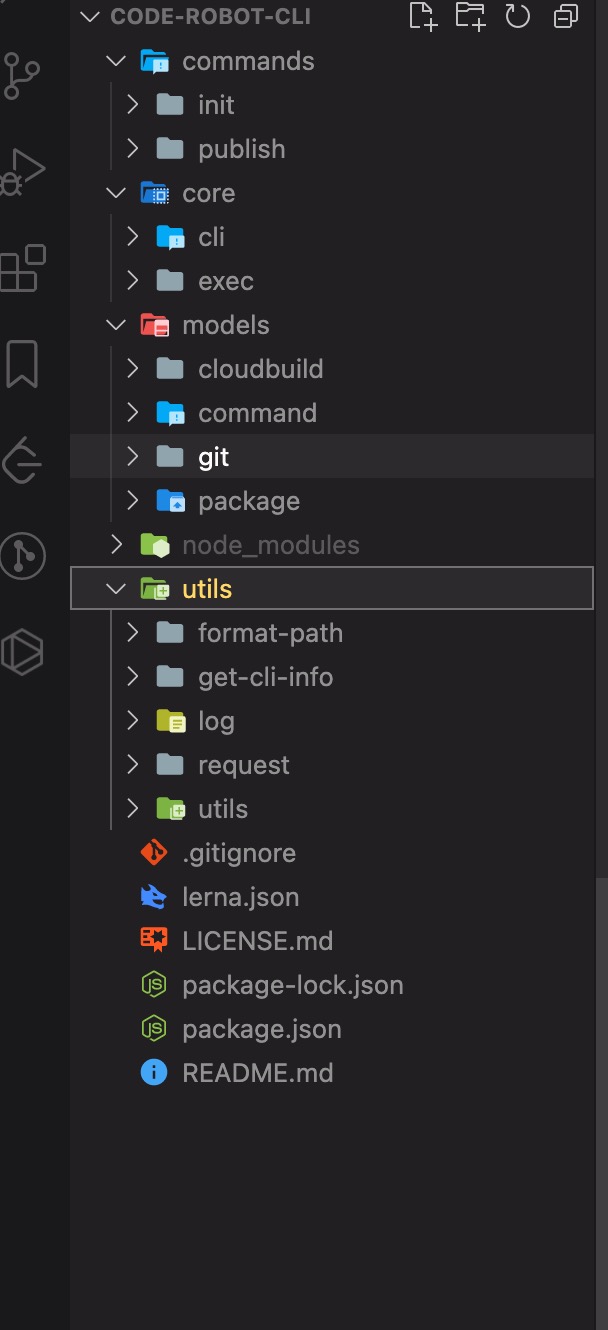
脚手架拆包策略
- 核心流程:core
- 命令:commands
- 初始化
- 发布
- 清除缓存
- 模型层:models
- Command命令
- Project项目
- Component组件
- Npm模块
- Git仓库
- 支持模块:utils
- Git操作
- 云构建
- 工具方法
- API请求
- Git API
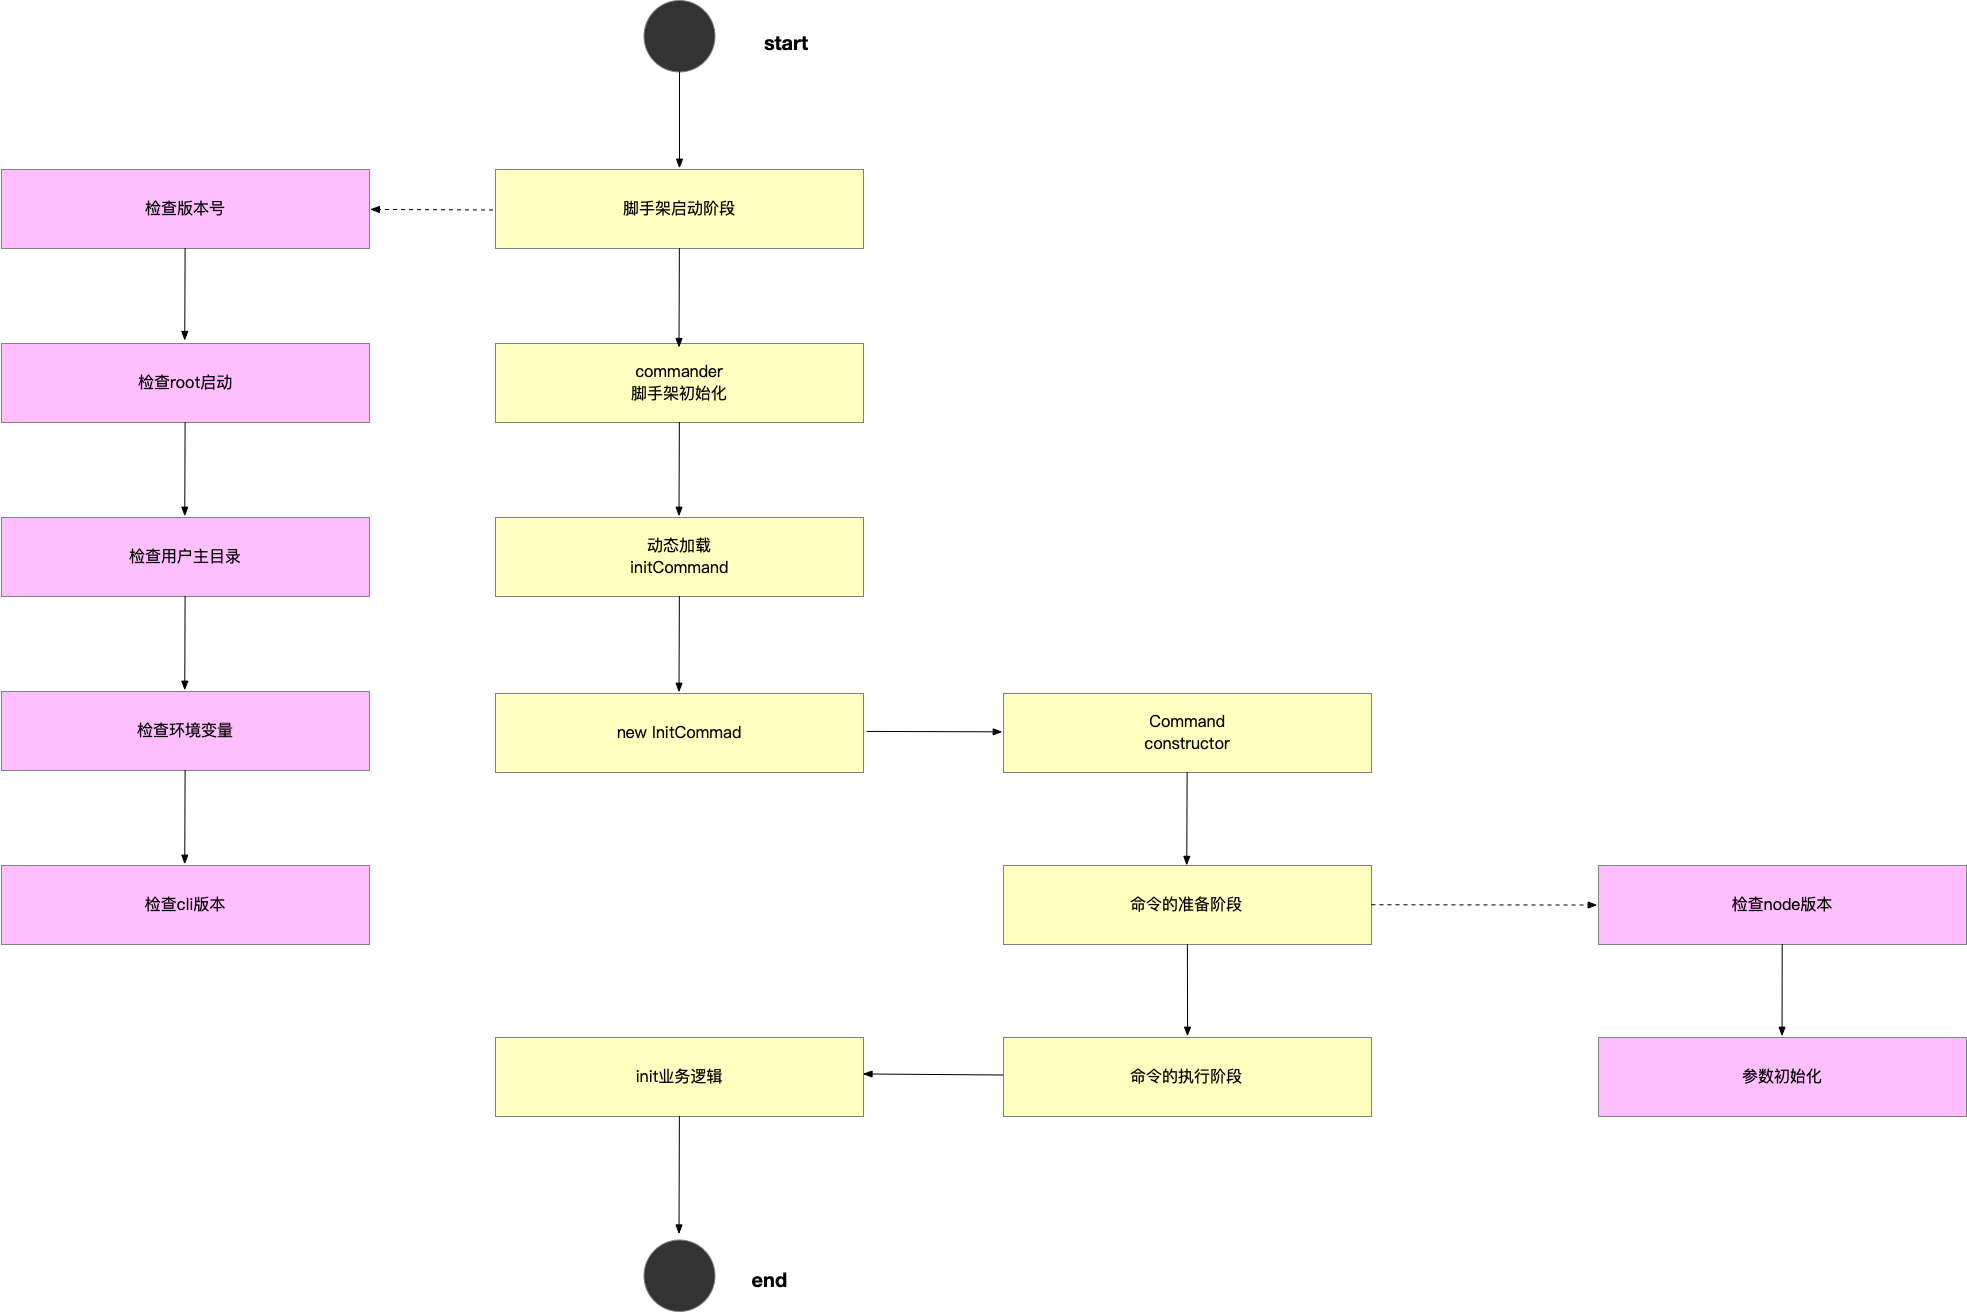
命令执行流程
- 准备阶段
命令注册

命令执行
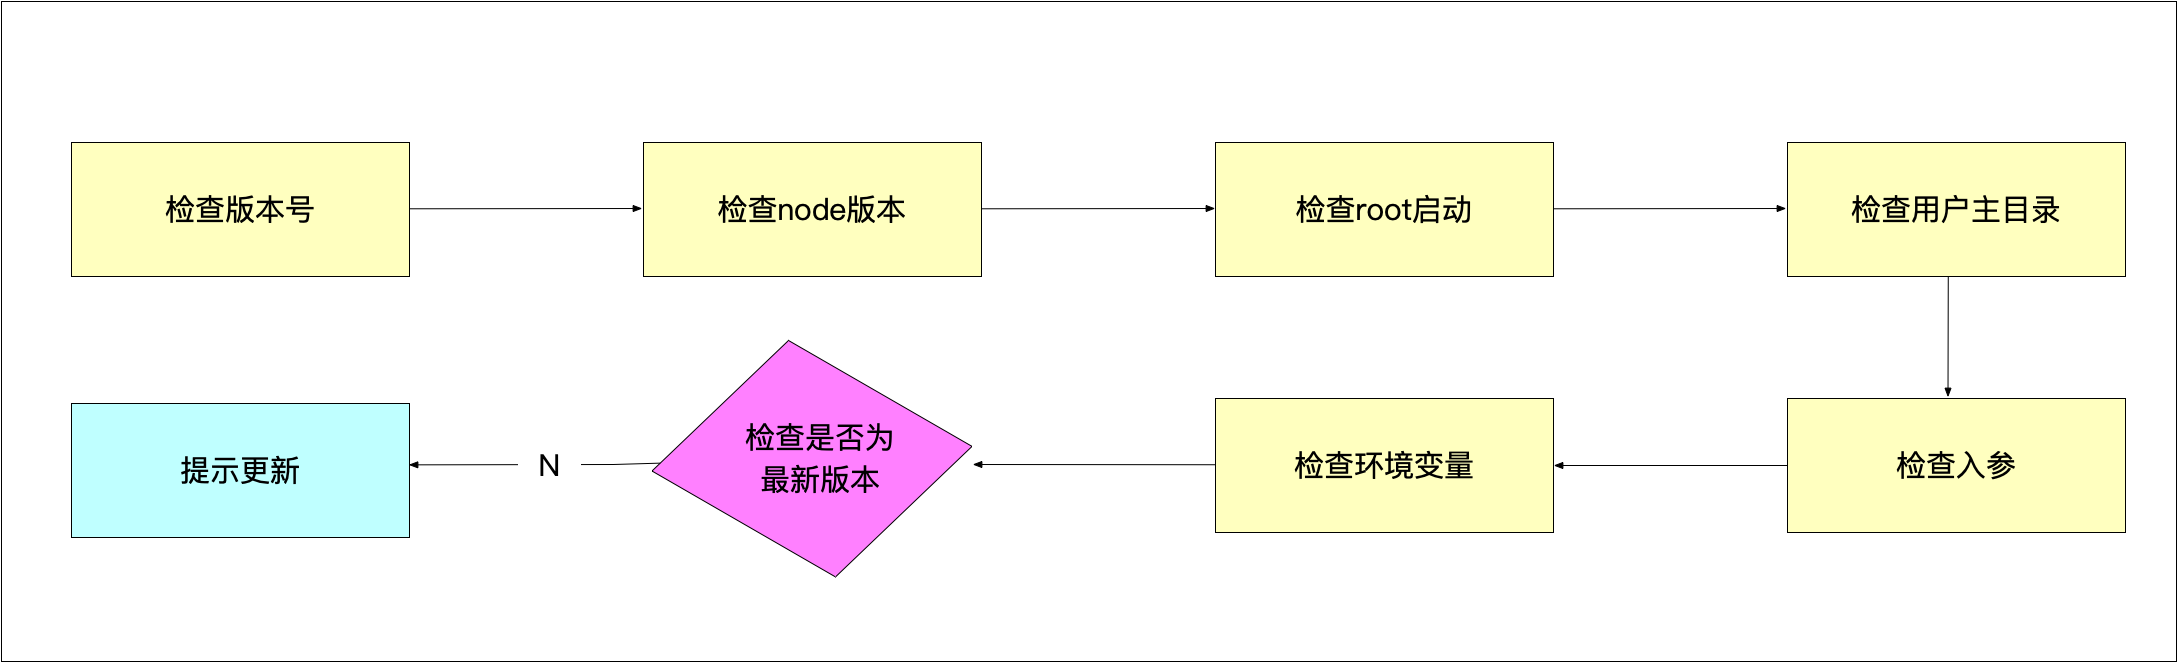
准备阶段
- 检查版本号
// 检查版本function checkPkgVersion() {log.info('cli', pkg.version);}
- 检查node版本
// 检查node版本checkNodeVersion() {//第一步,获取当前Node版本号const currentVersion = process.version;const lastVersion = LOWEST_NODE_VERSION;//第二步,对比最低版本号if (!semver.gte(currentVersion, lastVersion)) {throw new Error(colors.red(`code-robot-cli 需要安装v${lastVersion}以上版本的Node.js`));}}
- 检查root权限
// 检查root启动function checkRoot() {//使用后,检查到root账户启动,会进行降级为用户账户const rootCheck = require('root-check');rootCheck();}
- 检查用户主目录
// 检查用户主目录function checkUserHome() {if (!userHome || !pathExists(userHome)) {throw new Error(colors.red('当前登录用户主目录不存在!!!'));}}
- 检查入参
// 检查入参function checkInputArgs() {const minimist = require('minimist');args = minimist(process.argv.slice(2));checkArgs();}function checkArgs() {if (args.debug) {process.env.LOG_LEVEL = 'verbose';} else {process.env.LOG_LEVEL = 'info';}log.level = process.env.LOG_LEVEL;}
- 检查环境变量
// 检查环境变量function checkEnv() {const dotenv = require('dotenv');const dotenvPath = path.resolve(userHome, '.env');if (pathExists(dotenvPath)) {config = dotenv.config({path: dotenvPath});}createDefaultConfig();log.verbose('环境变量', process.env.CLI_HOME_PATH);}function createDefaultConfig() {const cliConfig = {home: userHome}if (process.env.CLI_HOME) {cliConfig['cliHome'] = path.join(userHome, process.env.CLI_HOME);} else {cliConfig['cliHome'] = path.join(userHome, constants.DEFAULT_CLI_HOME);}process.env.CLI_HOME_PATH = cliConfig.cliHome;}
- 检查是否是最新版本
// 检查是否是最新版本,是否需要更新async function checkGlobalUpdate() {//1.获取当前版本号和模块名const currentVersion = pkg.version;const npmName = pkg.name;//2.调用npm API,获取所有版本号const { getNpmSemverVersion } = require('@code-robot-cli/get-cli-info');//3.提取所有版本号,比对哪些版本号是大于当前版本号const lastVersion = await getNpmSemverVersion(currentVersion, npmName);if (lastVersion && semver.gt(lastVersion, currentVersion)) {//4.获取最新的版本号,提示用户更新到该版本log.warn(colors.yellow(`请手动更新${npmName},当前版本:${currentVersion},最新版本:${lastVersion}更新命令:npm install -g ${npmName}`))}}
命令注册
注册init阶段
//命名的注册function registerCommand() {program.name(Object.keys(pkg.bin)[0]).usage('<command> [options]').version(pkg.version).option('-d, --debug', '是否开启调试模式', false).option('-tp, --targetPath <targetPath>', '是否指定本地调试文件路径', '');program.command('init [projectName]').option('-f, --force', '是否强制初始化项目').action(init); //init 单独解析一个命令 exec动态加载模块//开启debug模式program.on('option:debug', function () {if (program.debug) {process.env.LOG_LEVEL = 'verbose';} else {process.env.LOG_LEVEL = 'info';}log.level = process.env.LOG_LEVEL;log.verbose('test');});//指定targetPathprogram.on('option:targetPath', function () {process.env.CLI_TARGET_PATH = program.targetPath;});//对未知命令的监听program.on('command:*', function (obj) {const availabelCommands = program.commands.map(cmd => cmd.name());log.verbose(colors.red('未知命令:' + obj[0]));if (availabelCommands.length > 0) {log.verbose(colors.blue('可用命令:' + availabelCommands.join(',')));}})program.parse(process.argv);//用户没有输入命令的时候if (program.args && program.args.length < 1) {program.outputHelp();console.log();}}
当前架构图
通过准备阶段和命令初始化init阶段,我们创建了如下一些package: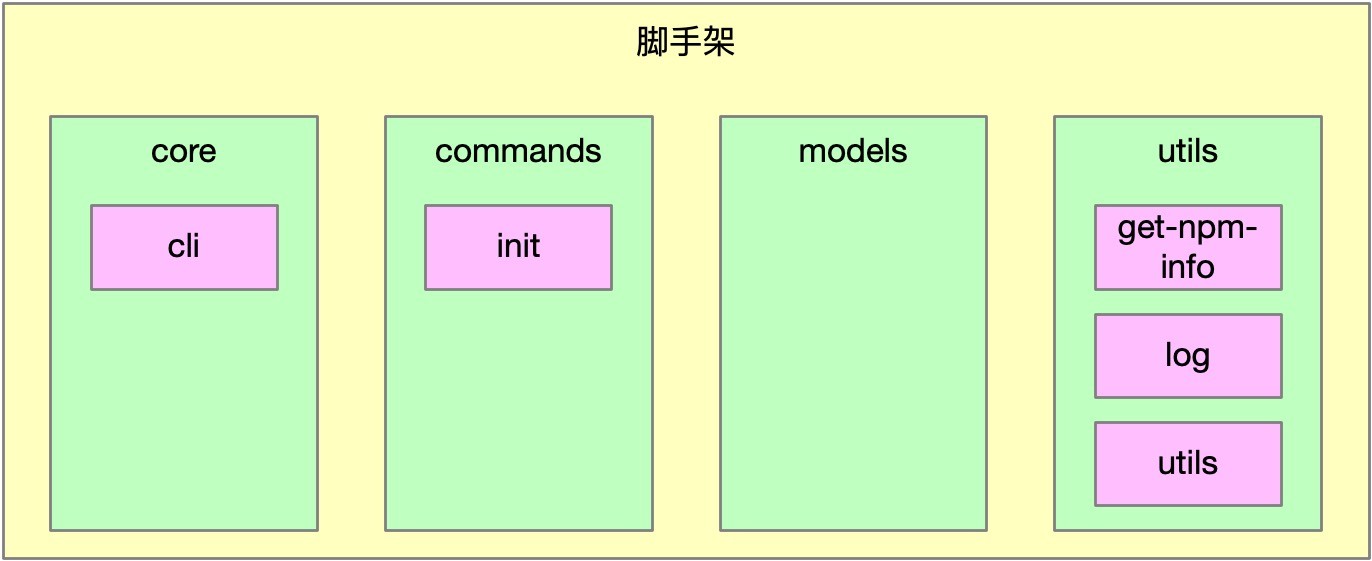
这样的架构设计已经可以满足一般脚手架需求,但是有以下两个问题:
1.cli安装速度慢:所有的package都集成在cli里,因此当命令较多时,会减慢cli的安装速度
2.灵活性差:init命令只能使用@code-robot-cli/init包,对于集团公司而言,每个团队init命令可能都各不相同,可能需要实现init命令动态化,如:
- 团队A使用@code-robot-cli/init作为初始化模板
- 团队B使用自己开发的@code-robot-cli/my-init作为初始化模板
- 团队C使用自己开发的@code-robot-cli/your-init作为初始化模板
这时对我们的架构设计就提出了挑战,要求我们能够动态加载init模块,这将增加架构的复杂度,但大大提升脚手架的可扩展性,将脚手架框架和业务逻辑解耦
脚手架架构优化
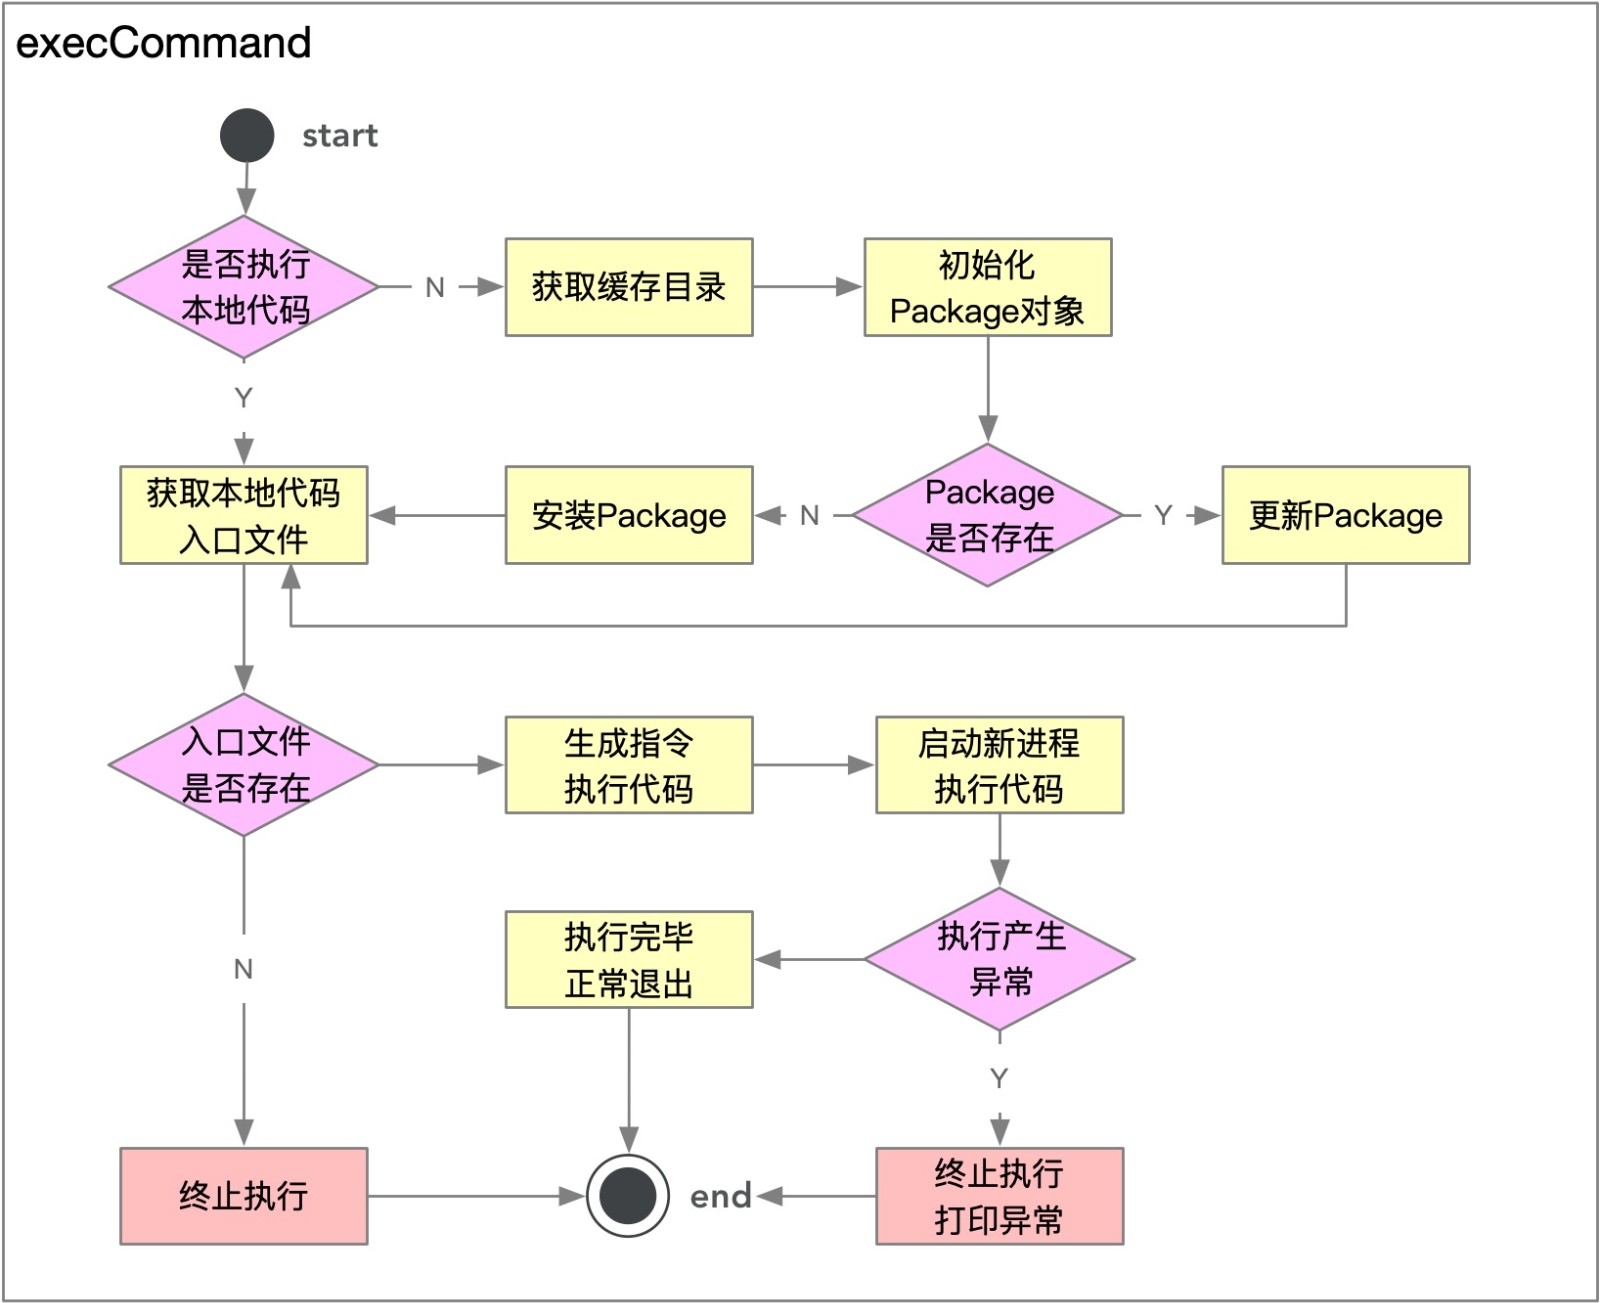
命令执行阶段
const SETTINGS = {init: "@code-robot-cli/init",}const CACHE_DIR = 'dependencies/';async function exec() {let targetPath = process.env.CLI_TARGET_PATH;const homePath = process.env.CLI_HOME_PATH;let storeDir = '';let pkg;log.verbose('targetPath', targetPath);log.verbose('homePath', homePath);const cmdObj = arguments[arguments.length - 1];const cmdName = cmdObj.name();const packageName = SETTINGS[cmdName];const packageVersion = 'latest';if (!targetPath) {//是否执行本地代码//生成缓存路径targetPath = path.resolve(homePath, CACHE_DIR);storeDir = path.resolve(targetPath, 'node_modules');log.verbose(targetPath, storeDir);//初始化Package对象pkg = new Package({targetPath,storeDir,packageName,packageVersion});//判断Package是否存在if (await pkg.exists()) {//更新packageawait pkg.update()} else {//安装packageawait pkg.install();}} else {pkg = new Package({targetPath,packageName,packageVersion});}//获取入口文件const rootFile = pkg.getRootFile();if (rootFile) {//判断入口文件是否存在try {//在当前进程中调用// require(rootFile).call(null, Array.from(arguments));//在node子进程中调用const args = Array.from(arguments);const cmd = args[args.length - 1];const o = Object.create(null);Object.keys(cmd).forEach(key=>{if (cmd.hasOwnProperty(key) && !key.startsWith('_') && key !== 'parent') {o[key] = cmd[key];}})args[args.length - 1] = o;const code = `require('${rootFile}').call(null, ${JSON.stringify(args)})`;const child = spawn('node',['-e',code],{cwd:process.cwd(),stdio:'inherit'});//执行产生异常child.on('error',e=>{log.error(e.message);process.exit(1);});//执行完毕 正常退出child.on('exit',e=>{log.verbose('命令执行成功:'+e);process.exit(e);})} catch (e) {log.error(e.message);}}//1.targetPath -> modulePath//2.modulePath -> Package(npm模块)//3.Package.getRootFile(获取入口文件)//4.Package.update/Package.install}
脚手架项目创建功能设计
首先我们要思考下脚手架项目创建为了什么:
- 可扩展性:能够快速复用到不同团队,适应不同团队之间的差异
- 低成本:在不改动脚手架源码的情况下,能够新增模板,且新增模板的成本很低
- 高性能:控制存储空间,安装时充分利用Node多进程提升安装性能
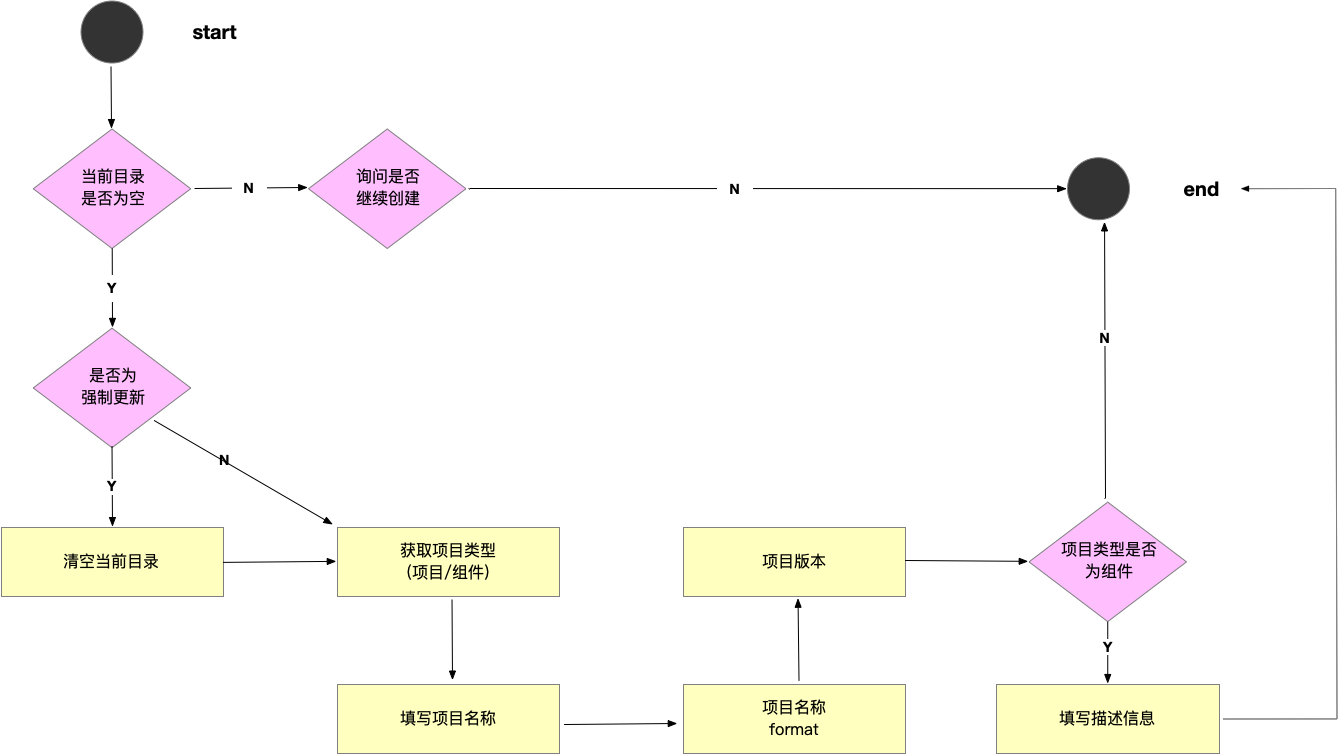
创建项目功能架构设计图
整体过程分为三个阶段:
- 准备阶段
- 下载模块
- 安装模块
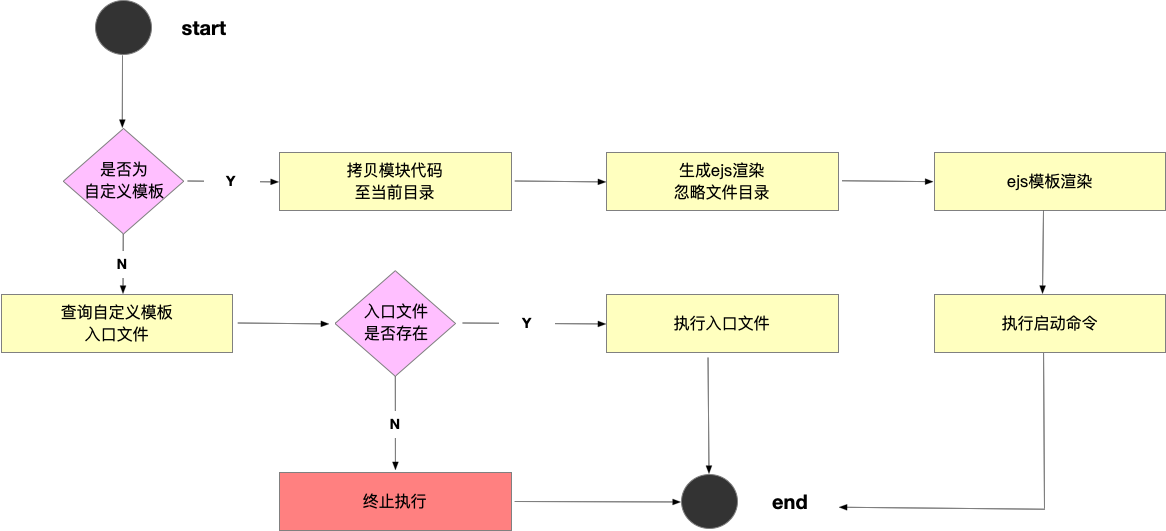
准备阶段
准备阶段的核心工作就是:
- 确保项目的安装环境
- 确认项目的基本信息
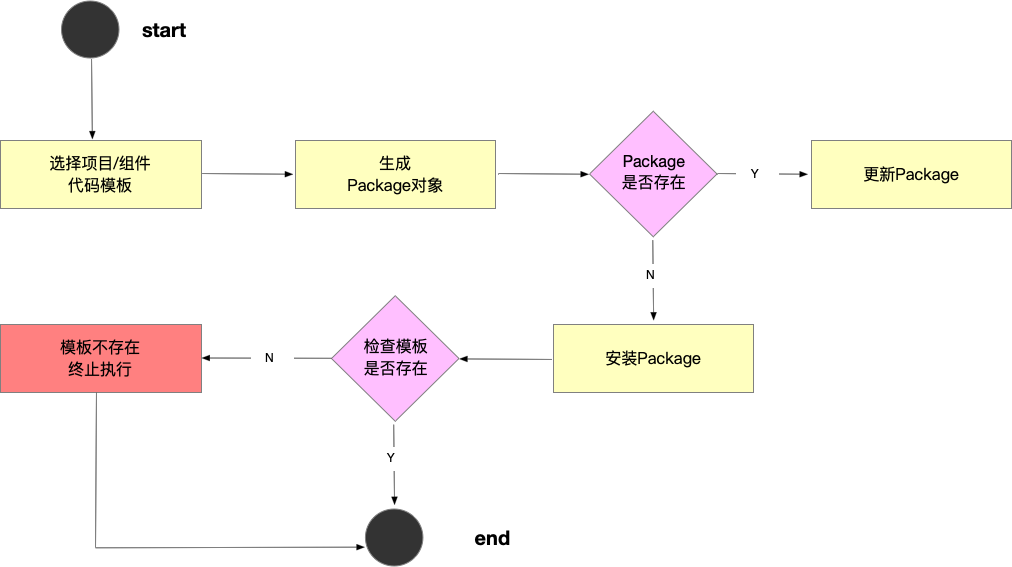
下载模块
下载模块是利用已经封装Package类快速实现相关功能
安装模块
安装模块分为标准模式和自定义模式:
- 标准模式下,将通过ejs实现模块渲染,并自动安装依赖并启动项目
- 自定义模式下,将允许用户主动去实现模块的安装过程和后续启动过程
核心代码如下:
class InitCommand extends Command {init() {this.projectName = this._argv[0] || '';this.force = this._cmd.force;log.verbose(this._argv);log.verbose('projectName', this.projectName);log.verbose('force', this.force);}async exec() {try {//1.准备阶段const projectInfo = await this.prepare();if (projectInfo) {//2.下载模板log.verbose('projectInfo', projectInfo);this.projectInfo = projectInfoawait this.downloadTemplate();//3.安装模板await this.installTemplate();}} catch (e) {log.error(e.message);if (process.env.LOG_LEVEL === 'verbose') {console.log(e);}}}async installTemplate() {log.verbose('templateInfo', this.templateInfo);if (this.templateInfo) {if (!this.templateInfo.type) {this.templateInfo.type = TEMPLATE_TYPE_NORMAL}if (this.templateInfo.type === TEMPLATE_TYPE_NORMAL) {//标准安装await this.installNormalTemplate();} else if (this.templateInfo.type === TEMPLATE_TYPE_CUSTOM) {//自定义安装await this.installCustomTemplate();} else {throw new Error('无法失败项目模板类');}} else {throw new Error('项目模板信息不存在');}}checkCommand(cmd) {if (WHITE_COMMAND.includes(cmd)) {return cmd;}return null;}async execCommand(command, errMsg) {let ret;if (command) {const cmdArray = command.split(' ');const cmd = this.checkCommand(cmdArray[0]);if (!cmd) {throw new Error('命令不存在!命令:' + command);}const args = cmdArray.slice(1);ret = await execAsync(cmd, args, {stdio: 'inherit',cwd: process.cwd(),})}if (ret !== 0) {throw new Error(errMsg)}}async ejsRender(options) {const dir = process.cwd();const projectInfo = this.projectInfo;return new Promise((resolve, reject) => {glob('**', {cwd: dir,ignore: options.ignore || '',nodir: true,}, (err, files) => {if (err) {reject(err);}Promise.all(files.map(file => {const filePath = path.join(dir, file);return new Promise((resolve1, reject1) => {ejs.renderFile(filePath, projectInfo, {}, (err, result) => {console.log(result);if (err) {reject1(err);} else {fse.writeFileSync(filePath, result);resolve1(result);}})});})).then(() => {resolve();}).catch(err => {reject(err);});})})}async installNormalTemplate() {//拷贝模板代码直当前目录let spinner = spinnerStart('正在安装模板');log.verbose('templateNpm', this.templateNpm)try {const templatePath = path.resolve(this.templateNpm.cachFilePath, 'template');const targetPath = process.cwd();fse.ensureDirSync(templatePath);//确保当前文件存不存在,不存在会创建fse.ensureDirSync(targetPath);fse.copySync(templatePath, targetPath);//把缓存目录下的模板拷贝到当前目录} catch (e) {throw e;} finally {spinner.stop(true);log.success('模板安装成功');}const templateIgnore = this.templateInfo.ignore || [];const ignore = ['**/node_modules/**', ...templateIgnore];await this.ejsRender({ ignore });//依赖安装const { installCommand, startCommand } = this.templateInfoawait this.execCommand(installCommand, '依赖安装过程中失败');//启动命令执行await this.execCommand(startCommand, '启动执行命令失败');}async installCustomTemplate() {//查询自定义模板的入口文件if (await this.templateNpm.exists()) {const rootFile = this.templateNpm.getRootFile();if (fs.existsSync(rootFile)) {log.notice('开始执行自定义模板');const options = {...this.options,cwd:process.cwd(),}const code = `require('${rootFile}')(${JSON.stringify(options)})`;log.verbose('code',code);await execAsync('node',['-e', code], { stdio: 'inherit', cwd: process.cwd()});log.success('自定义模板安装成功');} else {throw new Error('自定义模板入口文件不存在');}}}async downloadTemplate() {//1. 通过项目模板API获取项目模板信息//1.1 通过egg.js搭建一套后端系统//1.2 通过npm存储项目模板//1.3 将项目模板信息存储到mongodb数据库中//1.4 通过egg.js获取mongodb中的数据并且通过API返回const { projectTemplate } = this.projectInfo;const templateInfo = this.template.find(item => item.npmName === projectTemplate);const targetPath = path.resolve(userHome, '.code-robot-cli', 'template');const storeDir = path.resolve(userHome, '.code-robot-cli', 'template', 'node_modules');const { npmName, version } = templateInfo;this.templateInfo = templateInfo;const templateNpm = new Package({targetPath,storeDir,packageName: npmName,packageVersion: version})if (! await templateNpm.exists()) {const spinner = spinnerStart('正在下载模板...');await sleep();try {await templateNpm.install();} catch (e) {throw e;} finally {spinner.stop(true);if (templateNpm.exists()) {log.success('下载模板成功');this.templateNpm = templateNpm;}}} else {const spinner = spinnerStart('正在更新模板...');await sleep();try {await templateNpm.update();} catch (e) {throw e;} finally {spinner.stop(true);if (templateNpm.exists()) {log.success('更新模板成功');this.templateNpm = templateNpm;}}}}async prepare() {// 判断项目模板是否存在const template = await getProjectTemplate();if (!template || template.length === 0) {throw new Error('项目模板不存在');}this.template = template;//1.判断当前目录是否为空const localPath = process.cwd();if (!this.isDirEmpty(localPath)) {let ifContinue = false;if (!this.force) {//询问是否继续创建ifContinue = (await inquirer.prompt({type: 'confirm',name: 'ifContinue',default: false,message: '当前文件夹不为空,是否继续创建项目?'})).ifContinue;if (!ifContinue) {return;}}//2.是否启动强制更新if (ifContinue || this.force) {//给用户二次确认const { confirmDelete } = await inquirer.prompt({type: 'confirm',name: 'confirmDelete',default: false,message: '是否确认清空当前目录下的文件?',})if (confirmDelete) {//清空当前目录fse.emptyDirSync(localPath)}}}return this.getProjectInfo();//3.选择创建项目或组件//4.获取项目得基本信息}async getProjectInfo() {function isValidName(v) {return /^[a-zA-Z]+([-][a-zA-Z][a-zA-Z0-9]*|[_][a-zA-Z][a-zA-Z0-9]*|[a-zA-Z0-9])*$/.test(v);}let projectInfo = {};let isProjectInfoValid = false;if (isValidName(this.projectName)) {isProjectInfoValid = true;projectInfo.projectName = this.projectName;}//1.选择创建项目或组件const { type } = await inquirer.prompt({type: 'list',name: 'type',message: '请选择初始化类型',default: TYPE_PROJECT,choices: [{name: '项目',value: TYPE_PROJECT}, {name: '组件',value: TYPE_COMPONENT}]});log.verbose('type', type);this.template = this.template.filter(template => {return template.tag.includes(type);})const title = type === TYPE_PROJECT ? '项目' : '组件';//2.获取项目的基本信息const projectNamePrompt = {type: 'input',name: 'projectName',message: `请输入${title}的名称`,default: '',validate: function (v) {const done = this.async();setTimeout(function () {//1.输入的首字符必须为英文字符//2.尾字符必须为英文或数字,不能为字符//3.字符仅运行"-_"//\w = a-zA-Z0-9 *表示0个或多个if (!isValidName(v)) {done(`请输入合法的${title}名称`);return;}done(null, true);}, 0);},filter: function (v) {return v;}}let projectPrompt = [];if (!isProjectInfoValid) {projectPrompt.push(projectNamePrompt);}projectPrompt.push({input: 'input',name: 'projectVersion',message: `请输入${title}版本号`,default: '1.0.0',validate: function (v) {const done = this.async();setTimeout(function () {//1.输入的首字符必须为英文字符//2.尾字符必须为英文或数字,不能为字符//3.字符仅运行"-_"//\w = a-zA-Z0-9 *表示0个或多个if (!(!!semver.valid(v))) {done('请输入合法的版本号');return;}done(null, true);}, 0);},filter: function (v) {if (!!semver.valid(v)) {return semver.valid(v);} else {return v;}}}, {type: 'list',name: 'projectTemplate',message: `请选择${title}模板`,choices: this.createTemplateChoices()});if (type === TYPE_PROJECT) {const project = await inquirer.prompt(projectPrompt);projectInfo = {...projectInfo,type,...project}} else if (type === TYPE_COMPONENT) {const descriptionPrompt = {input: 'input',name: 'componentDescription',message: '请输入组件描述信息',default: '',validate: function (v) {const done = this.async();setTimeout(function () {//1.输入的首字符必须为英文字符//2.尾字符必须为英文或数字,不能为字符//3.字符仅运行"-_"//\w = a-zA-Z0-9 *表示0个或多个if (!v) {done('请输入组件描述信息');return;}done(null, true);}, 0);}}projectPrompt.push(descriptionPrompt);const component = await inquirer.prompt(projectPrompt);projectInfo = {...projectInfo,type,...component}}//return 项目的基本信息(object)if (projectInfo.projectName) {projectInfo.className = require('kebab-case')(projectInfo.projectName).replace(/^-/, '');}if (projectInfo.projectVersion) {projectInfo.version = projectInfo.projectVersion;}if (projectInfo.componentDescription) {projectInfo.description = projectInfo.componentDescription;}return projectInfo;}isDirEmpty(localPath) {let fileList = fs.readdirSync(localPath);//文件过滤的逻辑fileList = fileList.filter(file => (!file.startsWith('.') && ['node_modules'].indexOf(file) < 0));return !fileList || fileList.length <= 0;}createTemplateChoices() {return this.template.map(item => ({value: item.npmName,name: item.name}))}}function init(argv) {// console.log('init',projectName,cmdObj.force,process.env.CLI_TARGET_PATH);return new InitCommand(argv);}module.exports = init;module.exports.InitCommand = InitCommand;
如何通过Yargs来开发脚手架?
- 脚手架分为三部分构成(vue create vuex)
- bin:主命令在package.json中配置bin属性,npm link本地安装
- command:命令
- options:参数(boolean/string/number)
- 文件顶部增加
#!/usr/bin/env node,这行命令的用途时告诉操作系统要在环境变量当中查询到node命令,通过node命令来执行文件
- 脚手架初始化流程
- 构造函数:Yargs() (通过Yargs构造函数的调用去生成一个脚手架)
- 常用方法:
- Yargs.options (注册脚手架的属性)
- Yargs.option
- Yargs.group (将脚手架属性进行分组)
- Yargs.demandCommand (规定最少传几个command)
- Yargs.recommendCommands (在输入错误command以后可以给你推荐最接近的正确的command)
- Yargs.strict (开启以后可以报错提示)
- Yargs.fail (监听脚手架的异常)
- Yargs.alias (起别名)
- Yargs.wrapper (命令行工具的宽度)
- Yargs.epilogus (命令行工具底部的提示)
- 脚手架参数解析方法
- hideBin(process.argv)
- Yargs.parse(argv, options)
- 命令注册方法
- Yargs.command(command,describe, builder, handler)
- Yargs.command({command,describe, builder, handler})
Node.js模块路径解析流程
- Node.js项目模块路径解析是通过
require.resolve方法来实现的 require.resolve就是通过Module._resolveFileName方法实现的require.resolve实现原理:Module._resolveFileName方法核心流程有3点:- 判断是否为内置模块
- 通过
Module._resolveLookupPaths方法生成node_modules可能存在的路径 - 通过
Module._findPath查询模块的真实路径
Module._findPath核心流程有4点:- 查询缓存(将request和paths通过
\x00(空格)合并成cacheKey) - 遍历paths,将path与request组成文件路径basePath
- 如果basePath存在则调用
fs.realPathSync获取文件真实路径 - 将文件真实路径缓存到
Module._pathCache(key就是前面生成的cacheKey)
- 查询缓存(将request和paths通过
fs.realPathSync核心流程有3点:- 查询缓存(缓存的key为p,即
Module._findPath中生成的文件路径) - 从左往右遍历路径字符串,查询到
/时,拆分路径,判断该路径是否为软连接,如果是软连接则查询真实链接,并生成新路径p,然后继续往后遍历,这里有1个细节需要注意:- 遍历过程中生成的子路径base会缓存在knownHard和cache中,避免重复查询
- 遍历完成得到模块对应的真实路径,此时会将原路径original作为key,真实路径作为value,保存到缓存中
- 查询缓存(缓存的key为p,即
require.resolve.paths等价于Module._resolveLoopupPaths,该方法用于获取所有的node_modules可能存在的路径require.resolve.paths实现原理:

若有收获,就点个赞吧
0 人点赞
