用于 NumPy 用户的 Cython
原文: http://docs.cython.org/en/latest/src/userguide/numpy_tutorial.html
本教程针对的是根本没有 Cython 经验的 NumPy 用户。如果您对 Cython 有一些了解,可能需要跳到“高效索引”部分。
考虑的主要方案是 NumPy 最终用途而不是 NumPy / SciPy 开发。原因是 Cython 不能(还)能够以高级方式支持关于维数的通用功能。对于 SciPy 开发而言,这种限制比更具体的“最终用户”功能要严格得多。有关详细信息,请参阅最后一节。
本教程的风格不适合所有人,所以你也可以考虑:
- Kurt Smith 在 SciPy 2015 上的视频教程。这次演讲的幻灯片和笔记本是 github 上的。
- 基本的 Cython 文档(参见 Cython 首页)。
Cython 一览
Cython 是一个编译器,它将类似 Python 的代码文件编译为 C 代码。不过,’’Cython 不是 Python 到 C 的翻译’’。也就是说,它不会占用您的完整程序并“将其转换为 C” - 相反,结果充分利用了 Python 运行时环境。一种看待它的方式可能是你的代码仍然是 Python,因为它在 Python 运行时环境中运行,而不是编译为解释的 Python 字节码,而是编译为本机机器代码(但是增加了额外的语法以便于嵌入更快的类 C 代码)。
这有两个重要的后果:
- 速度。多少在很大程度上取决于所涉及的计划。典型的 Python 数值程序往往会获得很少的收益,因为大部分时间花在以高级方式使用的较低级别 C 上。然而,当添加键入信息时,for 循环风格的程序可以获得许多数量级(并且因此可以作为现实替代方案)。
- 轻松调用 C 代码。 Cython 的目的之一是允许轻松包装 C 库。在 Cython 中编写代码时,您可以像使用 Python 代码一样轻松调用 C 代码。
很少有 Python 构造尚不支持,虽然使 Cython 编译所有 Python 代码是一个明确的目标,你可以在 限制 中看到与 Python 的差异。
您的 Cython 环境
使用 Cython 包含以下步骤:
- 写一个
.pyx源文件 - 运行 Cython 编译器以生成 C 文件
- 运行 C 编译器以生成编译库
- 运行 Python 解释器并要求它导入模块
但是,有几个选项可以自动执行这些步骤:
- SAGE 数学软件系统为从交互式命令行或笔记本界面(如 Maple / Mathematica)使用 Cython 和 NumPy 提供了出色的支持。参见本文档。
- Cython 可以作为 Jupyter 笔记本中的扩展,使得编译和使用 Cython 代码只需在单元格顶部只有一个
%%cython。有关更多信息,请参阅 使用 Jupyter 笔记本 。 - pythonmport 的一个版本随 Cython 一起提供,因此您可以动态地将 pyx 文件导入 Python 并自动编译(参见 使用 pyximport进行编译)。
- Cython 支持 distutils,因此您可以非常轻松地创建自动化过程的构建脚本,这是 Cython 实现的库和包的首选方法。参见 Basic setup.py。
- 手动编译(见下文)
注意
如果使用除 SAGE 之外的其他交互式命令行环境(如 IPython 或 Python 本身),则在重新编译模块时重新启动该进程非常重要。再次发出“导入”声明是不够的。
安装
如果您已经有一个 C 编译器,那么就这样做:
pip install Cython
否则,请参见 安装页面 。
在撰写本文时,SAGE 附带了比本教程所要求的更早版本的 Cython。因此,如果使用 SAGE,您应该下载最新的 Cython 然后执行
$ cd path/to/cython-distro$ path-to-sage/sage -python setup.py install
这将把最新的 Cython 安装到 SAGE 中。
手动编译
由于知道发生了什么总是很重要,我将在这里描述手动方法。第一次运行 Cython:
$ cython yourmod.pyx
这会创建yourmod.c,这是 Python 扩展模块的 C 源代码。一个有用的附加开关是-a,它将生成一个文档yourmod.html,它显示哪个 Cython 代码逐行转换为哪个 C 代码。
然后我们编译 C 文件。这可能会因您的系统而异,但 C 文件应该像 Python 一样构建。用于编写扩展的 Python 文档应该有一些细节。在 Linux 上,这通常意味着:
$ gcc -shared -pthread -fPIC -fwrapv -O2 -Wall -fno-strict-aliasing -I/usr/include/python2.7 -o yourmod.so yourmod.c
gcc应该可以访问 NumPy C 头文件,因此如果它们未安装在/usr/include/numpy或类似文件中,您可能需要为这些文件传递另一个选项。如果你写的话,你只需要提供 NumPy 标题:
cimport numpy
在您的 Cython 代码中。
这会在同一目录中创建yourmod.so,Python 可以使用普通的import yourmod语句导入该目录。
第一个 Cython 程序
您可以通过下载 Jupyter 笔记本轻松执行本教程的代码。
下面的代码在 numpy 中相当于这个函数:
def compute_np(array_1, array_2, a, b, c):return np.clip(array_1, 2, 10) * a + array_2 * b + c
我们会说array_1和array_2是整数类型的 2D NumPy 数组,a,b和c是三个 Python 整数。
这个函数使用 NumPy 并且已经非常快了,所以使用 Cython 再次执行它可能有点过分。这是出于演示目的。尽管如此,我们将证明我们以更加冗长的代价实现了比 NumPy 更好的速度和内存效率。
此代码计算函数,其中循环在展开的两个维度上。它既是有效的 Python 又是有效的 Cython 代码。我将其称为 Python 版本的compute_py.py和 Cython 版本的compute_cy.pyx - Cython 使用.pyx作为其文件后缀(但它也可以编译.py文件)。
import numpy as npdef clip(a, min_value, max_value):return min(max(a, min_value), max_value)def compute(array_1, array_2, a, b, c):"""This function must implement the formulanp.clip(array_1, 2, 10) * a + array_2 * b + carray_1 and array_2 are 2D."""x_max = array_1.shape[0]y_max = array_1.shape[1]assert array_1.shape == array_2.shaperesult = np.zeros((x_max, y_max), dtype=array_1.dtype)for x in range(x_max):for y in range(y_max):tmp = clip(array_1[x, y], 2, 10)tmp = tmp * a + array_2[x, y] * bresult[x, y] = tmp + creturn result
这应该被编译为为 Linux 系统生成compute_cy.so(在 Windows 系统上,这将是.pyd文件)。我们运行 Python 会话来测试 Python 版本(从.py -file 导入)和编译的 Cython 模块。
In [1]: import numpy as npIn [2]: array_1 = np.random.uniform(0, 1000, size=(3000, 2000)).astype(np.intc)In [3]: array_2 = np.random.uniform(0, 1000, size=(3000, 2000)).astype(np.intc)In [4]: a = 4In [5]: b = 3In [6]: c = 9In [7]: def compute_np(array_1, array_2, a, b, c):...: return np.clip(array_1, 2, 10) * a + array_2 * b + cIn [8]: %timeit compute_np(array_1, array_2, a, b, c)103 ms ± 4.16 ms per loop (mean ± std. dev. of 7 runs, 10 loops each)In [9]: import compute_pyIn [10]: compute_py.compute(array_1, array_2, a, b, c)1min 10s ± 844 ms per loop (mean ± std. dev. of 7 runs, 1 loop each)In [11]: import compute_cyIn [12]: compute_cy.compute(array_1, array_2, a, b, c)56.5 s ± 587 ms per loop (mean ± std. dev. of 7 runs, 1 loop each)
还没有那么大的差别;因为 C 代码仍然完全符合 Python 解释器的作用(例如,意味着为每个使用的数字分配了一个新对象)。
从命令行调用 Cython 时可以使用-a查看 Python 交互和生成的 C 代码,使用 Jupyter Notebook 时使用%%cython -a,或者在使用setup.py时使用cythonize('compute_cy.pyx', annotate=True)。查看生成的 html 文件,看看即使是最简单的语句也需要什么。你很快就明白了。我们需要给 Cython 更多信息;我们需要添加类型。
添加类型
要添加类型,我们使用自定义 Cython 语法,因此我们现在正在破坏 Python 源兼容性。这是compute_typed.pyx。 阅读评论!
import numpy as np# We now need to fix a datatype for our arrays. I've used the variable# DTYPE for this, which is assigned to the usual NumPy runtime# type info object.DTYPE = np.intc# cdef means here that this function is a plain C function (so faster).# To get all the benefits, we type the arguments and the return value.cdef int clip(int a, int min_value, int max_value):return min(max(a, min_value), max_value)def compute(array_1, array_2, int a, int b, int c):# The "cdef" keyword is also used within functions to type variables. It# can only be used at the top indentation level (there are non-trivial# problems with allowing them in other places, though we'd love to see# good and thought out proposals for it).cdef Py_ssize_t x_max = array_1.shape[0]cdef Py_ssize_t y_max = array_1.shape[1]assert array_1.shape == array_2.shapeassert array_1.dtype == DTYPEassert array_2.dtype == DTYPEresult = np.zeros((x_max, y_max), dtype=DTYPE)# It is very important to type ALL your variables. You do not get any# warnings if not, only much slower code (they are implicitly typed as# Python objects).# For the "tmp" variable, we want to use the same data type as is# stored in the array, so we use int because it correspond to np.intc.# NB! An important side-effect of this is that if "tmp" overflows its# datatype size, it will simply wrap around like in C, rather than raise# an error like in Python.cdef int tmp# Py_ssize_t is the proper C type for Python array indices.cdef Py_ssize_t x, yfor x in range(x_max):for y in range(y_max):tmp = clip(array_1[x, y], 2, 10)tmp = tmp * a + array_2[x, y] * bresult[x, y] = tmp + creturn result
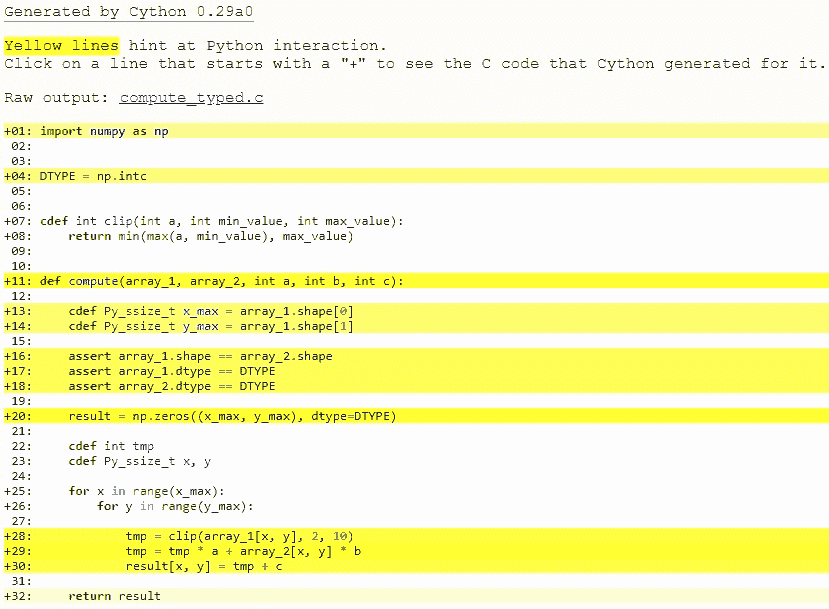
此时,查看为compute_cy.pyx和compute_typed.pyx生成的 C 代码。单击这些行以展开它们并查看相应的 C.
特别是看一下for-loops:在compute_cy.c中,这些是要设置的~20 行 C 代码,而在compute_typed.c中使用正常的 C for 循环。
在构建完这个并继续我的(非正式)基准测试后,我得到:
In [13]: %timeit compute_typed.compute(array_1, array_2, a, b, c)26.5 s ± 422 ms per loop (mean ± std. dev. of 7 runs, 1 loop each)
因此添加类型确实使代码更快,但是没有接近 NumPy 的速度?
发生的事情是,在这段代码中花费的大部分时间用在以下行中,并且这些行的执行速度比纯 Python 要慢:
tmp = clip(array_1[x, y], 2, 10)tmp = tmp * a + array_2[x, y] * bresult[x, y] = tmp + c
那么是什么让这些线条比纯 Python 版本慢得多?
array_1和array_2仍然是 NumPy 数组,所以 Python 对象,并期望 Python 整数作为索引。这里我们传递 C int 值。所以每次 Cython 到达这一行时,它必须将所有 C 整数转换为 Python int 对象。由于这条线经常被调用,它超过了之前从range()创建的纯 C 循环的速度优势。
此外,tmp * a + array_2[x, y] * b返回一个 Python 整数,tmp是一个 C 整数,因此 Cython 必须再次进行类型转换。最后,这些类型的转换会加起来。并使我们的计算非常缓慢。但是这个问题可以通过使用内存视图轻松解决。
使用内存视图进行高效索引
仍有两个瓶颈会降低性能,即数组查找和分配,以及 C / Python 类型转换。 [] -operator 仍然使用完整的 Python 操作 - 我们想要做的是直接以 C 速度访问数据缓冲区。
我们需要做的是输入ndarray对象的内容。我们使用 memoryview 执行此操作。 中有一个专门用于它的 Cython 文档 中的页面。
简而言之,内存视图是 C 结构,可以保存指向 NumPy 数组的数据的指针以及所有必要的缓冲区元数据,以提供有效和安全的访问:维度,步幅,项目大小,项目类型信息等…它们也支持切片,所以即使 NumPy 数组在内存中不连续,它们也能正常工作。它们可以由 C 整数索引,从而允许快速访问 NumPy 数组数据。
以下是如何声明整数的内存视图:
cdef int [:] foo # 1D memoryviewcdef int [:, :] foo # 2D memoryviewcdef int [:, :, :] foo # 3D memoryview... # You get the idea.
在我们的示例中,没有数据从 NumPy 数组复制到 memoryview。顾名思义,它只是记忆的“视图”。因此,我们可以使用视图result_view进行有效索引,最后返回保存我们操作数据的真实 NumPy 数组result。
以下是如何在我们的代码中使用它们:
compute_memview.pyx
import numpy as npDTYPE = np.intccdef int clip(int a, int min_value, int max_value):return min(max(a, min_value), max_value)def compute(int[:, :] array_1, int[:, :] array_2, int a, int b, int c):cdef Py_ssize_t x_max = array_1.shape[0]cdef Py_ssize_t y_max = array_1.shape[1]# array_1.shape is now a C array, no it's not possible# to compare it simply by using == without a for-loop.# To be able to compare it to array_2.shape easily,# we convert them both to Python tuples.assert tuple(array_1.shape) == tuple(array_2.shape)result = np.zeros((x_max, y_max), dtype=DTYPE)cdef int[:, :] result_view = resultcdef int tmpcdef Py_ssize_t x, yfor x in range(x_max):for y in range(y_max):tmp = clip(array_1[x, y], 2, 10)tmp = tmp * a + array_2[x, y] * bresult_view[x, y] = tmp + creturn result
让我们看看现在访问速度有多快。
In [22]: %timeit compute_memview.compute(array_1, array_2, a, b, c)22.9 ms ± 197 µs per loop (mean ± std. dev. of 7 runs, 10 loops each)
请注意这种变化的重要性。我们现在比 Python 的解释版快 3081 倍,比 NumPy 快 4.5 倍。
Memoryviews 也可以与切片一起使用,甚至可以与 Python 数组一起使用。查看 内存视图页面 ,看看它们能为您做些什么。
进一步调整索引
数组查找仍然受到两个因素的影响:
- 进行边界检查。
- 检查负指数并正确处理。上面的代码是明确编码的,因此它不使用负索引,并且(希望)总是在边界内访问。
使用装饰器,我们可以停用这些检查:
...cimport cython@cython.boundscheck(False) # Deactivate bounds checking@cython.wraparound(False) # Deactivate negative indexing.def compute(int[:, :] array_1, int[:, :] array_2, int a, int b, int c):...
现在没有执行边界检查(并且,作为一个副作用,如果你’碰巧’访问越界,你将在最好的情况下崩溃你的程序,在最坏的情况下会损坏数据)。可以通过多种方式切换边界检查模式,有关详细信息,请参阅 编译器指令 。
In [23]: %timeit compute_index.compute(array_1, array_2, a, b, c)16.8 ms ± 25.4 µs per loop (mean ± std. dev. of 7 runs, 100 loops each)
我们比 NumPy 版本(6.2x)更快。 NumPy 编写得很好,但不会懒惰地执行操作,导致在内存中进行大量的中间复制操作。我们的版本具有非常高的内存效率和缓存友好性,因为我们可以在一次运行中执行数据操作。
警告
速度需要一些成本。特别是将类型对象(如我们的示例代码中的array_1,array_2和result_view)设置为None会很危险。将这些对象设置为None是完全合法的,但您可以使用它们检查它们是否为 None。所有其他用途(属性查找或索引)都可能会破坏或损坏数据(而不是像在 Python 中那样引发异常)。
实际规则有点复杂,但主要信息很明确:不要使用类型化对象而不知道它们未设置为None。
将 NumPy 数组声明为连续
为了获得额外的速度增益,如果您知道您提供的 NumPy 阵列在内存中是连续的,则可以将 memoryview 声明为连续的。
我们举例说明一个有 3 个维度的数组。如果你想给 Cython 提供数据是 C-contiguous 的信息,你必须像这样声明 memoryview:
cdef int [:,:,::1] a
如果你想给 Cython 提供数据是 Fortran 连续的信息,你必须像这样声明 memoryview:
cdef int [::1, :, :] a
如果所有这些对你没有意义,你可以跳过这一部分,声明数组是连续的约束你的函数的用法,因为它拒绝数组切片作为输入。如果您仍然想了解连续数组的全部内容,可以在 StackOverflow 上看到这个答案。
为了给出数字,这里是通过将 memoryviews 声明为连续来获得的速度增益:
In [23]: %timeit compute_contiguous.compute(array_1, array_2, a, b, c)11.1 ms ± 30.2 µs per loop (mean ± std. dev. of 7 runs, 100 loops each)
我们现在的速度比 NumPy 版快 9 倍,比纯 Python 版快 6300 倍!
使功能更清洁
声明类型可以使您的代码非常详细。如果您不介意 Cython 推断变量的 C 类型,可以使用文件顶部的infer_types=True编译器指令。它会为你节省很多打字。
请注意,由于类型声明必须发生在顶部缩进级别,因此 Cython 不会推断在其他缩进级别中第一次声明的变量类型。它会改变我们代码的含义。这就是为什么我们仍然必须手动声明tmp,x和y变量的类型。
实际上,在使用融合类型时,手动给出tmp变量的类型会很有用。
# cython: infer_types=Trueimport numpy as npcimport cythonDTYPE = np.intccdef int clip(int a, int min_value, int max_value):return min(max(a, min_value), max_value)@cython.boundscheck(False)@cython.wraparound(False)def compute(int[:, ::1] array_1, int[:, ::1] array_2, int a, int b, int c):x_max = array_1.shape[0]y_max = array_1.shape[1]assert tuple(array_1.shape) == tuple(array_2.shape)result = np.zeros((x_max, y_max), dtype=DTYPE)cdef int[:, ::1] result_view = resultcdef int tmpcdef Py_ssize_t x, yfor x in range(x_max):for y in range(y_max):tmp = clip(array_1[x, y], 2, 10)tmp = tmp * a + array_2[x, y] * bresult_view[x, y] = tmp + creturn result
我们现在进行速度测试:
In [24]: %timeit compute_infer_types.compute(array_1, array_2, a, b, c)11.5 ms ± 261 µs per loop (mean ± std. dev. of 7 runs, 100 loops each)
瞧,速度没变。
更通用的代码
所有这些速度提升都很好,但添加类型会限制我们的代码。目前,这意味着我们的函数只能与具有np.intc类型的 NumPy 数组一起使用。是否可以使我们的代码适用于多种 NumPy 数据类型?
是的,借助称为融合类型的新功能。您可以在 文档 的这一部分了解更多相关信息。它类似于 C ++的模板。它在编译时生成多个函数声明,然后根据提供的参数类型在运行时选择正确的声明。通过比较 if 条件中的类型,还可以根据特定数据类型执行完全不同的代码路径。
在我们的例子中,由于我们不再访问 NumPy 的输入数组的 dtype,我们使用那些if-else语句来知道我们应该为输出数组使用什么 NumPy 数据类型。
在这种情况下,我们的功能现在适用于整数,双精度和浮点数。
# cython: infer_types=Trueimport numpy as npcimport cythonctypedef fused my_type:intdoublelong longcdef my_type clip(my_type a, my_type min_value, my_type max_value):return min(max(a, min_value), max_value)@cython.boundscheck(False)@cython.wraparound(False)def compute(my_type[:, ::1] array_1, my_type[:, ::1] array_2, my_type a, my_type b, my_type c):x_max = array_1.shape[0]y_max = array_1.shape[1]assert tuple(array_1.shape) == tuple(array_2.shape)if my_type is int:dtype = np.intcelif my_type is double:dtype = np.doubleelif my_type is cython.longlong:dtype = np.longlongresult = np.zeros((x_max, y_max), dtype=dtype)cdef my_type[:, ::1] result_view = resultcdef my_type tmpcdef Py_ssize_t x, yfor x in range(x_max):for y in range(y_max):tmp = clip(array_1[x, y], 2, 10)tmp = tmp * a + array_2[x, y] * bresult_view[x, y] = tmp + creturn result
我们可以检查输出类型是否正确:
>>>compute(array_1, array_2, a, b, c).dtypedtype('int32')>>>compute(array_1.astype(np.double), array_2.astype(np.double), a, b, c).dtypedtype('float64')
We now do a speed test:
In [25]: %timeit compute_fused_types.compute(array_1, array_2, a, b, c)11.5 ms ± 258 µs per loop (mean ± std. dev. of 7 runs, 100 loops each)
在编译时创建更多版本的函数。因此有意义的是,与以前一样使用整数执行此函数的速度不会改变。
使用多个线程
Cython 支持 OpenMP。它周围也有一些很好的包装器,比如函数prange()。您可以在 使用并行 中查看有关 Cython 和并行性的更多信息。由于我们进行元素操作,因此我们可以轻松地在多个线程之间分配工作。重要的是不要忘记将正确的参数传递给编译器以启用 OpenMP。使用 Jupyter 笔记本时,你应该像这样使用单元格魔术:
%%cython --force# distutils: extra_compile_args=-fopenmp# distutils: extra_link_args=-fopenmp
必须释放 GIL(参见 释放 GIL),这就是我们声明clip()函数nogil的原因。
# tag: openmp# You can ignore the previous line.# It's for internal testing of the cython documentation.# distutils: extra_compile_args=-fopenmp# distutils: extra_link_args=-fopenmpimport numpy as npcimport cythonfrom cython.parallel import prangectypedef fused my_type:intdoublelong long# We declare our plain c function nogilcdef my_type clip(my_type a, my_type min_value, my_type max_value) nogil:return min(max(a, min_value), max_value)@cython.boundscheck(False)@cython.wraparound(False)def compute(my_type[:, ::1] array_1, my_type[:, ::1] array_2, my_type a, my_type b, my_type c):cdef Py_ssize_t x_max = array_1.shape[0]cdef Py_ssize_t y_max = array_1.shape[1]assert tuple(array_1.shape) == tuple(array_2.shape)if my_type is int:dtype = np.intcelif my_type is double:dtype = np.doubleelif my_type is cython.longlong:dtype = np.longlongresult = np.zeros((x_max, y_max), dtype=dtype)cdef my_type[:, ::1] result_view = resultcdef my_type tmpcdef Py_ssize_t x, y# We use prange here.for x in prange(x_max, nogil=True):for y in range(y_max):tmp = clip(array_1[x, y], 2, 10)tmp = tmp * a + array_2[x, y] * bresult_view[x, y] = tmp + creturn result
我们可以以最小的努力获得可观的速度:
In [25]: %timeit compute_prange.compute(array_1, array_2, a, b, c)9.33 ms ± 412 µs per loop (mean ± std. dev. of 7 runs, 100 loops each)
我们现在比纯 Python 版本快 7558 倍,比 NumPy 快 11.1 倍!
然后去哪儿?
- 如果你想学习如何在 Cython 中使用 BLAS 或 LAPACK ,你可以在 SciPy 2015 上观看 Ian Henriksen 的演示。
- 如果你想学习如何在 Cython 中使用 Pythran 作为后端,你可以在 Pythran 中看到如何作为 NumPy 后端 。请注意,使用 Pythran 仅适用于 旧缓冲区语法 ,尚未使用内存视图。

若有收获,就点个赞吧
0 人点赞
