第十二章 MySQL基础语句
本节课所讲内容:
12.1 SQL概述
12.2 SQL语句结构
12.3 MySQL语句
12.1 SQL概述
结构化查询语言(Structured Query Language)简称SQL,是一种特殊目的的编程语言,是一种数据库查询和程序设计语言,用于存取数据以及查询、更新和管理关系数据库系统,同时也是数据库脚本文件的扩展名。
从上可以看出我们数据库相关工作职位大概两种:DBA和DBD
DBA是数据库管理员database administrator
DBD是数据库开发人员database developer
SQL 是1986年10 月由美国国家标准局(ANSI)通过的数据库语言美国标准,接着,国际标准化组织(ISO)颁布了SQL正式国际标准。1989年4月,ISO提出了具有完整性特征的SQL89标准,1992年11月又公布了SQL92标准。
常见的数据库软件名称:括DB2、ORACLE、SYBASE、MySQL、SQLSERVER、ACCESS等。
- 常见sql语句
Select 查询
Insert 插入
Delete 删除
Update 更新
- 理解数据库:数据库是一个有组织的,根据具体标准分类的数据集合
例如:
• 档案柜=数据库服务器
• 抽屉=数据库
• 文件=表
• 文件中每条信息=记录
12.2 SQL语句结构
SQL结构化查询语言包含6个部分:
- 数据查询语言(DQL:Data Query Language)
其语句,也称为“数据检索语句”,用以从表中获得数据,确定数据怎样在应用程序给出。保留字SELECT是DQL(也是所有SQL)用得最多的动词,其他DQL常用的保留字有WHERE,ORDER BY,GROUP BY和HAVING。这些DQL保留字常与其他类型的SQL语句一起使用。
- 数据操作语言(DML:Data Manipulation Language)
其语句包括动词INSERT,UPDATE和DELETE。它们分别用于添加,修改和删除表中的行。也称为动作查询语言。
- 事务处理语言(TPL):跟shell有点类似 由多条SQL语句组成的整体
它的语句能确保被DML语句影响的表的所有行及时得以更新。TPL语句包括BEGIN TRANSACTION,COMMIT和ROLLBACK。
- 数据控制语言(DCL)
它的语句通过GRANT或REVOKE获得许可,确定单个用户和用户组对数据库对象的访问。某些RDBMS可用GRANT或REVOKE控制对表单个列的访问。
- 数据定义语言(DDL)
其语句包括动词CREATE和DROP。在数据库中创建新表或删除表(CREAT TABLE 或 DROP TABLE);为表加入索引等。DDL包括许多与人数据库目录中获得数据有关的保留字。它也是动作查询的一部分。
- 指针控制语言(CCL)
它的语句,像DECLARE CURSOR,FETCH INTO和UPDATE WHERE CURRENT用于对一个或多个表单独行的操作。declare [dɪˈkler] 声明 ; cursor [ˈkɜ:rsə(r)] 光标 ; into [ˈɪntu] 获取到
12.3 MySQL语句
12.3.1 关于数据库的操作
说明:本节使用mariaDB讲解说明(以下快速安装mariaDB,如果仅安装 mariaDB服务,则安装mariadb-server、mariadb即可),本章最后演示升级MySQL5.7版本,往后章节则在MySQL5.7版本进行讲解MySQL
安装mariaDB:
[root@xuegod63 ~]# yum -y install mariadb-server mariadb
启动mariaDB:
[root@xuegod63 ~]# systemctl start mariadb #启动MariaDB服务
[root@xuegod63 ~]# systemctl enable mariadb #设置开启自动启动MariaDB服务
[root@xuegod63 ~]# systemctl status mariadb #查看MariaDB服务状态
[root@xuegod63 ~]# mysql_secure_installation #进入安全配置导向
NOTE: RUNNING ALL PARTS OF THIS SCRIPT IS RECOMMENDED FOR ALL MySQL
SERVERS IN PRODUCTION USE! PLEASE READ EACH STEP CAREFULLY!
In order to log into MySQL to secure it, we’ll need the current
password for the root user. If you’ve just installed MySQL, and
you haven’t set the root password yet, the password will be blank,
so you should just press enter here.
Enter current password for root (enter for none): #初次运行直接回车,因为root用户没有密码OK, successfully used password, moving on…
Setting the root password ensures that nobody can log into the MySQL
root user without the proper authorisation.
Set root password? [Y/n] Y #是否设置root用户密码,输入Y
New password: 123456 #新密码123456
Re-enter new password: 123456
Password updated successfully!
。。。
Remove anonymous users? [Y/n] Y #是否删除匿名用户,生产环境建议删除,所以直接回车或Y … Success!
Normally, root should only be allowed to connect from ‘localhost’. This
ensures that someone cannot guess at the root password from the network.
Disallow root login remotely? [Y/n] Y #是否禁止root远程登录,根据自己的需求选择Y/n并回车,建议禁止
… Success!
By default, MariaDB comes with a database named ‘test’ that anyone can
access. This is also intended only for testing, and should be removed
before moving into a production environment.
Remove test database and access to it? [Y/n] Y #是否删除test数据库,直接回车或Y
- Dropping test database…
… Success!
- Removing privileges on test database…
… Success!
Reloading the privilege tables will ensure that all changes made so far
will take effect immediately.
Reload privilege tables now? [Y/n] Y #是否重新加载权限表,直接回车 … Success!
Cleaning up…
All done! If you’ve completed all of the above steps, your MariaDB
installation should now be secure.
Thanks for using MariaDB!
… Success!
如果不做安全配置,设置root密码 :
[root@xuegod63 ~]# mysqladmin -u root password “123456”
- 查看数据库
[root@xuegod63 ~]# mysql -u root -p123456 #指定用户名称密码登录数据库。
Welcome to the MariaDB monitor. Commands end with ; or \g.
Your MariaDB connection id is 28
Server version: 5.5.56-MariaDB MariaDBServer #从这里可以看出来,CentOS 7中自带的MariaDB版本是5.5.56,还是基于MySQL的5.5版本开发的
Copyright (c) 2000, 2017, Oracle, MariaDB Corporation Ab and others.
Type ‘help;’ or ‘\h’ for help.Type ‘\c’ to clear the current input statement.
MariaDB [none]> show databases;
+————————————-+
| Database |
+————————————-+
| information_schema |
| mysql |
| performance_schema |
+————————————-+
4 rows in set (0.00 sec)
MariaDB [none] #这个none表示当前没选中任何数据库,当选中数据库时,none会变成选中的数据库名。
例:
MariaDB [none]> use mysql;
Reading table information for completion of table and column names
You can turn off this feature to get a quicker startup with -A
Database changed
MariaDB [mysql]>
注:
- information_schema #这数据库保存了MySQL服务器所有数据库的信息。如数据库名,数据库的表,表栏的数据类型不访问权限等。 schema [ˈskimə] 图表
- performance_schema #MySQL 5.5开始新增一个数据库:PERFORMANCE_SCHEMA,主要用于收集数据库服务器性能参数。并且库里表的存储引擎均为PERFORMANCE_SCHEMA,而用户是不能创建存储引擎为PERFORMANCE_SCHEMA的表。performance [pəˈfɔ:məns] 性能
- mysql库是系统库,里面保存有账户信息,权限信息等。
- MySQL 5.7增加了sys 系统数据库,通过这个库可以快速的了解系统的元数据信息。元数据是关于数据信息的数据,如:数据库名或表名,列的数据类型,或访问权限等。
例1:MariaDB [mysql]> show databases \G #以行的方式显示
* 1. row *
Database: information_schema
* 2. row *
Database: mysql
* 3. row *
Database: performance_schema
MariaDB [mysql]> exit
例2:mysql-e SQL语句,可以直接在终端上运行,免交互执行。后面写SQL相关Shell可以用到
[root@xuegod63 ~]# mysql -e ‘show databases’ -uroot -p123456
+————————————-+
| Database |
+————————————-+
| information_schema |
| mysql |
| performance_schema |
+————————————-+
- 创建数据库
语法:create database 数据库名;
创建数据库注意事项:
- 在文件系统中,MySQL的数据存储区将以目录方式表示MySQL数据库。因此,上面命令中的数据库名字必须与操作系统的约束的目录名字一致。例如不允许文件和目录名中有\,/,:,*,?,”,<,>,|这些符号,在MySQL数据库名字中这些字母会被自动删除。<遵从目录的约束>
- 数据库的名字不能超过64个字符,包含特殊字符的名字或者是全部由数字或保留字组成的名字必须用反引号``包起来。
- 数据库不能重名。
例:
MariaDB [xuegod]> create database HA; #创建一个名为HA的数据库
MariaDB [xuegod]> create database ‘HA-test’ ; #使用单引号时,是创建不了的
使用反引号可以创建成功:
MariaDB [xuegod]> create database HA-test ;
MariaDB [HA]> create database create;
总结:单引号和反引号使用场景
反引号是为了区分MySQL的保留字与普通字符而引入的符号。
例:create database create;
如果不用反引号,MySQL将把create视为保留字而导致出错,所以,有MySQL保留字作为字段的,必须加上反引号来区分。
引号一般用在字段的值,如果字段值是字符或字符串,则要加引号,如:select=’字段值’
不加反引号建的数据库或表不能包含MySQL保留字,否则出错。
[root@xuegod63 ~]#ls /var/lib/mysql/ #查看数据库存放目录。
- 选择要操作的数据库
使用USE语句将会选择一个数据库成为当前数据库。后面的操作默认都在被选择的数据库中操作。
MariaDB [none]> use HA-test;
Database changed
- 查看自己所处的位置及默认所在的位置
MariaDB [HA-test]> select database();
+———————+
| database() |
+———————+
| HA-test |
+———————+
如果什么数据库也没有选择,默认显示的是NULL,Null意味着没有选择数据库
MariaDB [none]> select database();
+———————+
| database() |
+———————+
| NULL |
+———————+
1 row in set (0.00 sec)
- 在命令行选择默认的数据库
[root@xuegod63 ~]# mysql –u root -p123456 HA
MariaDB [HA]> select now(),user(),database();
+————————————-+—————————-+———————-+
| now() | user() | database() |
+————————————-+—————————-+———————-+
| 2018-06-28 17:33:59 | root@localhost | HA |
+————————————-+—————————-+———————-+
1 row in set (0.00 sec)
- 删除数据库:删除没有任何提示,要慎重操作
方法1:在数MariaDB数据库中使用DROP命令删除库。
MariaDB [none]> drop database HA-test;
Query OK, 0 rows affected (0.00 sec)
方法2:直接到数据库存放目录中,将对应的库的目录移出就行。
MariaDB [none]> create database HA-test1; #创建数据库HA-test1
[root@xuegod63 ~]# cd /var/lib/mysql/
[root@xuegod63 mysql]# mv HA@002dtest1 /opt/ # HA@002dtest1 代表HA-test1
MariaDB [none]> show databases; #查看时,已经看不到数据库HA-test1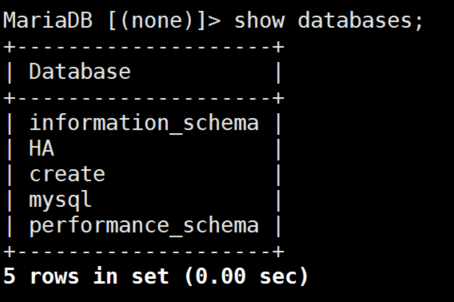
方法3:使用IF EXISTS 子句以避免删除不存在的数据库时出现的MySQL的错误信息
MariaDB [none]> drop database if exists HA-test; #IF EXISTS:如果存在则删除
Query OK, 0 rows affected, 1 warning (0.00 sec)
同理我们创建数据库时也可以使用IF EXISTS
MariaDB [none]> create database if not exists HA;
12.3.2 关于表的操作
- 查看库有哪些表,查看表时,要进入到数据库再查看
MariaDB [none ]> use mysql;
Database changed
MariaDB [mysql]> show tables;
+———————————————+
| Tables_in_mysql |
+———————————————+
| columns_priv |
| db |
| event |
| func |
| general_log |
| help_category |
| help_keyword |
| help_relation |
| help_topic |
| host |
| ndb_binlog_index |
| plugin |
| proc |
| procs_priv |
| proxies_priv |
| servers |
| slow_log |
| tables_priv |
| time_zone |
| time_zone_leap_second |
| time_zone_name |
| time_zone_transition |
| time_zone_transition_type |
| user |
+———————————————+
- 创建表
语法:create table 表名 (字段名 类型, 字段名 类型, 字段名 类型);
创建前必须得有库所以先创建库
MariaDB [none]> create database xuegod;
MariaDB [none]> use xuegod;
MariaDB [xuegod]> create table student(id int (20),name char(40),age int(11));
- 查看表的结构 describe [dɪˈskraɪb] 描述
方法1:
MariaDB [xuegod]>desc student;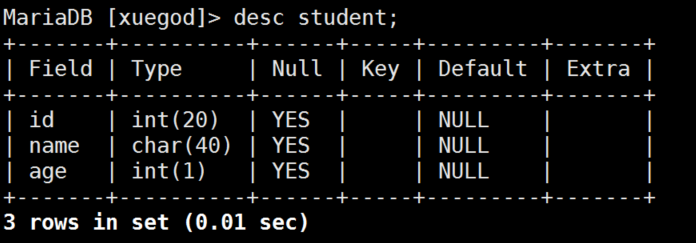
查看表结构其他方法(了解):
MariaDB [xuegod]> explain xuegod.student; # explain [ɪkˈspleɪn] 解释
MariaDB [xuegod]> show columns from xuegod.student; # column [‘kɒləm] 列
MariaDB [xuegod]> show fields from xuegod.student; # field [fi:ld] 领域
会一种常用的就行
- 查看创建表执行了哪些命令
MariaDB [xuegod]> show create table student \G
* 1. row *
Table: student
Create Table: CREATE TABLE student (
id int(20) DEFAULT NULL,
name char(40) DEFAULT NULL,
age int(11) DEFAULT NULL
) ENGINE=InnoDB DEFAULT CHARSET=latin1
1 row in set (0.00 sec)
MariaDB [xuegod]>create table student2(id int(20),name char(40),age int)ENGINE=MyISAM DEFAULT CHARSET=utf8;
可以指定表的默认存储引擎和字符集
MariaDB [xuegod]> show create table student2\G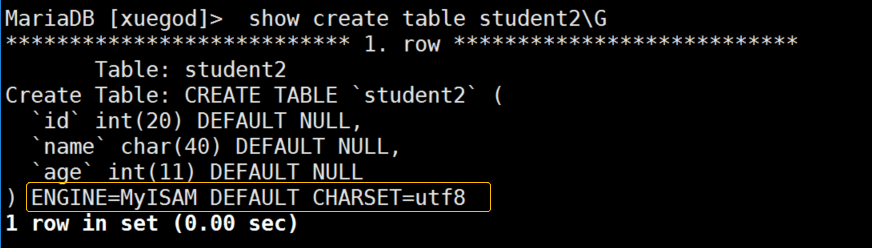
- 删除表
MariaDB [xuegod]> drop table student2;
Query OK, 0 rows affected (0.01 sec)
- 禁止预读表信息
没有禁止前的提示
MariaDB [xuegod]> use performance_schema;
Reading table information for completion of table and column names
You can turn off this feature to get a quicker startup with -A
登录的时候加上-A参数
[root@xuegod63 ~]# mysql -uroot-p123456 -A
MariaDB [(none)]> use performance_schema;
Database changed
- 修改表名称alter
语法:alter table 表名 rename 新表名;
MariaDB [none]> use xuegod;
MariaDB [xuegod]>alter table student rename students; #studen表名修改为students
MariaDB [xuegod]> show tables;
+——————————+
| Tables_in_xuegod|
+——————————+
| students |
+——————————+
1 row in set (0.00 sec)
- 修改表中的字段类型
语法:alter table 表名 modify 要修改的字段名要修改的类型;
MariaDB [xuegod]>desc students;
+————-+———————+————-+————-+————-+————-+
| Field | Type | Null | Key | Default | Extra |
+————-+———————+————-+————-+————-+————-+
| id | int(20) | YES | | NULL | |
| name | char(40) | YES | | NULL | |
| age | int(11) | YES | | NULL | |
+————-+———————+————-+————-+————-+————-+
MariaDB [xuegod]>alter table students modify id int(10);
MariaDB [xuegod]> desc students;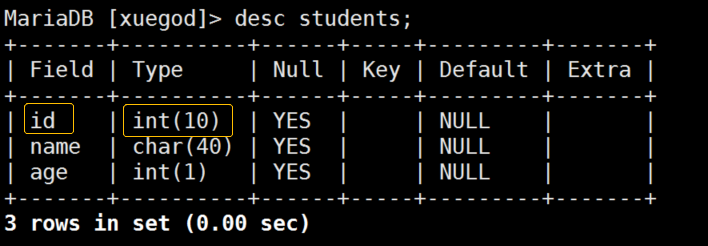
- 修改表中的字段类型和字段名称
语法:alter table 表名 change 原字段名新字段名新字段类型;
注意:MySQL不支持同时修改多个字段。
MODIFY [COLUMN] col_namecolumn_definition
[FIRST | AFTER col_name]
来源:http://dev.mysql.com/doc/refman/5.5/en/alter-table.html
+————-+————-+————-+——+———————+———-+
| Field | Type | Null | Key | Default | Extra |
+————-+————-+————-+——+———————+———-+
| id | int(10) | YES | | NULL | |
| name |char(40) | YES | | NULL | |
| age | int(11) | YES | | NULL | |
+————-+————-+————-+——+———————+———-+
MariaDB [xuegod]> alter table students change name stname char(20);
MariaDB [xuegod]> desc students;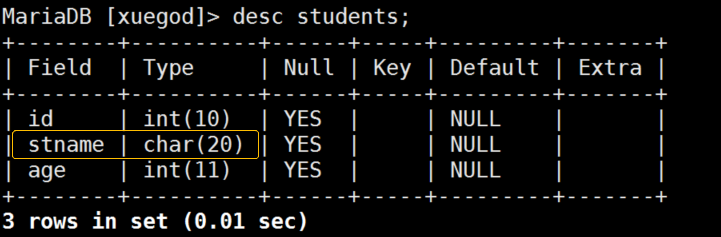
注:CHANGE 和MODIFY的区别:
CHANGE 对列进行重命名和更改列的类型,需给定旧的列名称和新的列名称、当前的类型。 MODIFY 可以改变列的类型,此时不需要重命名(不需给定新的列名称)
- 在表中添加字段
语法:alter table 表名 add字段名 字段类型;
MariaDB [xuegod]> alter table students add sex enum(‘M’,’W’);
MariaDB [xuegod]> desc students;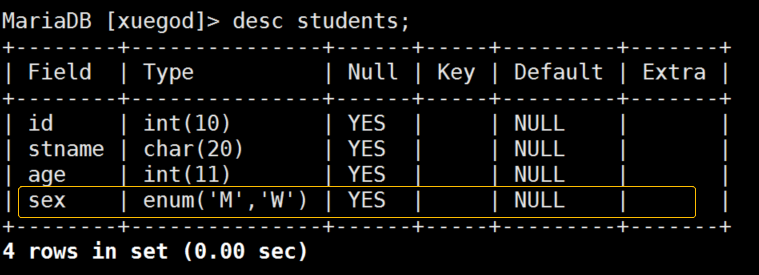
- 指定位置添加字段,在第一列添加一个字段
MariaDB [xuegod]> alter table students add uid int(10) first;
MariaDB [xuegod]> desc students;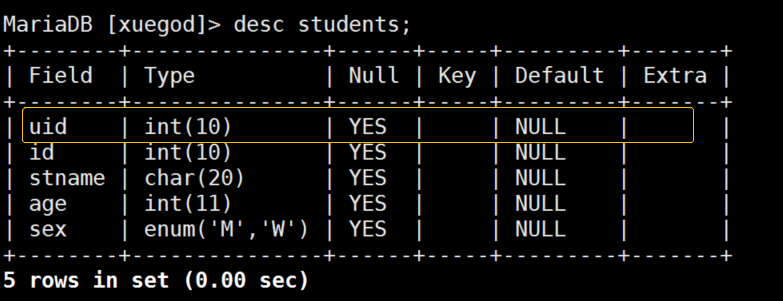
在age后面添加一个address字段:
MariaDB [xuegod]>alter table students add address char(40) after age;
MariaDB [xuegod]> desc students;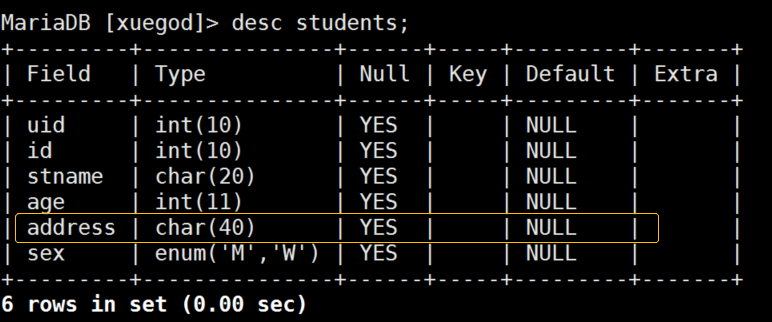
- 删除表中字段
语法:alter table 表名 drop 字段名 ;
MariaDB [xuegod]> alter table students drop address;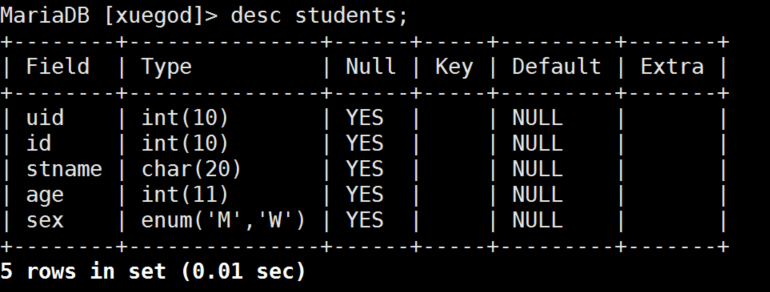
12.3.3 关于记录的操作
- 插入字段<记录>insert
语法:insert into 表名values (字段值1,字段值2, 字段值3);
MariaDB [xuegod]> create table student(id int(20),name char(40),age int);
MariaDB [xuegod]> insert into student values(1,’zhangs’,21);
插入记录时要对应相对的类型
MariaDB [xuegod]> insert into student values(2,’lis’,24),(3,’wange’,26);
同时插入多条,使用,分开
MariaDB [xuegod]> insert into student (id,name)values(4,’hangl’);
指定字段插入
- 查询表中记录
语法:select from 表名称;
MariaDB [xuegod]> select from student; # 表示所有。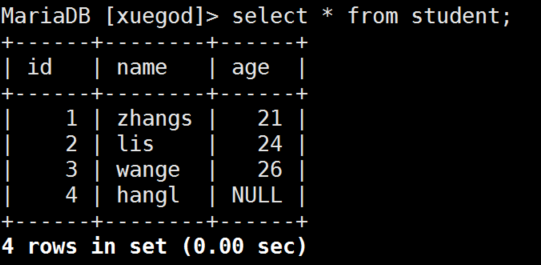
当字段比较多的时候我们也可以使用\G
MariaDB [xuegod]> select from student\G
* 1. row *
id: 1
name: zhangs
age: 21
* 2. row *
id: 2
name: lis
age: 24
* 3. row *
id: 3
name: wange
age: 26
* 4. row *
id: 4
name: hangl
age: NULL
4 rows in set (0.00 sec)
只查询表中某个字段的内容:
MariaDB [xuegod]> select name from student; #看我查看name字段的内容。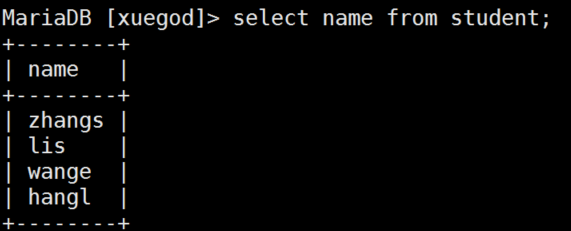
MariaDB [xuegod]> select id,name from student; #查看id和name字段的内容。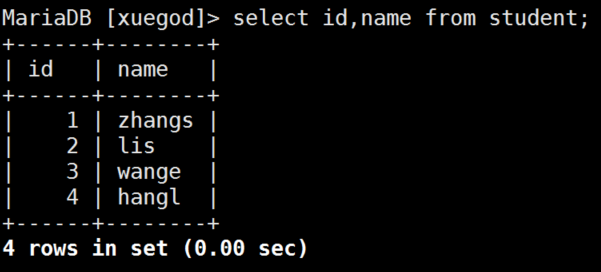
- 查看别的数据库的表或者不在本数据库上进行查看
语法:SELECT 字段 FROM 数据库名.表名;
MariaDB [xuegod]> use HA
MariaDB [HA]> create table student(id int(11),name char(40),age int(5));
MariaDB [HA]> insert into student values(1,’zhangs’,21),(2,’lis’,24),(3,’wange’,26),(4,’hangl’,’ ‘);
MariaDB [HA]> use xuegod
MariaDB [xuegod]> select *from HA.student; #查看某个数据库下指定的表内容,数据库名.表名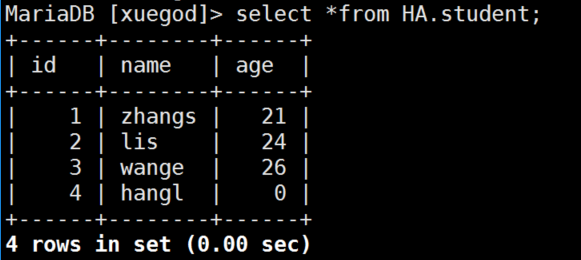
这样等效于先use 数据库,然后查看
- 删除记录
删除id为3的行
MariaDB [xuegod]> delete from student where id=3;
MariaDB [xuegod]> select * from student;
+———+————+———-+
| id | name | age |
+———+————+———-+
| 1 | zhangs | 21 |
| 2 | lis | 24 |
| 4 | hangl | NULL |
+———+————+———-+
3 rows in set (0.00 sec)
删除age为空的行:
MariaDB [xuegod]> delete from student where age is null;
MariaDB [xuegod]> select * from student;
+———+————+———+
| id | name | age |
+———+————+———+
| 1 | zhangs | 21 |
| 2 | lis | 24 |
+———+————+———+
2 rows in set (0.00 sec)
- 更新记录
MariaDB [xuegod]> update student set name =’M’ where id=2;
MariaDB [xuegod]> select from student;
+———+————+———+
| id | name | age |
+———+————+———+
| 1 | zhangs | 21 |
| 2 | M | 0 |
+———+————+———+
MariaDB [xuegod]> update student set id=2; 所有的都变为2
MariaDB [xuegod]> select from student;
+———+————+———+
| id | name | age |
+———+————+———+
| 2 | zhangs | 21 |
| 2 | M | 0 |
+———+————+———+
2 rows in set (0.00 sec)
MariaDB [xuegod]> update student set name=’zhangsan’,age=21 where id=1; #同时更新多个字段时候用,号隔开
13.3.4 SQL基础条件查询语句
语法:select 字段名1,字段名2 from 表名 [where 条件];
- 查询students表中的name,age
MariaDB [xuegod]> delete from student where id = 2;
MariaDB [xuegod]> insert into student values(1,’zhangs’,21),(2,’lis’,24),(3,’jk’,24),(4,’lo’,25),(5,’io’,25),(6,’jk’,22);
- 去重复查询 distinct [dɪˈstɪŋkt] 不同的
MariaDB [xuegod]> select distinct name,age from student;
+————-+———+
| name | age |
+————-+———+
| zhangs | 21 |
| lis | 24 |
| jk | 24 |
| lo | 25 |
| io | 25 |
| jk | 22 |
+————-+———+
MariaDB [xuegod]> select distinct id,name,age from student where id=3;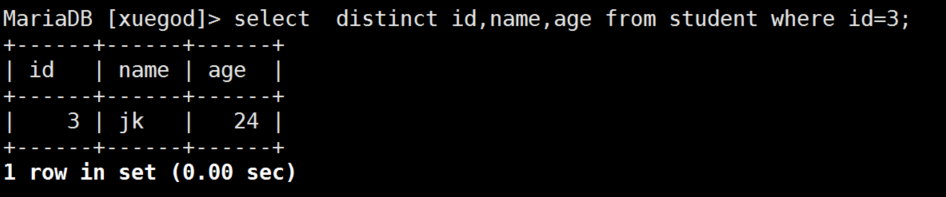
注:select distinct from student;
MySQL的distinct可以对使用
- 使用and和or进行多条件查询
or和and 同时存在时,先算and的两边值,逻辑与先执行
MariaDB [xuegod]> select id,name,age from student where id>1 and age>24;
+——+————+———-+
| id | name | age |
+——+————+———-+
| 4 | lo | 25 |
| 5 | io | 25 |
+——+————+———-+
2 rows in set (0.00 sec)
MariaDB [xuegod]> select id,name,age from student where id>1 or age>24;
+———+———+———+
| id | name | age |
+———+———+———+
| 2 | lis | 24 |
| 3 | jk | 24 |
| 4 | lo | 25 |
| 5 | io | 25 |
| 6 | jk | 22 |
+———+———+———+
5 rows in set (0.00 sec)
MariaDB [xuegod]> select * from student where name=’zhangs’ and (age=21 or age=24);
+———+————+———+
| id | name | age |
+———+————+———+
| 1 | zhangs | 21 |
+———+————+———+
1 row in set (0.00 sec)
注意and和or都是用的时候的逻辑关系
- MySQL区分大小写查询
MySQL查询默认是不区分大小写的
MariaDB [xuegod]> select name from student where name=’jk’;
+———+
| name |
+———+
| jk |
| jk |
+——-+
2 rows in set (0.00 sec)
解决:
MariaDB [xuegod]> select * from student where binary name=’jk’;
+——+———+———-+
| id | name | age |
+——+———+———-+
|3 | jk | 24 |
|6 | jk | 22 |
+——+———+———-+
2 rows in set (0.00 sec)
binary [ˈbaɪnəri] 二进制的
BINARY是类型转换运算符,它用来强制它后面的字符串为一个二进制字符串,可以理解为在字符串比较的时候区分大小写。
- MySQL查询排序
语法:select distinct 字段1,字段2 from 表名order by 字段名;
默认为升序asc
MariaDB [xuegod]> select distinct id from student order by id asc;
+——-+
| id |
+——-+
| 1 |
| 2 |
| 3 |
| 4 |
| 5 |
| 6 |
+——-+
6 rows in set (0.00 sec)
MariaDB [xuegod]> select distinct id from student order by id desc;
+——+
| id |
+——+
| 6 |
| 5 |
| 4 |
| 3 |
| 2 |
| 1 |
+——-+
13.3.5 关于MySQL命令帮助
help
MariaDB [xuegod]> help show;
会告诉我们很多使用方法和信息
MariaDB [xuegod]> help select;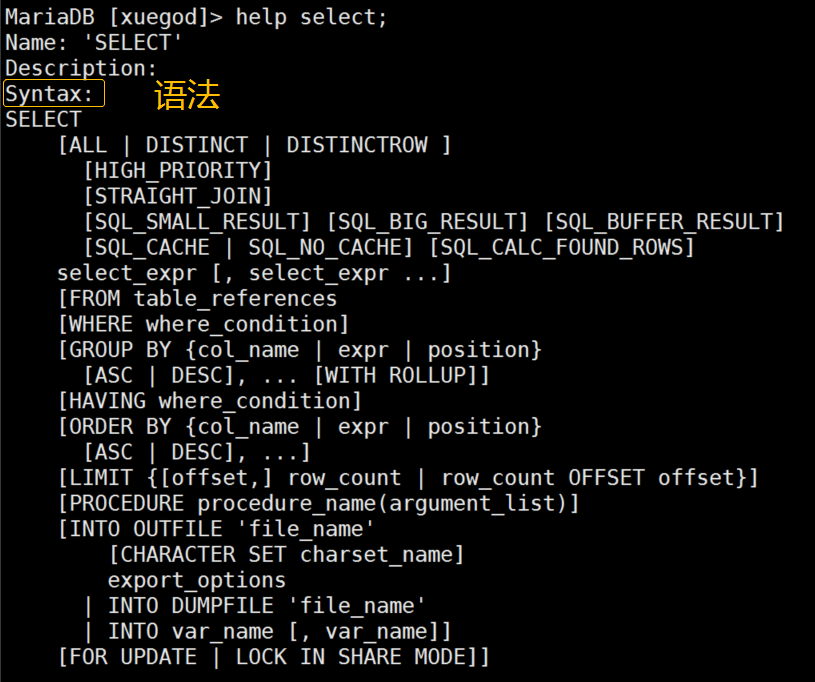
以下昨晚已讲
12.4 实战:升级MySQL版本到5.7版本并迁移数据
- 备份数据
mysqldump -u root -p123456 -B迁移的库名> 导出名称.sql
举例:
[root@xuegod63 ~]# mysqldump -u root -p123456 -B xuegod > /tmp/xuegod_back.sql
[root@xuegod63 ~]# cd /tmp/
[root@xuegod63 tmp]# ls
anaconda.log systemd-private-516329955c724619b8b05485d705755b-chronyd.service-DWxIXT
hsperfdata_root systemd-private-516329955c724619b8b05485d705755b-colord.service-uh8TP2
ifcfg.log systemd-private-516329955c724619b8b05485d705755b-cups.service-AJX6VH
ks-script-b_o29k systemd-private-516329955c724619b8b05485d705755b-rtkit-daemon.service-BrCqRn
packaging.log tracker-extract-files.0
program.log tracker-extract-files.1000
sensitive-info.log vmware-root
ssh-mRu0adViBm7a xuegod-back.sql
storage.log yum.log
- 删除旧版本mariadb
[root@xuegod63 tmp]# yum -y remove mariadb*
- yum 安装MySQL 5.7的方法
(1) CentOS 7版本下载
[root@xuegod63 ~]# rpm -ivh https://repo.mysql.com//yum/mysql-5.7-community/el/7/x86_64/mysql57-community-release-el7-10.noarch.rpm
[root@xuegod63 ~]# yum list #刷新yum 源缓存。
[root@xuegod63 ~]# yum -y install mysql-community-server #安装MySQL 5.7。
[root@xuegod63 ~]# systemctl start mysqld #启动MySQL会生成临时密码。
(2) 第一次通过# grep “password” /var/log/mysqld.log 命令获取MySQL的临时密码
[root@xuegod63 ~]# grep ‘password’ /var/log/mysqld.log
2018-08-01T09:59:33.918961Z 1 [Note] A temporary password is generated for root@localhost: buL.UJp!T2Od #临时密码
2018-08-01T09:59:40.752851Z 2 [Note] Access denied for user ‘root’@’localhost’ (using password: NO)
[root@xuegod64 ~]# mysql -u root -p’buL.UJp!T2Od’ #注意临时密码要引号
用该密码登录到服务端后,必须马上修改密码,不然操作查询时报错误
刚开始设置的密码必须符合长度,且必须含有数字,小写或大写字母,特殊字符。
(3) 如果想设置简单密码,如下操作:
方法一:首先,修改validate_password_policy参数的值
mysql> set global validate_password_policy=0;
Query OK, 0 rows affected (0.03 sec)
定义复杂度的级别:
0:只检查长度。
1:检查长度、数字、大小写、特殊字符。
2:检查长度、数字、大小写、特殊字符字典文件
mysql> set global validate_password_length=1; #定义长度 默认是8位数修改为1后密码长度>=4位数
Query OK, 0 rows affected (0.01 sec)
举例实验:
mysql> ALTER USER ‘root’@’localhost’ IDENTIFIED BY ‘123’;
ERROR 1819 (HY000): Your password does not satisfy the current policy requirements
mysql> ALTER USER ‘root’@’localhost’ IDENTIFIED BY ‘1234’;
Query OK, 0 rows affected (0.01 sec)
mysql> set password for root@localhost = password(‘123456’); #修改root用户密码
Query OK, 0 rows affected, 1 warning (0.05 sec)
mysql> flush privileges;
Query OK, 0 rows affected (0.01 sec)
方法二:在/etc/my.cnf 可关闭密码强度审计插件,重启MySQl服务。
在[myqld]末行;
validate-password=OFF #不使用密码强度审计插件
[root@xuegod63 ~]# systemctl restart mysqld
mysql> set password for ‘root’@’localhost’= password(‘1’);
Query OK, 0 rows affected, 1 warning (0.01 sec)
注:用这种方法可以让密码长度至少为1位数 但在生产环境中决不可以用简单的密码
- 导入数据库
[root@xuegod63 ~]# mysql -u root -p123456 <导出名称.sql #迁移数据库完成!
举例:
[root@xuegod64 tmp]# mysql -u root -p123456 < /tmp/xuegod_back.sql
[root@xuegod63 ~]# mysql -u root -p123456
mysql> show databases;
+————————————-+
| Database |
+————————————-+
| information_schema |
| mysql |
| performance_schema |
| sys |
| xuegod |
+————————————-+
5 rows in set (0.00 sec)
建议:按此方法安装一个新的MySQL5.7的环境(不需要备份数据、修改好root密码为123456即可),并保存一个快照,往后的MySQL课程都基于MySQL5.7环境讲解。
总结:
12.1 SQL概述
12.2 SQL语句结构
12.3 MySQL语句
12.4 实战:升级mysql版本到5.7版本并迁移数据

若有收获,就点个赞吧
0 人点赞
