第三章 文件的基本管理和文件的归档和压缩本节所讲内容:

在 WIN 系统中,查看文件先进入相应的盘符,然后进入文件目录
在 WIN 中,它是多根 c:\ d:\ e:\ Linux 只有一个/根目录
使用 tree 命令查看 linux 目录结构,如果没有这个命令,需要手工安装一下[root@xuegod63 ~]# yum install tree #安装 tree 命令
查看/tmp 目录结构[root@xuegod63 ~]# tree /tmp/ 查 看 根 下 有 哪 些 文 件 : [root@xuegod63 ~]# ls /
bin dev home lib64 mnt proc run srv tmp var boot etc lib media opt root sbin sys usr
根下的目录作用说明:
| 目 录 | 说 明 |
|---|---|
| / | 处于 linux 系统树形结构的最顶端,它是 linux 文件系统的入口,所有的目录、 文件、设备都在 / 之下 |
| /bin | bin 是 Binary 的缩写。常用的二进制命令目录。比如 ls、cp、mkdir、cut 等;和/usr/bin 类似,一些用户级工具 |
| /boot | 存放的系统启动相关的文件,例如:kernel.grub(引导装载程序) |
/dev |
dev 是 Device 的缩写。设备文件目录,比如声卡、磁盘……在 Linux 中一切都被看做文件。终端设备、磁盘等等都被看做文件 设备文件: /dev/sda,/dev/sda1,/dev/tty1,/dev/tty2,/dev/pts/1, /dev/zero, /dev/null, /dev/cdrom |
/etc |
常用系统及二进制安装包配置文件默认路径和服务器启动命令目录,如: /etc/passwd 用户信息文件 /etc/shadow 用户密码文件 |
| /etc/group 存储用户组信息 /etc/fstab 系统开机启动自动挂载分区列表 /etc/hosts 设定用户自己的 IP 与主机名对应的信息 |
|
|---|---|
| /home | 普通用户的家目录默认存放目录 |
| /lib | 库文件存放目录,函数库目录 |
/mnt /media |
/mnt 和/media 一般用来临时挂载存储设备的挂载目录,比如有 cdrom、U 盘等目录 /mnt/hgfs: 安装 vmware-tools 后,使用共享文件夹功能,可以共享虚拟机和真机的目录,实现文件相互复制,一般这个功能没有用。我们直接使用 xshell 来上传文件 |
| /opt | 表示的是可选择的意思,有些软件包也会被安装在这里。如:gitlab |
/proc |
操作系统运行时,进程(正在运行中的程序)信息及内核信息(比如 cpu、硬盘分区、内存信息等)存放在这里。/proc 目录是伪装的文件系统 proc 的挂载目录,proc 并不是真正的文件系统。因此,这个目录是一个虚拟的目录,它是系统内存的映射,我们可以通过直接访问这个目录来获取系统信息。也就是说,这个目录的内容不在硬盘上而是在内存里 查看咱们的 CPU 信息 cat /proc/cpuinfo |
| /sys | 系统目录,存放硬件信息的相关文件 |
| /run | 运行目录,存放的是系统运行时的数据,比如进程的 PID 文件 |
| /srv | 服务目录,存放的是我们本地服务的相关文件 |
/sbin |
大多数涉及系统管理的命令都存放在该目录中,它是超级权限用户 root 的可执行命令存放地,普通用户无权限执行这个目录下的命令,凡是目录 sbin 中包含 的命令都是 root 权限才能执行的 |
/tmp |
该目录用于存放临时文件,有时用户运行程序的时候,会产生一些临时文件。/tmp 就是用来存放临时文件的。/var/tmp 目录和该目录的作用是相似的, 不能存放重要数据,系统会定期删除这个目录下的没有被使用的文件。 它的权限比较特殊[root@xuegod63 ~]# ls -ld /tmp drwxrwxrw**t **10 root root 12288 Oct 3 20:45 /tmp/ 粘 滞 位 (sticky bit)目录的 sticky 位表示这个目录里的文件只能被文件的 owner(所有者)和 root 删除 |
/var |
系统运行和软件运行时产生的日志信息,该目录的内容是经常变动的,存放的是一些变化的文件。比如/var 下有/var/log 目录用来存放系统日志的目录,还有 mail、/var/spool/cron |
/usr |
存放应用程序和文件, /usr/bin 普通用户使用的应用程序 /usr/sbin 管理员使用的应用程序 /usr/lib 库文件 Glibc(32 位) /usr/lib64 库文件 Glibc |
| /lib /lib64 是 /usr/lib 和 |
这个目录里存放着系统最基本的动态链接共享库,包含许多被/bin/和/sbin/中的程序使用的库文件,目录/usr/lib/中含有更多用于用户程序的库文件。作用类似于 windows 里的 DLL 文件,几乎所有的应用程序都需要用到这些共享库 注:lib*.a 是静态库 , lib*.so 是动态库 |
| /usr/lib64 的软链接 | 静态库在编译时被加载到二进制文件中 动态库在运行时加载到进程的内存空间中 简单的说:这些库是为了让你的程序能够正常编译运行的 其实类似于 WIN 中.dll 文件,几乎所有的应用程序都需要用到这些共享库 |
|---|---|
1. **绝对路径和相对路径**
路径:在我们平时使用计算机时要找到需要的文件就必须知道文件的位置,而表示文件的位置的方式就是路径
绝对路径:在 Linux 中,绝对路径是从”/“开始的,比如/usr、/etc/passwd。如果一个路径是从根
(/)开始的,它一定是绝对路径.
相 对 路 径 : 相 对 路 径 是 以 . 或 .. 开 始 的 , [root@xuegod63 etc]# pwd #判断用户当前所处的位置绝对路径: 从/开始的路径 /home/user1
相对路径: 相对于当前目录开始,a.txt ./a.txt ../root/b.txt 当前目录在/etc [root@xuegod63 ~]# cd /etc/
[root@xuegod63 etc]# ll passwd
-rw-r—r— 1 root root 2116 11 月 16 14:57 passwd [root@xuegod63 etc]# ll /etc/passwd
-rw-r—r— 1 root root 2116 11 月 16 14:57 /etc/passwd
0.2 文件的管理
文件管理方式有多种: 改变目录: cd
创建/修改/移动/删除: touch mkdir mv vi rm cp
1. **创建文件和文件夹**
命令之:touch ; touch [tʌtʃ] 触摸;接触;
作用:常用来创建空文件,如果文件存在,则修改这个文件的时间语法:touch 文件名
[root@xuegod63 ~]# cd /opt/ [root@xuegod63 opt]# touch a.txt [root@xuegod63 opt]# touch file1 file2
[root@xuegod63 opt]# touch file{6..20} #创建 file6 到 file20 的文件[root@xuegod63 opt]# ls
a.txt file10 file12 file14 file16 file18 file2 file6 file8 rh file1 file11 file13 file15 file17 file19 file20 file7 file9
[root@xuegod63 ~]# touch a.txt [root@xuegod63 ~]# ll a.txt
-rw-r—r—. 1 root root 0 8 月 10 21:13 a.txt #这个时间是文件的修改时间。
[root@xuegod63 ~]# stat a.txt #查看文件属性(其中包括文件时间属性) 文件:a.txt
大小:0 块:0 IO 块:4096 普通空文件设备:802h/2050d Inode:16803136 硬链接:1
权限:(0644/-rw-r—r—) Uid:( 0/ root) Gid:( 0/ root) 最近访问:2022-02-15 10:27:31.981518522 +0800
最近更改:2022-02-15 10:27:31.981518522 +0800
最近改动:2022-02-15 10:27:31.981518522 +0800 创建时间:2022-02-15 10:27:31.981518522 +0800
注:
访问时间:atime 查看内容 cat a.txt
修改时间:mtime 修改内容 echo aaa > a.txt
改变时间:ctime 文件属性,比如权限 change time。 chmod +w a.txt 创建时间:Birth 文件创建的时间
[root@xuegod64 ~]# echo $LANG #查看当前语言设置zh_CN.UTF-8
[root@xuegod64 ~]# LANG=en_US.UTF-8 #切换为英文[root@xuegod63 ~]# stat a.txt
[root@xuegod64 ~]# LANG=zh_CN.UTF-8 #切换为中文
1. **使用 vim 和重定向创建一个新文件用 vim 命令创建一个新文件**
[root@xuegod63 mnt]# vim xuegod-1.txt 用重定向创建一新文件
[root@xuegod63 mnt]#echo aaa > xuegod.txt
1. **命令之:mkdir 作用:创建目录**
语法:mkdir (选项) 文件夹名子例:
[root@xuegod63 opt]# mkdir dir1 [root@xuegod63 opt]# mkdir dir2 dir3 /home/dir4 [root@xuegod63 opt]# ls /home/
dir4 user1
[root@xuegod63 opt]# mkdir /tmp/a/b/c
mkdir: 无法创建目录”/tmp/a/b/c”: 没有那个文件或目录
[root@xuegod63 opt]# mkdir -p /tmp/a/b/c #在创建一个目录的时候,如果这个目录的上一级不存在的话,要加参数-p
[root@xuegod63 opt]# tree /tmp/a/b/c
互动:在当前目录下,已经存在一个文件后,可以创建同名的目录文件吗? [root@xuegod63 opt]# touch aaa
[root@xuegod63 opt]# mkdir aaa
不可以创建成功,因为目录下不能存在两个同名的文件。

1. **删除文件和目录用到的命令:rm**
作用:可以删除一个目录中的一个或多个文件或目录,对于链接文件,只是删除整个链接文件,而原文件保持不变的
语法:rm (选项) 处理对象选项:
-f 强制删除,没有提示
-r 删除目录,递归删除,把目录下的文件和文件夹也删除例子:
[root@xuegod63 opt]# rm -rf a.txt [root@xuegod63 opt]# rm -rf a.txt dir [root@xuegod63 opt]# rm -rf file*
rm -rf (慎用,一定要在删除以前确定一下所在目录,防止误删除重要数据)
1. **复制文件**
命令:cp 源文件/目录 目标文件/目录
选项:-R/r:递归处理,将指定目录下的所有文件与子目录一并处理。复制目录时会使用 r 参数例子:
[root@xuegod63 ~]# cp /etc/passwd /opt/ #复制文件[root@xuegod63 ~]# cp -r /boot/grub2 /opt/ #复制目录
[root@xuegod64 ~]# cp -r /boot/grub2 /etc/passwd /opt #复制多个文件到目录
选项:\ :覆盖文件,不提示
例子:
[root@xuegod64 ~]# \cp -r /boot/grub2 /etc/passwd /opt #\反斜杠,覆盖文件,不提示
选项:-p:复制文件会保留文件属性例子:
[root@xuegod64 ~]# touch c.txt
[root@xuegod64 ~]# chmod a+w c.txt #添加写权限[root@xuegod64 ~]# ll c.txt #有写权限[root@xuegod64 ~]# cp c.txt /opt/ #复制到目录互动:复制到目录后,这个文件会带上 w 写权限吗?
[root@xuegod64 ~]# ll /opt/c.txt #检查,没有写权限[root@xuegod64 ~]# \cp -p c.txt /opt #-p 选项会保留文件属性[root@xuegod64 ~]# ll /opt/c.txt #检查,有写权限[root@xuegod63 opt]# mkdir dir1 dir2 dir3
[root@xuegod63 opt]# \cp -r /opt/!(dir1 | dir2) /root/ #除了 dir1 或 dir2 以外其他文件都复制到 root 目录下
1. **移动文件**
[root@xuegod63 ~]# cd /opt
[root@xuegod63 opt]# mv passwd bbbpasswd #重命名
[root@xuegod63 opt]# mv bbbpasswd /opt/passwd #在移动文件的时候支持改名操作[root@xuegod63 opt]# touch file1 file2 file3 file4
[root@xuegod63 opt]# mv /opt/!(file1 | file2) /root/ #除了 file1 或 file2 以外其他文件都移动到 root 目录下
0.3 查看文件
1. **命 令 之 :cat 语法:cat 文件名**
作用:查看文件内容,一次显示整个文件的内容
例子: [root@xuegod63 ~]# cat /etc/passwd
1. **命令之:more**
作用:以分页形式显示文件内容语法:more + 文件名
说明: 按下回车刷新一行,按下空格刷新一屏,输入 q 键退出例:
[root@xuegod63 ~]# cat /proc/cpuinfo | more [root@xuegod63 ~]# ifconfig | more [root@xuegod63 ~]# more /proc/cpuinfo
1. **命令之:less**
作用:和 more 功能一样语法:less +文件名
说明:linux 中 more 与 less 的区别
more:不支持后退,但几乎不需要加参数,空格键是向下翻页,Enter 键是向下翻一行,在不需要后退的情况下比较方便
less:支持前后翻滚,既可以向上翻页(pageup 按键),也可以向下翻页(pagedown 按键)。,空格键是向下翻页,Enter 键是向下翻一行
1. **命令之:head**
作用: 用于显示文件的开头的内容。在默认情况下,head 命令显示文件的头 10 行内容语法:head(选项)文件名
参数: -n 显示从文件头开始的行数[root@xuegod63 opt]# head /etc/passwd
[root@xuegod63 opt]# head -n 3 /etc/passwd #显示前 3 行
1. **命令之:tail**
作用: 用于显示文件中的尾部内容。默认在屏幕上显示指定文件的末尾 10 行语法:tail (选项)文件名
参数:
-n 显示文件尾部多少行的内容(n 为数字)
-f 动态显示数据(不关闭),常用来查看日志
[root@xuegod63 ~]# tail -n 3 /var/log/secure #查看最后 3 行记录[root@xuegod63 ~]# tail -3 /var/log/secure #查看最后 3 行记录
[root@xuegod63 ~]# tail -f /var/log/secure #在一个终端执行此命令动态查看文件内容[root@xuegod63 ~]# tailf /var/log/secure #在一个终端执行此命令动态查看文件内容
[root@xuegod63 ~]# ssh root@192.168.1.63 #在另一个终端远程登录 Linux,登录成功后[root@xuegod63 ~]# tail -f /var/log/secure #可以动态查看到登录成功的日志
Nov 17 00:08:32 xuegod63 sshd[2924]: Accepted password for root from 192.168.1.63 port 39904 ssh2
0.4 tar 命令进行文件的归档和压缩
1. **归档和压缩文件**
 归档和压缩文件的好处:节约硬盘的资源 ,加快文件传输速率tar 命令 作用:打包、压缩文件
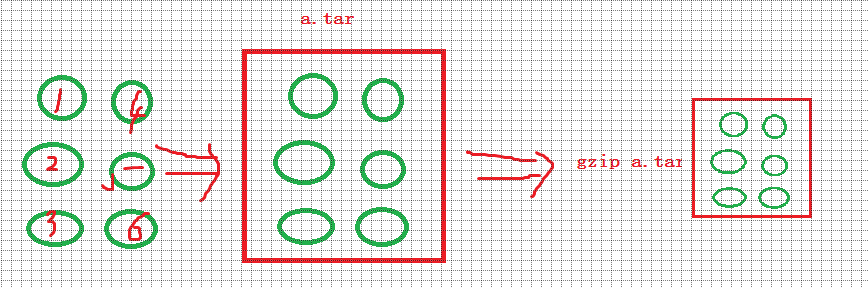
这幅图的就是说 123456 这几个文件打包成了一个 a.tar 文件,但是这个 a.tar 还是很大,继续用gzip 进行压缩,变成了一个更小的压缩文件。
作用:打包、压缩文件;tar 文件是把几个文件和(或)目录集合在一个文件里,该存档文件可以通过使用 gzip、bzip2 或 xz 等压缩工具进行行压缩后传输
查看 man tar 这里 man 不是男人的意思,是 manual 手册的缩写用法:tar [OPTION…] [FILE]…
参数:
-c create 创建文件
-x -extract [ˈekstrækt] 提取 解压还原文件
-v —verbose 显示执行详细过程
-f —file 指定备份文件
-t —list 列出压缩包中包括哪些文件,不解包,查看包中的内容
-C (大写)—directory 指定解压位置
例:给/boot/grub2 目录 打包
[root@xuegod63 ~]# tar -cvf grub.tar /boot/grub2/ # tar 的参数前可以不使用‘-’ [root@xuegod63 ~]# tar cvf grub.tar /boot/grub2/
tar: 从成员名中删除开头的“/”(就是把/根路径删除掉了,就变成了 boot/grub2 相对路径了,解
[root@xuegod63 ~]# tar cf grub.tar /boot/grub2/
压时会解压到当前目录,如果不删除,那就是/boot/grub2,当解压的时候就是绝对路径了,就会覆盖
不删除/的方法是使用 P 选项,解压时也要用 P 选项,不建议使用,因为解压时会覆盖掉源文件
[root@xuegod63 ~]# tar cvf grub.tar /boot/grub2 -P
[root@xuegod63 ~]# tar tvf grub.tar #此次查看发现文件路径带上了根/ [root@xuegod63 ~]# tar -xvf grub.tar -P #覆盖掉源路径
系统中此路径的文件)
[root@xuegod63 ~]# tar -cf grub.tar /boot/grub2/
[root@xuegod63 ~]# ls grub.tar [root@xuegod63 ~]# tar xvf grub.tar #解压缩boot/grub2/
tar: 从成员名中删除开头的“/”
boot/grub2/device.map
[root@xuegod63 ~]# ls boot #得到 boot 目录grub2
例 2:把两个目录或目录+文件打包成一个归档包: [root@xuegod63 ~]# mkdir ./back [root@xuegod63 ~]# cp /etc/passwd ./back/
[root@xuegod63 ~]# tar -cvf back.tar /boot/grub2 /root/back/ /etc/passwd tar: 从成员名中删除开头的“/”
-rw-r—r— root/root 1024 2020-06-28 19:46 boot/grub2/grubenv ###输出内容
-rw-r—r— root/root 5130 2020-06-28 19:46 boot/grub2/grub.cfg
drwxr-xr-x root/root 0 2020-07-03 14:23 root/back/
-rw-r—r— root/root 2735 2020-07-03 14:23 root/back/passwd
-rw-r—r— root/root 2735 2020-06-28 19:49 etc/passwd 例 3:不解包,查看 tar 中的内容:
[root@xuegod63 ~]# tar -tvf back.tar # List all files in archive.tar verbosely. 例 4:对比加 v 的效果
[root@xuegod63 ~]# tar -xf back.tar [root@xuegod63 ~]# tar -xvf back.tar boot/grub/
boot/grub/splash.xpm.gz
1. **tar 归档+压缩**
语法:tar czvf newfile.tar.gz SOURCE
语法:tar czvf 压缩后的文件名(tar.gz tar.bz2) 需要压缩的文件或目录常用参数:
-z, —gzip 以 gzip 方式压缩 扩展名: tar.gz
-j : 以 bz2 方式压缩的 扩展名:tar.bz2
-J: 以 xz 方式压缩 扩展名:tar.xz
例 1:创建.tar.gz 包
[root@xuegod63 ~]# tar cvf /root/etc.tar /etc
[root@localhost test]# tar czvf /root/etc.tar.gz /etc #归档,注意备份的名字后缀[root@localhost test]# tar xzvf /root/etc.tar.gz #解压缩
[root@localhost test]# tar xvf /root/etc.tar.gz #解压缩
例 2:创建.tar.bz2 包
语 法 : #tar jcvf newfile.tar.bz2 SOURCE [root@xuegod63 ~]# tar -cjvf ~/etc.tar.bz2 /etc
[root@xuegod63 ~]# tar -xjvf ~/etc.tar.bz2 #解压缩
[root@xuegod63 ~]# tar -xvf ~/etc.tar.bz2 #解压缩[root@xuegod63 ~]# tar xvf ~/etc.tar.bz2 -C /opt #解压到 opt 目录下
例 3:创建.tar.xz 包
[root@xuegod63 ~]# tar -cJvf etc.tar.xz /etc
[root@xuegod63 ~]# tar -xJvf etc.tar.xz #tar.xz 这类包,解压缩[root@xuegod63 ~]# tar -xvf etc.tar.xz
对比三种压缩方式后压缩比例:
[root@xuegod63 ~]# time tar czf /root/etc.tar.gz /etc [root@xuegod63 ~]# time tar cjf /root/etc.tar.bz2 /etc [root@xuegod63 ~]# time tar cJf /root/etc.tar.xz /etc [root@xuegod63 ~]# ll -h etc.tar (为通配符,代表任意字符任意次)
-rw-r—r— 1 0 root 28M 5 月 10 12:10 etc.tar
-rw-r—r— 1 0 root 8.7M 5 月 10 12:14 etc.tar.bz2#常用
-rw-r—r— 1 0 root 9.8M 5 月 10 12:11 etc.tar.gz # 常 用
-rw-r—r— 1 0 root 7.0M 5 月 10 12:16 etc.tar.xz #这个压缩比例最高,压缩的时间是最长查看源文件大小
[root@xuegod63 ~]# du -sh /etc 31M /etc
etc.tar 包为 28M ,实际几乎没怎么压缩。xz 格式化为 7.0M,传输的时候效率提高很多。
扩展:
解压指定文件到指定目录
[root@xuegod63 ~]# tar czf boot.tar.gz /boot/grub2/ [root@xuegod62 ~]# tar -C /opt -xvf boot.tar.gz boot/grub2/grub.cfg [root@xuegod63 ~]# ls /opt/boot/grub2/
解压某一类型文件到指定目录
—wildccards 文件名匹配,使用通配符[root@xuegod62 ~]# tar -tvf boot.tar.gz
[root@xuegod62 ~]# tar -C /opt -xvf boot.tar.gz —wildcards *.lst
排除指定文件并解压
[root@xuegod62 ~]# rm -rf /opt/boot
[root@xuegod62 ~]# tar -C /opt -xvf boot.tar.gz boot/grub2 — exclude=boot/grub2/i386-pc
[root@xuegod63 ~]# ls /opt/boot/grub2/
0.5 zip 管理压缩文件
zip 是压缩程序,unzip 是解压程序。例 1:压缩文件:
[root@xuegod63 ~]# zip a.zip /etc/passwd 例 2:将所有.jpg 文件压缩成一个 zip 包[root@xuegod63 ~]# touch {1..4}.jpg [root@xuegod63 ~]# ls
[root@xuegod63 ~]# zip all.zip .jpg 例 2:压缩一个目录
[root@xuegod63 ~]# zip -r ~/grub.zip /boot/grub2 #一般不用[root@xuegod63 ~]# tar -czf ~/grub.tar.gz /boot/grub2 [root@xuegod63 ~]# ll -h grub
解压缩:
[root@xuegod63 ~]# unzip ~/grub.zip
[root@xuegod63 ~]# unzip ~/grub.zip -d /opt/ #-d 解压到指定的目标/opt

若有收获,就点个赞吧
0 人点赞
