Spring Boot介绍
Spring Boot概述
Spring Boot的作用:
让Spring应用开发变得“简单粗暴”
Spring Boot makes it easy to create stand-alone, production-grade Spring based Applications that you can “just run”. We take an opinionated view of the Spring platform and third-party libraries so you can get started with minimum fuss. Most Spring Boot applications need minimal Spring configuration.
Spring Boot应用开发流程
Spring应用开发流程:
Spring Boot应用开发流程:
Spring Boot核心特性
- 极低的学习成本
- 可独立运行的Spring项目
- “习惯优于配置”,极大的提高了开发效率
- 极简的组件依赖,自动发现与自动装配
- 提供运行时的应用监控
- 与分布式架构和云计算的天然集成
Spring Boot应用开发
环境准备
- 安装JDK8以上版本
- 安装Intellij IDEA Ultimate(旗舰版)
使用Maven构建Spring Boot应用
使用Maven创建项目
根据标准Spring Boot目录结构,创建src/main/resources/static和templates文件夹
Spring Boot标准目录结构:
创建src/main/resources/application.properties配置文件
引入Spring boot依赖
pom.xml
<?xml version="1.0" encoding="UTF-8"?><project xmlns="http://maven.apache.org/POM/4.0.0"xmlns:xsi="http://www.w3.org/2001/XMLSchema-instance"xsi:schemaLocation="http://maven.apache.org/POM/4.0.0 http://maven.apache.org/xsd/maven-4.0.0.xsd"><modelVersion>4.0.0</modelVersion><groupId>com.song</groupId><artifactId>mysprintboot</artifactId><version>1.0-SNAPSHOT</version>+ <parent>+ <artifactId>spring-boot-starter-parent</artifactId>+ <groupId>org.springframework.boot</groupId>+ <version>2.0.0.RELEASE</version>+ </parent>+ <dependencies>+ <dependency>+ <groupId>org.springframework.boot</groupId>+ <artifactId>spring-boot-starter-web</artifactId>+ </dependency>+ </dependencies>+ <build>+ <plugins>+ <plugin>+ <groupId>org.springframework.boot</groupId>+ <artifactId>spring-boot-maven-plugin</artifactId>+ </plugin>+ </plugins>+ </build></project>
spring-boot-maven-plugin:在打包时,自动将所有的类和资源整合成一个独立的,可运行的jar包
- 新增controller
src/main/java/com/song/myspringboot/controller/MyController.java
package com.song.myspringboot.controller;import org.springframework.stereotype.Controller;import org.springframework.web.bind.annotation.RequestMapping;import org.springframework.web.bind.annotation.ResponseBody;@Controllerpublic class MyController {@RequestMapping("/out")@ResponseBodypublic String out(){return "success";}}
- 新增入口类
src/main/java/com/song/myspringboot/MySpringBootApplication.java
package com.song.myspringboot;

import org.springframework.boot.SpringApplication;
import org.springframework.boot.autoconfigure.SpringBootApplication;

@SpringBootApplication
public class MySpringBootApplication {
    public static void main(String[] args){
        SpringApplication.run(MySpringBootApplication.class);
    }
}
在浏览器中输入localhost:8080/out,可以看到”success”,到此Spring Boot应用的配置/部署/发布/启动都已经成功了
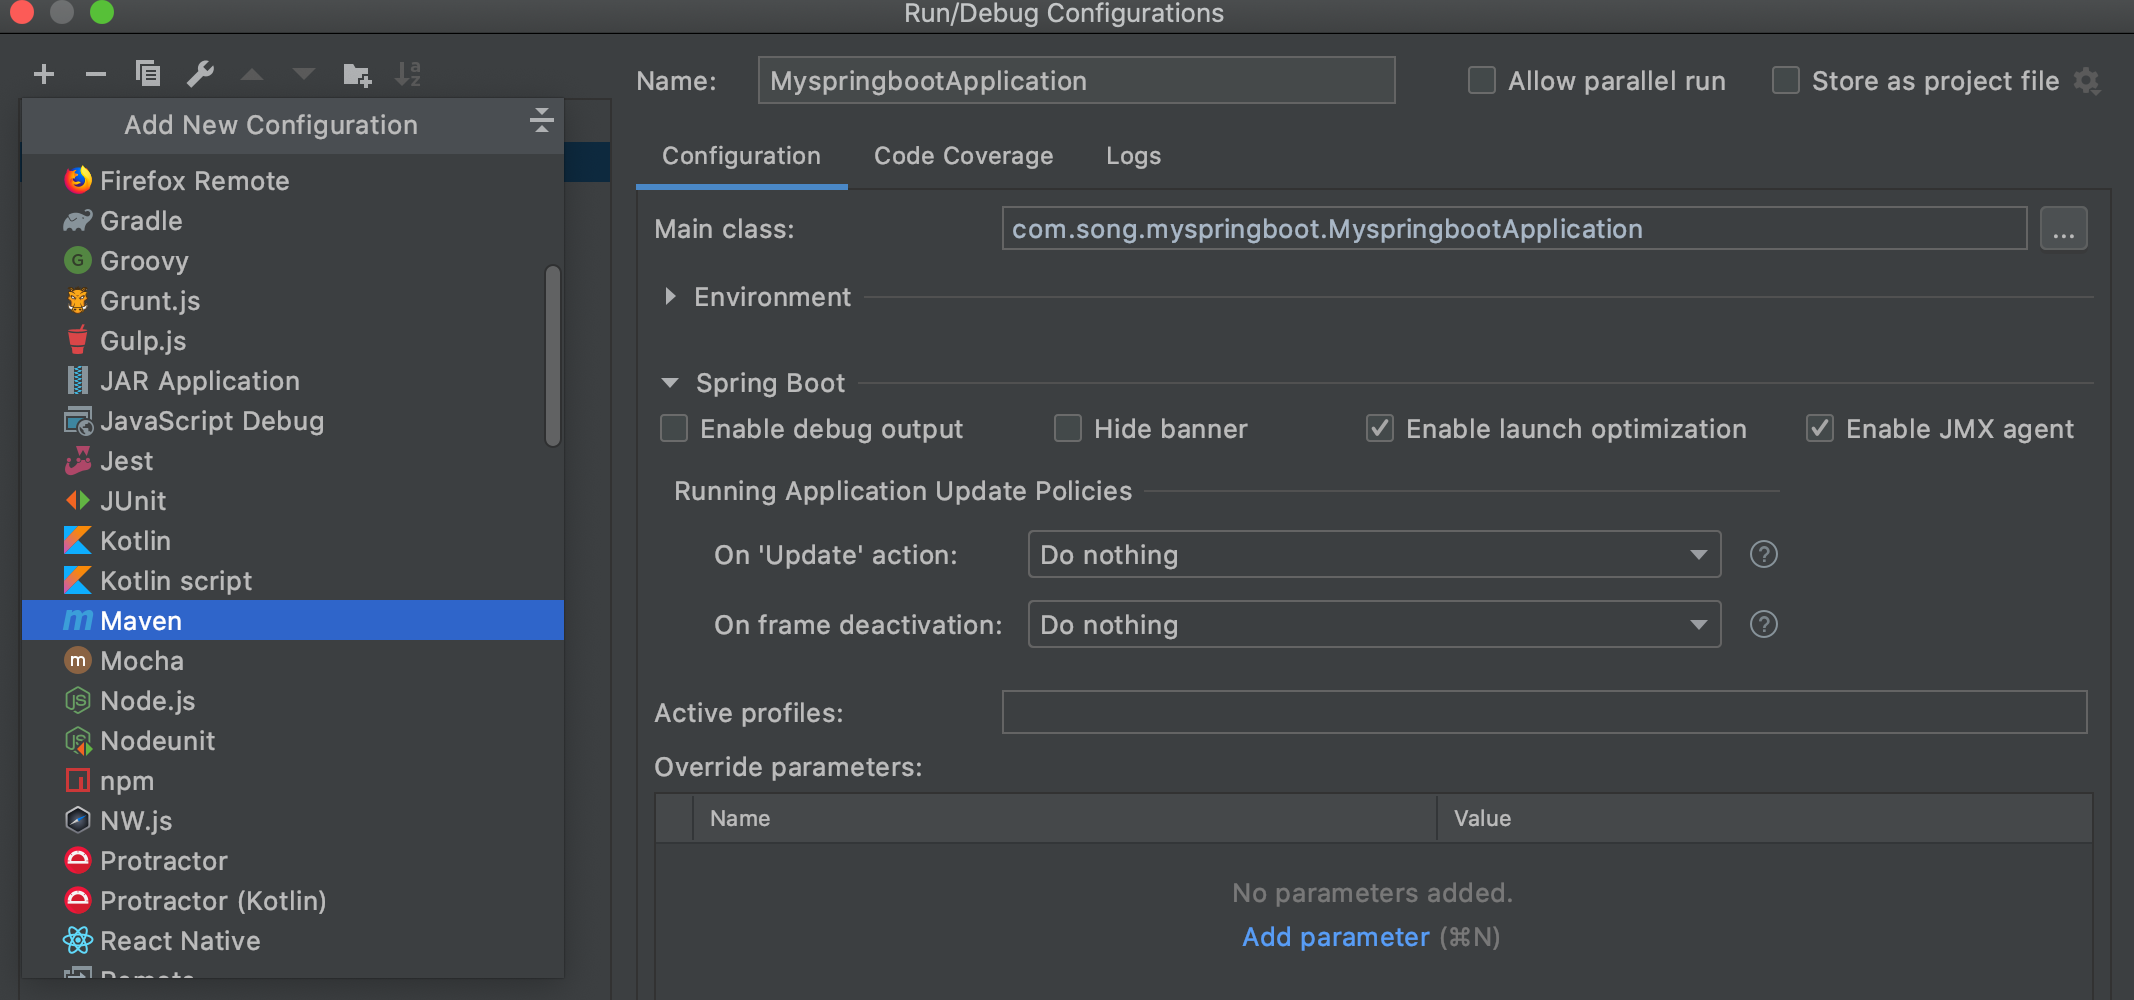
使用Spring Initializr构建Spring Boot应用
以上使用Maven构建Spring Boot应用的方法比较繁琐,IEDA提供了Spring Initialize,可以快速构建Spring Boot应用


Spring Boot配置详解
Sprint Boot入口类:
- 入口类命名通常以*Application结尾
- 入口类上增加@SpringBootApplication注解
- 利用SpringApplication.run()方法启动应用
Spring Boot启动流程

Spring Boot常用配置
application.properties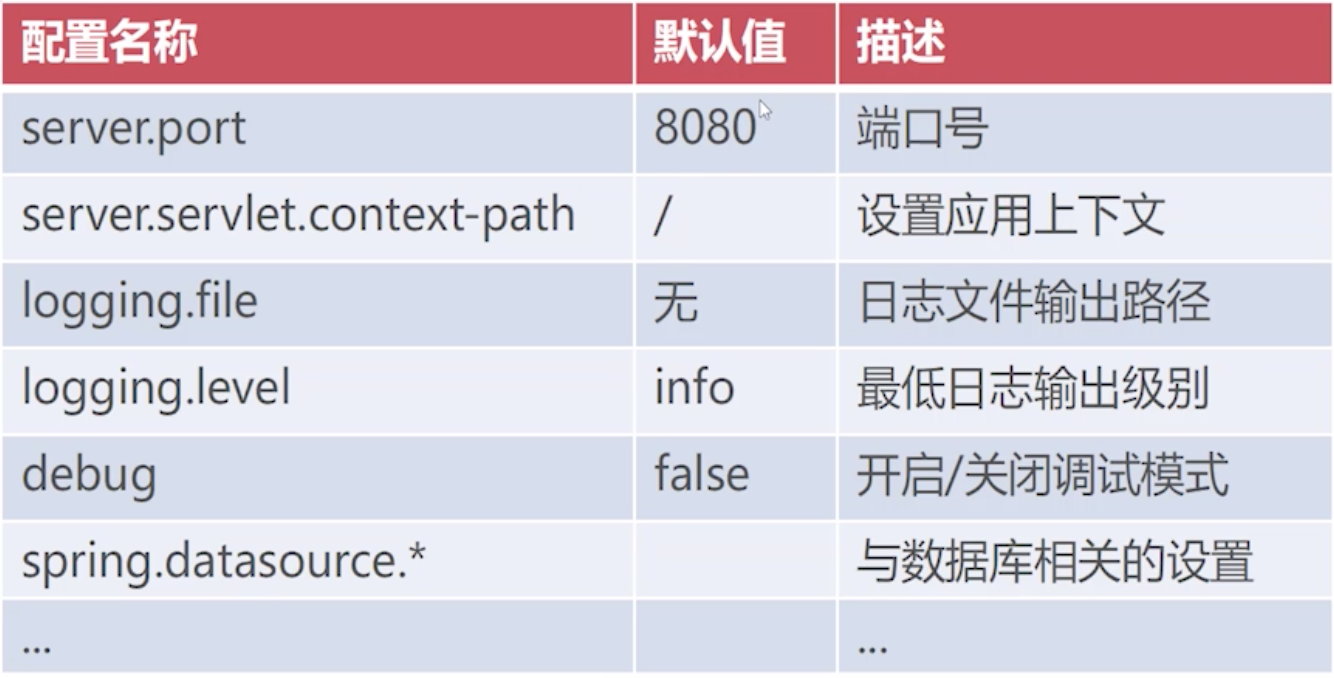
Spring Boot配置文件
Spring Boot支持两种配置文件:
- 属性文件:application.properties
- YAML格式:application.yml
YAML的语法:
YAML是一种简洁的非标记语言。YAML以数据为中心,使用空白,缩进,分行组织数据,从而使得表示更加简洁易读。
- 标准格式:key:(空格)value
- 使用空格代表层级关系
application.yml
debug: true
#logging.level.root
#logging.file
logging:
 level:
  root: info
 file: e:/myspringboot.log

spring:
  datasource:
    driver-class-name: com.mysql.jdbc.Driver
    url: jdbc:mysql://localhost:3306/test
    username: root
    password: 123456
Spring Boot自定义配置项
Spring Boot允许我们自定义应用配置项,在程序运行时允许动态加载,这位程序提供了良好的可维护性。
在实际项目开发中,我们通常将项目的自定义信息放在配置文件中。
自定义配置项:
src/main/resources/application.yml
...省略...

mall:
 config:
  name: 爱美商城
  description: 这是一家化妆品特卖网站
  hot-sales: 20
  show-advert: true
使用配置项
src/main/java/com/song/myspringboot/controller/MyController.java
package com.imooc.myspringboot.controller;

import org.springframework.beans.factory.annotation.Value;
import org.springframework.stereotype.Controller;
import org.springframework.web.bind.annotation.RequestMapping;
import org.springframework.web.bind.annotation.ResponseBody;

@Controller
public class MyController {
    @Value("${mall.config.name}")
    private String name;
    @Value("${mall.config.description}")
    private String description;
    @Value("${mall.config.hot-sales}")
    private Integer hotSales;
    @Value("${mall.config.show-advert}")
    private Boolean showAdvert;

    @RequestMapping("/out")
    @ResponseBody
    public String out(){
        return "success";
    }

    @RequestMapping("/info")
    @ResponseBody
    public String info(){
        return String.format("name:%s,description:%s,hot-sales:%s,show-advert:%s",
                name,description,hotSales,showAdvert);
    }
}

Spring Boot环境配置文件
- Spring Boot可针对不同的环境提供不同的Profile文件
- Profile文件的默认命名格式为application-{env}.yml
- 使用spring.profiles.active选项来指定不同的profile
src/main/resources/application.yml
spring:
 profiles:
  active: prd
src/main/resources/application-dev.yml
debug: true
#logging.level.root
#logging.file
logging:
 level:
  root: info
 file: e:/myspringboot.log

spring:
  datasource:
    driver-class-name: com.mysql.jdbc.Driver
    url: jdbc:mysql://localhost:3306/test
    username: root
    password: 123456
mall:
 config:
  name: 爱美商城
  description: 这是一家化妆品特卖网站
  hot-sales: 20
  show-advert: true
src/main/resources/application-prd.yml
debug: false
#logging.level.root
#logging.file
logging:
 level:
  root: info
 file: /local/user/app-prd.log

spring:
  datasource:
    driver-class-name: com.mysql.jdbc.Driver
    url: jdbc:mysql://155.32.55.88:3307/prd
    username: root1
    password: 3313@#!
mall:
 config:
  name: 优美商城
  description: 这是一家化妆品特卖网站
  hot-sales: 20
  show-advert: true
server:
  port: 80
打包与运行
- 利用Maven的package命令,生成可独立运行的Jar包
生成的Jar包存放在target目录下


利用java -jar xxx.jar 命令启动Spring Boot应用
java -jar myspringboot-0.0.1-SNAPSHOT.jarJar包可自动加载同目录的application配置文件
只需要把以下配置文件也放到target文件夹下即可,在application.yml修改当前环境配置,会自动识别
src/main/resources/application.yml
src/main/resources/application-prd.yml
src/main/resources/application-dev.yml
Springboot打包部署
Linux下安装Java(JDK8)
Neither the JAVA_HOME nor the JRE_HOME environment variable is defined 完美解决(tomcat error)
打包命令:mvn clean package
重要:
Linux云服务器下Tomcat部署超详细
在Centos7 tomcat正常启动,但浏览器无法访问
pom.xml
<?xml version="1.0" encoding="UTF-8"?>
<project xmlns="http://maven.apache.org/POM/4.0.0" xmlns:xsi="http://www.w3.org/2001/XMLSchema-instance"
         xsi:schemaLocation="http://maven.apache.org/POM/4.0.0 https://maven.apache.org/xsd/maven-4.0.0.xsd">
    <modelVersion>4.0.0</modelVersion>
    <parent>
        <groupId>org.springframework.boot</groupId>
        <artifactId>spring-boot-starter-parent</artifactId>
        <version>2.1.14.RELEASE</version>
        <relativePath/> <!-- lookup parent from repository -->
    </parent>

    <groupId>com.gxlaoshi</groupId>
    <artifactId>ut</artifactId>
    <version>0.0.1-SNAPSHOT</version>
    <packaging>war</packaging>

    <name>ut</name>
    <description>ut project</description>

    <properties>
        <java.version>1.8</java.version>
    </properties>

    <dependencies>
        <dependency>
            <groupId>org.springframework.boot</groupId>
            <artifactId>spring-boot-starter-web</artifactId>
        </dependency>
        <dependency>
            <groupId>org.mybatis.spring.boot</groupId>
            <artifactId>mybatis-spring-boot-starter</artifactId>
            <version>2.1.2</version>
        </dependency>

        <dependency>
            <groupId>org.springframework.boot</groupId>
            <artifactId>spring-boot-starter-test</artifactId>
            <scope>test</scope>
        </dependency>
        <dependency>
            <groupId>mysql</groupId>
            <artifactId>mysql-connector-java</artifactId>
        </dependency>
        <dependency>
            <groupId>com.mchange</groupId>
            <artifactId>c3p0</artifactId>
            <version>0.9.5.4</version>
        </dependency>
        <dependency>
            <groupId>org.springframework.boot</groupId>
            <artifactId>spring-boot-starter-tomcat</artifactId>
            <scope>provided</scope>
        </dependency>
    </dependencies>

    <build>
        <-- !!很重要,一定要写!! -->
        <finalName>utapi</finalName>
        <plugins>
            <plugin>
                <groupId>org.springframework.boot</groupId>
                <artifactId>spring-boot-maven-plugin</artifactId>
            </plugin>
        </plugins>
    </build>

</project>
重启服务器之后
- 确认下tomcat是否开启
确认方法:在浏览器中输入 http://gxlaoshi.com:8080,看看是否出现tomcat画面
开启方法:如果没有开启,按照下面命令开启
cd /usr/local/tomcat/apache-tomcat-9.0.35/bin
./startup.sh
防火墙开机启动
systemctl enable firewalld.service
关闭防火墙
systemctl stop firewalld.service
查看防火墙状态
firewall-cmd —state
查看现有的规则
iptables -nL firewall-cmd —zone=public —list-ports
重载防火墙配置
firewall-cmd —reload
添加单个单端口
firewall-cmd —permanent —zone=public —add-port=81/tcp
添加多个端口
firewall-cmd —permanent —zone=public —add-port=8080-8083/tcp
删除某个端口
firewall-cmd —permanent —zone=public —remove-port=81/tcp
针对某个 IP开放端口
firewall-cmd —permanent —add-rich-rule=”rule family=”ipv4” source address=”192.168.142.166” port protocol=”tcp” port=”6379” accept” firewall-cmd —permanent —add-rich-rule=”rule family=”ipv4” source address=”192.168.0.233” accept”
删除某个IP
firewall-cmd —permanent —remove-rich-rule=”rule family=”ipv4” source address=”192.168.1.51” accept”
针对一个ip段访问
firewall-cmd —permanent —add-rich-rule=”rule family=”ipv4” source address=”192.168.0.0/16” accept” firewall-cmd —permanent —add-rich-rule=”rule family=”ipv4” source address=”192.168.1.0/24” port protocol=”tcp” port=”9200” accept”
添加操作后别忘了执行重载
firewall-cmd —reload ```

若有收获,就点个赞吧
0 人点赞
