
检索源码列表
获取锁
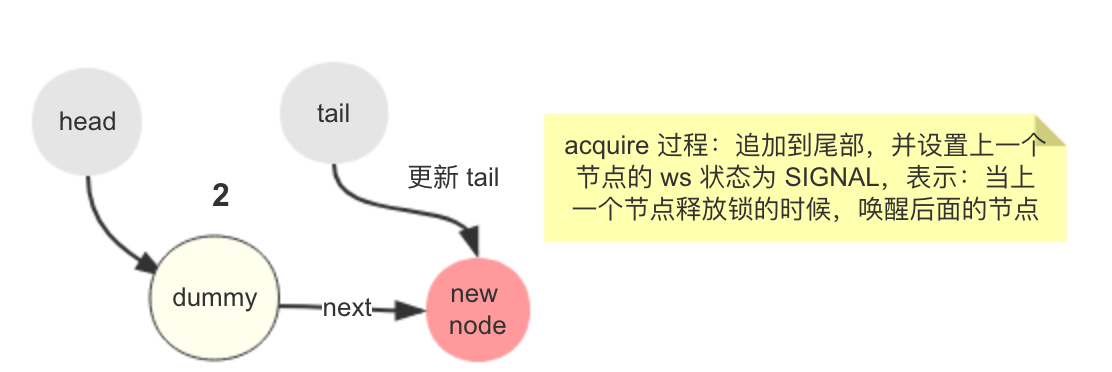
- acquire 1197
- tryAcquire — ReentrantLock重写 212
- addWaiter 605
- enq 583
- acquireQueued 857
- shouldParkAfterFailedAcquire 795
解锁
- release 1260
- tryRelease — ReentrantLock重写 148
- unparkSuccessor 638
1. CLH
CLH CLH(Craig, Landin, and Hagersten locks): 是一个自旋锁,能确保无饥饿性,提供先来先服务(FIFO)的公平性。CLH锁也是一种基于链表的可扩展、高性能、公平的自旋锁,申请线程只在本地变量上自旋,它不断轮询前驱的状态,如果发现前驱释放了锁就结束自旋。
大概过程为:当一个线程需要获得锁的时候,就会创建一个新的QNode。并将QNode的locked设置为true标识要获取锁,并且调用tail的getAndSet方法,让自己成为队列的尾部,同时获取一个指向前驱节点的myPred。然后就对前驱记节点的locked自旋,一直到前驱节点释放锁(locked为false)。当一个线程释放锁的时候,就将当前节点的locked设为false,并且将前驱节点收回,这时候之后节点就在自旋中检测到了前驱节点的锁释放,然后去获取锁。
2. 简单过程
简单说来,AQS会把所有的请求线程构成一个类似CLH队列,当一个线程执行完毕(lock.unlock())时会激活自己的后继节点,同步状态获取成功后,该后继节点会成为新的头节点且获取到了锁,而那些等待执行的线程全部处于阻塞状态(park())。

2.1. 源码分析
1.线程tryAcquire获取锁失败,线程被封装成Node进行入队操作,核心方法在于addWaiter()和enq(),同时enq()完成对同步队列的头结点初始化工作以及CAS操作失败的重试;
public final void acquire(int arg) {//先看同步状态是否获取成功,如果成功则方法结束返回//若失败则先调用addWaiter()方法再调用acquireQueued()方法if (!tryAcquire(arg) &&acquireQueued(addWaiter(Node.EXCLUSIVE), arg))selfInterrupt();}
private Node addWaiter(Node mode) {// 1. 将当前线程构建成Node实体,且为独占锁模式Node node = new Node(Thread.currentThread(), mode);// Try the fast path of enq; backup to full enq on failure// 2. 当前尾节点是否为null?Node pred = tail;if (pred != null) {node.prev = pred;//2.2 CAS原子性更新失败,被其他线程抢先if (compareAndSetTail(pred, node)) {// 2.3 将当前节点尾插入的方式插入同步队列中pred.next = node;return node;}}// 2.1, 2.2: 当前同步队列尾节点为null,说明当前线程是第一个加入同步队列进行等待的线程enq(node);return node;}
private Node enq(final Node node) {for (;;) {Node t = tail;if (t == null) { // Must initialize//1. 构造头结点if (compareAndSetHead(new Node()))tail = head;} else {// 2. 尾插入,CAS操作失败自旋尝试node.prev = t;if (compareAndSetTail(t, node)) {t.next = node;return t;}}}}

2.线程获取锁是一个自旋的过程,当且仅当当前节点的前驱节点是头结点并且成功获得同步状态时,将会出队即该当前节点引用的线程获得锁,否则,当不满足条件时就会调用LookSupport.park()方法使得线程阻塞;
final boolean acquireQueued(final Node node, int arg) {boolean failed = true;try {boolean interrupted = false;for (;;) {// 1. 获得当前节点的先驱节点final Node p = node.predecessor();// 2. 当前节点能否获取独占式锁// 2.1 如果当前节点的先驱节点是头结点并且成功获取同步状态,即可以获得独占式锁if (p == head && tryAcquire(arg)) {//队列头指针用指向当前节点setHead(node);//释放前驱节点p.next = null; // help GCfailed = false;return interrupted;}// 2.2 获取锁失败,线程进入等待状态等待获取独占式锁if (shouldParkAfterFailedAcquire(p, node) &&parkAndCheckInterrupt())interrupted = true;}} finally {if (failed)cancelAcquire(node);}}
private static boolean shouldParkAfterFailedAcquire(Node pred, Node node) {int ws = pred.waitStatus;if (ws == Node.SIGNAL)/** This node has already set status asking a release* to signal it, so it can safely park.*/return true;if (ws > 0) {/** Predecessor was cancelled. Skip over predecessors and* indicate retry.*/do {node.prev = pred = pred.prev;} while (pred.waitStatus > 0);pred.next = node;} else {/** waitStatus must be 0 or PROPAGATE. Indicate that we* need a signal, but don't park yet. Caller will need to* retry to make sure it cannot acquire before parking.*/compareAndSetWaitStatus(pred, ws, Node.SIGNAL);}return false;}
parkAndCheckInterrupt的方法中,LockSupport.park(this)会把当前线程挂起,直至唤醒或中断—可以代码演示
private final boolean parkAndCheckInterrupt() {//1. 把当前线程挂起,等待unpark调用或中断响应LockSupport.park(this);return Thread.interrupted();}
头节点的更替
1. 原头节点后继节点设为null,与队列脱节p.next = null; // help GC2. 设置当前node为新的头节点,且前驱节点设为nullprivate void setHead(Node node) {head = node;node.thread = null;node.prev = null;}

3.释放锁的时候会唤醒后继节点;首先获取头节点的后继节点,后继节点不存在或取消中断的时候,就会从尾节点向前遍历,找到最前面的一个符合条件的节点,调用LookSupport.unpark()方法唤醒,从而唤醒该节点所包装的线程。因此,每一次锁释放后就会唤醒队列中该节点的后继节点所引用的线程,从而进一步可以佐证获得锁的过程是一个FIFO(先进先出)的过程。
private void unparkSuccessor(Node node) {/** If status is negative (i.e., possibly needing signal) try* to clear in anticipation of signalling. It is OK if this* fails or if status is changed by waiting thread.*/int ws = node.waitStatus;if (ws < 0)compareAndSetWaitStatus(node, ws, 0);/** Thread to unpark is held in successor, which is normally* just the next node. But if cancelled or apparently null,* traverse backwards from tail to find the actual* non-cancelled successor.*/Node s = node.next;if (s == null || s.waitStatus > 0) {s = null;for (Node t = tail; t != null && t != node; t = t.prev)if (t.waitStatus <= 0)s = t;}if (s != null)LockSupport.unpark(s.thread);}
2.2 可中断获取锁
我们知道lock相较于synchronized有一些更方便的特性,比如能响应中断以及超时等待等特性,现在我们依旧采用通过学习源码的方式来看看能够响应中断是怎么实现的。可响应中断式锁可调用方法lock.lockInterruptibly();而该方法其底层会调用AQS的acquireInterruptibly方法,源码为:
public final void acquireInterruptibly(int arg)throws InterruptedException {//1.先行判断是否已被中断if (Thread.interrupted())throw new InterruptedException();if (!tryAcquire(arg))doAcquireInterruptibly(arg);}
private void doAcquireInterruptibly(int arg)throws InterruptedException {final Node node = addWaiter(Node.EXCLUSIVE);boolean failed = true;try {for (;;) {final Node p = node.predecessor();if (p == head && tryAcquire(arg)) {setHead(node);p.next = null; // help GCfailed = false;return;}if (shouldParkAfterFailedAcquire(p, node) &&parkAndCheckInterrupt())//2.线程中断抛异常throw new InterruptedException();}} finally {if (failed)cancelAcquire(node);}}
2.3 超时等待式获取锁
通过调用lock.tryLock(timeout,TimeUnit)方式达到超时等待获取锁的效果,该方法会在三种情况下才会返回:
1.在超时时间内,当前线程成功获取了锁;
2.当前线程在超时时间内被中断;
3.超时时间结束,仍未获得锁返回false。
public final boolean tryAcquireNanos(int arg, long nanosTimeout)throws InterruptedException {if (Thread.interrupted())throw new InterruptedException();return tryAcquire(arg) ||//实现超时等待的效果doAcquireNanos(arg, nanosTimeout);}
private boolean doAcquireNanos(int arg, long nanosTimeout)throws InterruptedException {if (nanosTimeout <= 0L)return false;//1. 根据超时时间和当前时间计算出截止时间final long deadline = System.nanoTime() + nanosTimeout;final Node node = addWaiter(Node.EXCLUSIVE);boolean failed = true;try {for (;;) {final Node p = node.predecessor();//2. 当前线程获得锁出队列if (p == head && tryAcquire(arg)) {setHead(node);p.next = null; // help GCfailed = false;return true;}// 3.1 重新计算超时时间nanosTimeout = deadline - System.nanoTime();// 3.2 已经超时返回falseif (nanosTimeout <= 0L)return false;// 3.3 线程阻塞等待//但如果park需要的时间都要多于线程剩下的时间//没什么必要park了,让其再自旋多一次,拿不到就超时返回falseif (shouldParkAfterFailedAcquire(p, node) &&nanosTimeout > spinForTimeoutThreshold)//3.4在这段时间内都会被park掉,这段时间内,只有unpark和interrupt可以恢复//超过这个时间也会恢复,然后又一次自旋,然后超时GGLockSupport.parkNanos(this, nanosTimeout);// 3.5 线程被中断抛出被中断异常if (Thread.interrupted())throw new InterruptedException();}} finally {if (failed)cancelAcquire(node);}}
2.4 公平和非公平锁
实际上公平与非公平的区别如下:
1、公平锁的流程是,先经hasQueuedPredecessors方法判断是否有线程在排队,有的话则新来的线程乖乖去排队。
该方法的一个基本逻辑是:是否有其他线程节点在同步队列, 其中 h != t 就证明至少有两个节点或者虚拟头节点刚建立完,还没有设置head == tail这一步, 所以判断出有线程早于当前线程去申请入队, 所以根据FIFO公平原则, 当前线程要去排队而不能快速尝试获取同步状态.
public final boolean hasQueuedPredecessors() {// The correctness of this depends on head being initialized// before tail and on head.next being accurate if the current// thread is first in queue.Node t = tail; // Read fields in reverse initialization orderNode h = head;Node s;return h != t &&((s = h.next) == null || s.thread != Thread.currentThread());}
2、非公平锁的流程是,新来的线程先去抢一把试试,没抢到再去排队。
3、思考
3.1 为什么要使用双向链表,而不是单向
双向链表更方便检索节点,且出现”断链”的情况,即前驱节点或后继节点处于cancelled(timeout或被中断)状态时,如下面两种代码的情形,通过双向链表来”续链”.
#摘自unparkSuccessor方法--638行/** Thread to unpark is held in successor, which is normally* just the next node. But if cancelled or apparently null,* traverse backwards from tail to find the actual* non-cancelled successor.*/Node s = node.next;if (s == null || s.waitStatus > 0) {s = null;//1.因头结点的后继节点因为空或者处于cancelled状态,已经找不到下一个合适的节点//所以只能从尾结点向前遍历查找适用的且排在最前的节点作为唤醒的节点(FIFO理念)for (Node t = tail; t != null && t != node; t = t.prev)if (t.waitStatus <= 0)s = t;}if (s != null)LockSupport.unpark(s.thread);
#摘自shouldParkAfterFailedAcquire方法--795行if (ws > 0) {/** Predecessor was cancelled. Skip over predecessors and* indicate retry.*/do {node.prev = pred = pred.prev;} while (pred.waitStatus > 0);pred.next = node;}
3.2 为什么要初始化头结点—哨兵节点的作用
这里尾节点为null时建立一个没有设置任何线程和标识的节点当作头节点.
#摘自enq方法--583行if (t == null) { // Must initialize//并没有其代表的线程if (compareAndSetHead(new Node()))tail = head;}
首先从前驱节点的角度分析:
参考shouldParkAfterFailedAcquire方法可以知道,第一次尝试失败过后,每个节点都必须设置前驱节点的 ws 状态为 SIGNAL,然后被挂起,因为后续是通过该前驱节点release时唤醒当前节点.
#摘自unparkSuccessor方法Node s = node.next;...LockSupport.unpark(s.thread);
问题在于有个边界问题:第一个节点怎么办?他是没有前置节点的。
那就创建一个假的。
这就是为什么要创建一个没有设置线程,虚拟节点的原因。
其次参阅acquireQueued方法中:
因为获取锁的永远都是只有队列中第2个节点才能尝试,假设第一个线程进去不设置一个虚拟节点当头节点,那它将一直被挂起且永远不会被唤醒,可以看下面(1)处
final boolean acquireQueued(final Node node, int arg) {boolean failed = true;try {boolean interrupted = false;for (;;) {//(1) 需要获取前驱节点,且该节点为头节点final Node p = node.predecessor();if (p == head && tryAcquire(arg)) {setHead(node);p.next = null; // help GCfailed = false;return interrupted;}if (shouldParkAfterFailedAcquire(p, node) &&parkAndCheckInterrupt())interrupted = true;}} finally {if (failed)cancelAcquire(node);}}
4、并发的设计
- 把共享变量复制一份局部变量,也就是放在线程当前栈帧的局部变量表当中,后续不受并发影响
- 通过volatile来保证了可见性和有序性,每一次拿到的值都是最新的.
- 通过for循环配合CAS解决了原子性 — 这次被修改了被插队了没关系,自旋到成功为止.
其实加锁本质上是将并发转变为串行来实现的,势必会影响吞吐量。而高效的做法就是不加锁,使用无锁的方式没有锁竞争带来的开销,也没有线程间频繁调度带来的开销,它比基于锁的方式有更优越的性能,所以在目前被广泛应用,我们在程序设计时也可以适当的使用.
5、学习的点
5.1 善于寻找循环打破的判断节点和处理边界问题
这里的打破循环节点为当前节点为头节点且成功获取同步状态
for (;;) {final Node p = node.predecessor();if (p == head && tryAcquire(arg)) {setHead(node);p.next = null; // help GCfailed = false;return interrupted;}if (shouldParkAfterFailedAcquire(p, node) &&parkAndCheckInterrupt())interrupted = true;}
这里打破循环的节点是成功插入到尾节点;还有一个边界问题的处理就是第一个线程的头节点,需要建立一个虚拟节点,保证每一个线程节点都有头节点——保证唤醒下一节点的作用.
for (;;) {Node t = tail;if (t == null) { // Must initializeif (compareAndSetHead(new Node()))tail = head;} else {node.prev = t;if (compareAndSetTail(t, node)) {t.next = node;return t;}}}
5.2 设计模式
运用模板方法的设计模式,定义了需要重写的方法. 且这里不是abstract修饰的,而是protected的几个方法,因为抽象类不一定要定义抽象方法,这样做的好处是优于抽象方法不能有任何实现代码的限制,有个默认的处理方法 — 这里是抛出UnsupportedOperationException,具体寓意下图所示:

以下摘自AbstractQueuedSynchronizer类注释中的一段话:
要将此类用作同步器的基础,请根据适用情况重新定义以下方法,方法是使用getState 、 setState和/或compareAndSetState检查和/或修改同步状态: tryAcquire tryRelease tryAcquireShared tryReleaseShared isHeldExclusively 默认情况下,这些方法中的每一个都会抛出UnsupportedOperationException 。 这些方法的实现必须是内部线程安全的,并且通常应该是简短的而不是阻塞的。 定义这些方法是使用此类的唯一支持方式。 所有其他方法都被声明为final因为它们不能独立变化
5.3 final的运用
在方法上,其他不能独立变化的方法都被final声明。<br />在变量上定义局部变量和一些全局变量时很多都用了final关键字修饰,这里除了Java基础层面一些值或引用不可变的特质外,还有就是于多线程并发的考虑——基于final域的重排序规则
重排序— 因编译器和处理器为了性能优化会对指令序列有编译器和处理器重排序重排序
final域的特殊重排序规则避免了下面情况1、2这两种情况
- 禁止对final域的写重排序到构造函数之外—情况1:保证在对象引用为任意线程可见之前,对象的final域已经被正确初始化过了,而普通域就不具有这个保障,就会出现读取未初始化的对象.
- 在一个线程中,初次读对象引用和初次读该对象包含的final域,JMM会禁止这两个操作的重排序—情况2:读对象的普通域被重排序到了读对象引用的前面就会出现还未读到对象引用就在读取该对象的普通域变量,这显然是错误的操作。
5.4 帮助GC
很多这种//help GC的身影,把对象设为null,让程序不再有任何引用变量引用该对象时,尽早到达不可触及状态,垃圾处理器早些回收它占用的内存.
for (;;) {final Node p = node.predecessor();if (p == head && tryAcquire(arg)) {setHead(node);p.next = null; // help GCfailed = false;return interrupted;}if (shouldParkAfterFailedAcquire(p, node) &&parkAndCheckInterrupt())interrupted = true;}

若有收获,就点个赞吧
0 人点赞
