起点
基于之前的脚步范例,做了小幅修改:将结果输出为被选择的对象,而不是格式化之后的表格。
<#.SYNOPSISGet-DiskInventory retrieves logical disk information from one or more computers..DESCRIPTIONGet-DiskInventory uses WMI to retrieve the Win32_LogicalDiskinstances from one or more computers. It displays each disk'sdrive letter, free space, total size, and percentage of free space..PARAMETER computernameThe computer name, or names, to query. Default:Localhost..PARAMETER drivetypeThe drive type to query. See Win32_LogicalDisk documentationfor values. 3 is a fixed disk,and is the default..EXAMPLEGet-DiskInventory -computername SERVER-R2 -drivetype 3#>param(# 此处定义参数块$computername = 'localhost',$drivetype = 3)Get-CimInstance -ClassName Win32_LogicalDisk -ComputerName $computername `-Filter "drivetype=$drivetype" |Sort-Object -Property DeviceID |# 此处,将Format-Table修改为Select-ObjectSelect-Object -Property DeviceID,@{label='FreeSpace(MB)'; e={$_.FreeSpace / 1MB -as [int]}},@{label='Size(GB)'; expression={$_.Size / 1GB -as [int]}},@{name='%Free'; expre={$_.FreeSpace / $_.Size * 100 -as [int]}}
为什么使用Select-Object而不是Format-Table?因为通常写一个脚本所产生的结果是已格式化的并不是一个好主意。毕竟,如果某个用户需要CSV格式的文件,而脚本输出格式化后的表,该用户就无法完成工作。
通过本次修改,我们可以通过下述方式获得格式化后的表。
或者通过下述方式运行获取CSV文件:
关键点是输出对象(也就是Select-Object完成的工作),对照格式化的显示结果,将会使得我们的脚本从长远角度来说更加灵活。
变为“高级脚本”
只需在上述脚本的基础上再多加一行脚本,就能展现PowerShell的奇妙。这使得从技术上来说,把我们的脚本变为所谓的“高级脚本”,使得大量PowerShell能做的事得以展现。
<#-----snip----#>[CmdletBinding()]param(# 此处定义参数块$computername = 'localhost',$drivetype = 3)Get-CimInstance -ClassName Win32_LogicalDisk -ComputerName $computername `-Filter "drivetype=$drivetype" |Sort-Object -Property DeviceID |Select-Object -Property DeviceID,@{label='FreeSpace(MB)'; e={$_.FreeSpace / 1MB -as [int]}},@{label='Size(GB)'; expression={$_.Size / 1GB -as [int]}},@{name='%Free'; expre={$_.FreeSpace / $_.Size * 100 -as [int]}}
在基于备注的帮助代码后面,将[CmdletBinding()]指示符置于脚本的第一行非常重要。PowerShell只会在该位置,查看该指示符。加上这个指示符之后,脚本会启用好几个功能,下面来进行探索。
将参数定义为强制化参数
我们并不确定是否真正需要-ComputerName参数,我们更倾向于选择提示用户输入值。幸运的是,PowerShell中实现该功能很简单——同样,只需要添加一行代码就能完成。
<#-----snip----#>[CmdletBinding()]param(#[Parameter(Mandatory=$True, HelpMessage="Enter a computer name to query")][Parameter(Mandatory=$True)][string]$computername,#$computername = 'localhost', # 取消默认参数[int]$drivetype = 3)Get-CimInstance -ClassName Win32_LogicalDisk -ComputerName $computername `-Filter "drivetype=$drivetype" |Sort-Object -Property DeviceID |Select-Object -Property DeviceID,@{label='FreeSpace(MB)'; e={$_.FreeSpace / 1MB -as [int]}},@{label='Size(GB)'; expression={$_.Size / 1GB -as [int]}},@{name='%Free'; expre={$_.FreeSpace / $_.Size * 100 -as [int]}}
当某个用户使用你写的脚本,却没有为强制参数提供值时,PowerShell将会提示他输入参数值。
仅仅使用[Parameter(Mandatory=$True)]这样一个描述符,会使得当用户忘记提供计算机名称时,PowerShell就会提示用户输入该参数。为了更进一步帮助PowerShell识别用户传入的参数,我们定义两个输入参数的数据类型:-computerName定义为[string]类型,而-drivetype定义为INT(也就是整型)。
让我们更进一步查看Param()代码块的语法: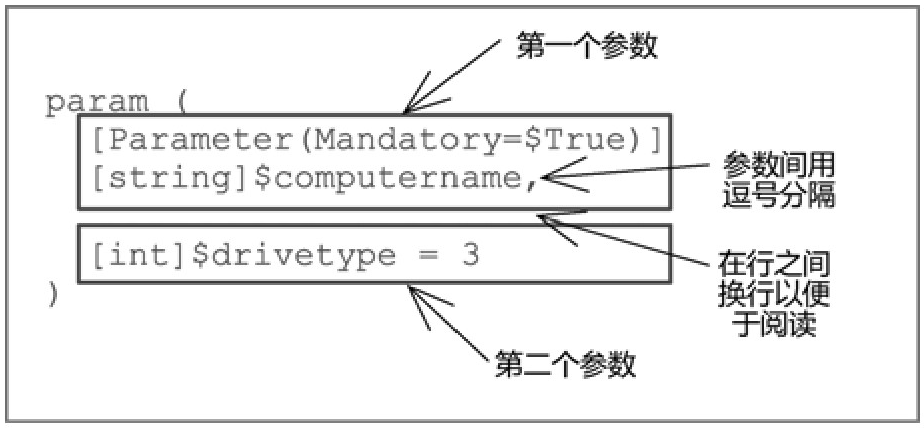
说明:
- 所有的参数都必须被包括在Param()代码段的括号内。
- 可以对一个参数添加多个修饰符,多个修饰符既可以是一行,也可以是图中那样的多行。
- 多行更易于阅读,但重点是即使是多行,它们也是一个整体。
Mandatory标签仅修饰-computerName参数——它对-drivetype参数并没有影响。
- 除了最后一个参数之外,所有的参数之间以逗号分隔。
补充说明
还可以添加一条帮助信息:[Parameter(Mandatory=$True, HelpMessage="Enter a computer name to query")]
某些PowerShell宿主程序会将帮助信息作为提示的一部分,使得用户获得更简洁的帮助信息。但并不是所有的宿主应用程序都会使用该标签,所以你测试的时候没有看到提示的帮助信息也不用沮丧。当我们写一些给他人使用的脚本时,我们喜欢在脚本中将帮助信息包含在内。这么做永远不会有任何坏处。添加参数别名
使用-computerName作为参数名称,是因为该参数名称与其他PowerShell命令一致。查看Get-Service、Get-WmiObject、Get-Process以及其他命令,你可以发现这些命令都使用-computerName作为参数名称。所以我们也同样使用该名称作为参数名称。
但假如你认为-hostname更容易记忆的话,你可以将该名称作为备用名称添加,也就是参数别名。这只需要另外一个修饰符:[Alias('hostname')]
现在可以运行:<#-----snip----#>[CmdletBinding()]param(#[Parameter(Mandatory=$True, HelpMessage="Enter a computer name to query")][Parameter(Mandatory=$True)][Alias('hostname')][string]$computername,#$computername = 'localhost', # 取消默认参数[int]$drivetype = 3)-----snip----

再次声明,新增的标签是-computerName参数的一部分,因此对-drivetype参数不生效。现在-computerName参数的定义占用了3行。当然,我们也能将三行连成一行。[Parameter(Mandatory=$True)][Alias('hostname')][string]$computername,
但这样不容易阅读,因此很少这样书写。验证输入的参数
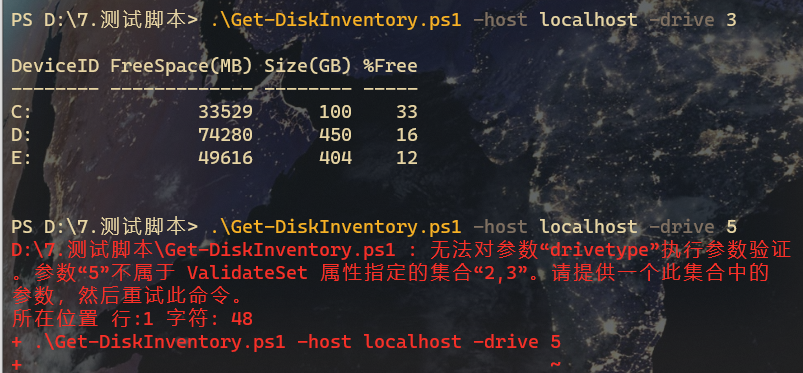
根据MSDN中WIN32_LogicalDisk这个WMI类的文档,驱动器类型3是本地磁盘,类型2是可移动磁盘。驱动类型1、4、5、6更少被使用(类型6是RAM驱动器)。在某些情况下,有一些磁盘没有可用空间(比如类型为5的光盘)。所以我们希望阻止使用脚本的用户使用这些类型。
新的标签告诉PowerShell,对于参数-drivetype,只允许传入2和3这两个值,并且3是默认值。<#-----snip----#>[CmdletBinding()]param(#[Parameter(Mandatory=$True, HelpMessage="Enter a computer name to query")][Parameter(Mandatory=$True)][Alias('hostname')][string]$computername,#$computername = 'localhost', # 取消默认参数[ValidateSet(2,3)][int]$drivetype = 3)-----snip----
可以将多个修饰符添加到同一个参数上,运行help about_functions_advanced_parameters可以获得完整列表。Jeffery还写了一个关于其他可能用上的“验证”标签的系列博客——可以在网站http://jdhitsolutions.com/blog/上查看到该系列博客(搜索“validate”)。添加详细输出-Write-Verbose
很多脚本使用者喜欢看到脚本输出执行的进度,我们倾向于使用Write-Verbose而不是Write-Host产生这些信息。 ```powershell <# .SYNOPSIS Get-DiskInventory retrieves logical disk information from one or more computers. .DESCRIPTION Get-DiskInventory uses WMI to retrieve the Win32_LogicalDisk instances from one or more computers. It displays each disk’s drive letter, free space, total size, and percentage of free space. .PARAMETER computername The computer name, or names, to query. Default:Localhost. .PARAMETER drivetype The drive type to query. See Win32_LogicalDisk documentation for values. 3 is a fixed disk,and is the default. .EXAMPLE Get-DiskInventory -computername SERVER-R2 -drivetype 3>
[CmdletBinding()] param([Parameter(Mandatory=$True, HelpMessage=”Enter a computer name to query”)]
[Parameter(Mandatory=$True)] [Alias(‘hostname’)] [string]$computername,$computername = ‘localhost’, # 取消默认参数
[ValidateSet(2,3)] [int]$drivetype = 3 ) Write-Verbose “Conneting to $computername” Write-Verbose “Looking for drive type $drivetype”
Get-CimInstance -ClassName Win32LogicalDisk -ComputerName $computername `
-Filter “drivetype=$drivetype” |
Sort-Object -Property DeviceID |
Select-Object -Property DeviceID,
@{label=’FreeSpace(MB)’; e={$.FreeSpace / 1MB -as [int]}},
@{label=’Size(GB)’; expression={$.Size / 1GB -as [int]}},
@{name=’%Free’; expre={$.FreeSpace / $_.Size * 100 -as [int]}}
``
下面尝试以两种方式运行该脚本,加上-Verbose参数会显示详细输出。<br />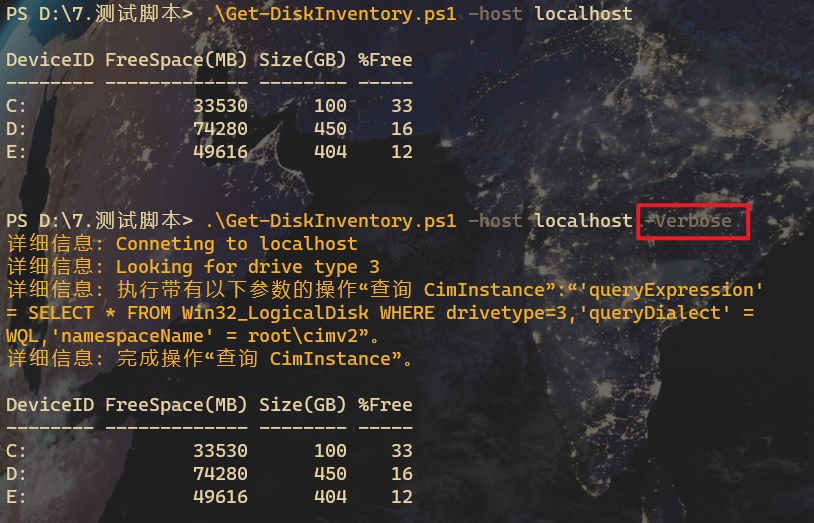<br />当添加[CmdletBinding()]时,就可以无成本拥有详细输出,而无须编写-Verbose参数的任何实现代码。最妙的部分是,该标签还会激活脚本中所包含命令的详细输出!该技术使得启用或禁用详细输出变得非常容易,相比Write-Host更加灵活。而且无须通过操作$VerbosePreference`变量,就能将输出结果显示在屏幕上。

若有收获,就点个赞吧
0 人点赞
