今日重点
课程发布预览的dtn实现:(内容请求分发)上传资源到七牛云 主要:文件夹层级必须和本地保存形式一致!cdn实现加速原理:将项目资源上传到源点 通过源站分发到各个不能网络商家的CDN节点 达到专网专用,加速!( 运营商区分 )项目资源发送到源网址服务器, 通过低于进行区分 用户到底访问那个节点服务器! (地域区分)数据同步:删除后不会马上访问不到该资源,因为源点虽然删除了,但是节点数据还是存在的并不会马上进行更新,因为节点主要负责给用户查询,实现cdn加速数据默认情况下不会立即刷新!(分布式事务中的AP思想)要想达到源点删除,分节点立即同步可以将网址放入设置中,进行立即更新!nginx反向代理:访问www.xuecheng.com/xxxxx 相当于访问七牛云中的资源路径!修改Hosts文件 nginx.conf修改自己的七牛云地址课程发布:高性能页面:将课程详情页生成html文件存储到cdn服务业务解耦:将一个按钮需要实现的功能进行拆分,各自负责各自的管辖!这样的好处是: 课程发布执行时间会很短课程发布与其他业务逻辑解耦,新增下游订阅者,上游不需要修改任何代码!分布式事务:feign=同步: 串联 同步发送请求内部发送feign进行调用别的服务,按顺序执行!Rabbitmq=异步: 并联 异步异步是一个人访问一个接口,执行三个方法 同时进行互相不影响!MQ实现可靠消息最终一致性:(核心---本地消息表)1.首先生产方自己业务操作2.写消息数据前先写个消息表,都成功了之后发送消息数据给mq。3.消费方接收消息消费消息4.告诉生产方把消息表状态修改为消息已处理课程发布业务概述:(业务比较重 拆开了 异步执行 提升效率 )前端告诉生产方,生产进行改表,修改课程基础信息,审核状态,保存课程发布信息并通过mq发送消息队列,消息方生产详情页并上传到七牛云生产方异常:生产方操作业务,写消息前写消息表,两个表有一个失败,整个回滚消费方异常:生产方正常,消费方处理自己的业务失败了,告诉生产方,消费表状态是失败了定时器,扫描消息表,未消费的消息读取出来,再发前端发送 消息到 后端控制层,控制层 调用 服务层(保存课程发布表 和保存 本地消息表)然后 跑去MQ 告诉交换机 有消息了。 交换机接收到 消息 成功给 ACK0 失败 给NACK要改两个表,改成功了跑去告诉mq不管 交换机成功与否 都会调用 confirm callback ACK 就改 本地消息 状态 改为1失败了直接不告诉了对 ,保存 发布表和 本地消息表 成功了, 在去告诉MQ 的 交换机然后 到了 MQ交换机后,不管成功与否 都会 调用 confirmcallback (成功返回 ACK 改消息表 状态调成1, 失败返回NACK 原地踏步,等定时任务扫)MQ交换机成功后,交换机 给队列(成功 正常走, 失败 就调用returncallback (摇人摇人))
1. 课程发布
课程发布是在课程预览的基础上做功能的扩展,课程发布的业务操作中,后期会进行大量的业务操作,课程中有些重要的操作会在课程发布时来去出发,下面我们来分析下课程发布的业务操作和环境,以及相关实际到的技术方法。
1.1 需求分析
此模块主要实现教学机构对课程的发布过程,课程发布时将形成门户可访问的课程详情页面。
具体操作如下:
1.根据课程 Id 获得课程发布的数据模型
2.获得课程详情页模板,并通过 Freemarker 生成课程详情页
3.将生成好的页面上传到云服务(七牛云)指定位置,供用户来进行访问
这里还需要满足两个技术上的需求,如下:(面试)
1.高性能课程详情页访问。
1.将课程详情页生成html文件
2.将静态资源存储到CDN服务
2.业务的解耦。
1.1.1 页面静态化需求
我们将通过课程详情页静态化的方式,满足高性能课程详情页访问需求。为什么页面静态化将提高页面访问性能?
1.静态化页面,会在生成该页面时读取页面所需的业务数据,组装数据与页面样式形成页面文件。而用户访问该页面时,仅仅是访问已生成的页面文件,无需执行数据库访问,减少访问环节、计算环节。
课程详情页示意图

2.静态化页面,由于是静态内容,更容易对其缓存,更容易对其进行近一步优化。适用于读多写少的场景,我们的课程详情符合该应用场景。
对于缓存静态化资源通常会采用下面方式:
●使用 CDN 缓存静态资源 需要购买域名和CDN进行CNAME绑定。
●CDN 和 Nginx 结合使用缓存静态资源(项目中学习使用) 七牛云CND域名并不是学成在线标识的域名。 七牛云CND域名只是测试域名,30天内容就会自动回收。
1.1.2 使用消息队列解耦
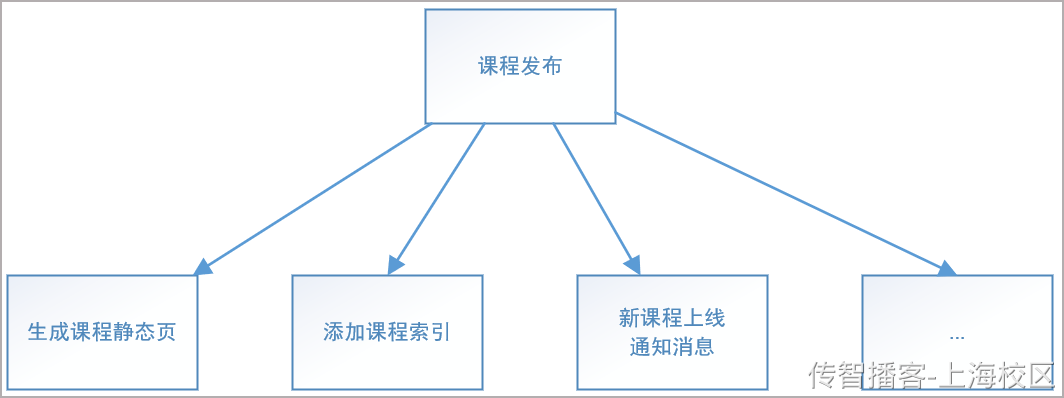
课程发布对于该项目来说是一个核心业务,除了页面生成之外,一般都需要扩展其他操作,这些逻辑若都在课程发布中接入,那课程发布的实现将耦合所有下游业务。且下游模块出现问题,将会影响该核心业务。如下图:
我们的优化方案如下,课程发布时会向(消息队列)MQ发送一条消息,哪些模块需要关注该课程发布消息,则主动订阅,当有课程发布消息发布时,订阅方执行自身业务处理。
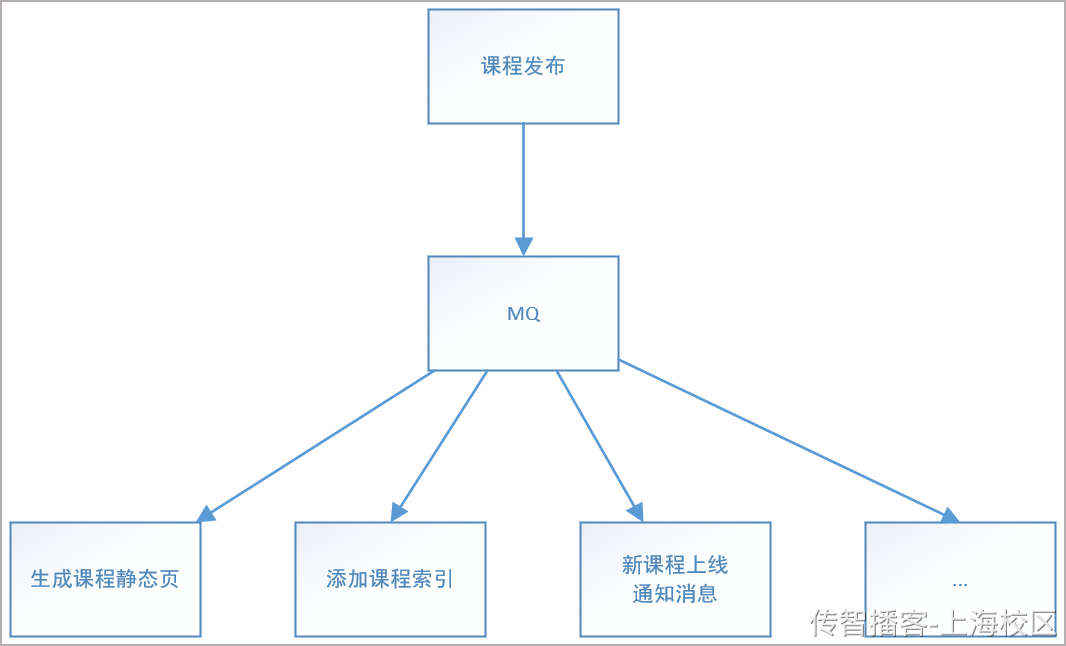
这样的好处是:(面试)
(1)课程发布时间执行短。
(2)课程发布与其他业务逻辑解耦,新增下游订阅者,上游不需要修改任何代码。
1.2 业务流程描述
教学机构课程发布流程如下:
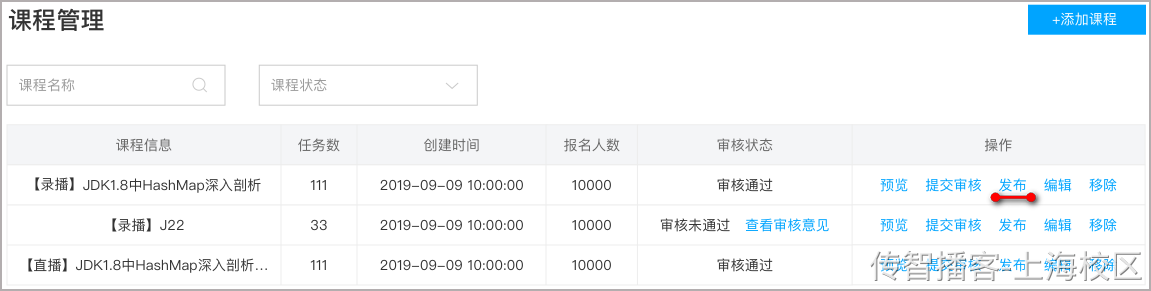
1.教育机构用户在课程管理中可对机构内课程进行检索。
2.点击某课程数据后的 发布 链接(审核状态为通过),即可对该课程进行发布。
3.通过门户首页,点击课程连接,即可浏览已发布课程的详情页面。
4.课程详情页面如下。
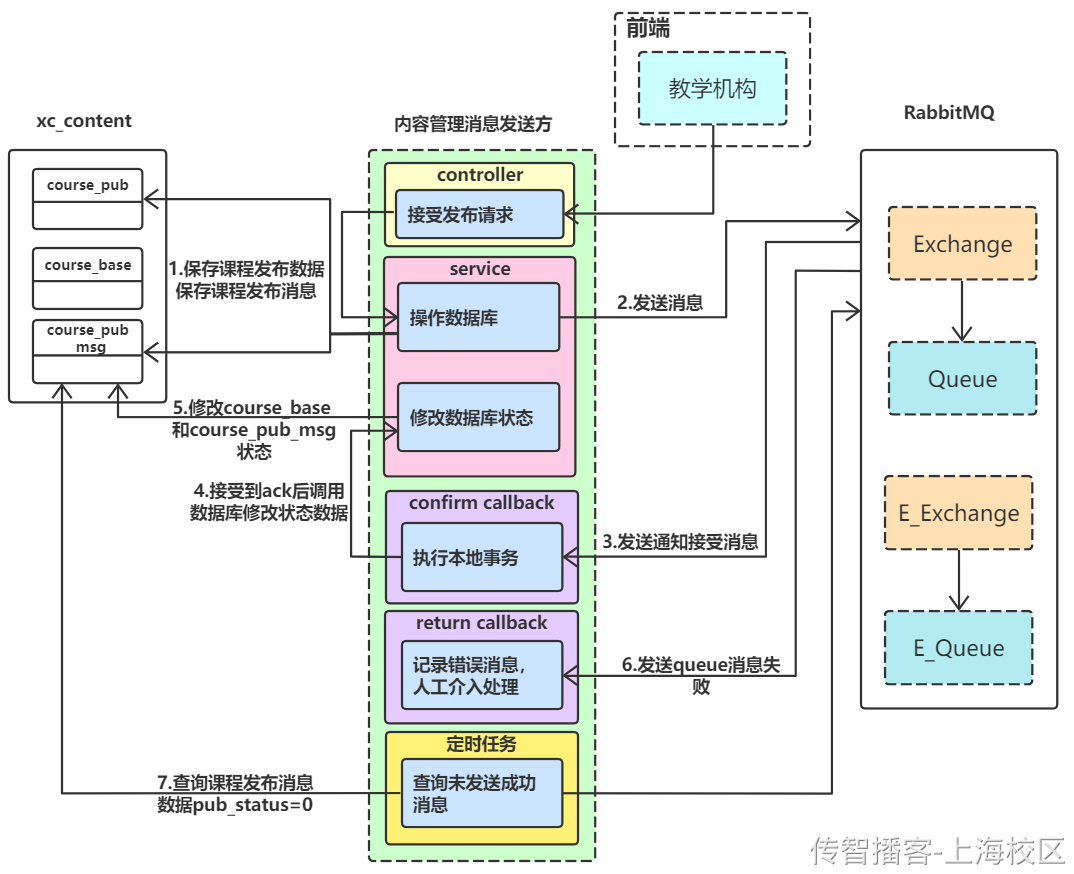
1.3 系统交互流程
课程发布交互流程如下:
生产方系统交互图
步骤描述:
1.前端对某审核通过的课程执行课程发布操作
2.查询课程基本信息、课程营销、课程计划、教师信息并保存到 课程发布中。
3.远程调用系统管理查询课程分类信息
4.保存课程发布数据和课程发布消息数据
5.消息发送方异步通知课程发布操作
6.消息发送成功后,将课程状态和消息发送状态进行修改
7.如果消息发送失败,定时器来查询消息状态为未发送的数据,并再次发送消息
消费方系统交互图
步骤描述:
1.课程发布数据执行后,MQ将消息传递给消费方
2.消费方接受消息查看课程发布数据是否已经发布
3.消费方获得消息在课程发布状态为1时,会生成课程详情页
4.生成详情页后,将页面存放到cdn服务上
5.修改课程发布数据的状态is_pub=0
6.如果消费消息一致失败,经消息发送到mq制定的exchange中
1.4 相关技术预研和使用
通过课程发布的系统交互结构图中,我们可以看到设计到的相关内容如下:
●设计到的后端微服务:1.内容管理微服务 2.系统管理微服务
●设计到的后端服务:1.消息队列后端服务 2.Nginx 服务 3.MySQL 数据库服务 4.配置中心 Nacos 5.七牛云服务
从上面的结构中设计到的服务,以及业务需求,现在有三个技术问题需求进行解决,如下:
1.消息队列服务环境搭建和集成
由于在课程发布时,需要使用 MQ 对复杂业务进行解耦操作,项目中需要搭建环境并集成到项目中。
2.分布式事务问题的解决
课程发布系统交互图中,生成 CoursePub 信息 和 生成静态化页面并发布到指定位置,两件事是异步来完成,这两件业务来构成课程发布的功能。
那么现在如何来实现这两件事要么都成功,要么都失败呢?这里需要靠事务来完成,但又由于是分布式来做的业务,所有要通过 分布式事务 来解决此问题。
这里的分布式会采用 MQ 来完成可靠消息最终一致性,所有项目中需要搭建环境并集成到项目中。
3.Nginx 的 Web 环境
课程发布会生成静态页面,业务中需要将静态页面存放到指定位置。并通过 Nginx 的虚拟主机来完成静态页面的客户端的访问。
1.4.1 消息队列服务环境集成
在课程发布时,需要通过消息队列 MQ 来完成复杂业务解耦操作,下面我们来讲 MQ 的环境搭建,并集成到项目中。
对于市面中,MQ 服务有很多如下列:(面试)
几种常见MQ的对比:
| | RabbitMQ
| ActiveMQ
| RocketMQ
| Kafka
| | —- | —- | —- | —- | —- | | 公司/社区
| Rabbit
| Apache
| 阿里
| Apache
| | 开发语言
| Erlang
| Java
| Java
| Scala&Java
| | 协议支持
| AMQP,XMPP,SMTP,STOMP
| OpenWire,STOMP,REST,XMPP,AMQP
| 自定义协议
| 自定义协议
| | 可用性
| 高
| 一般
| 高
| 高
| | 单机吞吐量
| 一般
| 差
| 高
| 非常高
| | 消息延迟
| 微秒级
| 毫秒级
| 毫秒级
| 毫秒以内
| | 消息可靠性
| 高
| 一般
| 高
| 一般
|
追求可用性:Kafka、 RocketMQ 、RabbitMQ
追求可靠性:RabbitMQ、RocketMQ
追求吞吐能力:RocketMQ、Kafka
追求消息低延迟:RabbitMQ、Kafka
综合上面的应用场景,学成在线项目中采用 RabbitMQ 作为消息队列服务(消息中间件),下面我们来 开始环境的搭建 和 项目的集成。
1.4.1.1 RabbitMQ 环境搭建
对于 RabbitMQ 来说,可以在 Linux 或 Windows 环境下运行,为考虑到电脑内存开销,项目中会在 Windows 下来运行 RabbitMQ 服务。环境的运行会根据 RabbitMQ 架构结构图来进行启动。
PS:由于 RabbitMQ 已经有前置课程,对此直接使用,详细信息不会在阐述。
架构结构图
RabbitMQ中的一些角色:
●publisher:生产者
●consumer:消费者
●exchange个:交换机,负责消息路由
●queue:队列,存储消息
●virtualHost:虚拟主机,隔离不同租户的exchange、queue、消息的隔离
●Linux环境部署
在 Linux 的 Docker 环境下部署 RabbitMQ,并启动 服务。
拉取镜像
docker pull rabbitmq:3.8-management
执行下面的命令来运行MQ容器:
docker run \-e RABBITMQ_DEFAULT_USER=itcast \-e RABBITMQ_DEFAULT_PASS=123321 \-v mq-plugins:/plugins \--name mq \--hostname mq \-p 15672:15672 \-p 5672:5672 \-d \rabbitmq:3.8-management
访问RabbitMQ控制台界面:http://ip:15672
1.4.1.2 Spring Boot 集成
项目中,我们将使用 Spring Boot 集成 RabbitMQ 提供的 Api 来编写业务代码。
xc-content-service 工程将 SpringBoot 集成 RabbitMQ 依赖引入
<!--AMQP依赖,包含RabbitMQ--><dependency><groupId>org.springframework.boot</groupId><artifactId>spring-boot-starter-amqp</artifactId></dependency>
1.消息生成方工程测试代码编写
消息生成方编写代码会根据下面的概念模型来编写。
概念模型

在Direct模型下:
●队列与交换机的绑定,不能是任意绑定了,而是要指定一个RoutingKey(路由key)
●消息的发送方在 向 Exchange发送消息时,也必须指定消息的 RoutingKey。
●Exchange不再把消息交给每一个绑定的队列,而是根据消息的Routing Key进行判断,只有队列的Routingkey与消息的 Routing key完全一致,才会接收到消息
在生产者声明下面内容
1声明DirectExchange、Queue、RoutingKey
2将交互级和队列继续绑定
3在publisher中编写测试方法,向direct发送消息
对于两项信息我们通过 xc-content-service 配置文件 bootstrap.yml 来完成,如下:
spring:rabbitmq:host: 192.168.94.129 # 主机名port: 5672 # 端口virtual-host: / # 虚拟主机username: itcast # 用户名password: 123321 # 密码
对于后两项的信息我们通过 RocketMQ-spring-boot-starter 所提供的 RocketMQTemplate 来设置,对此在 test-rocketmq-producer 工程中编写测试代码如下:
package com.xuecheng.content.config.rabbitmq;import org.springframework.amqp.core.*;import org.springframework.beans.factory.annotation.Value;import org.springframework.context.annotation.Bean;import org.springframework.context.annotation.Configuration;/*** <p></p>** @Description:*/@Configurationpublic class RabbitMQConfig {@Bean("coursePubEx")public DirectExchange simpleExchange(){// 三个参数:交换机名称、是否持久化、当没有queue与其绑定时是否自动删除return new DirectExchange("test.direct", true, false);}@Bean("coursePubQueue")public Queue simpleQueue(){// 使用QueueBuilder构建队列,durable就是持久化的return QueueBuilder.durable("test.queue").build();}@Beanpublic Binding errorBinding(Queue coursePubQueue, DirectExchange coursePubEx){return BindingBuilder.bind(coursePubQueue).to(coursePubEx).with("test");}}
编写测试用例,发送方测试代码
@SpringBootTestpublic class RabbitMQTest {@Autowiredprivate RabbitTemplate rabbitTemplate;@Testpublic void sendTest() {rabbitTemplate.convertAndSend("test.direct","test","hello msg");}}
2.消息消费方工程测试代码编写
消息消费方编写代码会根据下面的概念模型来编写。
概念模型
消息生成方需要完成的事项:
1声明监听器,指定DirectExchange、Queue、RoutingKey(生产端如果声明,无需声明)
Rabbitmq 测试监听器代码
@Componentpublic class RabbitMQConsumer {/* 简单形式:只去指定队列名称(此队列必须要提前声明出来)*///@RabbitListener(queues = "test.queue")//public void publishPage(String msg) {// System.out.println("收到消息:"+msg);//}/* 绑定交互级和队列形式:推荐使用此方式 */@RabbitListener(bindings = @QueueBinding(value = @Queue(value="test.queue"),exchange = @Exchange(value ="test.direct",type = ExchangeTypes.DIRECT),key = {"test"}))public void publishPage(String msg) {System.out.println("收到消息:"+msg);}}
1.4.2 分布式事务研究
课程发布要在分布式项目中 生成 CoursePub 信息 和 生成静态化页面并发布到指定位置,这里要实现这两件事要么都成功,要么都失败的事务统一,也就是分布式事务。
分布式内容的学习,具体在今天下发资料 资料/分布式事务 文档中。
1.5 课程发布的业务实现
在课程发布的实现中,在后端我们需要做的内容如下:
根据上面的图片,课程发布现在需要两件业务操作,如下:
●消息发送方:获得课程发布消息,将其保存到数据库,并向MQ发送消息。
●消息消费方:获得课程发布消息,生成生成课程详情页,并将页面发送到指定位置。
下面我们分别来实现。
1.5.1 消息发送方业务实现
在内容管理中,需要结合 RabbitMQ 的发送方消息可靠性来进行课程发布的业务操作,概念图如下:
课程发布概念图
1.5.1.1 消息发送方相关配置
在课程发布时,需要使用 RocketMQ 是事务消息,这里会设计到下面的内容
1.RabbitMQ 服务信息
2.Rabbit生产方消息确认配置信息
3.声明课程发布交换机和队列名称
4.添加项目中的RabbitMQ配置信息
5.项目引用Nacos中配置
6.创建数据库课程发布消息表
以上的消息在代码中使用字符串的形式写死,会导致代码维护成本高,在配置中心中可以将其内容进行配置。
1.创建 RabbitMQ 公共信息
在配置中心 Nacos 中添加公共配置信息 :rabbitmq-config.properties,并将下面的配置信息配置当中。
●rocketmq 配置信息
#rabbitmq 配置信息spring.rabbitmq.host = 192.168.94.129spring.rabbitmq.port = 5672spring.rabbitmq.username = itcastspring.rabbitmq.password = 123321spring.rabbitmq.password.virtual-host = /
2.配置Rabbit生产方消息确认配置信息
在配置中心的 content-service-dev.properties 中添加发送方的配置信息。
●RabbitMQ 的发送方消息确认配置信息
#异步回调,定义ConfirmCallback,MQ返回结果时会回调这个ConfirmCallbackspring.rabbitmq.publisher-confirm-type = correlated#开启publish-return功能,同样是基于callback机制,不过是定义ReturnCallbackspring.rabbitmq.publisher-returns = true#定义消息路由失败时的策略。true,则调用ReturnCallback;false:则直接丢弃消息spring.rabbitmq.template.mandatory = true
3.声明课程发布交换机和队列名称
在配置中心的 content-service-dev.properties 中添加配置信息。
# 课程发布 交互级名称course.publish.exchange = course_pub.direct# 课程发布 页面生成队列名称course.publish.queue = course_page.queuecourse.publish.routingkey= publish.course
4.添加配置
在 xc-content-service 中添加rabbitmq配置信息。
声明交换机和队列
package com.xuecheng.content.config.rabbitmq;import org.springframework.amqp.core.*;import org.springframework.beans.factory.annotation.Value;import org.springframework.context.annotation.Bean;import org.springframework.context.annotation.Configuration;/*** <p></p>** @Description:*/@Configurationpublic class RabbitMQConfig {/*# 课程发布 交互级名称course.publish.exchange = course_pub.direct# 课程发布 页面生成队列名称course.publish.queue = course_page.queuecourse.publish.routingkey= publish.page*/@Value("${course.publish.exchange}")private String exchange;@Value("${course.publish.queue}")private String queue;@Value("${course.publish.routingkey}")private String routingkey;@Bean("coursePubEx")public DirectExchange simpleExchange(){// 三个参数:交换机名称、是否持久化、当没有queue与其绑定时是否自动删除return new DirectExchange(exchange, true, false);}@Bean("coursePubQueue")public Queue simpleQueue(){// 使用QueueBuilder构建队列,durable就是持久化的return QueueBuilder.durable(queue).build();}@Beanpublic Binding errorBinding(Queue coursePubQueue, DirectExchange coursePubEx){return BindingBuilder.bind(coursePubQueue).to(coursePubEx).with(routingkey);}}
声明rabbitmqTemplate的returncallback
package com.xuecheng.content.config.rabbitmq;import lombok.extern.slf4j.Slf4j;import org.springframework.amqp.rabbit.core.RabbitTemplate;import org.springframework.beans.BeansException;import org.springframework.context.ApplicationContext;import org.springframework.context.ApplicationContextAware;import org.springframework.context.annotation.Configuration;/*** <p></p>** @Description:*/@Slf4j@Configurationpublic class ReturnCallbackConfig implements ApplicationContextAware {@Overridepublic void setApplicationContext(ApplicationContext applicationContext) throws BeansException {// 获取RabbitTemplateRabbitTemplate rabbitTemplate = applicationContext.getBean(RabbitTemplate.class);// 设置ReturnCallbackrabbitTemplate.setReturnCallback((message, replyCode, replyText, exchange, routingKey) -> {// 投递失败,记录日志log.info("消息发送失败,应答码{},原因{},交换机{},路由键{},消息{}",replyCode, replyText, exchange, routingKey, message.toString());});}}
5.项目添加配置
在 xc-content-service 的 bootstrap.yml 文件中引入 rocketmq 配置信息。
#微服务配置spring:application:name: content-servicecloud:nacos:discovery: #配置注册中心server-addr: 192.168.94.129:8848namespace: 5c0b093c-4084-46b5-bf33-899321cb7ef5group: ${group.name}config: #配置中心server-addr: 192.168.94.129:8848namespace: 5c0b093c-4084-46b5-bf33-899321cb7ef5group: ${group.name}file-extension: propertiesshared-configs:- dataId: mp-config.propertiesgroup: ${dev.group}- dataId: spring-http-config.propertiesgroup: ${dev.group}- dataId: spring-druid-config.propertiesgroup: ${dev.group}- dataId: feign-config.propertiesgroup: ${dev.group}- dataId: ribbon-config.propertiesgroup: ${dev.group}- dataId: redis-config.propertiesgroup: ${dev.group}- dataId: freemarker-config.propertiesgroup: ${dev.group}- dataId: rabbitmq-config.propertiesgroup: ${dev.group}
6.创建课程发布消息表
CREATE TABLE `course_pub_msg` (`pub_id` bigint(11) NOT NULL COMMENT '课程发布id',`pub_name` varchar(255) DEFAULT NULL COMMENT '课程发布名称',`pub_status` tinyint(255) DEFAULT NULL COMMENT '课程发布消息状态(0:未发送,1:已发送)',`course_id` bigint(11) DEFAULT NULL COMMENT '课程基本信息id',`company_id` bigint(11) DEFAULT NULL COMMENT '教学机构id',`create_date` datetime DEFAULT NULL,`change_date` datetime DEFAULT NULL,PRIMARY KEY (`pub_id`)) ENGINE=InnoDB DEFAULT CHARSET=utf8mb4
通过代码生成器生成基础代码。
1.5.1.2 消息发送接口定义
在课程发布业务中,由前端向后端发送请求来开启课程发布的业务,所有需要在消息发送方定义课程发布的接口。
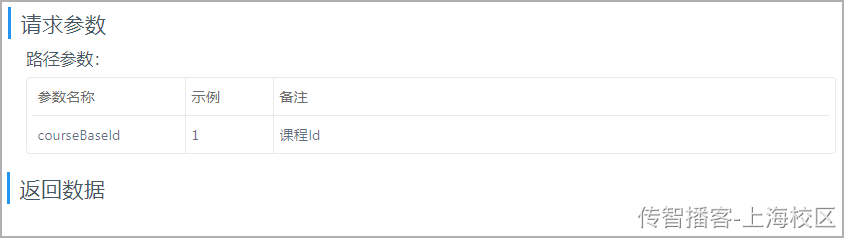
1.接口参数列表
根据前后端传入参数列表来定义接口
Http接口地址

接口传入传出列表
2. 接口编写
在 xc-api 工程的 com.xuecheng.api.content 包下创建接口类接口定义如下:
●课程预览
@Api(value = "课程基本信息管理Api",tags = "内容-课程基本信息管理",description = "课程基本信息业务管理")public interface CourseBaseApi {//其他代码省略@ApiOperation(value = "课程发布")void publish(Long courseBaseId);}
1.5.1.3 消息发送接口开发
1.DAO编写
Mybatis Plus 已经简化了单表操作,它提供的 Api 就可以完成添加数据操作,所有不需要进行编写。
2.service 编写
●接口定义
/*** <p>* 课程发布 服务类* </p>*/public interface CoursePubService extends IService<CoursePub> {//其他代码省略/*** 课程发布* @param courseId* @param companyId* @return*/void publish(Long courseBaseId, Long companyId,boolean isResend);}
●实现类
/*** <p>* 课程发布 服务实现类* </p>*/@Slf4j@Servicepublic class CoursePubServiceImpl extends ServiceImpl<CoursePubMapper, CoursePub> implements CoursePubService {//其他代码省略@Autowiredprivate CourseBaseService courseBaseService;@Autowiredprivate CourseMarketService courseMarketService;@Autowiredprivate TeachplanService teachplanService;@Autowiredprivate SystemApiAgent systemApiAgent;@Autowiredprivate RabbitTemplate rabbitTemplate;@Autowiredprivate CoursePubMsgService coursePubMsgService;@Value("${course.publish.exchange}")private String exchange;@Value("${course.publish.routingkey}")private String routingkey@Autowiredprivate RabbitTemplate rabbitTemplate;@Autowiredprivate CoursePubMsgService coursePubMsgService;@Value("${course.publish.exchange}")private String exchange;@Value("${course.publish.routingkey}")private String routingkey;/** 构建CoursePub数据并保存* 业务分析:* 1.判断关键数据* courseId companyId* 2.判断业务数据* 课程基础信息* 判断是否存在* 判断是否是同一家机构* 判断是否删除* 判断审核状态:教学机构课程预览--未提交、审核未通过* 课程营销* 判断是否存在:根据courseid* 课程计划* 获得课程计划:根据courseId和companyId(树形结构)* 课程教师* 判断教师信息是否存在:一定要确保课程最少有一个教师信息** 课程分类数据并完善Coursepub数据* 调用system服务获得课程分类的名称** 3.保存数据的业务数据和消息数据* 业务数据:CoursePub数据进行保存* 消息数据:CoursePubMsg数据进行保存** 4.发送消息给MQ** */@Override@Transactionalpublic void publish(Long courseBaseId, Long companyId,boolean isResend) {//1.判断关键数据// courseId companyIdif (ObjectUtils.isEmpty(courseBaseId)||ObjectUtils.isEmpty(companyId)) {ExceptionCast.cast(CommonErrorCode.E_100101);}CoursePubMsg coursePubMsg = null;// 判断是否是从新发送消息,如果是,没有必要创建CoursePub和CoursePubMsg数据了if (isResend) {// 查询课程发布消息表的数据即可LambdaQueryWrapper<CoursePubMsg> queryWrapper = new LambdaQueryWrapper<>();queryWrapper.eq(CoursePubMsg::getCourseId,courseBaseId);queryWrapper.eq(CoursePubMsg::getCompanyId,companyId);coursePubMsg = coursePubMsgService.getOne(queryWrapper);// 如果在定时器重新发送消息时,消息表的数据不存在// 记录消息并结束该方法if (ObjectUtils.isEmpty(coursePubMsg)) {log.error(ContentErrorCode.E_120203.getDesc()+",courseBaseId 信息:{}",courseBaseId);return;}} else {// 前端的课程发布业务操作会调用,需要生成CoursePub和CoursePubMSG数据// 2.判断业务数据// 课程基础信息// 判断是否存在// 判断是否是同一家机构// 判断是否删除// 判断审核状态:教学机构课程预览--未提交、审核未通过// 课程营销// 判断是否存在:根据courseid// 课程计划// 获得课程计划:根据courseId和companyId(树形结构)// 课程教师// 判断教师信息是否存在:一定要确保课程最少有一个教师信息// 课程分类数据并完善Coursepub数据// 调用system服务获得课程分类的名称CoursePub coursePub = this.generateCoursePub(courseBaseId, companyId,true);// 3.保存数据的业务数据和消息数据// 业务数据:CoursePub数据进行保存(已经在generateCoursePub进行了保存,无需操作)// 消息数据:CoursePubMsg数据进行保存coursePubMsg = new CoursePubMsg();coursePubMsg.setPubId(coursePub.getId());coursePubMsg.setCourseId(coursePub.getCourseId());coursePubMsg.setCompanyId(coursePub.getCompanyId());coursePubMsg.setPubName(coursePub.getName());// 发送消息默认的状态:未发送成功coursePubMsg.setPubStatus(CoursePubMsg.UNSENT);boolean result = coursePubMsgService.save(coursePubMsg);if (!result) {ExceptionCast.cast(ContentErrorCode.E_120206);}}// 4.发送消息给MQ/** 参数:* 1.交换机的名称* 2.rontingkey* 3.消息* 消息表的数据:CoursePubMsg(json)* 4.CorrelationData(设置confirm callback)* 接受交互机处理数据的结果(应答机制)* ack:交换机处理成功--> 修改业务数据和消息表的状态* nack:交换机处理失败--> 记录错误消息,并不操作业务数据和消息表* *//* 构造方法需要指定消息唯一标识:业务数据作为依赖数据 (CoursePubId)*/CorrelationData correlationData = new CorrelationData(coursePubMsg.getPubId().toString());correlationData.getFuture().addCallback(/* mq的交换机接受消息,但不知道是否处理成功 */confirm -> {boolean ack = confirm.isAck();if (ack) {// 修改业务数据和消息表的状态execuChangeLocalStatusData(correlationData.getId());} else {// 记录错误消息,并不操作业务数据和消息表log.error(ContentErrorCode.E_120206.getDesc()+",业务数据为CoursePubId:{}",correlationData.getId());}},/* mq的服务异常,没有接收到消息 */throwable -> {log.error(ContentErrorCode.E_120207.getDesc()+",业务数据为CoursePubId:{} erroMsg: {}",correlationData.getId(),throwable.getMessage());});String msgJsonString = JsonUtil.objectTojson(coursePubMsg);rabbitTemplate.convertAndSend(exchange,routingkey,msgJsonString,correlationData);}/** 修改本地数据的状态值:* 0.判断消息是否已经修改* 1.CourseBase* 审核状态:课程已发布* 2.CoursePubMsg* 发送成功的状态:0->1* */@Transactionalpublic void execuChangeLocalStatusData(String coursePubId) {// 0.判断消息是否已经修改// 查询coursePubMsg表中的数据并判断其状态// CoursePubMsg中的id和CoursePub表的id是唯一、一致// select * from course_pub_msg where pubid = ? and pubStatus = ?LambdaQueryWrapper<CoursePubMsg> pubMsgQueryWrapper = new LambdaQueryWrapper<>();pubMsgQueryWrapper.eq(CoursePubMsg::getPubId, new Long(coursePubId));pubMsgQueryWrapper.eq(CoursePubMsg::getPubStatus, CoursePubMsg.UNSENT);CoursePubMsg coursePubMsg = coursePubMsgService.getOne(pubMsgQueryWrapper);if (ObjectUtils.isEmpty(coursePubMsg)) {log.info("修改消息数据已经处理,无需操作,CoursPubId:{}",coursePubId);return;}// 1. CourseBase// 审核状态:课程已发布Long courseId = coursePubMsg.getCourseId();// update course_base set auditStatus = ? where id = ?LambdaUpdateWrapper<CourseBase> baseUpdateWrapper = new LambdaUpdateWrapper<>();baseUpdateWrapper.set(CourseBase::getAuditStatus,CourseAuditEnum.AUDIT_PUBLISHED_STATUS.getCode());baseUpdateWrapper.eq(CourseBase::getId, courseId);boolean baseResult = courseBaseService.update(baseUpdateWrapper);if (!baseResult) {log.error("修改消课程审核状态失败,CoursPubId:{}",coursePubId);return;}// 2.CoursePubMsg// 发送成功的状态:0->1// update set course_pub_msg set pub_status = ? where pub_id = ?LambdaUpdateWrapper<CoursePubMsg> pubMsgUpdateWrapper = new LambdaUpdateWrapper<>();pubMsgUpdateWrapper.set(CoursePubMsg::getPubStatus,CoursePubMsg.SENT);pubMsgUpdateWrapper.eq(CoursePubMsg::getPubId, coursePubMsg.getPubId());boolean pubResult = coursePubMsgService.update(pubMsgUpdateWrapper);if (!pubResult) {log.error("修改消息表的状态失败,CoursPubId:{}",coursePubId);// 要保证数据的一致性ExceptionCast.cast(ContentErrorCode.E_120206);}}
3.controller编写
@RestControllerpublic class CourseBaseController implements CourseBaseApi {@Autowiredprivate CoursePubService coursePubService;//其他代码省略@PostMapping("course_pub/publish/{courseId}")public void publish(@PathVariable Long courseBaseId) {Long companyId = SecurityUtil.getCompanyId();coursePubService.publish(courseBaseId,companyId,false);}}
1.5.1.4 消息重 发
在异常情况下,生产方发送消息给MQ,MQ返回NACK。在失败的情况下,我们需要重新让系统重新发送消息。
这里就用到了定时器。
对于定时器,Spring框架中已经对其进行整合。可以在项目中直接使用,其功能为 Spring-Task。
开启定时任务功能,在xc-content-service启动类上添加下面注解
package com.xuecheng.content;import com.spring4all.swagger.EnableSwagger2Doc;import org.springframework.boot.SpringApplication;import org.springframework.boot.autoconfigure.SpringBootApplication;import org.springframework.cloud.client.discovery.EnableDiscoveryClient;import org.springframework.cloud.context.config.annotation.RefreshScope;import org.springframework.cloud.openfeign.EnableFeignClients;import org.springframework.scheduling.annotation.EnableScheduling;@EnableScheduling//其他注解省略public class ContentApplication {public static void main(String[] args) {SpringApplication.run(ContentApplication.class, args);}}
课程发布重新发送消息业务实现
package com.xuecheng.content.task;import com.baomidou.mybatisplus.core.conditions.query.LambdaQueryWrapper;import com.xuecheng.content.entity.CoursePubMsg;import com.xuecheng.content.service.CoursePubMsgService;import com.xuecheng.content.service.CoursePubService;import lombok.extern.slf4j.Slf4j;import org.springframework.beans.factory.annotation.Autowired;import org.springframework.scheduling.annotation.Scheduled;import org.springframework.stereotype.Component;import java.util.List;/*** <p></p>** @Description:*/@Slf4j@Componentpublic class CoursePublishTask {@Autowiredprivate CoursePubMsgService coursePubMsgService;@Autowiredprivate CoursePubService coursePubService;/* 执行时间频率:时间(毫秒) */// @Scheduled(fixedRate = 3000l)/** cron* Spring-task一共是6位* 3 * * * * ? 每一天的每一小时的每一分钟的第三秒会执行* 3 * 12 * * ? 每一天的12点的每一分钟的第三秒会执行* 3,12,20,28 * 12 * * ? 每一天的12点的每一分钟的第三秒、第十二秒....会执行* 3-28 * 12 * * ? 每一天的12点的每一分钟的第三秒、第十二秒....会执行* 10/5 * 12 ? * 3 每一天的12点的每一分钟* 冲突:* 第四位和第六位是冲突的* 当前场景下服务为了同步课程发布数据内容* 每隔5-10秒执行* */@Scheduled(cron = "0/10 * * * * ?")public void testTask() {log.info("定时任务执行操作-重新发送消息");// 1.查询发布消息表中pubStatus为0的数据LambdaQueryWrapper<CoursePubMsg> msgLambdaQueryWrapper = new LambdaQueryWrapper<>();msgLambdaQueryWrapper.eq(CoursePubMsg::getPubStatus, CoursePubMsg.UNSENT);List<CoursePubMsg> list = coursePubMsgService.list(msgLambdaQueryWrapper);// 2.如果list数据存在,需要将数据一条一条发送到mq中if (!(CollectionUtils.isEmpty(coursePubMsgs))) {for (CoursePubMsg coursePubMsg : coursePubMsgs) {Long courseId = coursePubMsg.getCourseId();Long companyId = coursePubMsg.getCompanyId();coursePubService.publish(courseId, companyId,true);}}}}
1.5.2 消息消费方业务实现
课程概念图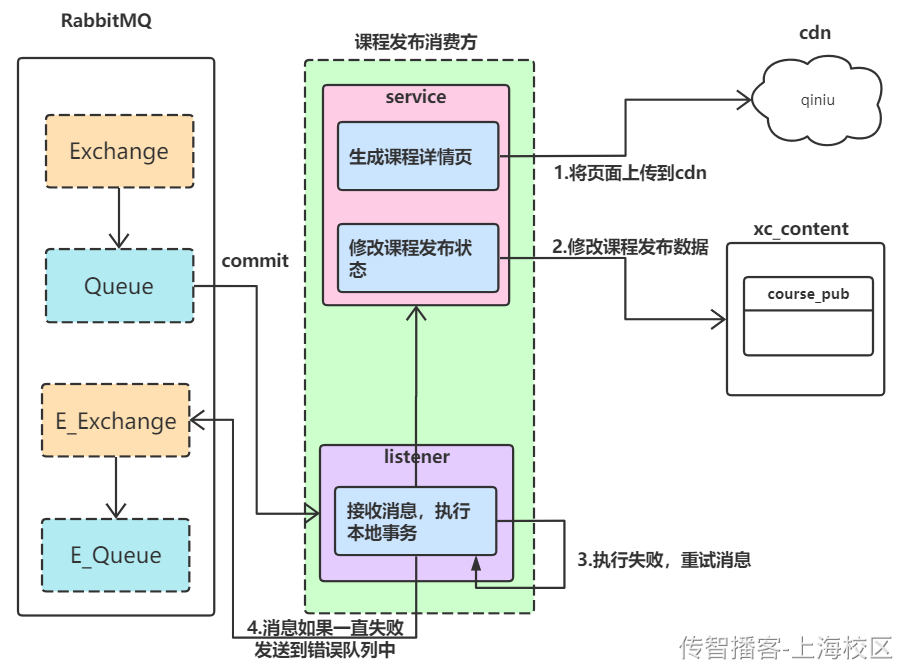
1.5.1.1 消息消费方相关配置
在课程发布时,消息消费方需要配置相关内容,这里会设计到下面的内容
1.搭建课程发布消息消费方服务
2.配置课程发布消息消费方服务
3.配置消费方MQ应答机制
4.配置消费方重试机制
5.七牛服务相关的参数信息(秘钥、存储空间的名称)
以上的消息在代码中使用字符串的形式写死,会导致代码维护成本高,在配置中心中可以将其内容进行配置。
1.导入工程
将资料中的 xc-coursepub-consumer 工程导入到xc-parent工程下。
2.配置消费方基础信息
在配置中心的 coursepub-consumer-service-dev.properties 中添加发送方的配置信息。
#springboot server 配置server.servlet.context-path = /pub_consumerserver.port=63333#druid 配置信息spring.datasource.url = jdbc:mysql://192.168.94.129:3306/xc_content?userUnicode=true&useSSL=false&characterEncoding=utf8
3.配置应答机制
#消费端应答模式spring.rabbitmq.listener.simple.acknowledge-mode = auto
4.配置重试机制
# 开启消费者失败重试spring.rabbitmq.listener.simple.retry.enabled = true# 初识的失败等待时长为1秒spring.rabbitmq.listener.simple.retry.initial-interval = 1000ms# 失败的等待时长倍数,下次等待时长 = multiplier * last-intervalspring.rabbitmq.listener.simple.retry.multiplier = 1# 最大重试次数spring.rabbitmq.listener.simple.retry.max-attempts = 3# true无状态;false有状态。如果业务中包含事务,这里改为falsespring.rabbitmq.listener.simple.retry.stateless = true
5.交换机和队列配置
# 课程发布 交换机名称course.publish.exchange = course_pub.direct# 课程发布 页面生成队列名称course.publish.queue = course_page.queuecourse.publish.routingkey= publish.course
6.消息消费失败配置
#课程发布 消费失败配置信息course.publish.error.exchange = error.course_pub.directcourse.publish.error.queue = error.course_page.queuecourse.publish.error.routingkey = error.publish_course
7.七牛云相关配置内容
#生成静态化页面发布位置course.publish.position = pages/#七牛云的存储消息file.qiniu.accessKey = 自己七牛的accessKeyfile.qiniu.secretKey = 自己七牛的secretKeyfile.qiniu.bucket = 自己七牛的存储空间名称
1.5.1.2 消息消费方开发
1.service 编写
根据消息发送方的概念图,需要在xc-coursepub-comsumer 的 service 层定义下面的方法,并完成下面的操作:
●工具类
由于我需要将相应的内容上传到七牛中,需要借助于七牛的SDK代码并封装到工具类中。
package com.xuecheng.publish.common.util;import com.alibaba.fastjson.JSON;import com.google.gson.Gson;import com.qiniu.common.QiniuException;import com.qiniu.common.Zone;import com.qiniu.http.Response;import com.qiniu.storage.Configuration;import com.qiniu.storage.UploadManager;import com.qiniu.storage.model.DefaultPutRet;import com.qiniu.util.Auth;import lombok.extern.slf4j.Slf4j;import java.io.UnsupportedEncodingException;/*** 七牛云工具类*/@Slf4jpublic class QiniuUtils {/*** 上传到七牛服务中* @param accessKey 七牛云accessKey* @param secretKey 七牛云secretKey* @param bucket 七牛云存储空间* @param contentText 静态化字符串内容* @param fileKey 上传文件的文件key值* @return*/public static boolean upload2Qiniu(String accessKey, String secretKey, String bucket, String contentText, String fileKey) throws Exception {//构造一个带指定 Region 对象的配置类Configuration cfg = new Configuration(Zone.huadong());//上传管理对象UploadManager uploadManager = new UploadManager(cfg);try {byte[] uploadBytes = contentText.getBytes("utf-8");Auth auth = Auth.create(accessKey, secretKey);String upToken = auth.uploadToken(bucket);try {Response response = uploadManager.put(uploadBytes, fileKey, upToken);//解析上传成功的结果if (response != null && response.isOK()) {//解析上传成功的结果DefaultPutRet putRet = new Gson().fromJson(response.bodyString(),DefaultPutRet.class);log.info("qiNiu result, key:{}, hash:{}, response:{}",putRet.key, putRet.hash, JSON.toJSONString(response));return true;} else {return false;}} catch (QiniuException ex) {Response r = ex.response;log.error("qiNiu error, response: {}", JSON.toJSONString(r));throw ex;}} catch (UnsupportedEncodingException | QiniuException ex) {log.error("qiNiu error, response: {}", ex);throw ex;}}}
●接口定义
/*** <p>* 课程发布 服务类* </p>** @author itcast* @since 2020-01-30*/public interface CoursePubService extends IService<CoursePub> {//其他代码省略/*** 发布课程页面* @param coursePubMsg*/void publishPage(CoursePubMsg coursePubMsg);}
●实现类
package com.xuecheng.publish.service.impl;import com.baomidou.mybatisplus.core.conditions.query.LambdaQueryWrapper;import com.baomidou.mybatisplus.core.conditions.update.LambdaUpdateWrapper;import com.baomidou.mybatisplus.extension.service.impl.ServiceImpl;import com.xuecheng.api.content.model.dto.TeachplanDTO;import com.xuecheng.common.enums.content.CourseModeEnum;import com.xuecheng.common.exception.ExceptionCast;import com.xuecheng.common.util.JsonUtil;import com.xuecheng.publish.common.constant.CoursePubTemplateKey;import com.xuecheng.publish.common.constant.CoursePublishErrorCode;import com.xuecheng.publish.common.util.QiniuUtils;import com.xuecheng.publish.entity.CourseMarket;import com.xuecheng.publish.entity.CoursePub;import com.xuecheng.publish.entity.CoursePubMsg;import com.xuecheng.publish.mapper.CoursePubMapper;import com.xuecheng.publish.service.CoursePubService;import freemarker.template.Configuration;import freemarker.template.Template;import lombok.extern.slf4j.Slf4j;import org.springframework.beans.factory.annotation.Autowired;import org.springframework.beans.factory.annotation.Value;import org.springframework.stereotype.Service;import org.springframework.transaction.annotation.Transactional;import org.springframework.ui.freemarker.FreeMarkerTemplateUtils;import org.springframework.util.ObjectUtils;import java.time.LocalDateTime;import java.util.HashMap;import java.util.Map;/*** <p>* 课程发布 服务实现类* </p>** @author itcast*/@Slf4j@Servicepublic class CoursePubServiceImpl extends ServiceImpl<CoursePubMapper, CoursePub> implements CoursePubService {@Autowiredprivate Configuration configuration;/*#生成静态化页面发布位置course.publish.position = pages/#七牛云的存储消息file.qiniu.accessKey = pFcOu02W6CdSqjY6qmRH1jz--pwfQEVyuM4RkBGCfile.qiniu.secretKey = z4CqmQb9LYD3AiuViX3ADk3r3-iOAm9yQePGP6Hhfile.qiniu.bucket = xc134-staitc-pages* */@Value("${file.qiniu.accessKey}")private String accessKey;@Value("${file.qiniu.secretKey}")private String secretKey;@Value("${file.qiniu.bucket}")private String bucket;@Value("${course.publish.position}")private String position;/** 业务分析:* 1.判断消息的幂等性* PS:在MQ的消费方如果有消息重试,必须要考虑消息的幂等性* 使用CoursePub 的 isPub来标识消息的幂等性* 0:已经发布页面* 1:没有发布页面* 2.生成课程页面* 数据模型:coursePubId* 页面模板:Configuration* 3.将生成后的页面信息上传到cdn服务上** 4.修改课程发布的幂等值:isPub=0* */@Transactionalpublic void publishPage(CoursePubMsg coursePubMsg) {// 测试消息重试// int i = 1 / 0;//1.判断消息的幂等性// PS:在MQ的消费方如果有消息重试,必须要考虑消息的幂等性// 使用CoursePub 的 isPub来标识消息的幂等性// 0:已经发布页面// 1:没有发布页面LambdaQueryWrapper<CoursePub> pubQueryWrapper = new LambdaQueryWrapper<>();pubQueryWrapper.eq(CoursePub::getId, coursePubMsg.getPubId());pubQueryWrapper.eq(CoursePub::getIsPub, CoursePub.PUBLISHED);int count = this.count(pubQueryWrapper);// 如果课程页面已经发布,记录消息,但不要抛出异常,抛出异常后,spring-retry会进行重试if (count > 0) {log.info("课程发布页面已经操作完,无需操作:coursePubId--{}",coursePubMsg.getPubId());return;}// 2.生成课程页面// 数据模型:coursePubId// 页面模板:ConfigurationCoursePub coursePub = null;String htmlString = null;try {coursePub = this.getById(coursePubMsg.getPubId());Map<String, Object> dataMap = generateDataMap(coursePub);Template template = configuration.getTemplate("learing_article.ftl");htmlString = FreeMarkerTemplateUtils.processTemplateIntoString(template, dataMap);} catch (Exception e) {log.error(CoursePublishErrorCode.E_120209.getDesc()+" coursePubId:{}",coursePub.getId());ExceptionCast.cast(CoursePublishErrorCode.E_120209);}// 4.修改课程发布的幂等值:isPub=0LambdaUpdateWrapper<CoursePub> updateWrapper = new LambdaUpdateWrapper<>();updateWrapper.set(CoursePub::getIsPub, CoursePub.PUBLISHED);updateWrapper.set(CoursePub::getChangeDate, LocalDateTime.now());updateWrapper.eq(CoursePub::getId, coursePubMsg.getPubId());boolean result = this.update(updateWrapper);if (!result) {log.error("课程发布修改发布的状态失败: coursePubId --{}",coursePub.getId());// 程序抛出异常,让spring-retry 进行消息的重试ExceptionCast.cast(CoursePublishErrorCode.E_120214);}// 3.将生成后的页面信息上传到cdn服务上/** htmlKey:文件标识* 要体现出上传的文件目录* 文件名称的唯一* 和coursePub数据能够对应上** 形式:pages/coursePubId.html* */try {String htmlKey = position+coursePubMsg.getPubId()+".html";QiniuUtils.upload2Qiniu(accessKey,secretKey,bucket,htmlString,htmlKey);} catch (Exception e) {log.error(CoursePublishErrorCode.E_120210.getDesc()+" coursePubId:{}",coursePub.getId());ExceptionCast.cast(CoursePublishErrorCode.E_120210);}}private Map<String, Object> generateDataMap(CoursePub coursePub) {// 1.构建数据模型对象HashMap<String, Object> dataMap = new HashMap<>();// 2.构建coursePubdataMap.put(CoursePubTemplateKey.COURSEPUB, coursePub);// 3.构建courseMarketString marketJsonString = coursePub.getMarket();CourseMarket courseMarket = JsonUtil.jsonToObject(marketJsonString, CourseMarket.class);dataMap.put(CoursePubTemplateKey.COURSEMARKET,courseMarket );// 4.构建课程计划String teachplanJsonString = coursePub.getTeachplan();TeachplanDTO teachplanDTO = JsonUtil.jsonToObject(teachplanJsonString, TeachplanDTO.class);dataMap.put(CoursePubTemplateKey.TEACHPLANNODE,teachplanDTO );// 5.构建课程模式CourseModeEnum[] values = CourseModeEnum.values();dataMap.put(CoursePubTemplateKey.COURSETEACHMODEENUMS,values );return dataMap;}}
3. RabbitMQ 监听编写
在消息消费方的 RocketMQ 监听器,需要完成下面事项:
1.接收消息调用 service 方法完成课程详情页发布。
●RocketMQ监听器
package com.xuecheng.publish.listener;import com.xuecheng.common.exception.ExceptionCast;import com.xuecheng.common.util.JsonUtil;import com.xuecheng.common.util.StringUtil;import com.xuecheng.publish.common.constant.CoursePublishErrorCode;import com.xuecheng.publish.entity.CoursePubMsg;import com.xuecheng.publish.service.CoursePubService;import lombok.extern.slf4j.Slf4j;import org.springframework.amqp.rabbit.annotation.Exchange;import org.springframework.amqp.rabbit.annotation.Queue;import org.springframework.amqp.rabbit.annotation.QueueBinding;import org.springframework.amqp.rabbit.annotation.RabbitListener;import org.springframework.beans.factory.annotation.Autowired;import org.springframework.stereotype.Component;/*** <p></p>** @Description:*/@Slf4j@Componentpublic class PublishPageConsumer {@Autowiredprivate CoursePubService coursePubService;/** # 课程发布 交换机名称course.publish.exchange = course_pub.direct# 课程发布 页面生成队列名称course.publish.queue = course_page.queuecourse.publish.routingkey= publish.course* */@RabbitListener(bindings = {@QueueBinding(value = @Queue(value = "${course.publish.queue}"),exchange = @Exchange(value = "${course.publish.exchange}"),key = {"${course.publish.routingkey}"})})public void publishPage(String jsonString) {// 1.接受消息并解析为对象CoursePubMsg coursePubMsg = JsonUtil.jsonToObject(jsonString, CoursePubMsg.class);log.info("课程发布消息生成页面执行:{}",coursePubMsg.getPubId());// 2.调用service完成本地事务操作coursePubService.publishPage(coursePubMsg);}}
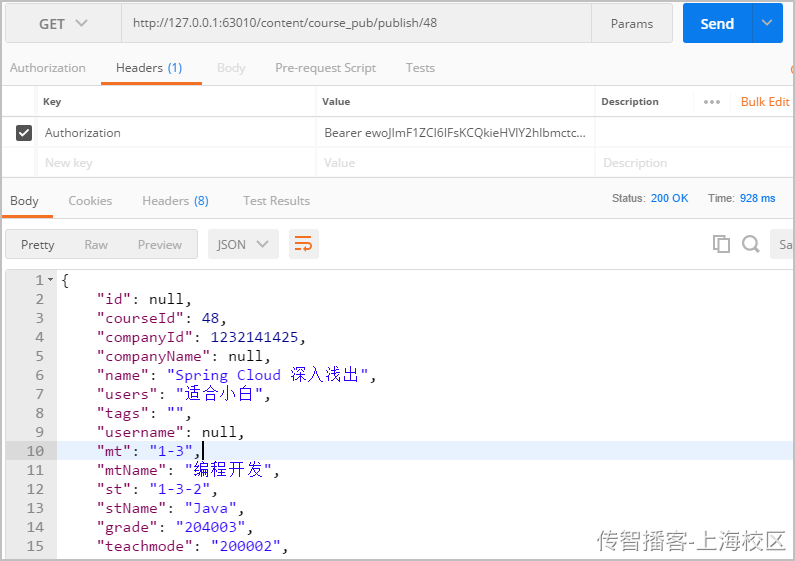
1.6 课程发布接口测试
使用postman进行接口测试,依然调用课程发布接口,请求界面如下:
1.按照接口定义,请求Method为POST
2.参数是通过 Restful 方法进行传递
3.接口地址如下:http://127.0.0.1:63010/content/course_pub/publish/48
测试接口示意图
生成静态文件
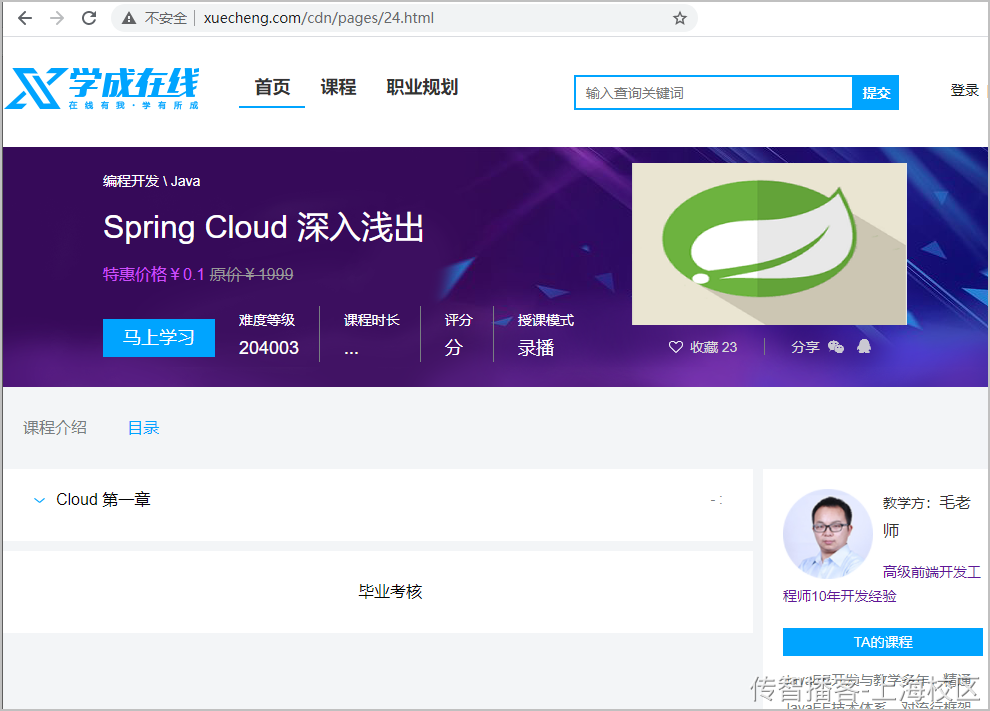
通过Nginx访问该页面,访问地址http://www.xuecheng.com/cdn/pages/24.html,展示如下:

若有收获,就点个赞吧
0 人点赞
