- 补充说明:关于项目部署,历来是开发和运维人员的痛点。造成部署困难的主要原因之一是大家的Linux环境不同,这包括发行版、解释器、插件、运行库、配置、版本级别等等太多太多的细节。因此,一个成功的部署案例,往往很难移植到别的环境下,总是要填许多坑。那么,别人的案例就没有参考价值了么?当然不是,部署的过程其实就是参考很多的成功案例,摸索出自己适用的方式!这过程中需要什么?熟练的Linux技能是最基本的!一些部署的经验和灵活的思维也是要有的。不惧怕满屏的英文错误信息,能从中抓住问题的耐心更是要有的。
- 鉴于以上原因,我在这一节并没有介绍得太详细,因为多说多错。但肯定是一个成功的案例,不能说你按照我的方案没有部署成功,那么我这个就是错误的,这有失偏颇。那么有没有比较好的大家都能用起来的部署方案呢?Docker了解一下!
- Python3 + ubuntu 16.04 + Nginx + uWSGI + Django 1.11
- 一、安装Nginx
- 二、安装uWSGI
- 三、配置uwsgi
- 四、配置Nginx
- 五、启动服务
阅读: 25072 评论:17
补充说明:关于项目部署,历来是开发和运维人员的痛点。造成部署困难的主要原因之一是大家的Linux环境不同,这包括发行版、解释器、插件、运行库、配置、版本级别等等太多太多的细节。因此,一个成功的部署案例,往往很难移植到别的环境下,总是要填许多坑。那么,别人的案例就没有参考价值了么?当然不是,部署的过程其实就是参考很多的成功案例,摸索出自己适用的方式!这过程中需要什么?熟练的Linux技能是最基本的!一些部署的经验和灵活的思维也是要有的。不惧怕满屏的英文错误信息,能从中抓住问题的耐心更是要有的。
鉴于以上原因,我在这一节并没有介绍得太详细,因为多说多错。但肯定是一个成功的案例,不能说你按照我的方案没有部署成功,那么我这个就是错误的,这有失偏颇。那么有没有比较好的大家都能用起来的部署方案呢?Docker了解一下!
本节将介绍如何部署Django,基于下面的架构:
Python3 + ubuntu 16.04 + Nginx + uWSGI + Django 1.11
首先,你得有一台ubuntu机器,真实物理机和虚拟机都行,如果是阿里云ECS主机并且带有独立公网IP,那是最好不过。
我这里和大家一样,什么都没有,只有虚拟机,囧。
至于如何安装ubutun、Python3和Django 1.11,不是本节的内容,请自行解决。下面我假定你已将安装好了这三者。
一、安装Nginx
我不太推荐Apache2,偏爱Nginx。
Ubuntu默认源里面的Nginx版本比较旧,需要先添加一个Nginx的源,再通过apt-get安装Nginx。
sudo add-apt-repository ppa:nginx/stableapt-get updateapt-get install nginx
一般这个都没问题,nginx是居家必备软件,各家Linux下都可以顺利安装。
使用service --status-all命令查看一下,安装好后,服务应该会自动启动:
......[ + ] network-manager[ + ] networking[ + ] nginx[ + ] ondemand[ - ] plymouth[ - ] plymouth-log......
如果能看到带+号的nginx,表明一切ok!
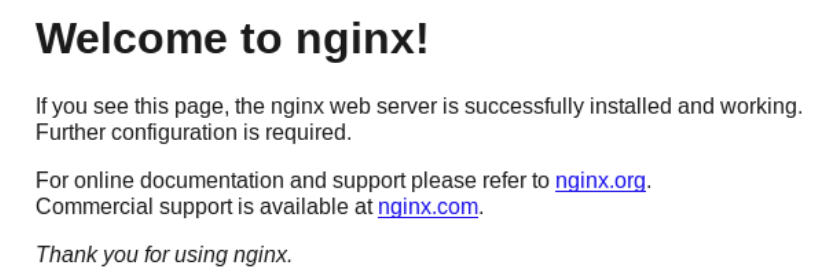
然后,通过ifconfig,查看一下你的ubuntu虚拟机的ip地址,我这里是192.168.1.121。使用同一局域网内的主机,通过浏览器访问192.168.1.121,如果能看到下面的界面,说明nginx服务正常。
二、安装uWSGI
Django的主要部署平台就是WSGI,它也是Python的标准web服务器和应用。
uWSGI是实现了WSGI的工具,我们需要下载和安装它。
uWSGI的官网地址:https://uwsgi-docs.readthedocs.io/en/latest/index.html
根据血和泪的经验教训,请确保安装的是最新版本的uwsgi,否则可能出现各种坑。
所以不建议使用:pip3 install uwsgi(不一定是最新版)
不建议使用:pip install https://projects.unbit.it/downloads/uwsgi-lts.tar.gz(也不一定是最新版)
而是建议到https://uwsgi-docs.readthedocs.io/en/latest/Download.html页面,下载Stable/LTS版本的源文件。
为什么要最新版?因为现在的官方教程和相关技术文章全是以新版编写的,很多参数名,用法有较大改变。用旧版,你可能连跑都跑不起来。
我这里下载的是uwsgi-2.0.14.tar.gz,可能等到你看到此文时,已经不是最新的了。
在ubuntu中,解压源码,然后指定安装位置,将uwsgi安装好:
# 解压文件tar -zxvf uwsgi# 进入解压目录sudo python3 setup.py install
安装完毕后,尝试运行一下uwsgi:
[feixue@feixue-VirtualBox: ~/soft]$ uwsgi*** Starting uWSGI 2.0.14 (64bit) on [Wed Dec 20 22:41:46 2017] ***compiled with version: 5.4.0 20160609 on 20 December 2016 12:48:11os: Linux-4.4.0-101-generic #124-Ubuntu SMP Fri Nov 10 18:29:59 UTC 2017nodename: feixue-VirtualBoxmachine: x86_64clock source: unixdetected number of CPU cores: 2current working directory: /home/feixue/softdetected binary path: /usr/local/bin/uwsgi!!! no internal routing support, rebuild with pcre support !!!*** WARNING: you are running uWSGI without its master process manager ***your processes number limit is 15648your memory page size is 4096 bytesdetected max file descriptor number: 1024lock engine: pthread robust mutexesthunder lock: disabled (you can enable it with --thunder-lock)The -s/--socket option is missing and stdin is not a socket.
虽然运行出错了,但至少表明你的uwsgi在系统可执行命令路径中。
如果出现找不到命令的提示,那么建议创建一个指向/usr/local/bin目录的软链接。这些都是Linux管理员的业务领域,不展开介绍了。
需要提醒大家注意的是权限的问题,该sudo的时候要sudo。还有读写权限,看看当前用户是否具备相关文件的读写能力。很多时候部署失败,都不是Python和Django层面的原因,而是你的Linux管理业务还不够熟练。
三、配置uwsgi
软件安装好了后,首先是要拷贝项目代码。
因为我这里是在Windows下使用Pycharm编写的代码,不是在ubuntu虚拟机内编写的代码,所以需要将项目文件先整体拷贝到虚拟机中。
这个过程,也是八仙过海,各有奇招,好了,项目文件拷贝过去了。
在项目的根目录下,也就是有manage.py的目录下,新建一个uwsgi.ini文件。文件名可以随便,但后缀必须是ini。
在里面写入下面的配置内容:
[uwsgi]chdir = /home/feixue/python/www/for_test //项目根目录module = for_test.wsgi:application //指定wsgi模块socket = 127.0.0.1:8000 //对本机8000端口提供服务master = true //主进程#vhost = true //多站模式#no-site = true //多站模式时不设置入口模块和文件#workers = 2 //子进程数#reload-mercy = 10#vacuum = true //退出、重启时清理文件#max-requests = 1000#limit-as = 512#buffer-size = 30000#pidfile = /var/run/uwsgi9090.pid //pid文件,用于下脚本启动、停止该进程daemonize = /home/feixue/python/www/for_test/run.log // 日志文件disable-logging = true //不记录正常信息,只记录错误信息
详细说明:
- 配置项中以‘#’开头的都是被注释的项目,不起作用;
- 以双斜杠开头,表示注释;
- chdir是你的项目根目录。我这里的项目名叫for_test;
- moudule是你的入口wsgi模块,将for_test替换成你的项目名称;
- socket是通信端口设置,和我一样就行;
- master=True表示以主进程模式运行;
- demonize是你的日志文件,会自动建立
- disable-logging = true 表示不记录正常信息,只记录错误信息。否则你的日志可能很快就爆满了。
四、配置Nginx
uwsgi设置好了,就配置一下Nginx。
备份/etc/nginx/sites-available文件夹内的default文件,然后编辑它:
### You should look at the following URL's in order to grasp a solid understanding# of Nginx configuration files in order to fully unleash the power of Nginx.# http://wiki.nginx.org/Pitfalls# http://wiki.nginx.org/QuickStart# http://wiki.nginx.org/Configuration## Generally, you will want to move this file somewhere, and start with a clean# file but keep this around for reference. Or just disable in sites-enabled.## Please see /usr/share/doc/nginx-doc/examples/ for more detailed examples.### Default server configuration#server {listen 80;listen [::]:80;# SSL configuration## listen 443 ssl default_server;# listen [::]:443 ssl default_server;## Note: You should disable gzip for SSL traffic.# See: https://bugs.debian.org/773332## Read up on ssl_ciphers to ensure a secure configuration.# See: https://bugs.debian.org/765782## Self signed certs generated by the ssl-cert package# Don't use them in a production server!## include snippets/snakeoil.conf;# root /var/www/html;# Add index.php to the list if you are using PHP# index index.html index.htm index.nginx-debian.html;server_name 192.168.1.121;location / {# First attempt to serve request as file, then# as directory, then fall back to displaying a 404.# try_files $uri $uri/ =404;include uwsgi_params;uwsgi_pass 127.0.0.1:8000;}location /static {alias /home/feixue/python/www/for_test/static;}# pass the PHP scripts to FastCGI server listening on 127.0.0.1:9000##location ~ \.php$ {# include snippets/fastcgi-php.conf;## # With php7.0-cgi alone:# fastcgi_pass 127.0.0.1:9000;# # With php7.0-fpm:# fastcgi_pass unix:/run/php/php7.0-fpm.sock;#}# deny access to .htaccess files, if Apache's document root# concurs with nginx's one##location ~ /\.ht {# deny all;#}}# Virtual Host configuration for example.com## You can move that to a different file under sites-available/ and symlink that# to sites-enabled/ to enable it.##server {# listen 80;# listen [::]:80;## server_name example.com;## root /var/www/example.com;# index index.html;## location / {# try_files $uri $uri/ =404;# }#}
关键是这一部分:
server_name 192.168.1.121;location / {# First attempt to serve request as file, then# as directory, then fall back to displaying a 404.# try_files $uri $uri/ =404;include uwsgi_params;uwsgi_pass 127.0.0.1:8000;}location /static {alias /home/feixue/python/www/for_test/static;}
请将server_name改成你的实际名称,location /static的alias改成你的实际情况,其它部分保持不变,尤其是include一定要一样。
修改完毕,保存退出,然后重启nginx服务:
sudo service nginx restart
五、启动服务
下面我们可以尝试启动服务了! 进入项目的根目录,也就是有uwsgi.ini文件的地方,运行:
sudo uwsgi uwsgi.ini
系统提示:
[uWSGI] getting INI configuration from uwsgi.ini
到主机浏览器中访问‘192.168.1.121’,却看见下面的错误提示页面:
DisallowedHost at /Invalid HTTP_HOST header: '192.168.1.121'. You may need to add '192.168.1.121' to ALLOWED_HOSTS.Request Method: GETRequest URL: http://192.168.1.121/Django Version: 1.11.3Exception Type: DisallowedHostException Value:Invalid HTTP_HOST header: '192.168.1.121'. You may need to add '192.168.1.121' to ALLOWED_HOSTS.Exception Location: /usr/local/lib/python3.5/dist-packages/django/http/request.py in get_host, line 113Python Executable: /usr/local/bin/uwsgiPython Version: 3.5.2......
不要被它们吓到!很多人都不愿意仔细看错误信息,其实解决办法,人家已经提示得非常清楚了,需要在ALLOWED_HOSTS配置项目中添加’192.168.1.121’。
进入相应目录,编辑settings.py文件:
DEBUG = FalseALLOWED_HOSTS = ['192.168.1.121']
同时将DEBUG设置为False。
在ubuntu中,运行下面的命令:
sudo killall -9 uwsgi
这会删除先前的uwsgi进程。 过几秒,一定要过几秒,数5下,然后:
sudo uwsgi uwsgi.ini
为什么要过几秒?因为端口释放有延迟啦。
再次在浏览器中访问192.168.1.121,看到如下的欢迎信息:
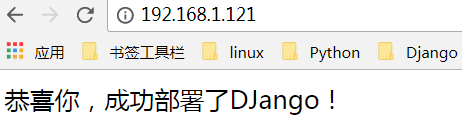
上面的信息是因为我配置了一条url和一个简单的视图:
# 根urls.pyfrom django.conf.urls import urlfrom django.contrib import adminfrom app1 import viewsurlpatterns = [url(r'^admin/', admin.site.urls),url(r'^$', views.index),]# app1/views.pyfrom django.shortcuts import HttpResponsedef index(request):return HttpResponse("恭喜你,成功部署了DJango!")
到此一个基本的Django项目就部署好了。但这还没有结束,还有静态文件配置、密钥文件处理、服务自启动等等,以后再介绍吧。

若有收获,就点个赞吧
0 人点赞
