01_Spring概述
 Spring是什么?
 Spring是分层的 Java SE/EE应用轻量级开源框架,以 IoC(Inverse Of Control:反转控制)和 AOP(Aspect Oriented Programming:面向切面编程)为内核。
提供了视图层SpringMVC和持久层Spring JDBCTemplate以及业务层事务管理等众多的企业级应用技术,还能整合开源世界众多著名的第三方框架和类库,逐渐成为使用最多的
JavaEE企业应用开源框架 Spring的发展历程
 创始人:Rod Johnson
https://spring.io/Spring的优势
方便解耦,简化开发
 AOP 编程的支持
 声明式事务的支持
方便程序的测试Spring的体系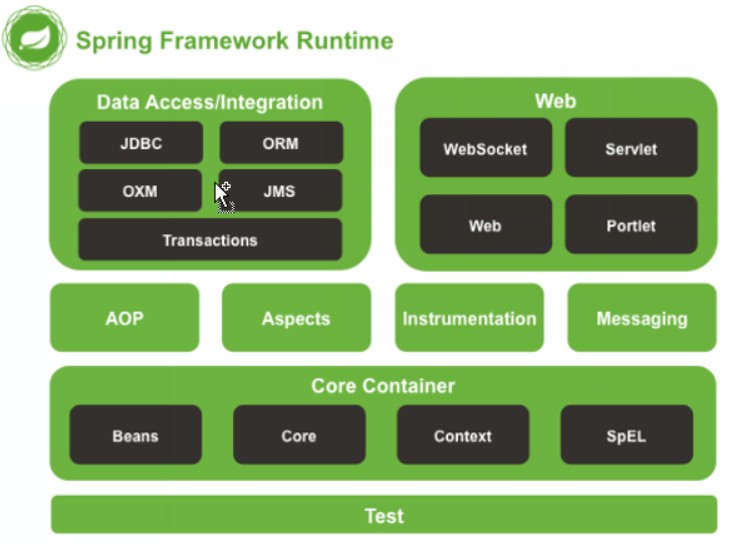
02_Spring资源包说明
下载地址:http://maven.springframework.org/release/org/springframework/spring/说明:通过Maven部署资源从仓库获取(后期课程)
资源文件
//spring依赖包spring‐framework‐5.1.8.RELEASE‐dist//spring文档spring‐framework‐5.1.8.RELEASE‐docs//spring约束文件spring‐framework‐5.1.8.RELEASE‐schema
C.核心jar(4个),日志包(1个)
spring‐beans‐5.1.8.RELEASE.jarspring‐context‐5.1.8.RELEASE.jarspring‐core‐5.1.8.RELEASE.jarspring‐expression‐5.1.8.RELEASE.jarspring‐jcl‐5.1.8.RELEASE.jar
03_Spring入门案例
导入jar包(4个) 在classpath目录下创建核心配置文件(spring.xml)
<?xml version="1.0" encoding="UTF‐8" ?><beans xmlns="http://www.springframework.org/schema/beans"xmlns:xsi="http://www.w3.org/2001/XMLSchema‐instance"xsi:schemaLocation="http://www.springframework.org/schema/beanshttp://www.springframework.org/schema/beans/spring‐beans.xsd "></beans>
将应用程序需要使用的资源配置成Spring的Bean实例
<!‐‐ 所有资源以Bean的形式存在 ‐‐><!‐‐ bean:声明一个资源Bean ‐‐><!‐‐ bean:id:用于区分bean的标识 ‐‐><!‐‐ bean:class:bean对应的模型类名 ‐‐><bean id="user" class="cn.qzw.bean.User"></bean>
测试
ApplicationContext ctx = new ClassPathXmlApplicationContext("spring.xml");Object user = ctx.getBean("user");
04_使用 spring 的 IOC 解决程序耦合
控制反转IoC(Inversion of Control) 控制:控制的双方是什么?谁控制谁? 主控方:Spring
被控方:应用程序所使用的资源(原始)应用程序直接控制需要的外部资源(Spring)Spring控制所需要的外部资源反转:什么是反转?反转什么? 正向:应用程序直接调用资源反向:应用程序依赖Spring为其提供资源反转的是资源的控制权应用程序由主动调用资源,变为被动的等待Spring提供资源有什么好处?
正向缺点:应用程序控制的资源分布在程序的每一个地方反向的优点:所有的资源都在Spring中,便于管理,降低了耦合度。总结:
Spring反向控制应用程序所需要使用的外部资源。资源受Spring管理,利用率最大化。
05_ApplicationContext的三个实现类
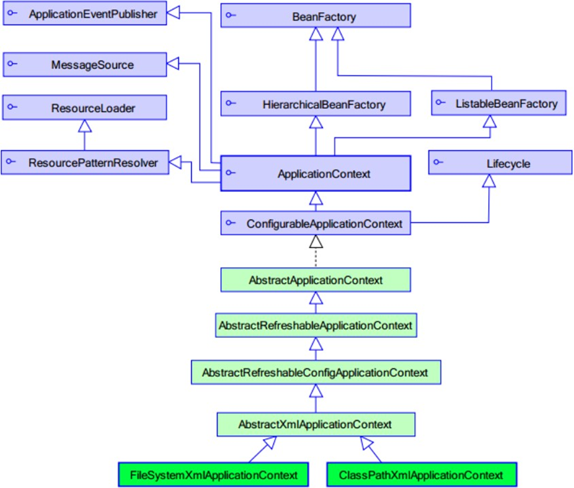 查看继承关系
ClassPathXmlApplicationContext源码下,右键->Diagrams->show diagrams 选中ApplicationContext-> show implementations ApplicationContext 接口的实现类
 ClassPathXmlApplicationContext:
它是从类的根路径下加载配置文件 推荐使用这种
FileSystemXmlApplicationContext:
它是从磁盘路径上加载配置文件,配置文件可以在磁盘的任意位置。
AnnotationConfigApplicationContext:
当我们使用注解配置容器对象时,需要使用此类来创建 spring 容器。它用来读取注解。代码测试ClassPathXmlApplicationContext源码下
ClassPathXmlApplicationContext application = new ClassPathXmlApplicationContext("applicationContext.xml")
FileSystemXmlApplicationContext
FileSystemXmlApplicationContext application = new FileSystemXmlApplicationContext("A:\\workspace\\idea\\spring\\src\\applicationCo ntext.xml");
06_BeanFactory和ApplicationContext的区别
BeanFactory 才是Spring容器中的顶层接口。ApplicationContext 是它的子接口。BeanFactory 和 ApplicationContext 的区别:
ApplicationContext:只要一读取配置文件,默认情况下就会创建对象。
BeanFactory:什么使用什么时候创建对象。代码测试
BeanFactory application = new XmlBeanFactory(new ClassPathResource("applicationContext.xml"));IUserService userService = (IUserService) application.getBean("userService");
07_Spring创建对象
 A.Spring创建对象的三种方式构造器初始化【重点】:
Bean对应的类必须提供一个无参构造方法
静态工厂初始化【了解】
提供一个工厂类,使用其中的静态方法获取对象
public class Bean01Factory {public static Bean01 getBean() {return new Bean01();}}
<bean id="bean01" factory‐method="getBean" class="com.qzw.util.Bean01Factory"></bean>
实例工厂初始化【了解】
提供一个工厂类,使用其中的普通方法获取对象
public class Bean02Factory {public Bean01 getBean() {return new Bean01();}}
<bean id="bean01" factory‐method="getBean" factory‐bean="factory"></bean><bean id="factory" class="com.qzw.util.Bean02Factory"></bean>
08_Bean的作用域及生命周期
| 取值范围 | 说明 |
|---|---|
| singleton | 默认值,单例的 |
| prototype | 多例的 |
| request | WEB项目中,Spring创建一个Bean的对象,将对象存入到reques t域中 |
| session | WEB项目中,Spring创建一个Bean的对象,将对象存入到session 域中 |
| global sessio n | WEB项目中,在Portlet环境,如果没有Portlet环境,相当于sessio n |
更改作用域的方法
//scope属性:singleton:单例 ;prototype:非单例<bean id=”beanId” class=”BeanClassName” scope=”prototype”></bean>
09_Bean的生命周期
单例对象: scope=”singleton”
一个应用只有一个对象的实例。它的作用范围就是整个引用。
生命周期:
对象出生:当应用加载,创建容器时,对象就被创建了。
对象活着:只要容器在,对象一直活着。对象死亡:当应用卸载,销毁容器时,对象就被销毁了。多例对象: scope=”prototype”
每次访问对象时,都会重新创建对象实例。
生命周期:
对象出生:当使用对象时,创建新的对象实例。
对象活着:只要对象在使用中,就一直活着。
对象死亡:当对象长时间不用时,被 java 的垃圾回收器回收了。<br />监听<br />init-method:<br /> 初始化回调方法名,配置的方法必须由bean对象提供<br />destroy-method:<br /> 销毁回调方法名,配置的方法必须由bean对象提供
<bean id="user" class="cn.qzw.bean.User" init‐method="init" destroy‐method="destroy" scope="singleton"></bean>
10_依赖注入DI
依赖注入: Dependency Injection。
它是 Spring 框架核心 IOC 的具体实现。
在编写程序时,通过控制反转,把对象的创建交给了Spring,但是代码中不可能出现没有依赖的情况
IOC 解耦只是降低他们的依赖关系,但不会消除。例如:业务层仍会调用持久层的方法,那这种业务层和持久层的依赖关系,在使用Spring之后,就让Spring来维护了。简单的说,就是框架把持久层对象传入业务层,而不用我们自己去获取。依赖注入的数据类型
基本数据类型和String
javaBean类型复杂类型/集合类型依赖注入的方式
使用构造函数注入
使用set方法注入
使用注解
11_构造器注入
顾名思义,就是使用类中的构造函数,给成员变量(简单类型、javaBean)赋值。注意,赋值的操作不是我们自己做的,而是通过配置的方式,让spring框架来为我们注入。具体步骤如下:a.提供对应的构造方法b.配置构造方法的参数需求1:给简单类型注入值javaBean类
public class User {private int id;private String password;public User() {};public User(int id, String username, String password) {this.id = id;this.username = username;this.password = password;}}
spring.xml配置文件
<bean id="user1" class="com.qfedu.bean.User"><constructor‐arg name="id" value="1"></constructor‐arg><constructor‐arg name="username" value="root"></constructor‐arg><constructor‐arg name="password" value="root"></constructor‐arg></bean>
测试代码
ClassPathXmlApplicationContext applicationContext = new ClassPathXmlApplicationContext("spring.xml");User user = (User) applicationContext.getBean("user1");System.out.println(user);
需求2:给javaBean注入值
javaBean类
//用户类public class User {private int id;private String username;private String password;private Order order;public User() {}public User(int id, String username, String password, Order order) {this.id = id;this.username = username;this.password = password;this.order = order;}}//订单类public class Order {private int id;private String name;public Order() {}public Order(int id, String name) {this.id = id;this.name = name;}}
spring.xml配置文件
<bean id="user1" class="com.qfedu.bean.User"><constructor‐arg name="id" value="1"></constructor‐arg><constructor‐arg name="username" value="root"></constructor‐arg><constructor‐arg name="password" value="root"></constructor‐arg><constructor‐arg name="order" ref="order"></constructor‐arg></bean><bean id="order" class="com.qfedu.bean.Order"><constructor‐arg name="id" value="123"></constructor‐arg><constructor‐arg name="name" value="订单一"></constructor‐arg></bean>
测试代码
ClassPathXmlApplicationContext applicationContext = new ClassPathXmlApplicationContext("spring.xml");User user = (User) applicationContext.getBean("user1");System.out.println(user);
12_set方法注入
顾名思义,就是在类中提供需要注入成员的set方法给成员变量(简单类型、javaBean)赋值。注意,赋值的操作不是我们自己做的,而是通过配置的方式,让spring框架来为我们注入。具体步骤如下:
提供对应的set方法配置set方法的参数需求1:
给简单类型注入值
javaBean类
public class User {private int id;private String username;private String password;//无参/有参构造方法public void setId(int id) {this.id = id;}public void setUsername(String username) {this.username = username;}public void setPassword(String password) {this.password = password;}//toString方法}
spring.xml配置文件
<bean id="user1" class="com.qfedu.bean.User"><property name="id" value="1"></property><property name="username" value="root"></property><property name="password" value="root"></property></bean>
测试代码
ClassPathXmlApplicationContext applicationContext = new ClassPathXmlApplicationContext("spring.xml");User user = (User) applicationContext.getBean("user1");System.out.println(user);
需求2:给javaBean注入值
javaBean类
public class User {private int id;private String username;private String password;private Order order;//无参有参构造方法public int getId() {return id;}public void setId(int id) {this.id = id;}public String getUsername() {return username;}public void setUsername(String username) {this.username = username;}public String getPassword() {return password;}public void setPassword(String password) {this.password = password;}//toString方法}
spring.xml配置文件
<bean id="user1" class="com.qfedu.bean.User"><property name="id" value="1"></property><property name="username" value="root"></property><property name="password" value="root"></property><property name="order" ref="order"></property></bean><bean id="order" class="com.qfedu.bean.Order"><property name="id" value="123"></property><property name="name" value="订单一"></property></bean>
测试代码
ClassPathXmlApplicationContext applicationContext = new ClassPathXmlApplicationContext("spring.xml");User user = (User) applicationContext.getBean("user1");System.out.println(user);
13_集合注入
顾名思义,就是给类中的集合成员传值,它用的也是set方法注入的方式,只不过变量的数据类型都是集合。我们这里介绍注入数组, List,Set,Map。代码实现
public class Bean01 {private String[] myStrs;private List < String > myList;private Set < String > mySet;private Map < String,String > myMap;private Properties myProps;//Setter方法}
<bean id="bean01" class="com.qzw.bean.Bean01"><property name="myStrs" ><array><value>aaa</value><value>bbb</value></array></property><property name="myList"><list><value>aaa</value><value>bbb</value></list></property><property name="mySet"><list><value>aaa</value><value>bbb</value></list></property><property name="myMap"><map><entry key="key1" value="value1" ></entry></map></property></bean>
14_团队开发
团队开发时,每个独立的模块制作成一个独立的配置文件同一个工程中,仅配置一个主配置文件applicationContext.xml,其中添加公用信息对应的
Bean,每个开发人员根据自己的模块需求,制作独立的配置文件
spring01.xmlspring02.xmlspring03.xml
多配置文件加载格式一(掌握):
在主配置文件(spring.xml)中导入子配置文件
<import resource="spring01.xml"/><import resource="spring02.xml"/><import resource="spring03.xml"/>
加载ApplicatioContext对象时需要加载主配置文件即可
ApplicationContext ctx = new ClassPathXmlApplicationContext("spring.xml");
格式二:
一次性加载多个配置文件(可变参数对象格式)
ApplicationContext ctx = new ClassPathXmlApplicationContext("spring01.xml","spring02.xml","spring03.xml");
格式三:
一次性加载多个配置文件(数组对象格式)
ApplicationContext ctx = new ClassPathXmlApplicationContext(new String[]{"spring01.xml","spring02.xml","spring03.xml"});
注意事项
配置冲突问题,后生效的配置覆盖之前的配置!!!

若有收获,就点个赞吧
0 人点赞
