1、简介
MyCAT是一款由阿里Cobar演变而来的用于支持数据库,读写分离、分表分库的分布式中间件。MyCAT支持Oracle、MSSQL、MYSQL、PG、DB2关系型数据库,同时也支持MongoDB等非关系型数据库。
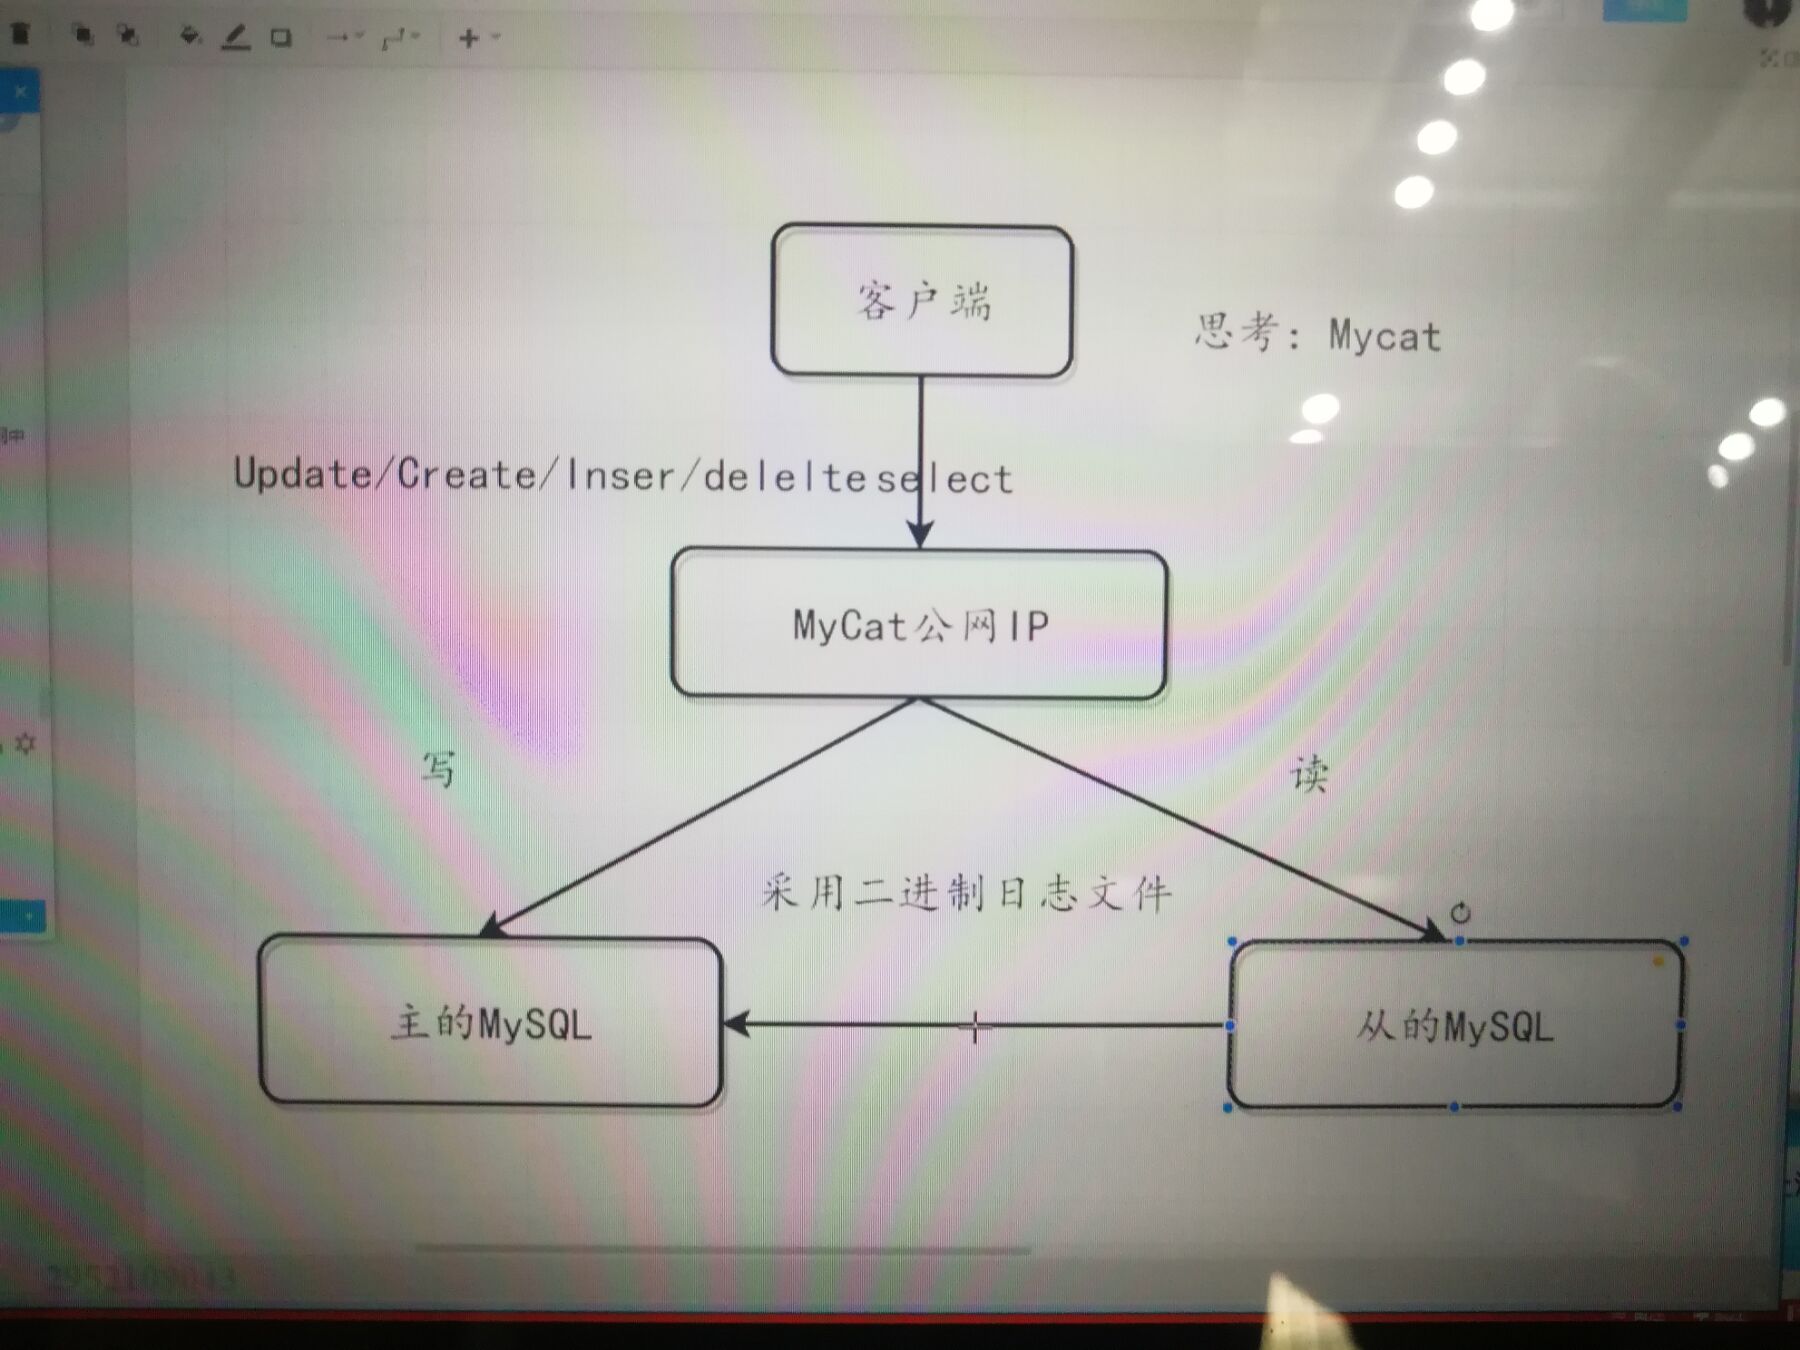
2、原理
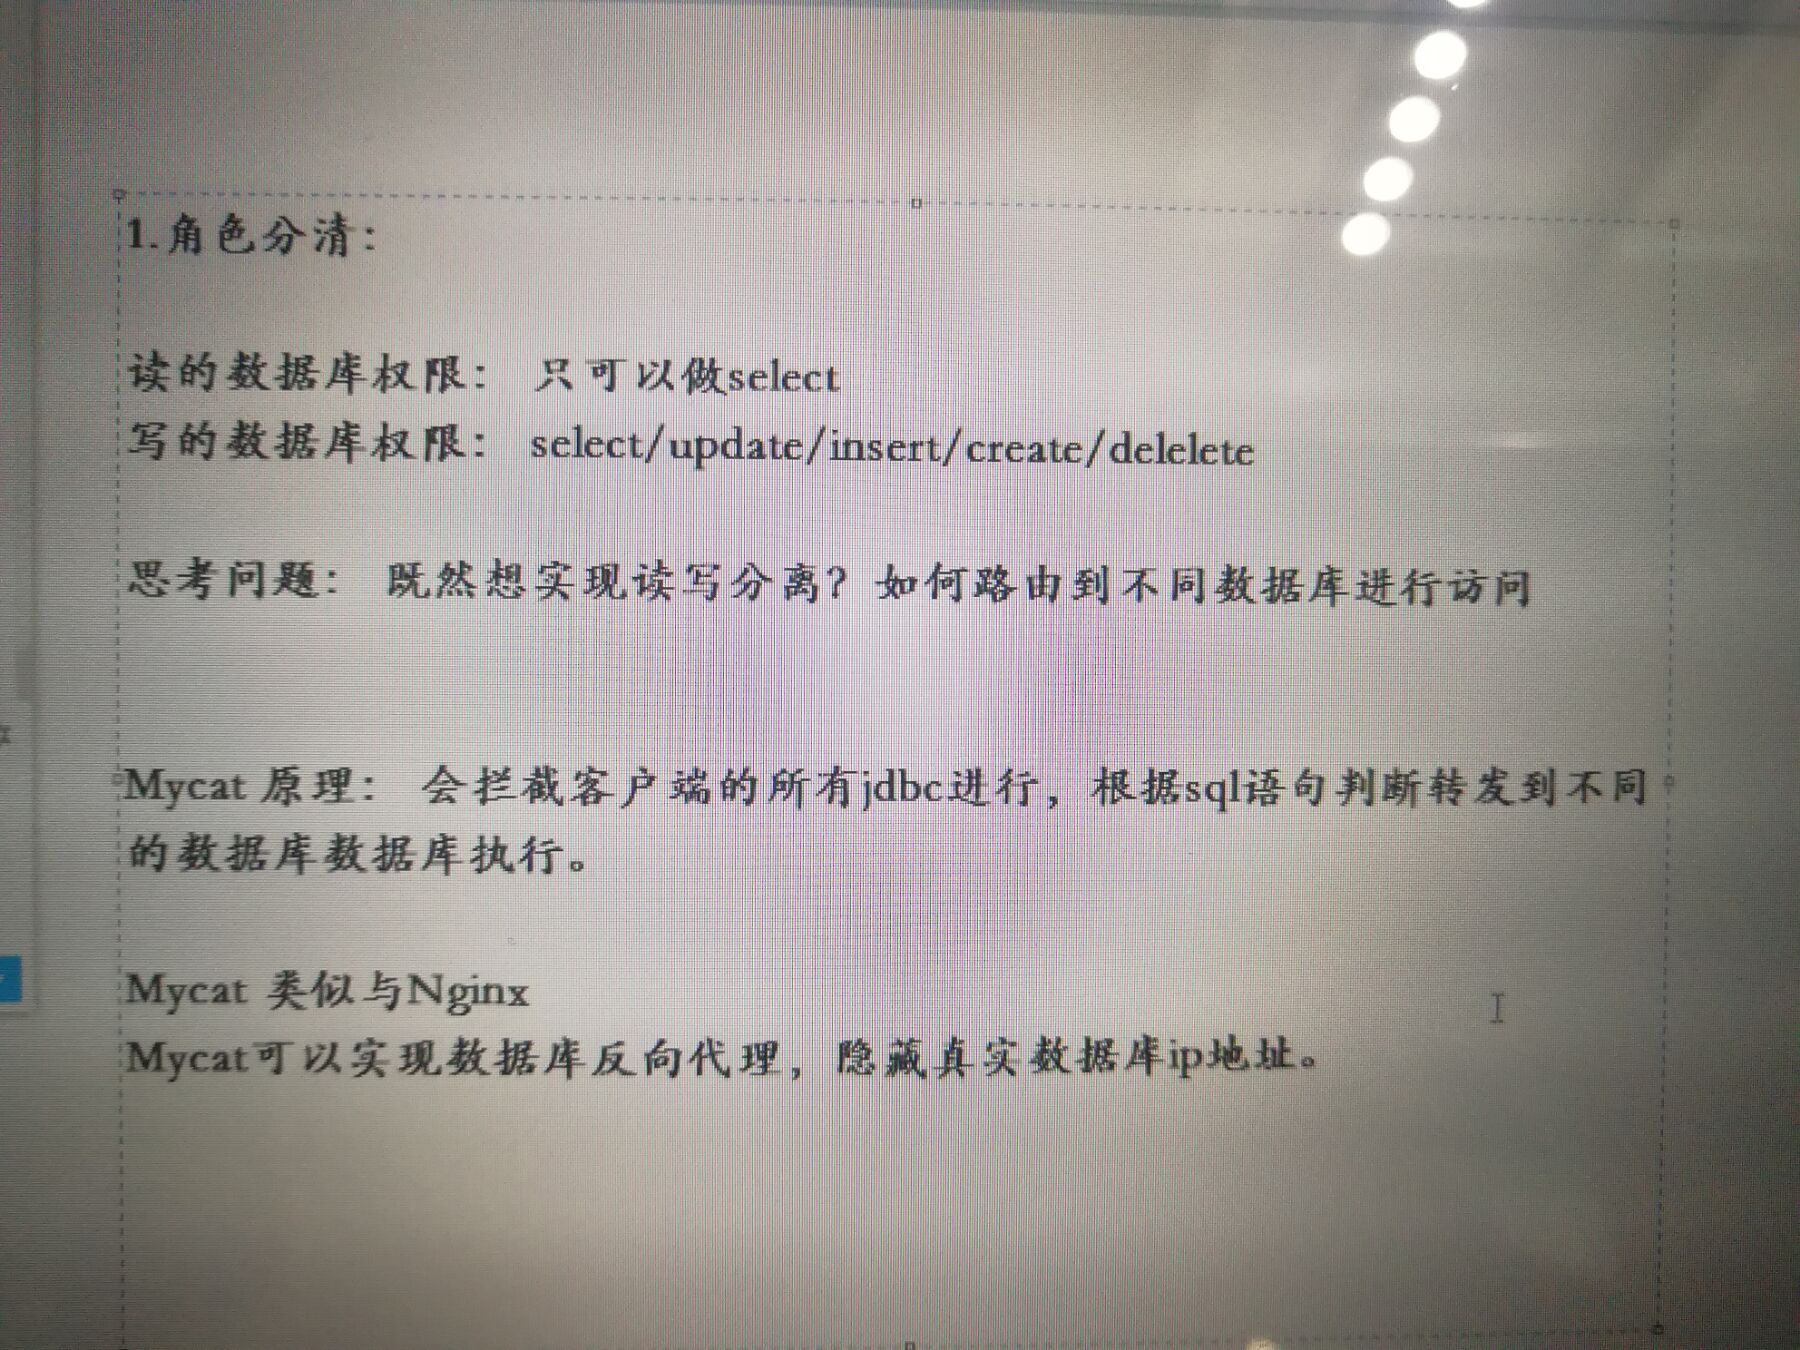
MyCAT原理MyCAT主要是通过对SQL的拦截,然后经过一定规则的分片解析、路由分析、读写分离分析、缓存分析等,然后将SQL发给后端真实的数据块,并将返回的结果做适当处理返回给客户端。
**
3、如何配置

<?xml version="1.0"?><!DOCTYPE mycat:schema SYSTEM "schema.dtd"><mycat:schema xmlns:mycat="http://io.mycat/"><!-- TESTDB1 是mycat的逻辑库名称,链接需要用的 --><schema name="mycat_testdb" checkSQLschema="false" sqlMaxLimit="100" dataNode="dn1"></schema><!-- database 是MySQL数据库的库名 --><dataNode name="dn1" dataHost="localhost1" database="test" /><!--dataNode节点中各属性说明:name:指定逻辑数据节点名称;dataHost:指定逻辑数据节点物理主机节点名称;database:指定物理主机节点上。如果一个节点上有多个库,可使用表达式db$0-99, 表示指定0-99这100个数据库;dataHost 节点中各属性说明:name:物理主机节点名称;maxCon:指定物理主机服务最大支持1000个连接;minCon:指定物理主机服务最小保持10个连接;writeType:指定写入类型;0,只在writeHost节点写入;1,在所有节点都写入。慎重开启,多节点写入顺序为默认写入根据配置顺序,第一个挂掉切换另一个;dbType:指定数据库类型;dbDriver:指定数据库驱动;balance:指定物理主机服务的负载模式。0,不开启读写分离机制;1,全部的readHost与stand by writeHost参与select语句的负载均衡,简单的说,当双主双从模式(M1->S1,M2->S2,并且M1与 M2互为主备),正常情况下,M2,S1,S2都参与select语句的负载均衡;2,所有的readHost与writeHost都参与select语句的负载均衡,也就是说,当系统的写操作压力不大的情况下,所有主机都可以承担负载均衡;--><dataHost name="localhost1" maxCon="1000" minCon="10" balance="3" writeType="0" dbType="mysql" dbDriver="native" switchType="1" slaveThreshold="100"><heartbeat>select user()</heartbeat><!-- 可以配置多个主从 --><writeHost host="hostM1" url="192.168.212.202:3306" user="root" password="root"><!-- 可以配置多个从库 --><readHost host="hostS2" url="192.168.212.203:3306" user="root" password="root" /></writeHost></dataHost></mycat:schema>
<?xml version="1.0" encoding="UTF-8"?><!-- - - Licensed under the Apache License, Version 2.0 (the "License");- you may not use this file except in compliance with the License. - Youmay obtain a copy of the License at - - http://www.apache.org/licenses/LICENSE-2.0- - Unless required by applicable law or agreed to in writing, software -distributed under the License is distributed on an "AS IS" BASIS, - WITHOUTWARRANTIES OR CONDITIONS OF ANY KIND, either express or implied. - See theLicense for the specific language governing permissions and - limitationsunder the License. --><!DOCTYPE mycat:server SYSTEM "server.dtd"><mycat:server xmlns:mycat="http://io.mycat/"><!-- 读写都可用的用户 --><user name="root" defaultAccount="true"><property name="password">123456</property><property name="schemas">mycat_testdb</property></user><!-- 只读用户 --><user name="user"><property name="password">user</property><property name="schemas">mycat_testdb</property><property name="readOnly">true</property></user></mycat:server>

3、SpringBoot整合Mycat实现动态数据源


spring:datasource:###可读数据源select:jdbc-url: jdbc:mysql://192.168.212.205:8066/mycat_testdbdriver-class-name: com.mysql.jdbc.Driverusername: userpassword: user####可写数据源update:jdbc-url: jdbc:mysql://192.168.212.205:8066/mycat_testdbdriver-class-name: com.mysql.jdbc.Driverusername: rootpassword: 123456type: com.alibaba.druid.pool.DruidDataSource
@Component@Lazy(false)public class DataSourceContextHolder {// 采用ThreadLocal 保存本地多数据源private static final ThreadLocal<String> contextHolder = new ThreadLocal<>();// 设置数据源类型public static void setDbType(String dbType) {contextHolder.set(dbType);}public static String getDbType() {return contextHolder.get();}public static void clearDbType() {contextHolder.remove();}}
@Configurationpublic class DataSourceConfig {// 创建可读数据源@Bean(name = "selectDataSource")@ConfigurationProperties(prefix = "spring.datasource.select") // application.properteis中对应属性的前缀public DataSource dataSource1() {return DataSourceBuilder.create().build();}// 创建可写数据源@Bean(name = "updateDataSource")@ConfigurationProperties(prefix = "spring.datasource.update") // application.properteis中对应属性的前缀public DataSource dataSource2() {return DataSourceBuilder.create().build();}}
//在Spring 2.0.1中引入了AbstractRoutingDataSource, 该类充当了DataSource的路由中介, 能有在运行时, 根据某种key值来动态切换到真正的DataSource上。@Component@Primarypublic class DynamicDataSource extends AbstractRoutingDataSource {@Autowired@Qualifier("selectDataSource")private DataSource selectDataSource;@Autowired@Qualifier("updateDataSource")private DataSource updateDataSource;/*** 这个是主要的方法,返回的是生效的数据源名称*/@Overrideprotected Object determineCurrentLookupKey() {System.out.println("DataSourceContextHolder:::" + DataSourceContextHolder.getDbType());return DataSourceContextHolder.getDbType();}/*** 配置数据源信息*/@Overridepublic void afterPropertiesSet() {Map<Object, Object> map = new HashMap<>();map.put("selectDataSource", selectDataSource);map.put("updateDataSource", updateDataSource);setTargetDataSources(map);setDefaultTargetDataSource(updateDataSource);super.afterPropertiesSet();}}
// 使用AOP动态切换不同的数据源@Aspect@Component@Lazy(false)@Order(0) // Order设定AOP执行顺序 使之在数据库事务上先执行public class SwitchDataSourceAOP {// 这里切到你的方法目录@Before("execution(* com.mayikt.service.*.*(..))")public void process(JoinPoint joinPoint) {String methodName = joinPoint.getSignature().getName();if (methodName.startsWith("get") || methodName.startsWith("count") || methodName.startsWith("find")|| methodName.startsWith("list") || methodName.startsWith("select") || methodName.startsWith("check")) {DataSourceContextHolder.setDbType("selectDataSource");} else {// 切换dataSourceDataSourceContextHolder.setDbType("updateDataSource");}}}
12-24.pptx初始MyCat实现读写分离与动态数据源切换.zip
schema.xml配置mycat虚拟数据库与真是的数据之间的映射关系,我们项目中配置的是Mycat中虚拟的数据库;
server.xml配置mycat的用户信息,其中可以配置用户是否有写的权限,这样就可以根据在项目中根据需要读写不同的权限不同的方法通过切换数据源来实现;
**

若有收获,就点个赞吧
0 人点赞
