| 更新时间 | 更新内容 |
|---|---|
| 2019-04-30 | IOC原理简要代码实现 |
IoC控制反转
控制(对象的生命周期)反转(对象的控制权给IoC容器)(Inversion of Control),即创建被调用者的实例不是由调用者完成,而是由 Spring 容器完成,并注入调用者。
当应用了 IoC,一个对象依赖的其它对象会通过被动的方式传递进来,而不是这个对象自己创建或者查找依赖对象。即,不是对象从容器中查找依赖,而是容器在对象初始化时不等对象请求就主动将依赖传递给它。
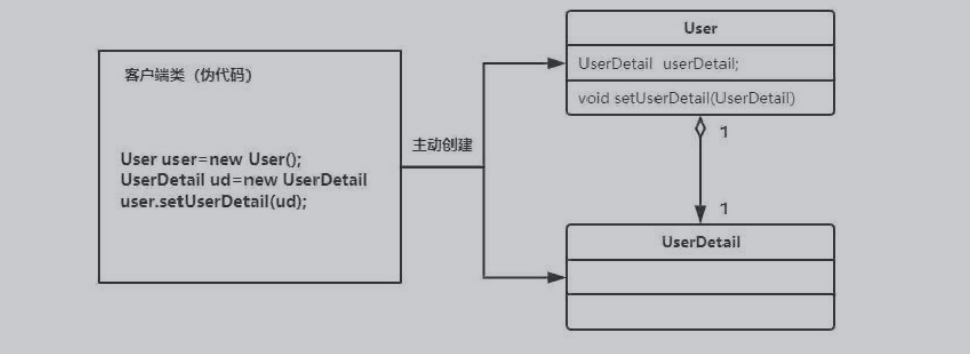
传统意义上创建对象的方式,客户端类如果需要用到User和UserDetail,需要通过new 来构建,这种方式使代码之间的耦合度非常高
IOC原理简要代码实现
当某个Java对象需要调用另外一个Java对象(被调用者被依赖对象),在传统开发模式下,调用者采用new被调用对象的方式创建对象,导致调用者与被调用者耦合度高,后期维护升级维护成本高。
在Spring框架中,被调用对象不再有调用者创建,而是有Spring容器创建。
对象之间的依赖关系由spring使用依赖注入实现
ioc的核心思想在于,资源不由使用资源的双方管理,而由不使用资源的第三方管理。
1.资源的集中管理,实现了资源的可配置和易管理
2降低了使用资源的双方的依赖程度,也是所谓的耦合度。
helloword工程
maven配置
<dependencies><dependency><groupId>org.springframework</groupId><artifactId>spring-context</artifactId><version>5.0.2.RELEASE</version></dependency></dependencies>
创建接口
package com.bx.service;public interface UserService {public void sayHello();}
创建接口实现
package com.bx.service.impl;import com.bx.service.UserService;public class UserServiceImpl implements UserService {public void sayHello() {System.out.println("Hello Spring");}}
创建spring配置文件,在 src/main/resources 目录下创建 spring-context.xml 配置文件,将类的实例化交给 Spring 容器管理(IoC)
<?xml version="1.0" encoding="UTF-8"?><beans xmlns="http://www.springframework.org/schema/beans"xmlns:xsi="http://www.w3.org/2001/XMLSchema-instance"xsi:schemaLocation="http://www.springframework.org/schema/beans http://www.springframework.org/schema/beans/spring-beans.xsd"><bean id="userService" class="com.bx.service.impl.UserServiceImpl"></bean></beans>
<bean/>用于定义一个实例对象。一个实例对应一个Bean 元素。id:该属性是 Bean 实例的唯一标识,通过 id 属性访问 Bean,Bean与Bean间的依赖关系也是通过 id 属性关联的。class:指定该 Bean 所属的类,注意这里只能是类,不能是接口。
测试spring
public static void main(String[] args) {// 获取 Spring 容器ApplicationContext ac = new ClassPathXmlApplicationContext("spring-context.xml");// 从 Spring 容器中获取对象UserService us = (UserService) ac.getBean("userService");us.sayHello();}}
spring的简单容器实现原理
import java.io.InputStream;import java.util.Enumeration;import java.util.HashMap;import java.util.Map;import java.util.Properties;public class BeanFactory {private static Properties properties;private static Map<String,Object> beans;static {try {properties = new Properties();InputStream in = BeanFactory.class.getClassLoader().getResourceAsStream("bean.properties");properties.load(in);beans = new HashMap<String, Object>();Enumeration<Object> keys= properties.keys();while (keys.hasMoreElements()){String key = keys.nextElement().toString();String beanPath = properties.getProperty(key);Object value = Class.forName(beanPath).newInstance();beans.put(key,value);}}catch (Exception e){e.printStackTrace();}}public static Object getBean(String beanName){return beans.get(beanName);}}
ApplicationContext
构建核心容器时,创建对象的采取的策略是采用立即加载的方式,意味着读取配置文件后会通过反射的方式创建配置文件中的bean对象
ClassPathXmlApplicationContext
加载类路径下的配置文件,要求配置文件必须在类路径下,否则无法加载。
new ClassPathXmlApplicationContext("applicationContext.xml");
FileSystemXmlApplicationContext
加载磁盘任意路径下的配置文件 注意需要有文件的访问权限
AnnotationConfigApplicationContext
读取注解创建容器的
Setter 注入
public class User {public class User {private String name;private int age;public String getName() {return name;}public void setName(String name) {this.name = name;}public int getAge() {return age;}public void setAge(int age) {this.age = age;}@Overridepublic String toString() {return "User{" +"name='" + name + '\'' +", age='" + age + '\'' +'}';}}
applicationContext.xml增加user bean
<bean id="user" class="cn.java.bean.User"><property name="name" value="小王"></property><property name="age"><value>20</value></property></bean>
Bean实例化
1 默认构造器实例化
配置id和class属性之后,且没有其他属性和标签是,采用的就是默认的构造函数创建bean对象,注意如果类中没有默认构造函数,对象无法创建。
2 实例工厂方法
public class InstanceFactory {public AccountServiceImpl getAccountService(){return new AccountServiceImpl();}}
<bean id="instanceFactory" class="com.jdbc.factory.InstanceFactory"></bean><bean id="accountService" factory-bean="instanceFactory" factory-method="getAccountService"></bean>
3 静态工厂方法
使用工厂中的静态方法创建对象(使用某个类的中静态方法创建对象,并存入spirng容器)
public class InstanceFactory {public static AccountServiceImpl getAccountService(){return new AccountServiceImpl();}}
<bean id="accountService" class="com.jdbc.factory.InstanceFactory" factory-method="getAccountService"></bean>
构造器注入
User.java增加
public User(String name, int age) {this.name = name;this.age = age;}
applicationContext.xml修改user bean
<bean id="user" class="cn.java.bean.User"><constructor-arg><value>小明</value></constructor-arg><constructor-arg><value>26</value></constructor-arg></bean>
ApplicationContext context = new ClassPathXmlApplicationContext("applicationContext.xml");User user = context.getBean("user", User.class);System.out.println(user);
引用其他bean
创建UserInfo.java
public class UserInfo {private User user;public User getUser() {return user;}public void setUser(User user) {this.user = user;}@Overridepublic String toString() {return "UserInfo{" +"user=" + user +'}';}}
applicationContext.xml修改userInfo bean
<bean id="userInfo" class="cn.java.bean.UserInfo"><property name="user" ref="user"></property></bean>
自动装配
安装名称自动装配
<bean id="userInfo" class="cn.java.bean.UserInfo" autowire="byName"></bean>
安装属性类型自动装配
<bean id="userInfo" class="cn.java.bean.UserInfo" autowire="byType"></bean>
作用范围scope
标签scope指定bean的作用范围,取值参数:
singleton:单例模式,默认是单例模式创建bean 对象
prototype :多例模式
request:作用于web应用的请求范围
session:作用于web应用的回话范围
global-session:作用于集群环境的全局会话范围,如果是在单机实例则等于session
<bean id="userInfo" class="cn.java.bean.UserInfo" ></bean><bean id="userInfo" class="cn.java.bean.UserInfo" scope="singleton"></bean>
生命周期
| 单例对象 | 多例对象 | |
|---|---|---|
| 创建 | 当容器创建时对象创建 | 使用对象时才创建 |
| 销毁 | 容器销毁 | Java的回收机制 |
依赖注入(Dependency Injecttion),
当前类需要使用其他类的对象,由spring 为我们提供,我们只需要在配置文件中说明,依赖关系的维护称作依赖注入。
能注入的类型
1 基本类型和String
2 其他bean类型(在配置文件中或者注解配置的bean)
3 复杂类型/集合类型
XML注入的方式
使用构造函数(Constructor injection)
使用到标签是constructor-arg其中主要的属性
type 用于指定要注入的数据的数据类型,该类型也是构造函数中某个或者某些参数的类型
index 指定注入的数据给构造函数中指定的索引位置的参数赋值,索引的位置从0开始
name 用于指定给构造函数中指定名称的参数赋值
value 用于给基本类型和String类型的数据
ref 用于指定其他的bean类型数据,它指的是spring的IOC核心容器配置中出现过的bean对象
private String name;private String age;private Date birthday;public AccountServiceImpl(String name, String age, Date birthday) {this.name = name;this.age = age;this.birthday = birthday;}
<bean id="accountService" class="com.spring.service.impl.AccountServiceImpl"><constructor-arg name="name" value="test"></constructor-arg><constructor-arg name="age" value="18"></constructor-arg><constructor-arg name="birthday" ref="now"></constructor-arg></bean><bean id="now" class="java.util.Date"></bean>
设置注入(Setter Injection)
property 标签
<bean id="accountServiceSet" class="com.spring.service.impl.AccountServiceImpl"><property name="name" value="test"></property><property name="age" value="20"></property><property name="birthday" ref="now"></property></bean><bean id="now" class="java.util.Date"></bean>
集合类型
list 结构注入标签 array list set
map 结构注入标签 map props
<bean id="accountServiceList"class="com.spring.service.impl.AccountServiceImpl"><property name="myStrs"><array><value>a</value><value>b</value><value>c</value></array></property><property name="myList"><list><value>e</value><value>f</value><value>g</value></list></property><property name="mySet"><set><value>h</value><value>i</value><value>j</value></set></property><property name="myMap"><map><entry key="k1" value="v1"></entry><entry key="k2"><value>v2</value></entry></map></property><property name="myProps"><props><prop key="p1">v1</prop><prop key="p2">v2</prop></props></property></bean>
注解
context:component-scan 需要扫描的包路径
<?xml version="1.0" encoding="UTF-8"?><beans xmlns="http://www.springframework.org/schema/beans"xmlns:xsi="http://www.w3.org/2001/XMLSchema-instance"xmlns:context="http://www.springframework.org/schema/context"xsi:schemaLocation="http://www.springframework.org/schema/beanshttp://www.springframework.org/schema/beans/spring-beans.xsdhttp://www.springframework.org/schema/contexthttp://www.springframework.org/schema/context/spring-context.xsd"><context:component-scan base-package="com.spring"></context:component-scan>
Component
把当前的类对象存入spring 容器中 其中value 用于指定bean的id,当我们不写value时,它的默认值是当前类名,且首字母小写。
Controller
Service
同Component功能更一致,一般用在业务层
@Service("accountService")public class AccountServiceImpl implements IAccountService {public void saveAccount() {System.out.println("业务层数据存储");}}
Repository
同Component功能更一致,一般用在持久层
@Repository("accountDao")public class AccountDaoImpl implements IAccountDao {public void saveAccount() {System.out.println("持久层保存数据");}}
autowired
自动按照类型注入。只要容器中唯一的一个bean对象类型和要注入的变量类型匹配,就可以注入成功。出现位置 可以是变量 也可以是方法上。在使用自动注解是 set方法就不是必须的了。
@Service("accountService")public class AccountServiceImpl implements IAccountService {@Autowiredprivate IAccountDao accountDao;public void saveAccount() {accountDao.saveAccount();}}
Qualifier
在按照类中注入的基础上在按照名称注入。在给类成员注入时不能单独使用,需要和autowired一起使用,但是给方法参数注入时可以。
属性
value 用于指定注入的bean的id
######Resource
作用:直接按照bean的id注入。它可以独立使用
属性
name:用于指定bean的id
@Service("accountService")public class AccountServiceImpl implements IAccountService {@Resource(name = "accountDao")private IAccountDao accountDao;public void saveAccount() {accountDao.saveAccount();}}

