一、项目整合与部署存在的问题
1.1 SSM手动整合存在的问题
- SSM整合步骤多、配置繁琐
- 项目进行服务器部署步骤繁琐
1.2 如何简化这些繁琐的配置和部署步骤?
- SpringBoot就是一个可以简化整合过程中复杂配置的框架
二、SpringBoot简介
2.1 概念
- 随着动态语言的流行,Java语言的开发就显得格外笨重:配置繁琐、开发效率低、项目的部署变得复杂、集成第三方技术难度大。
- 在这种情况下,SpringBoot就应运而生。
- SpringBoot采用了
**习惯优于配置/约定大于配置**的理念快速的搭建项目的开发环境,我们无需或者进行很少的相关spring配置就能够快速的将项目运行起来
2.2 优点
- 能够快速的搭建项目
- 对主流的开发框架都提供了无配置集成(SpringBoot内置了配置)
- 项目可以独立运行、无需单独配置Servlet容器(内置了Tomcat)
- 极大提高了开发、部署效率
- 提供了运行时监控系统(日志等)
- 与云原生有天然的集成
2.3 缺点
- 由于配置都是内置的,报错时定位比较困难
- 版本迭代速度比较快、有些版本改动还是比较大(增加学习成本)
三、第一个SpringBoot应用
体验:基于SpringBoot整合SpringMVC
SpringBoot应用需要依赖远程服务器进行创建
远程服务器:
- Spring官方:https://start.spring.io
- ali:https://start.aliyun.com
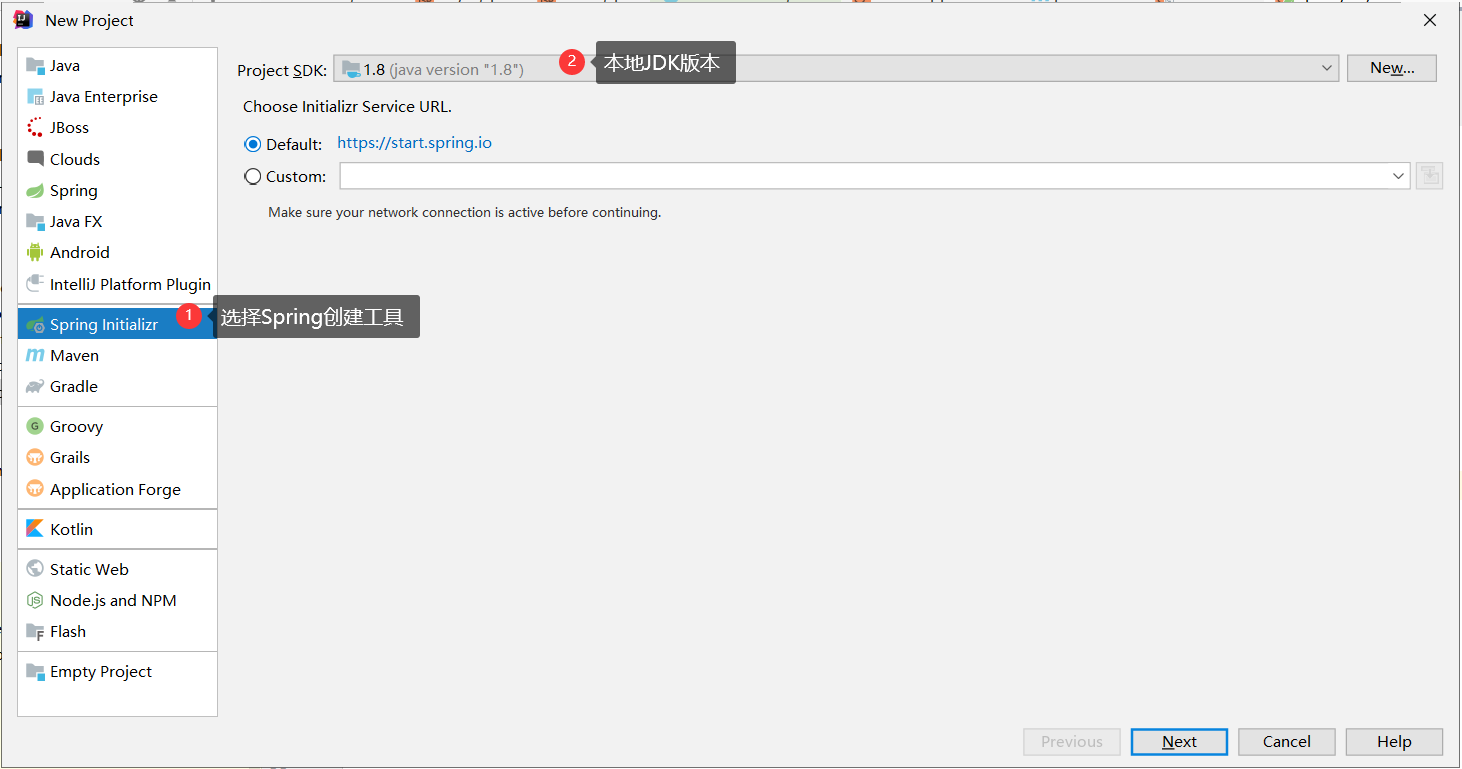
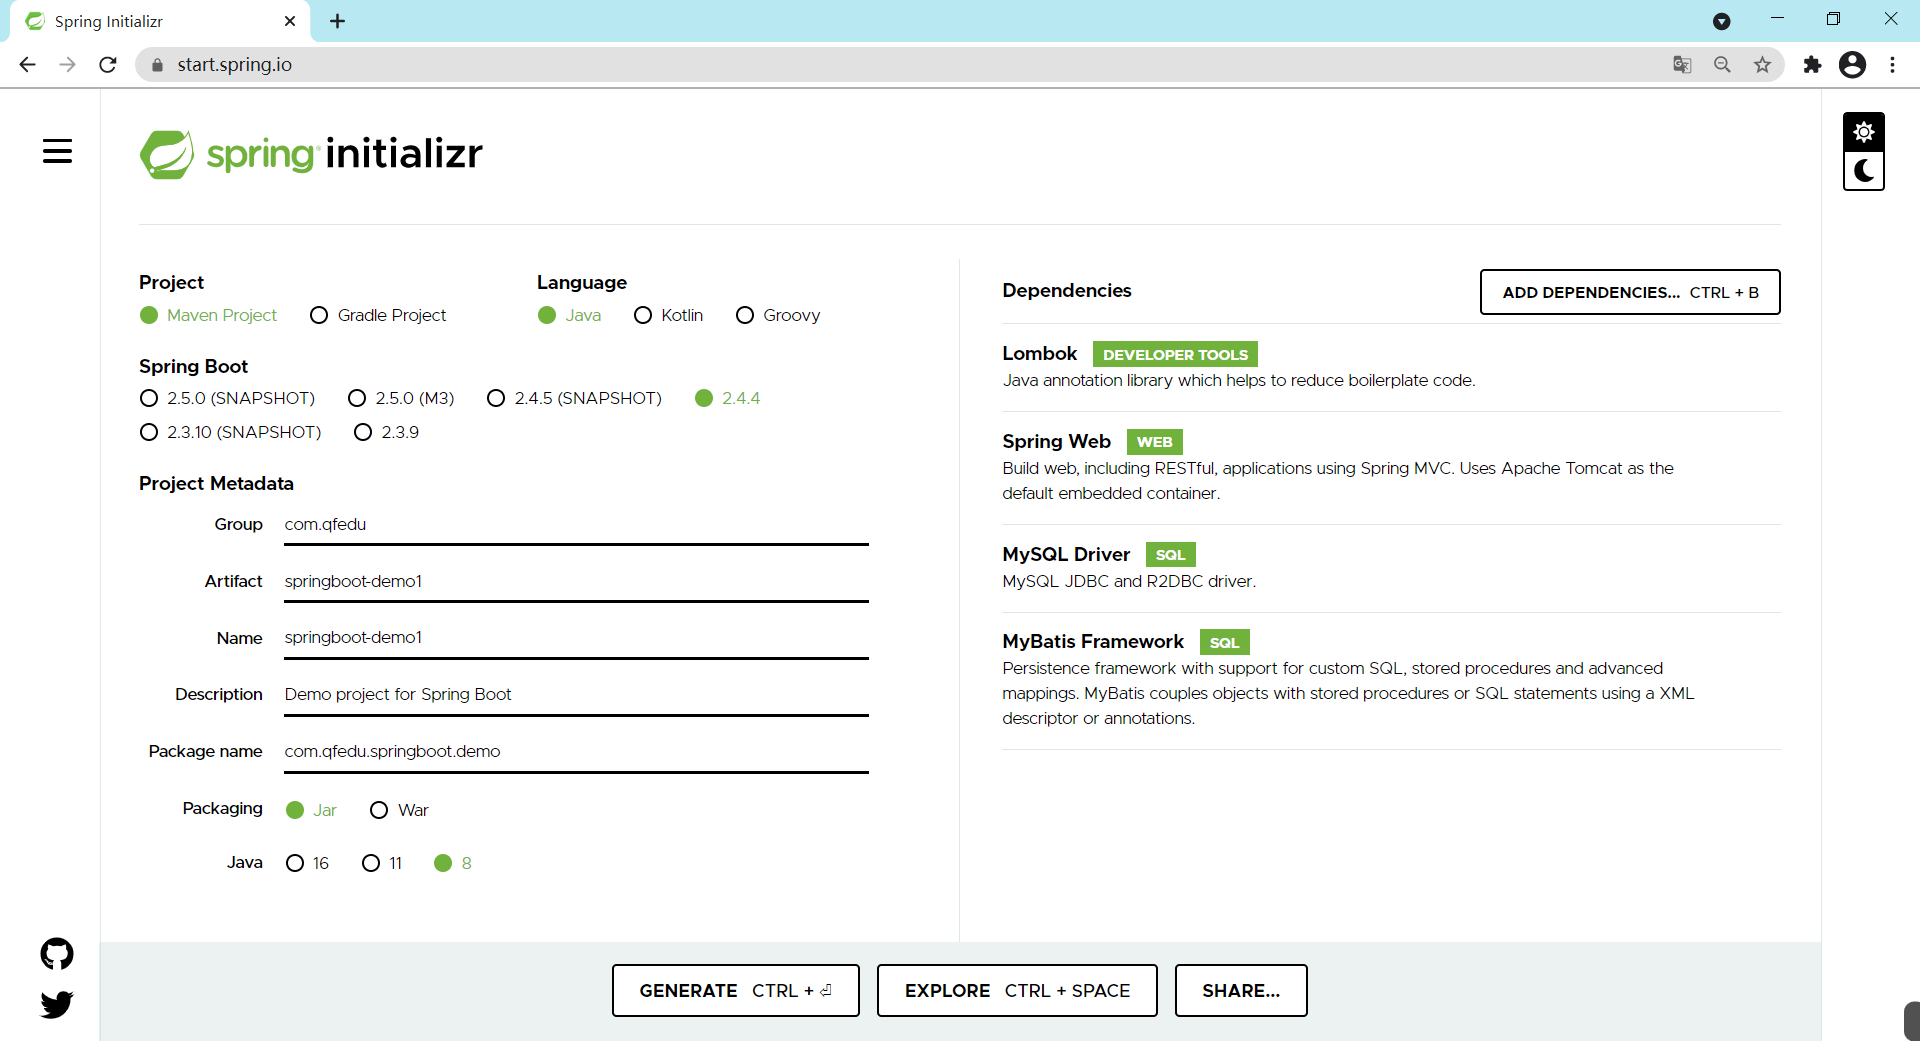
3.1 创建项目
3.1 File—-New—-Project
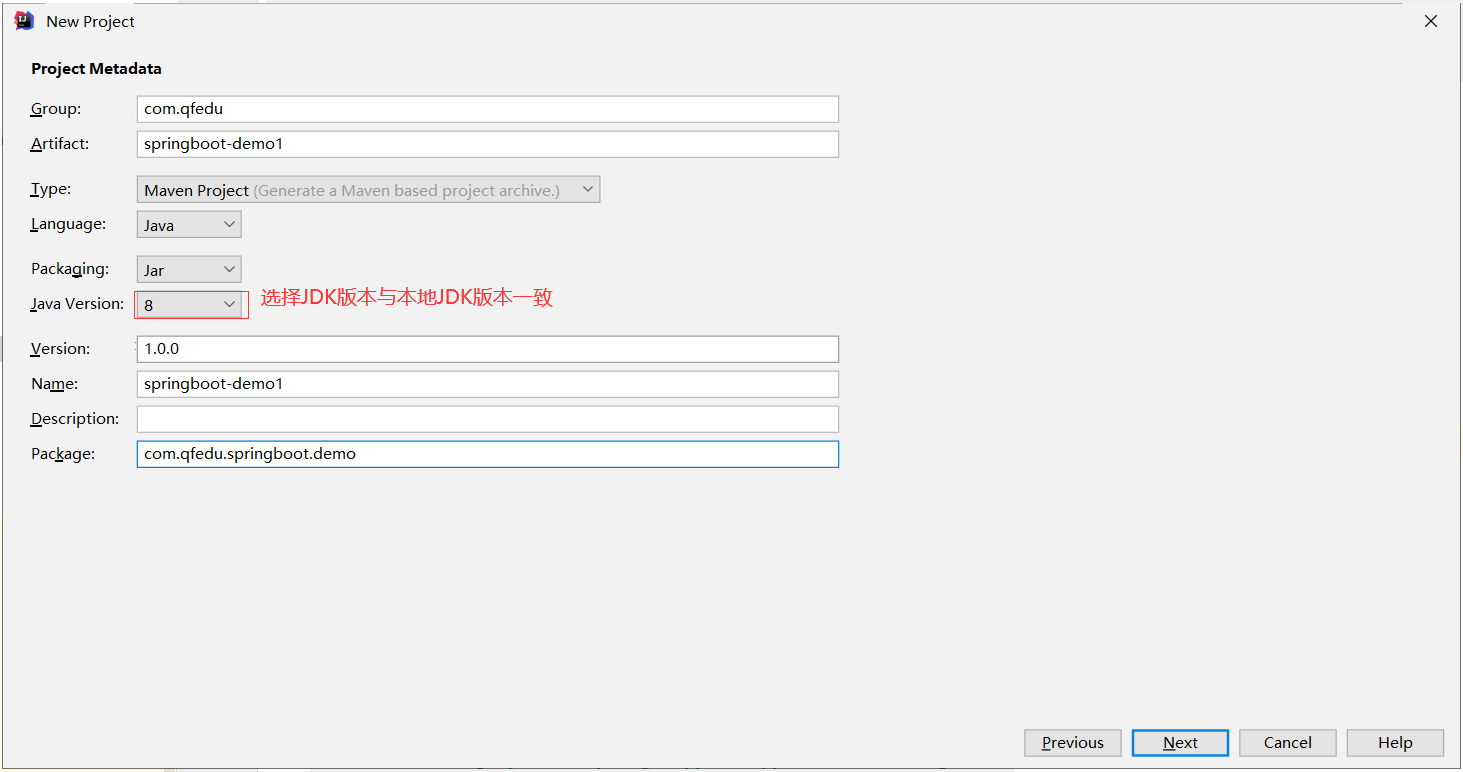
3.2 填写项目信息
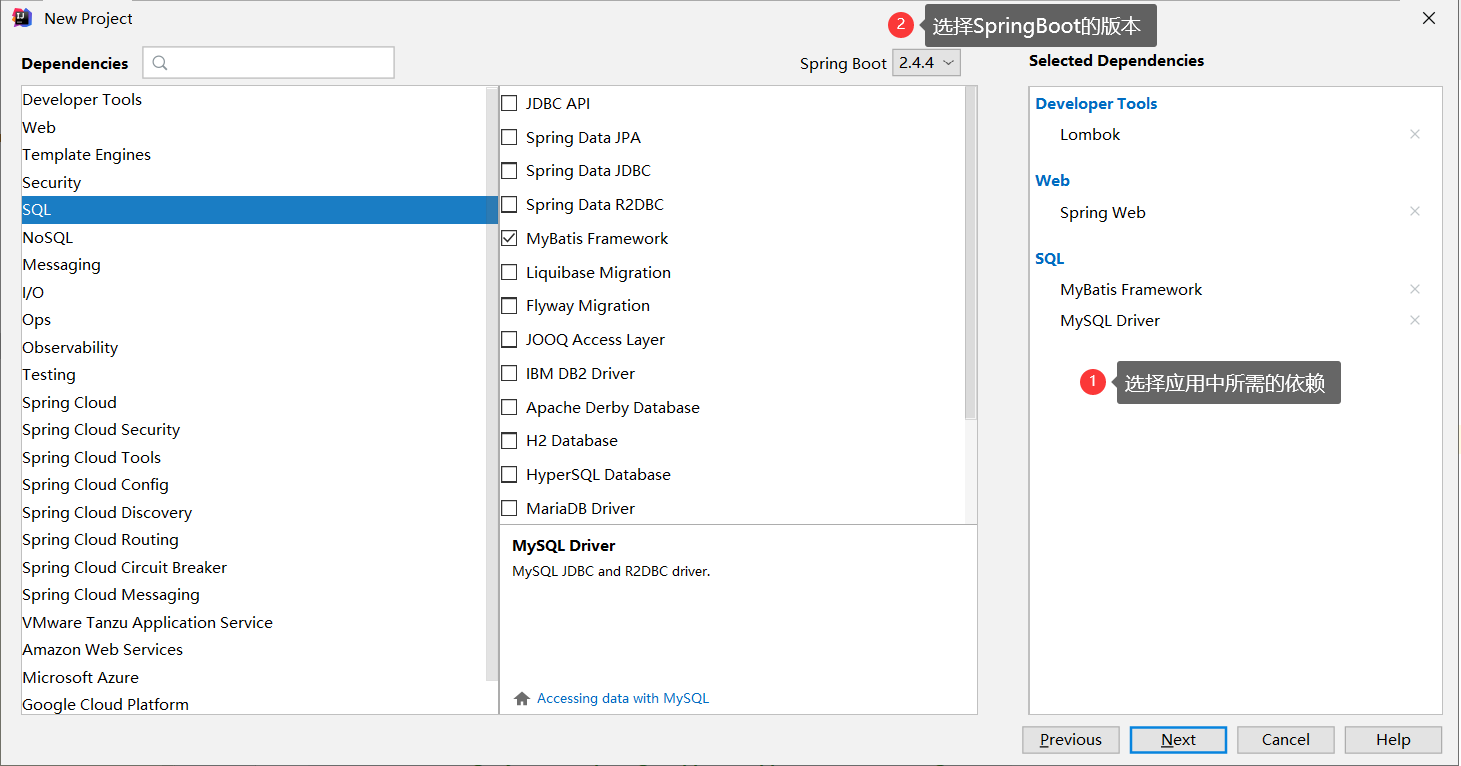
3.3 选择项目依赖
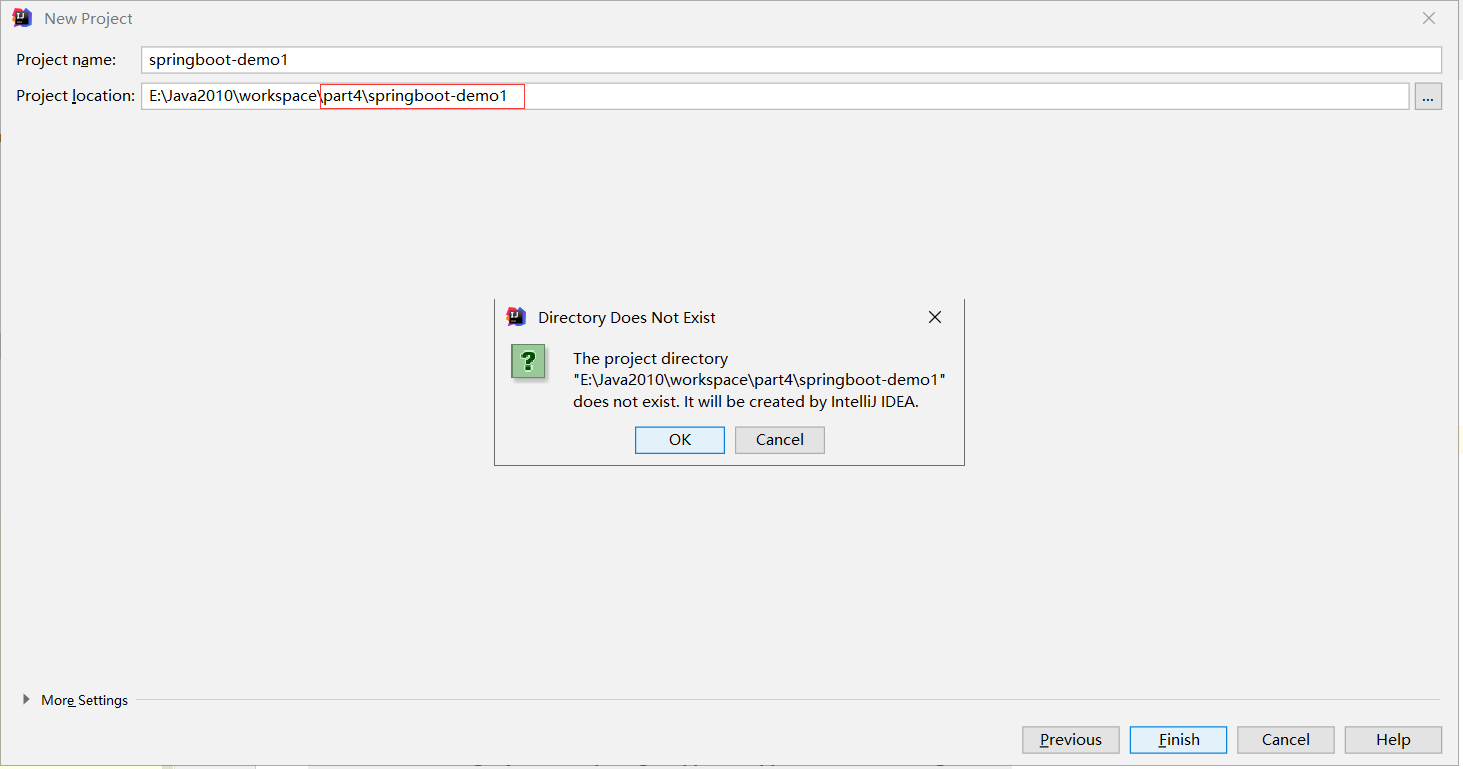
3.4 选择项目存储目录
3.5 网页创建SpringBoot应用
如果基于IDEA创建无法下载,可以基于网页版进行创建
3.2 配置项目
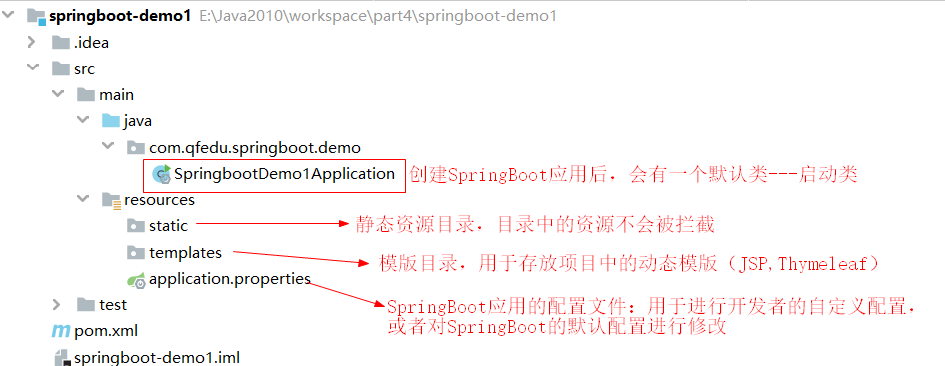
3.2.1 应用项目结构
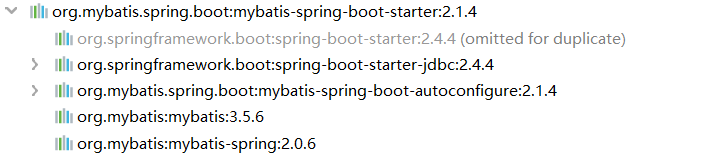
3.2.2 自定义配置(整合MyBatis)
SpringBoot帮助我们完成通用性配置,但是像数据库连接地址、账号、密码等还是需要手动完成配置
- 修改mysql驱动的版本(选择性)
- 在SpringBoot主配置文件
application.properties文件中配置数据源及路径
```properties配置数据源 (key必须按照SpringBoot的要求)
spring.datasource.driver-class-name=com.mysql.jdbc.Driver spring.datasource.url=jdbc:mysql://localhost:3306/db_2010_mybatis?characterEncoding=utf-8 spring.datasource.username=root spring.datasource.password=admin123
配置映射文件路径及实体类的包名
mybatis.mapper-locations=classpath:mappers/*Mapper.xml mybatis.type-aliases-package=com.qfedu.springboot.demo.entity
-  在SpringBoot启动类通过`@MapperScan`注解指定DAO接口的包名
```java
@SpringBootApplication
@MapperScan("com.qfedu.springboot.demo.dao")
public class SpringbootDemo1Application {

    public static void main(String[] args) {
        SpringApplication.run(SpringbootDemo1Application.class, args);
    }

}
3.3 启动项目
3.3.1 启动
SpringBoot应用自带Servlet容器—Tomcat,因此无需进行额外的服务器配置,运行启动类即可启动一个SpringBoot应用
3.3.2 测试
用户的注册功能
四、SpringBoot原理
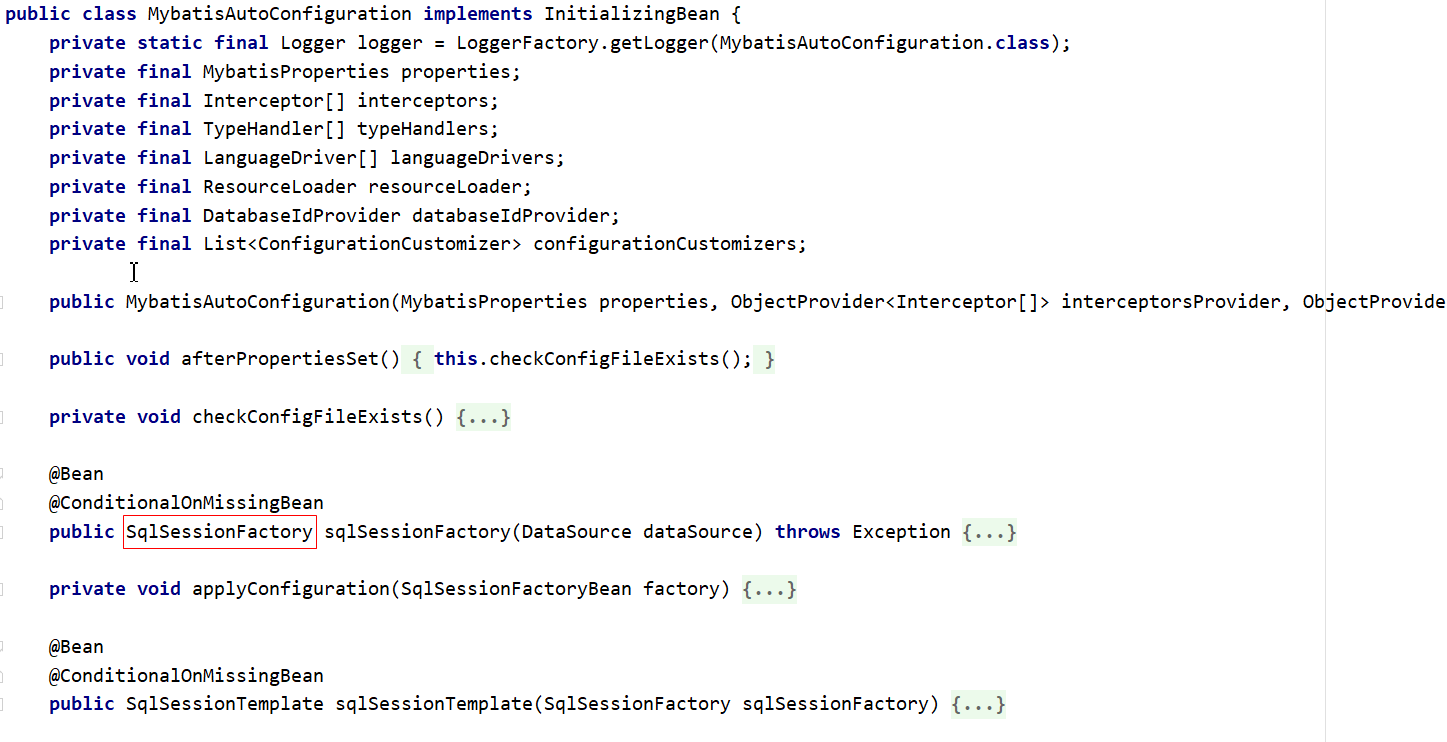
4.1 starter
一个starter就是一个开发场景的支持( 依赖 + 配置)
SpringBoot为我们提供了简化企业级开发绝大多数场景的支持(提供了多个starter),我们在进行项目开发的过程中只需引入对应的starter(创建SpringBoot应用时可选择),相关的依赖和配置就会被内置到项目中(消除人工配置)。
4.1.1 starter依赖
一个starter依赖表示的不是一个依赖,而是某种开发环境所需的一组依赖
- Spring Web —-
spring-boot-starter-web - MyBatis Framework —-
mybatis-spring-boot-starter
4.1.2 starter配置
一个starter不仅包含所需依赖,还包含了其所需的对应的配置
- MyBatis Framework —-
mybatis-spring-boot-starter- 依赖:
- 配置:
- 依赖:
4.1.3 案例
引入redis开发场景
- 添加starter依赖
<dependency>
    <groupId>org.springframework.boot</groupId>
    <artifactId>spring-boot-starter-data-redis</artifactId>
</dependency>
- 在service中可以直接注入redis客户端
@Service
public class UserServiceImpl implements UserService {

    @Resource
    private UserDAO userDAO;

    @Resource
    private StringRedisTemplate stringRedisTemplate;
}
4.2 SpringBoot应用的pom文件
4.2.1 基于Spring官方服务器创建的SpringBoot应用
- 继承spring-boot-starter-parent.pom
<?xml version="1.0" encoding="UTF-8"?>
<project xmlns="http://maven.apache.org/POM/4.0.0" xmlns:xsi="http://www.w3.org/2001/XMLSchema-instance"
    xsi:schemaLocation="http://maven.apache.org/POM/4.0.0 https://maven.apache.org/xsd/maven-4.0.0.xsd">
    <modelVersion>4.0.0</modelVersion>

    <!-- SpringBoot应用中的pom 继承了spring-boot-starter-parent.pom -->
    <!-- spring-boot-starter-parent.pom又继承了spring-boot-dependencies.pom-->
    <!-- 在spring-boot-dependencies.pom已经对主流的框架的版本进行了声明 -->
    <parent>
        <groupId>org.springframework.boot</groupId>
        <artifactId>spring-boot-starter-parent</artifactId>
        <version>2.4.4</version>
        <relativePath/>
    </parent>

</project>
- 引入了maven对springboot应用支持的插件 spring-boot
<build>

    <plugins>
        <plugin>
            <groupId>org.springframework.boot</groupId>
            <artifactId>spring-boot-maven-plugin</artifactId>
            <configuration>
                <mainClass>com.qfedu.springboot.demo.SpringbootDemo1Application</mainClass>
                <excludes>
                    <exclude>
                        <groupId>org.projectlombok</groupId>
                        <artifactId>lombok</artifactId>
                    </exclude>
                </excludes>
            </configuration>
        </plugin>
    </plugins>
</build>
4.2.2 基于ali服务器创建的SpringBoot应用
<?xml version="1.0" encoding="UTF-8"?>
<project xmlns="http://maven.apache.org/POM/4.0.0" xmlns:xsi="http://www.w3.org/2001/XMLSchema-instance"
         xsi:schemaLocation="http://maven.apache.org/POM/4.0.0 https://maven.apache.org/xsd/maven-4.0.0.xsd">
    <modelVersion>4.0.0</modelVersion>
    <groupId>com.qfedu</groupId>
    <artifactId>springboot-demo2</artifactId>
    <version>1.0.0</version>
    <name>springboot-demo2</name>
    <description>Demo project for Spring Boot</description>

    <properties>
        <java.version>1.8</java.version>
        <project.build.sourceEncoding>UTF-8</project.build.sourceEncoding>
        <project.reporting.outputEncoding>UTF-8</project.reporting.outputEncoding>
<!--SpringBoot引用的pom没有继承spring-boot-starter-parent.pom,因此版本需要在当前pom中进行定义 -->
        <spring-boot.version>2.3.7.RELEASE</spring-boot.version>
    </properties>

    <build>
            <plugin>
                <groupId>org.springframework.boot</groupId>
                <artifactId>spring-boot-maven-plugin</artifactId>
                <version>2.3.7.RELEASE</version>
                <configuration>
                    <mainClass>com.qfedu.springboot.demo2.SpringbootDemo2Application</mainClass>
                </configuration>
                <executions>
                    <execution>
                        <id>repackage</id>
                        <goals>
                            <goal>repackage</goal>
                        </goals>
                    </execution>
                </executions>
            </plugin>
        </plugins>
    </build>

</project>
4.3 Java配置方式
如果我们需要在SpringBoot应用中整合一种新的开发场景,只需在pom.xml引入对应的starter即可
一个starter不仅包含依赖,还包含相应的配置,starter中包含的配置都是通过Java类实现的——Java配置方式
4.3.1 Spring版本发展
随着Spring版本的迭代,配置方式也在发生变化
- Spring 1.x
- 所有的bean的配置只能通过xml完成
- Spring 2.x
- 基于JDK1.5对注解的支持,Spring 2.x开始支持注解
- 企业开发中到底是用xml配置还是用注解?
- 对基础配置、引用的第三方依赖中的配置使用xml完成:例如数据源配置
- 业务开发使用注解:例如controller、service
- Spring 3.x
- Spring 开始提供基于Java的配置方式
- Spring 4.x
- xml、注解、Java
4.3.2 xml配置
<!--applicationContext.xml-->
<bean id="stu" class="com.qfedu.beans.Student"></bean>
<bean id="date" class="java.util.Date"></bean>
4.3.3 注解配置
@Component
public class Student{

}
4.3.4 Java配置方式
主要配置第三方类
- 创建配置类
@Configuration
public class SpringConfig{

    @Bean
    public Date getDate(){
        return new Date();
    }
}
4.4 SpringBoot自动配置

4.5 全局配置文件
SpringBoot针对不同的开发场景提供默认的属性配置,如果默认的配置不能满足开发的需要,我们需要对属性配置进行修改
- SpringBoot应用提供了一个全局配置文件
application.properties用于进行自定义配置 - 全局配置文件支持2中语法配置:
- properties 键值对配置
- yaml 语法的配置
4.5.1 基于properties配置
# 配置数据源  (key必须按照SpringBoot的要求)
spring.datasource.driver-class-name=com.mysql.jdbc.Driver
spring.datasource.url=jdbc:mysql://localhost:3306/db_2010_mybatis?characterEncoding=utf-8
spring.datasource.username=root
spring.datasource.password=admin123

# 配置映射文件路径及实体类的包名
mybatis.mapper-locations=classpath:mappers/*Mapper.xml
mybatis.type-aliases-package=com.qfedu.springboot.demo.entity
4.5.2 基于yaml配置
spring:
  datasource:
    url: jdbc:mysql://localhost:3306/db_2010_mybatis?characterEncoding=utf-8
    driver-class-name: com.mysql.jdbc.Driver
    username: root
    password: admin123

mybatis:
  mapper-locations: classpath:mappers/*Mapper.xml
  type-aliases-package: com.qfedu.springboot.demo.entity
4.5.3 常用的全局配置
server:
  port: 9999
  servlet:
    context-path: /demo1
4.6 自定义Banner
- 在SpringBoot应用启动的时候是有一个默认启动图案的
- 这个默认图案支持自定义配置
- 在resources目录创建一个banner.txt
- 在banner.txt文件中定义图案 http://patorjk.com/software/taag/
- 佛祖保佑
////////////////////////////////////////////////////////////////////
//                          _ooOoo_                               //
//                         o8888888o                              //
//                         88" . "88                              //
//                         (| ^_^ |)                              //
//                         O\  =  /O                              //
//                      ____/`---'\____                           //
//                    .'  \\|     |//  `.                         //
//                   /  \\|||  :  |||//  \                        //
//                  /  _||||| -:- |||||-  \                       //
//                  |   | \\\  -  /// |   |                       //
//                  | \_|  ''\---/''  |   |                       //
//                  \  .-\__  `-`  ___/-. /                       //
//                ___`. .'  /--.--\  `. . ___                     //
//              ."" '<  `.___\_<|>_/___.'  >'"".                  //
//            | | :  `- \`.;`\ _ /`;.`/ - ` : | |                 //
//            \  \ `-.   \_ __\ /__ _/   .-` /  /                 //
//      ========`-.____`-.___\_____/___.-`____.-'========         //
//                           `=---='                              //
//      ^^^^^^^^^^^^^^^^^^^^^^^^^^^^^^^^^^^^^^^^^^^^^^^^^^        //
//            佛祖保佑       永不宕机     永无BUG                   //
////////////////////////////////////////////////////////////////////
五、SpringBoot整合JSP
SpringBoot应用默认支持的动态网页技术是Thymeleaf,并不支持JSP;因此在SpringBoot应用想要使用JSP需要通过手动整合来实现
5.1 添加依赖
<dependency>
    <groupId>org.apache.tomcat.embed</groupId>
    <artifactId>tomcat-embed-jasper</artifactId>
    <version>9.0.45</version>
</dependency>
<dependency>
    <groupId>javax.servlet</groupId>
    <artifactId>jstl</artifactId>
    <version>1.2</version>
</dependency>
5.2 创建JSP页面
- 修改pom文件打包方式为war
- 在main中创建webapp目录
- 在webapp创建.jsp页面
5.3 将JSP页面放在WEB-INF中的访问
- 将JSP文件存放到WEB-INF目录
在application.yml文件配置SpringMVC视图解析方式:
spring:
mvc:
 view:
   prefix: /WEB-INF/
   suffix: .jsp
创建PageController
```java @Controller public class PageController {@RequestMapping(“/index.html”) public String index() {
return "index";}
}
<a name="baae7f39"></a>
## 六、基于SpringBoot的SSM整合

<a name="0c57f7a3"></a>
#### 6.1 创建Springboot项目

-  创建项目时添加依赖
   - lombok
   - spring web
   - mysql driver
   - mybatis framework
-  修改mysql驱动的版本(可选)
```xml
<!--pom.xml-->
<properties>
    <java.version>1.8</java.version>
    <mysql.version>5.1.47</mysql.version>
</properties>
6.2 进行MyBatis所需的配置
- 将默认创建的application.properties后缀名修改为
yml(根据习惯可选) - 完成MyBatis的自定义配置
```yaml spring: datasource: driver-class-name: com.mysql.jdbc.Driver url: jdbc:mysql://localhost:3306/db_2010_mybatis?characterEncoding=utf-8 username: root password: admin123
mybatis: type-aliases-package: com.qfedu.springboot.ssm.beans mapper-locations: classpath:mappers/*Mapper.xml
<a name="a23b5d7a"></a>
#### 6.3 在启动类配置DAO扫描

- `@MapperScan`

```java
@SpringBootApplication
@MapperScan("com.qfedu.springboot.ssm.dao")
public class SpringbootSsmApplication {

    public static void main(String[] args) {
        SpringApplication.run(SpringbootSsmApplication.class, args);
    }

}
6.4 整合Druid连接池
在SpringBoot中整合MyBatis的时候,默认集成了Hikari连接池,Hikari的效率比Druid要高,但是得益于Druid提供了比较便捷的监控系统在企业开发中,druid使用还是最多的。
6.4.1 添加druid的starter
<dependency>
    <groupId>com.alibaba</groupId>
    <artifactId>druid-spring-boot-starter</artifactId>
    <version>1.1.10</version>
</dependency>
6.4.2 配置druid数据源
spring:
  datasource:
    druid:
      driver-class-name: com.mysql.jdbc.Driver
      url: jdbc:mysql://localhost:3306/db_2010_mybatis?characterEncoding=utf-8
      username: root
      password: admin123
      initial-size: 1
      min-idle: 1
      max-active: 20
七、Thymeleaf
Thymeleaf是一种类似于JSP的动态网页技术
7.1 Thymeleaf简介
- JSP 必须依赖Tomcat运行,不能直接运行在浏览器中
- HTML可以直接运行在浏览器中,但是不能接收控制器传递的数据
- Thymeleaf是一种既保留了HTML的后缀能够直接在浏览器运行的能力、又实现了JSP显示动态数据的功能——静能查看页面效果、动则可以显示数据
7.2 Thymeleaf的使用
SpringBoot应用对Thymeleaf提供了良好的支持
7.2.1 添加thymeleaf的starter
<dependency>
    <groupId>org.springframework.boot</groupId>
    <artifactId>spring-boot-starter-thymeleaf</artifactId>
</dependency>
7.2.2 创建Thymeleaf模板
Thymeleaf模板就是HTML文件
- SpringBoot应用中
resources\templates目录就是用来存放页面模板的 重要说明:- static 目录下的资源被定义静态资源,SpringBoot应用默认放行;如果将HTML页面创建static目录是可以直接访问的
- templates 目录下的文件会被定义为动态网页模板,SpringBoot应用会拦截templates中定义的资源;如果将HTML文件定义在templates目录,则必须通过控制器跳转访问。
- 在templates创建HTML页面模板
创建PageController,用于转发允许”直接访问”的页面请求
```java @Controller @RequestMapping(“/page”) public class PageController {@RequestMapping(“/test.html”) public String test(){
return "test";}
}
<a name="955a2dc9"></a>
#### 7.3 Thymeleaf基本语法

> 如果要在thymeleaf模板中获取从控制传递的数据,需要使用th标签


<a name="34a7debf"></a>
###### 7.3.1 在thymeleaf模板页面引入th标签的命名空间

```html
<!DOCTYPE html>
<html lang="en" xmlns:th="http://www.thymeleaf.org">
    <head>
        <meta charset="UTF-8">
        <title>Title</title>
    </head>
    <body>


    </body>
</html>
7.3.2 th:text
在几乎所有的HTML双标签都可以使用 th:text属性,将接收到的数据显示在标签的内容中
<label th:text="${price}"></label>
<div th:text="${str}"></div>
<p th:text="${book.bookName}"></p>
7.3.3 th:inline 内联
HTML内联
<p th:inline="text">图书名称:[[${book.bookName}]]</p>CSS内联
<style type="text/css" th:inline="css">
 .style1{
     color:[[${color}]]
 }
</style>
JavaScript内联
```html<a name="59e8c9ac"></a> ###### 7.3.4 th:object 和 * ```html <div th:object="${book}"> <p th:text="*{bookId}"></p> <p th:text="*{bookName}"></p> <p th:text="*{bookAuthor}"></p> </div>7.4 流程控制
7.4.1 th:each 循环
<table style="width: 600px" border="1" cellspacing="0">
    <caption>图书信息列表</caption>
    <thead>
        <tr>
            <th>图书ID</th>
            <th>图书名称</th>
            <th>作者</th>
        </tr>
    </thead>
    <tbody>
        <tr th:each="b:${books}">
            <td th:text="${b.bookId}"></td>
            <td th:text="${b.bookName}"></td>
            <td th:text="${b.bookAuthor}"></td>
        </tr>
    </tbody>
</table>
7.4.2 分支
- th:if 如果条件不成立,则不显示此标签
```html太贵!!! 太贵!!!
推荐购买
-  th:switch 和 th:case
```html
<td th:switch="${b.bookPrice}/10">
    <label th:case="3">建议购买</label>
    <label th:case="4">价格合理</label>
    <label th:case="*">价格不合理</label>
</td>
<td th:switch="${user.gender}"> <label th:case="M">男</label> <label th:case="F">女</label> <label th:case="*">性别不详</label> </td>7.5 碎片使用
7.5.1 碎片的概念
碎片,就是HTML片段,我们可以将多个页面中使用的相同的HTML标签部分单独定义,然后通过th:include可以在HTML网页中引入定义的碎片
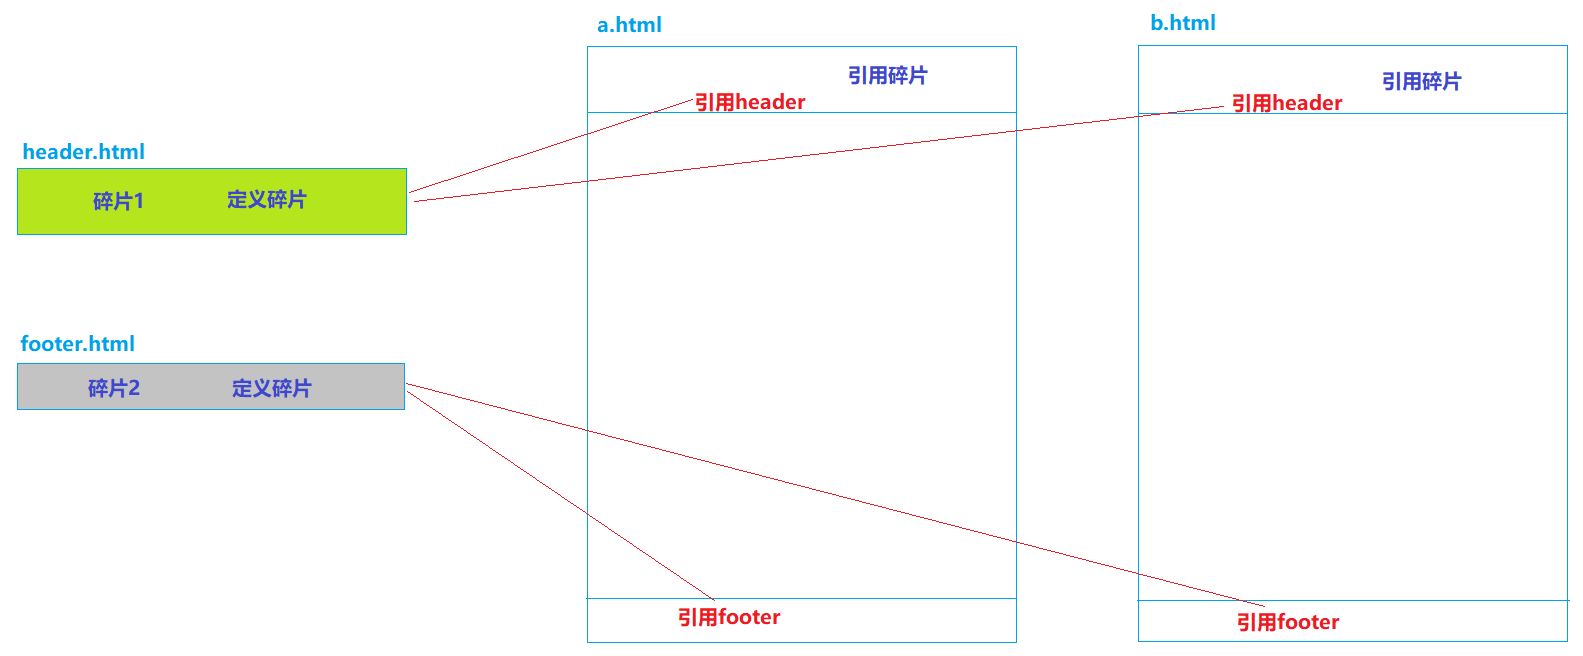
7.5.2 碎片使用案例
- 定义碎片 th:fragment
- header.html
```html <!DOCTYPE html>
- header.html
千锋武汉Java2010班,六六六!!!- footer.html ```html <!DOCTYPE html> <html lang="en" xmlns:th="http://www.thymeleaf.org"> <head> <meta charset="UTF-8"> <title>Title</title> </head> <body> <div th:fragment="fragment2" style="width: 100%; height: 30px;background: lightgray; color:white; font-size: 16px;"> 千锋教育 武汉校区 </div> </body> </html>- 引用碎片 th:include 和 th:replace
- a.html
```html <!DOCTYPE html>
- a.html
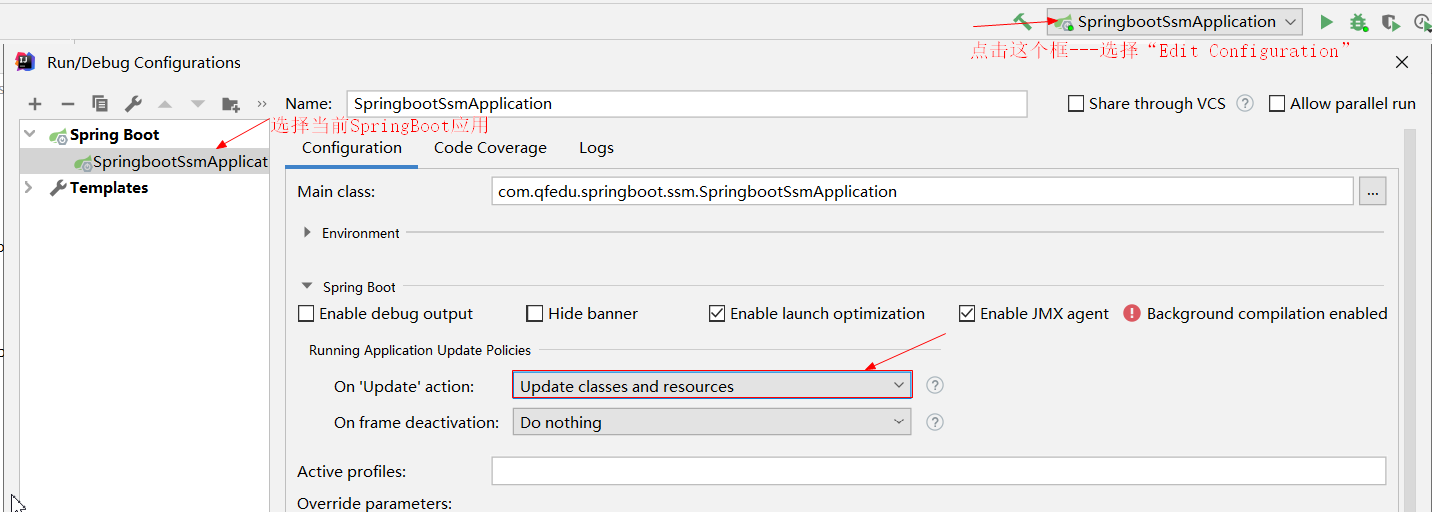
<div th:replace="header::fragment1"></div>

<div style="width: 100%; height: 500px">
    定义内容
</div>
<div th:replace="footer::fragment2"></div><a name="56647e57"></a> ## 八、SpringBoot应用的热部署配置 <a name="8503ecde"></a> #### 8.1 热部署 项目首次部署、服务启动之后,如果应用发生了变化、而且IDEA感知到了应用的变化,就自动的完成jar的更新,无需手动再次启动服务器,就可以访问应用的更新。 <a name="4852551d"></a> #### 8.2 热部署配置 <a name="bc8a12c7"></a> ###### 8.2.1 IDE配置(idea) - File---settings<br /> - Ctrl+Shift+Alt+/ ----- Registry |  | | --- | |  | - 高版本在Settings中的Advanced Settings中勾选第一个  <a name="246d59ba"></a> ###### 8.2.2 SpringBoot项目配置 - 在需要进行热部署的SpringBoot应用中添加依赖 ```xml <dependency> <groupId>org.springframework.boot</groupId> <artifactId>spring-boot-devtools</artifactId> </dependency>配置SpringBoot的Maven插件
<plugin>
 <groupId>org.springframework.boot</groupId>
 <artifactId>spring-boot-maven-plugin</artifactId>
 <configuration>
     <fork>true</fork>
 </configuration>
</plugin>
配置SpringBoot应用的变化更新策略
- th:if 如果条件不成立,则不显示此标签

若有收获,就点个赞吧
0 人点赞
