1. 填充
1.1 通过位置来填充字符串
'hello {0} i am {1}'.format('Kevin','Tom')#hello Kevin i am Tom'hello {} i am {}'.format('Kevin','Tom')#hello Kevin i am Tom'hello {0} i am {1} .my name is {0}'.format('Kevin','Tom')# hello Kevin i am Tom .my name is Kevin
foramt会把参数按位置顺序来填充到字符串中,第一个参数是0,然后1 …… 也可以不输入数字,这样也会按顺序来填充 同一个参数可以填充多次,这个是format比%先进的地方
1.2 通过key来填充
print 'hello {name1} i am {name2}'.format(name1='Kevin',name2='Tom')
1.3 通过下标填充
names=['Kevin','Tom']'hello {names[0]} i am {names[1]}'.format(names=names)#hello Kevin i am Tom'hello {0[0]} i am {0[1]}'.format(names)#hello Kevin i am Tom
1.4 通过字典的key填充
names={'name':'Kevin','name2':'Tom'}print 'hello {names[name]} i am {names[name2]}'.format(names=names)
注意访问字典的key,不用引号的
1.5 通过对象的属性填充
classNames():name1='Kevin'name2='Tom''hello {names.name1} i am {names.name2}'.format(names=Names)#hello Kevin i am Tom
1.6 使用魔法参数填充
args=['lu']kwargs = {'name1': 'Kevin', 'name2': 'Tom'}print 'hello {name1} {} i am {name2}'.format(*args, **kwargs)# hello Kevin i am Tom
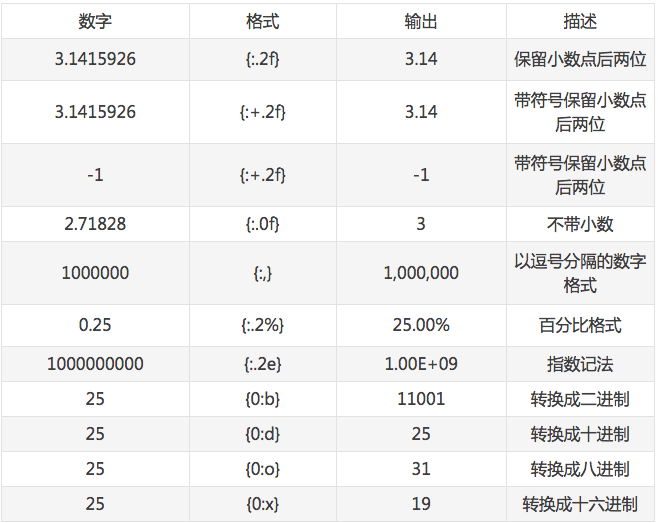
2. 格式转换
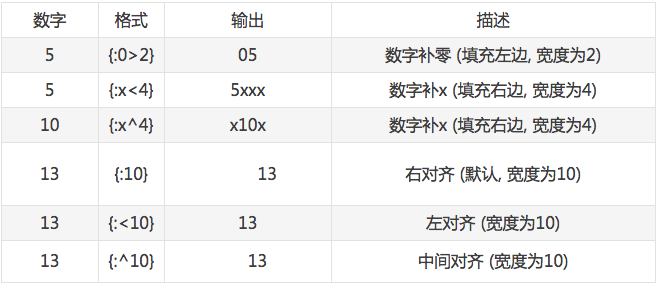
3. 对齐与填充
4. 其他
4.1 转义{和}符号
print '{{ hello {0} }}'.format('Kevin')
跟%中%%转义%一样,format中用两个大括号来转义
4.2 format作为函数
f = 'hello {0} i am {1}'.formatprint f('Kevin','Tom')
4.3 格式化datetime
now=datetime.now()print '{:%Y-%m-%d %X}'.format(now)
4.4 {}内嵌{}
print 'hello {0:>{1}} '.format('Kevin',50)
4.5 叹号的用法
#!后面可以加s r a 分别对应str() repr() ascii()#作用是在填充前先用对应的函数来处理参数"{!s}".format('2')# 2"{!r}".format('2')# '2'
差别就是repr带有引号,str()是面向用户的,目的是可读性,repr()是面向python解析器的,返回值表示在python内部的含义


