嵌套导航图
嵌套导航图(nested graph) 是被组合成一个 根导航图(root graph) 的子图的当一系列目的地,它有助于整理、复用您应用中的 UI 部分,例如一个独立的登录流程。
嵌套导航图将其目的地封装起来。和跟导航图一样,嵌套导航图也必须把一个目的地标记为起始目的地,而嵌套导航图之外的目的地(比如,根导航图中的那些)只能通过这个起始目的地来访问它。
图一展示了一个简单的转账应用的导航图。从最左边的起始目的地开始,该导航图有两个流程:上方的是转账,下方的是查看账户余额。
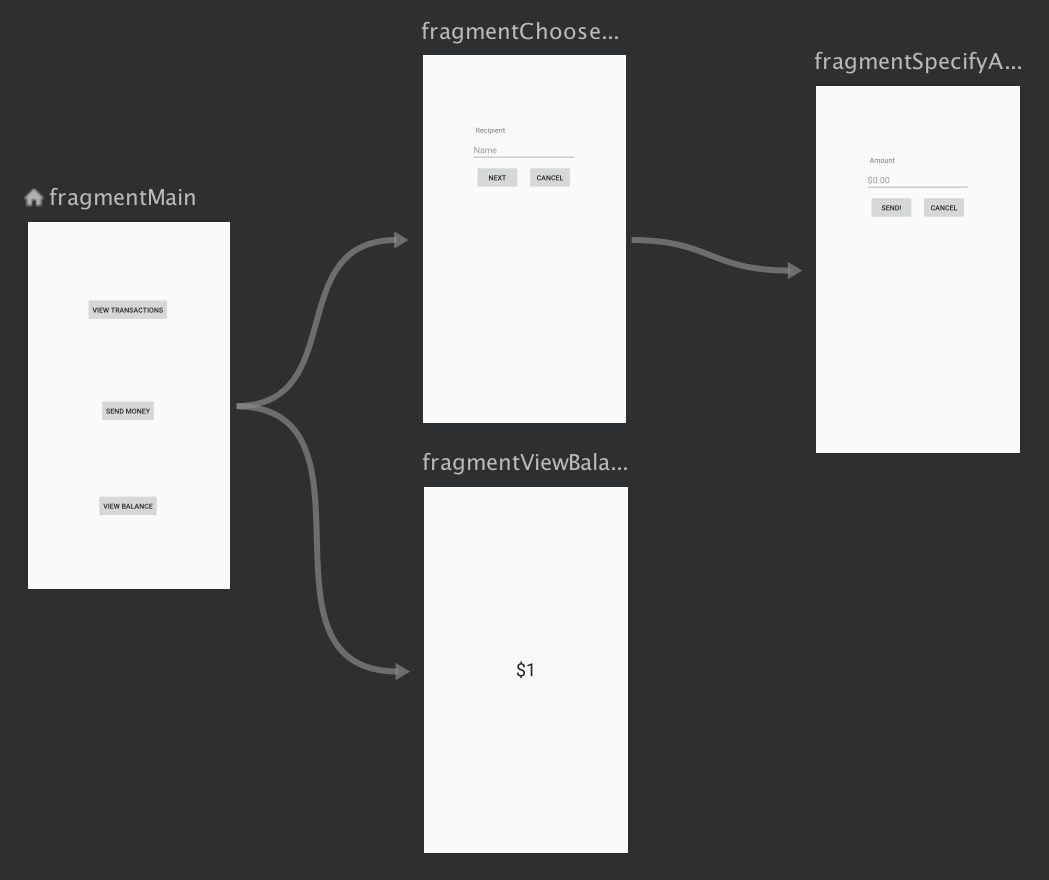
图一:转账的导航图
欲将目的地组合成一个嵌套导航图,请按如下操作:
- 在导航编辑器中,按压 Shift 键不动,同时单击您想要加入到嵌套导航图中的目的地。
右键单击打开 context 菜单,选择 Move to Nested Graph > New Graph。现在,这些目的地已被组合到一个嵌套导航图中了,图二展示了该嵌套导航图在导航编辑器中的样子:
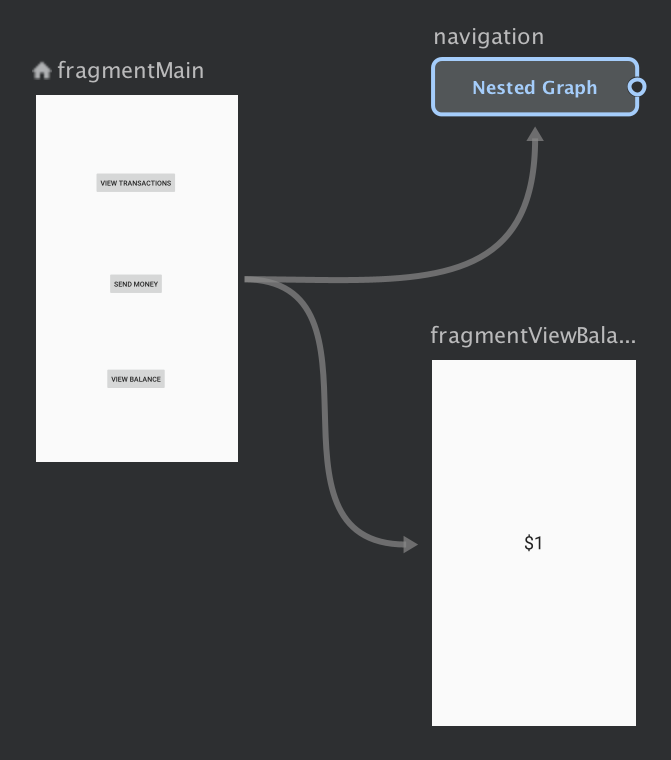
图二:图编辑器中的嵌套导航图
单击该嵌套导航图,如下属性将出现在 Attributes 面板中:
- Type:“Nested Graph”
- ID:一个系统赋值的 ID,用于在代码中引用该嵌套导航图
- 双击该嵌套导航图以显示其包含的目的地。
单击 Text 标签页来切换到 XML 视图。一个嵌套导航图的代码已被添加到原有的导航图中,它含有自己的
navigation元素、自己的 ID 、和一个指向该嵌套导航图中第一个目的地的startDestination属性:<?xml version="1.0" encoding="utf-8"?><navigation xmlns:app="http://schemas.android.com/apk/res-auto"xmlns:tools="http://schemas.android.com/tools"xmlns:android="http://schemas.android.com/apk/res/android"app:startDestination="@id/mainFragment"><fragmentandroid:id="@+id/mainFragment"android:name="com.example.cashdog.cashdog.MainFragment"android:label="fragment_main"tools:layout="@layout/fragment_main" ><actionandroid:id="@+id/action_mainFragment_to_chooseRecipient"app:destination="@id/sendMoneyGraph" /><actionandroid:id="@+id/action_mainFragment_to_viewBalanceFragment"app:destination="@id/viewBalanceFragment" /></fragment><fragmentandroid:id="@+id/viewBalanceFragment"android:name="com.example.cashdog.cashdog.ViewBalanceFragment"android:label="fragment_view_balance"tools:layout="@layout/fragment_view_balance" /><navigation android:id="@+id/sendMoneyGraph" app:startDestination="@id/chooseRecipient"><fragmentandroid:id="@+id/chooseRecipient"android:name="com.example.cashdog.cashdog.ChooseRecipient"android:label="fragment_choose_recipient"tools:layout="@layout/fragment_choose_recipient"><actionandroid:id="@+id/action_chooseRecipient_to_chooseAmountFragment"app:destination="@id/chooseAmountFragment" /></fragment><fragmentandroid:id="@+id/chooseAmountFragment"android:name="com.example.cashdog.cashdog.ChooseAmountFragment"android:label="fragment_choose_amount"tools:layout="@layout/fragment_choose_amount" /></navigation></navigation>
在您的代码中,使用连接根导航图和嵌套导航图之间的动作的资源 ID:
view.findNavController().navigate(R.id.action_mainFragment_to_sendMoneyGraph)
回到 Design 标签页中,您可以单击 Root 来返回到根导航图中。
使用 来引用其他导航图
您可以使用 include 来在一个导航图的内部引用其他的导航图。尽管从功能上来说,这和使用嵌套导航图是一样的,但 include 让您还能使用项目的其他模块或类库中的导航图,如下所示:
<!-- (根导航图)nav_graph.xml --><?xml version="1.0" encoding="utf-8"?><navigation xmlns:android="http://schemas.android.com/apk/res/android"xmlns:app="http://schemas.android.com/apk/res-auto"xmlns:tools="http://schemas.android.com/tools"android:id="@+id/nav_graph"app:startDestination="@id/fragment"><include app:graph="@navigation/included_graph" /><fragmentandroid:id="@+id/fragment"android:name="com.example.myapplication.BlankFragment"android:label="Fragment in Root Graph"tools:layout="@layout/fragment_blank"><actionandroid:id="@+id/action_fragment_to_second_graph"app:destination="@id/second_graph" /></fragment>...</navigation>
<!-- included_graph.xml --><?xml version="1.0" encoding="utf-8"?><navigation xmlns:android="http://schemas.android.com/apk/res/android"xmlns:app="http://schemas.android.com/apk/res-auto"xmlns:tools="http://schemas.android.com/tools"android:id="@+id/second_graph"app:startDestination="@id/includedStart"><fragmentandroid:id="@+id/includedStart"android:name="com.example.myapplication.IncludedStart"android:label="fragment_included_start"tools:layout="@layout/fragment_included_start" /></navigation>

若有收获,就点个赞吧
0 人点赞
