🔖 简介与分类
运行级别
1、运行级别及含义
| 运行级别 | 含义 |
|---|---|
| 0 | 关机 |
| 1 | 单用户模式,主要用于系统修复 |
| 2 | 不完全的命令行模式,不含NFS服务 |
| 3 | 完全的命令行模式,就是标准字符串界面 |
| 4 | 系统保留 |
| 5 | 图形模式 |
| 6 | 重启动 |
2、查看运行级别
[root@VM_28_36_centos ~]# runlevelN 3
4、设置运行级别
# 设置运行级别为0[root@VM_28_36_centos ~]# init 3[root@VM_28_36_centos ~]#
5、修改系统默认运行级别
编辑文件:/etc/inittab 里的 id:3:initdefault:
[root@VM_28_36_centos ~]# cat /etc/inittab# inittab is only used by upstart for the default runlevel.## ADDING OTHER CONFIGURATION HERE WILL HAVE NO EFFECT ON YOUR SYSTEM.## System initialization is started by /etc/init/rcS.conf## Individual runlevels are started by /etc/init/rc.conf## Ctrl-Alt-Delete is handled by /etc/init/control-alt-delete.conf## Terminal gettys are handled by /etc/init/tty.conf and /etc/init/serial.conf,# with configuration in /etc/sysconfig/init.## For information on how to write upstart event handlers, or how# upstart works, see init(5), init(8), and initctl(8).## Default runlevel. The runlevels used are:# 0 - halt (Do NOT set initdefault to this)# 1 - Single user mode# 2 - Multiuser, without NFS (The same as 3, if you do not have networking)# 3 - Full multiuser mode# 4 - unused# 5 - X11# 6 - reboot (Do NOT set initdefault to this)#id:3:initdefault:[root@VM_28_36_centos ~]#
服务分类

查询已安装的服务
1、查看服务自启动状态,可以看到所有RPM包安装的服务
2、源码包安装的服务
服务与端口
1、查看端口/启动的服务
netstat -tlunp
| -t | 列出tcp数据 |
|---|---|
| -u | 列出udp数据 |
| -l | 列出正在监听的网络服务(不包含已经连接的网络服务) |
| -n | 用端口号来显示服务,而不是服务名 |
| -p | 列出该服务的进程ID(pid)和程序服务名 |
| -a | 显示所有选项 |
| -e | 显示扩展信息,例如uid等 |
| -c | 每隔一个固定时间,执行该netstat命令 |
| -s | 按各个协议进行统计 |
🔖 RPM包服务管理
RPM包服务的位置
1、常见的RPM包服务的位置
| 位置 | 说明 |
|---|---|
| /etc/init.d/ | 启动脚本位置 |
| /etc/sysconfig/ | 初始化环境配置文件位置 |
| /etc/ | 配置文件位置 |
| /etc/xinetd.conf | xinetd配置文件 |
| /etc/xinetd.d/ | 基于xineted服务的启动脚本 |
| /var/lib/ | 服务产生的数据 |
| /var/log/ | 服务日志 |
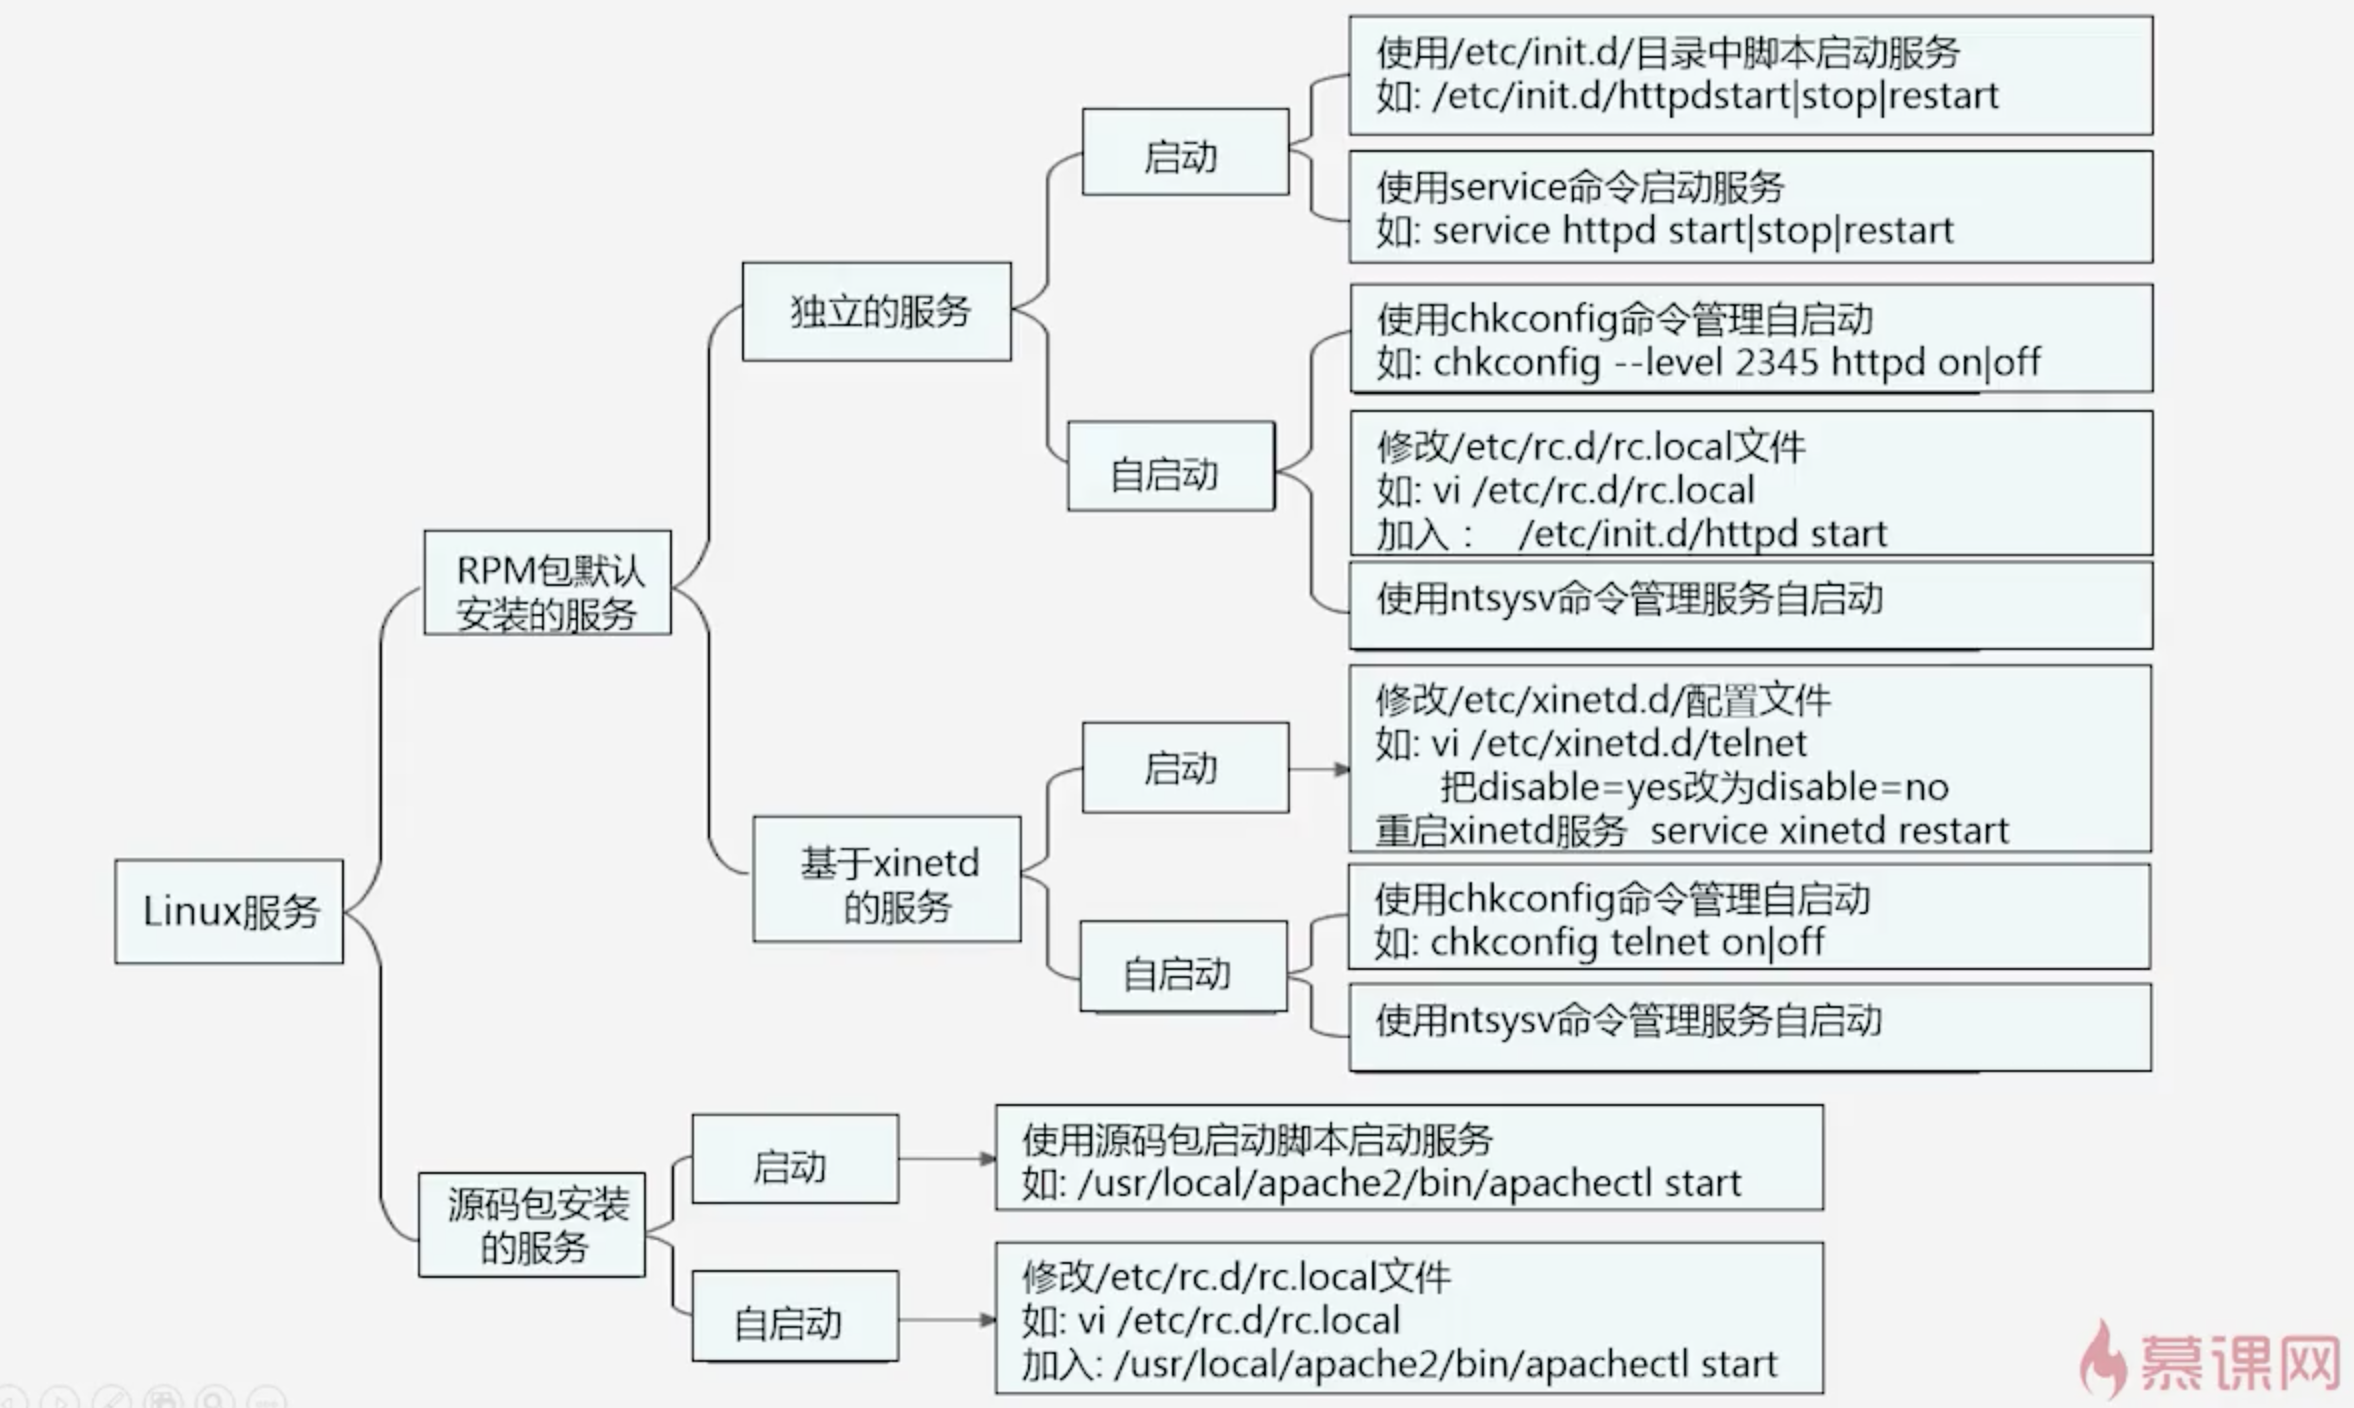
独立服务的启动
1、通过绝对路径启动
# /etc/init.d/独立服务名 或者 /etc/rc.d/init.d/独立服务名 start | stop | status | restart/etc/init.d/httpd start
2、service启动(RedHat系列)
# service 独立服务名 start | stop | status | restartservice httpd start
3、设置自启动方法一
# 开启chkconfig --level 2345 httpd on# 关闭chkconfig httpd off
4、自启动方法二(此处设置chkconfig并不会变)
# 把启动命令写入“/etc/rc.d/rc.local” 或 “/etc/rc.local” 文件echo /etc/init.d/httpd start >> /etc/rc.d/rc.local
5、ntsysv设置自启动(此处设置chkconfig会变)
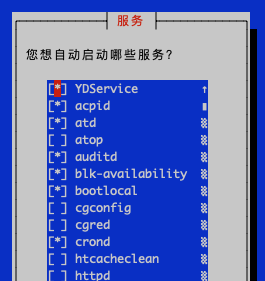
基于xinetd的服务的启动
1、基于xinetd的服务的启动
- 修改基于xinetd服务的配置文件:
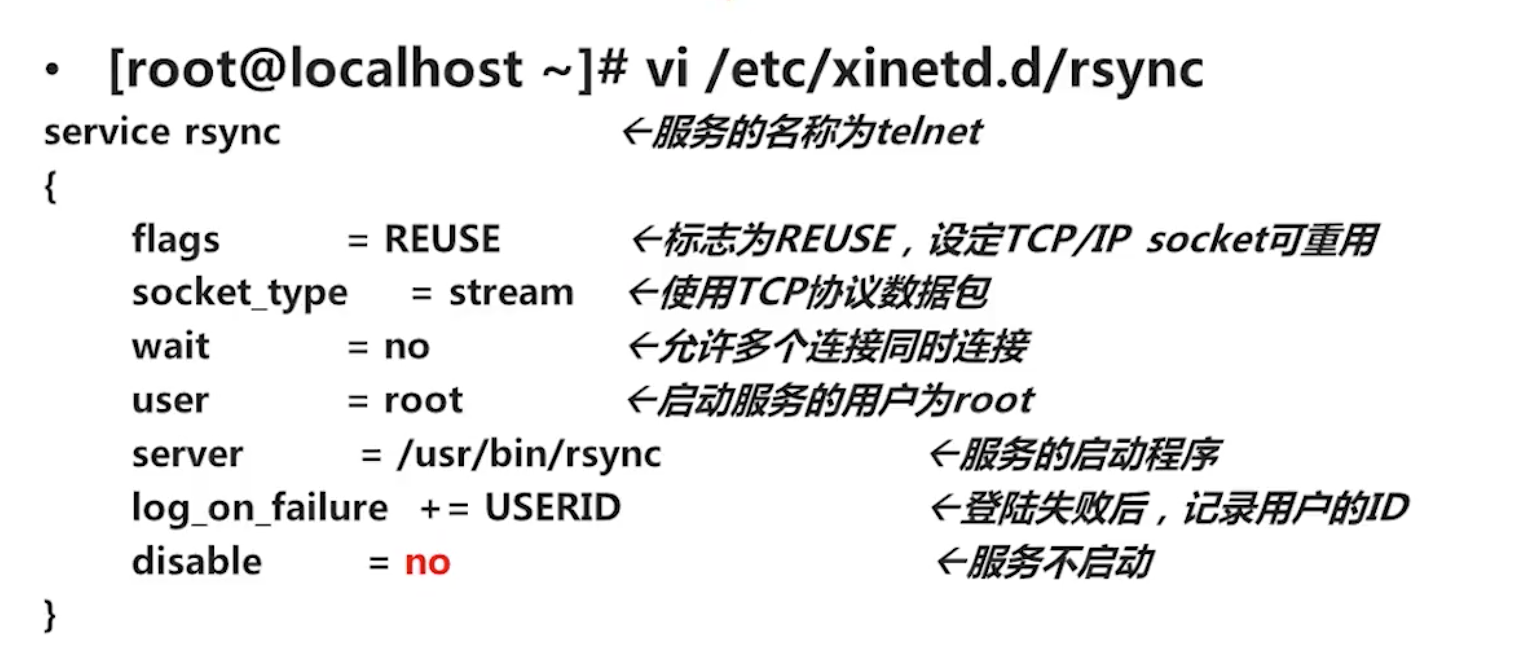
vi /etc/xinetd.d/服务名
- 重启xinetd服务
service xinetd restart
2、基于xinetd的服务的自启动
chkconfig 和 ntsysv
# 开启,不能设置--levelchkconfig 2345 httpd on# 关闭chkconfig httpd off
3、区别于其他独立服务,xinetd的自启动即是启动,启动也即是自启动
🔖 源码包服务管理
源码包安装的服务的启动
1、源码包安装的绝对路径调用启动脚本来启动
# eg/usr/local/apache2/bin/apachectl start
2、让源码包服务被服务管理命令识别
#把绝对启动路径软链到“ /etc/init.d/” 并把原服务“apachectl”重命名为“apache”ln -s /usr/local/apache2/bin/apachectl /etc/init.d/apache
源码包安装的服务的自启动
1、自启动
# 把启动命令写入“/etc/rc.d/rc.local” 或 “/etc/rc.local” 文件echo /usr/local/apache2/bin/apachectl start >> /etc/rc.d/rc.local
2、加入chkconfig与ntsysv命名管理
# eg:让源码包apache服务加入chkconfig与ntsysv命名管理,并指定运行级别、启动顺序和关闭顺序分别为:35 86 76# 注意:“/etc/init.d/apche” 是把绝对启动路径软链到“ /etc/init.d/” 并把原服务“apachectl”重命名为“apache”的文件# 也就是:前提是需要先让源码包服务被服务管理命令识别## 步骤一[root@VM_28_36_centos ~]#vi /etc/init.d/apche# 写入下面两项配置:# 注意:1、启动顺序号“ 86 76 ”不能和现有服务冲突,下面👇例子查看现有服务启动顺序# 2、必须”#“ 号开头,这里”#“号不代表注释# chkconfig: 35 86 76# description: #说明内容## 步骤二[root@VM_28_36_centos ~]#chkconfig --add apache## 步骤二# 源码包apache服务即可通过chkconfig与ntsysv命名管理
# 查看现有服务启动顺序# K 代表3级别退出会将K级别都关闭# S 代表3级别启动会将S级别都启动# “K”、"S"和服务名之间的数字即是代表顺序[root@VM_28_36_centos ~]# cd /etc/rc3.d/[root@VM_28_36_centos rc3.d]# lsK10psacct K45memcached K87irqbalance S10network S26acpid S95atdK10saslauthd K50netconsole K87restorecond S11auditd S26udev-post S95confluenceK15htcacheclean K60atop K89rdisc S12rsyslog S50php-fpm-73 S99jenkinsK15httpd K71cgred K92ip6tables S15mdmonitor S55sshd S99localK15nginx K72cgconfig K92iptables S20kdump S56xinetdK15svnserve K74ntpd S01sysstat S22messagebus S80postfixK16php-fpm K75ntpdate S02lvm2-monitor S25blk-availability S85YDServiceK36mysqld K75quota_nld S08bootlocal S25netfs S90crond
其它
1、获取pid执行的文件及路径
ps -x | grep pid
总结

若有收获,就点个赞吧
0 人点赞
