SpringBean生命周期
- AbstractApplicationContext中的refresh()方法,其中核心方法有两个registerBeanPostProcessors(beanFactory)和finshBeanFactoryInitialization(beanFactory)(实例化所有剩余的非懒加载的Singletions)。finshBeanFactoryInitialization(beanFactory)→beanFactory.preInstantiateSingletions()→DefaultListableBeanFactory.java中getBean(beanName)→AbstractBeanFactory.java中doGetBean(beanName, null, null, false)方法。
- AbstractBeanFactory.java中的doGetBean方法会执行DefaultSingletionBeanRegistry.java中getSingletons(beanName, true)方法
protected Object getSingleton(String beanName, boolean allowEarlyReference) {// Quick check for existing instance without full singleton lockObject singletonObject = this.singletonObjects.get(beanName);if (singletonObject == null && isSingletonCurrentlyInCreation(beanName)) {singletonObject = this.earlySingletonObjects.get(beanName);if (singletonObject == null && allowEarlyReference) {synchronized (this.singletonObjects) {// Consistent creation of early reference within full singleton locksingletonObject = this.singletonObjects.get(beanName);if (singletonObject == null) {singletonObject = this.earlySingletonObjects.get(beanName);if (singletonObject == null) {ObjectFactory<?> singletonFactory = this.singletonFactories.get(beanName);if (singletonFactory != null) {singletonObject = singletonFactory.getObject();this.earlySingletonObjects.put(beanName, singletonObject);this.singletonFactories.remove(beanName);}}}}}}return singletonObject;}
- 第一次创建时,一二三级缓存都为null,继续执行AbstractBeanFactory的doGetBean方法,会调用DefaultListableBeanFactory中的重载方法getSingletions(beanName, ObjectFactory<?> singletonFactory)方法。
- 该方法中有四个关键步骤
- 步骤A:beforeSingletonCreation(beanName),判断该bean是否在创建中,如果不在则将该bean放入SingletonCurrentlyInCreation的Set
集合中。 - 步骤B:执行singletonFactory.getObject()方法,获取对象(原始对象或代理对象)。
- 步骤C:afterSingletonCreation(beanName),将该bean从正在创建的SingletonCurrentlyInCreation的Set
集合中移除。 - 步骤D:将对象放入单例池(SingletonObjects),并从二三级缓存中移除。
- 步骤A:beforeSingletonCreation(beanName),判断该bean是否在创建中,如果不在则将该bean放入SingletonCurrentlyInCreation的Set
- 其中singletonFactory.getObject()方法中,会执行AbstractAutowireCapableBeanFactory中的doCreateBean()方法。
- 该方法会执行addSingleonFactory(beanName, ()->getEarlyBeanReference(beanName, RootBeanDefinition, bean))。即将beanName、RootBeanDefinition和bean对象放入三级缓存中。
- populateBean(beanName, RootBeanDefinition, bean) // 设置bean的属性
- initializeBean(beanName, bean, RootBeanDefinition) // 初始化bean
- initializeBean方法中分别执行invokeAwareMethods方法(BeanNameAware、BeanClassLoaderAware、BeanFactoryAware)
- 获取全部的BeanPostProcessor,执行postProcessBeforeInitialization方法
- 执行invokeInitMethods(),如果实现了InitializingBean,执行afterPropertiesSet()方法,如果配置了initMethod方法,则执行initMethod方法
- 执行BeanPostProcessor的postProcessAfterInitialization方法,即AbstractAutoProxyCreator中的执行BeanPostProcessor的postProcessAfterInitialization方法。先去earlyProxyReference的HashMap中判断是否提前进行了aop,wrapIfNecessary方法,生成代理对象。
protected void addSingletonFactory(String beanName, ObjectFactory<?> singletonFactory) {Assert.notNull(singletonFactory, "Singleton factory must not be null");synchronized (this.singletonObjects) {if (!this.singletonObjects.containsKey(beanName)) {this.singletonFactories.put(beanName, singletonFactory);this.earlySingletonObjects.remove(beanName);this.registeredSingletons.add(beanName);}}}
- 如果是循环依赖,会去二级缓存(earlySingletonObjects)中找对象,没有的话会去三级缓存(singletonFacotries)中获取。会执行getEarlyBeanReference()方法,将该对象放入earlyProxyReferenceHashMap中,并生成代理对象。
ArrayList源码分析
add(E e)
public boolean add(E e) {ensureCapacityInternal(size + 1); // Increments modCount!!elementData[size++] = e;return true;}
ensureCapacityInternal(size+1)
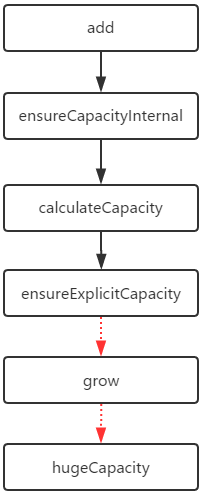
// 数组内部容量检查private void ensureCapacityInternal(int minCapacity) {// 判断是否为空数组if (elementData == DEFAULTCAPACITY_EMPTY_ELEMENTDATA) {minCapacity = Math.max(DEFAULT_CAPACITY, minCapacity);}ensureExplicitCapacity(minCapacity);}private void ensureExplicitCapacity(int minCapacity) {modCount++;// 最小容量>数组缓冲区长度if (minCapacity - elementData.length > 0)// 扩容grow(minCapacity);}private void grow(int minCapacity) {// 获取当前数组长度int oldCapacity = elementData.length;// 扩容,默认扩容1.5倍int newCapacity = oldCapacity + (oldCapacity >> 1);if (newCapacity - minCapacity < 0)newCapacity = minCapacity;// 如果扩容后的容量大于临界值,则进行大容量分配if (newCapacity - MAX_ARRAY_SIZE > 0)newCapacity = hugeCapacity(minCapacity);// minCapacity is usually close to size, so this is a win:// 新的数组容量大小已经确定,就复制数组,改变容量大小elementData = Arrays.copyOf(elementData, newCapacity);}private static int hugeCapacity(int minCapacity) {if (minCapacity < 0) // overflowthrow new OutOfMemoryError();return (minCapacity > MAX_ARRAY_SIZE) ?Integer.MAX_VALUE :MAX_ARRAY_SIZE;}
我们调用add(e)方法时,函数调用过程如下:
remove(Object o)
// 删除ArrayList指定位置的元素public E remove(int index) {RangeCheck(index);modCount++;E oldValue = (E) elementData[index];int numMoved = size - index - 1;if (numMoved > 0)System.arraycopy(elementData, index+1, elementData, index,numMoved);elementData[--size] = null; // Let gc do its workreturn oldValue;}// 删除ArrayList的指定元素public boolean remove(Object o) {if (o == null) {for (int index = 0; index < size; index++)if (elementData[index] == null) {fastRemove(index);return true;}} else {for (int index = 0; index < size; index++)if (o.equals(elementData[index])) {fastRemove(index);return true;}}return false;}// 快速删除第index个元素private void fastRemove(int index) {modCount++;int numMoved = size - index - 1;// 从"index+1"开始,用后面的元素替换前面的元素。if (numMoved > 0)System.arraycopy(elementData, index+1, elementData, index,numMoved);// 将最后一个元素设为nullelementData[--size] = null; // Let gc do its work}// 删除元素public boolean remove(Object o) {if (o == null) {for (int index = 0; index < size; index++)if (elementData[index] == null) {fastRemove(index);return true;}} else {// 便利ArrayList,找到“元素o”,则删除,并返回true。for (int index = 0; index < size; index++)if (o.equals(elementData[index])) {fastRemove(index);return true;}}return false;}/*** 用src数组srcPos索引(包括该索引)元素值及其后面元素值,覆盖到* dest数组destPos索引(包括该索引)位置。*/public static native void arraycopy(Object src, int srcPos,Object dest, int destPos,int length);
clear()
/*** 移除list中的所有元素,这个list表将在调用之后置空* - 它会将数组缓冲区所以元素置为 null* - 清空后,我们直接打印 list,却只会看见一个 [], 而不是 [null, null, ….] ==> toString() 和 迭代器进行了处理*/public void clear() {modCount++;// clear to let GC do its workfor (int i = 0; i < size; i++)elementData[i] = null;size = 0;}

