Docker安装
环境需求
Linux,且要求内核3.0以上。
# 查看内核版本[root@VM-8-9-centos ~]# uname -aLinux VM-8-9-centos 4.18.0-305.3.1.el8.x86_64 #1 SMP Tue Jun 1 16:14:33 UTC 2021 x86_64 x86_64 x86_64 GNU/Linux# 查看发行版(本文档采用centos8)[root@VM-8-9-centos ~]# cat /etc/os-releaseNAME="CentOS Linux"VERSION="8 (Core)"ID="centos"ID_LIKE="rhel fedora"VERSION_ID="8"PLATFORM_ID="platform:el8"PRETTY_NAME="CentOS Linux 8 (Core)"ANSI_COLOR="0;31"CPE_NAME="cpe:/o:centos:centos:8"HOME_URL="https://www.centos.org/"BUG_REPORT_URL="https://bugs.centos.org/"CENTOS_MANTISBT_PROJECT="CentOS-8"CENTOS_MANTISBT_PROJECT_VERSION="8"REDHAT_SUPPORT_PRODUCT="centos"REDHAT_SUPPORT_PRODUCT_VERSION="8"
安装
详细安装参考文档,下面只记录命令。https://docs.docker.com/engine/install/centos/。
# 卸载已存在的dockersudo yum remove docker \docker-client \docker-client-latest \docker-common \docker-latest \docker-latest-logrotate \docker-logrotate \docker-engine# 安装yum工具yum install -y yum-utils# 配置docker repo的国内地址yum-config-manager \--add-repo \https://mirrors.aliyun.com/docker-ce/linux/centos/docker-ce.repo# 刷新yum索引yum makecache fast# 安装docker相关的 docker-ce 社区版(ee是企业版,要收费)yum install docker-ce docker-ce-cli containerd.io# 启动dockersystemctl start docker# 使用docker version查看是否按照成功[root@VM-8-9-centos ~]# docker versionClient: Docker Engine - CommunityVersion: 20.10.9API version: 1.41Go version: go1.16.8Git commit: c2ea9bcBuilt: Mon Oct 4 16:08:25 2021OS/Arch: linux/amd64Context: defaultExperimental: trueServer: Docker Engine - CommunityEngine:Version: 20.10.9API version: 1.41 (minimum version 1.12)Go version: go1.16.8Git commit: 79ea9d3Built: Mon Oct 4 16:06:48 2021OS/Arch: linux/amd64Experimental: falsecontainerd:Version: 1.4.11GitCommit: 5b46e404f6b9f661a205e28d59c982d3634148f8runc:Version: 1.0.2GitCommit: v1.0.2-0-g52b36a2docker-init:Version: 0.19.0GitCommit: de40ad0
卸载Docker
# 卸载依赖yum remove docker-ce docker-ce-cli containerd.io# 删除资源,/var/lib/docker 是docker的默认工作路径!rm -rf /var/lib/docker
配置Docker仓库加速地址
由于我用的是腾讯云轻量应用服务器,所以就使用腾讯云的加速,使用阿里云的可以去搜一下。
# 创建一个文件vim /etc/docker/daemon.json# 输入加速地址{"registry-mirrors": ["https://mirror.ccs.tencentyun.com"]}# 重启Dockersudo systemctl restart docker
Docker工作流程
docker架构图

Docker is an open platform for developing, shipping, and running applications. Docker enables you to separate your applications from your infrastructure so you can deliver software quickly. With Docker, you can manage your infrastructure in the same ways you manage your applications. By taking advantage of Docker’s methodologies for shipping, testing, and deploying code quickly, you can significantly reduce the delay between writing code and running it in production.
Docker是一个CS结构的应用管理平台,开发者通过Docker客户端连接上Docker服务器后,就可以在不同的基础环境中运行应用,因为Docker对基础环境提供了抽象。
从图中可以看出,如果想使用Docker运行一个容器。需要先从docker hub上拉取一个镜像,然后启动这个镜像就可以让其作为一个容器运行起来。
Docker命令
帮助命令
docker基本信息
[root@VM-8-9-centos ~]# docker infoClient:Context: defaultDebug Mode: falsePlugins:app: Docker App (Docker Inc., v0.9.1-beta3)buildx: Build with BuildKit (Docker Inc., v0.6.3-docker)scan: Docker Scan (Docker Inc., v0.8.0)Server:Containers: 0Running: 0Paused: 0Stopped: 0Images: 3Server Version: 20.10.9Storage Driver: overlay2Backing Filesystem: extfsSupports d_type: trueNative Overlay Diff: trueuserxattr: falseLogging Driver: json-fileCgroup Driver: cgroupfsCgroup Version: 1Plugins:Volume: localNetwork: bridge host ipvlan macvlan null overlayLog: awslogs fluentd gcplogs gelf journald json-file local logentries splunk syslogSwarm: inactiveRuntimes: io.containerd.runc.v2 io.containerd.runtime.v1.linux runcDefault Runtime: runcInit Binary: docker-initcontainerd version: 5b46e404f6b9f661a205e28d59c982d3634148f8runc version: v1.0.2-0-g52b36a2init version: de40ad0Security Options:seccompProfile: defaultKernel Version: 4.18.0-305.3.1.el8.x86_64Operating System: CentOS Linux 8 (Core)OSType: linuxArchitecture: x86_64CPUs: 2Total Memory: 3.649GiBName: VM-8-9-centosID: RWPV:56TQ:L2XR:PRWM:UYGT:A2MU:PJXQ:BUFW:7TUK:AEH2:XOA7:BTATDocker Root Dir: /var/lib/dockerDebug Mode: falseRegistry: https://index.docker.io/v1/Labels:Experimental: falseInsecure Registries:127.0.0.0/8Registry Mirrors:https://mirror.ccs.tencentyun.com/Live Restore Enabled: false
从上面输出的信息中可以看出来Docker的基本信息,比如docker的版本,当前docker拥有几个镜像,Linux的版本,机子的信息,镜像仓库的地址。
docker帮助命令
# 查看docker的命令docker help# 查看命令的帮助文档docker 命令 --help
镜像命令
搜索镜像
[root@VM-8-9-centos ~]# docker search mysqlNAME DESCRIPTION STARS OFFICIAL AUTOMATEDmysql MySQL is a widely used, open-source relation… 11521 [OK]mariadb MariaDB Server is a high performing open sou… 4373 [OK]mysql/mysql-server Optimized MySQL Server Docker images. Create… 851 [OK]centos/mysql-57-centos7 MySQL 5.7 SQL database server 91mysql/mysql-cluster Experimental MySQL Cluster Docker images. Cr… 88centurylink/mysql Image containing mysql. Optimized to be link… 59 [OK]databack/mysql-backup Back up mysql databases to... anywhere! 51prom/mysqld-exporter 42 [OK]deitch/mysql-backup REPLACED! Please use http://hub.docker.com/r… 41 [OK]tutum/mysql Base docker image to run a MySQL database se… 35linuxserver/mysql A Mysql container, brought to you by LinuxSe… 32schickling/mysql-backup-s3 Backup MySQL to S3 (supports periodic backup… 31 [OK]mysql/mysql-router MySQL Router provides transparent routing be… 23centos/mysql-56-centos7 MySQL 5.6 SQL database server 20arey/mysql-client Run a MySQL client from a docker container 18 [OK]fradelg/mysql-cron-backup MySQL/MariaDB database backup using cron tas… 16 [OK]yloeffler/mysql-backup This image runs mysqldump to backup data usi… 7 [OK]genschsa/mysql-employees MySQL Employee Sample Database 7 [OK]openshift/mysql-55-centos7 DEPRECATED: A Centos7 based MySQL v5.5 image… 6idoall/mysql MySQL is a widely used, open-source relation… 3 [OK]devilbox/mysql Retagged MySQL, MariaDB and PerconaDB offici… 3jelastic/mysql An image of the MySQL database server mainta… 2ansibleplaybookbundle/mysql-apb An APB which deploys RHSCL MySQL 2 [OK]widdpim/mysql-client Dockerized MySQL Client (5.7) including Curl… 1 [OK]centos/mysql-80-centos7 MySQL 8.0 SQL database server 1
除了使用docker search搜索,我们还可以去docker hub上搜索,一般最常用的还是去docker hub上搜索。
下载镜像
# 下载镜像是可以携带版本号,也可以不携带,如果不携带默认使用最新版,但是使用时一般都会携带版本号。# docker pull 镜像名:tag[root@VM-8-9-centos ~]# docker pull nginx:1.21.31.21.3: Pulling from library/nginx07aded7c29c6: Already existsbbe0b7acc89c: Pull complete44ac32b0bba8: Pull complete91d6e3e593db: Pull complete8700267f2376: Pull complete4ce73aa6e9b0: Pull completeDigest: sha256:06e4235e95299b1d6d595c5ef4c41a9b12641f6683136c18394b858967cd1506Status: Downloaded newer image for nginx:1.21.3docker.io/library/nginx:1.21.3
如果不知道镜像的名字或版本号就可以去docker hub上搜索。
查看本地镜像
[root@VM-8-9-centos ~]# docker imagesREPOSITORY TAG IMAGE ID CREATED SIZEnginx 1.21.3 f8f4ffc8092c 13 days ago 133MBmysql latest 2fe463762680 13 days ago 514MBhello-world latest feb5d9fea6a5 2 weeks ago 13.3kBcentos latest 5d0da3dc9764 3 weeks ago 231MB
解释
REPOSITORY 镜像名TAG 标签IMAGE ID 镜像IDCREATED 创建时间SIZE 镜像大小
可选项
# -a Show all images (default hides intermediate images)# -q Only show image IDs[root@VM-8-9-centos ~]# docker images -aREPOSITORY TAG IMAGE ID CREATED SIZEnginx 1.21.3 f8f4ffc8092c 13 days ago 133MBmysql latest 2fe463762680 13 days ago 514MBhello-world latest feb5d9fea6a5 2 weeks ago 13.3kBcentos latest 5d0da3dc9764 3 weeks ago 231MB[root@VM-8-9-centos ~]# docker images -qf8f4ffc8092c2fe463762680feb5d9fea6a55d0da3dc9764
参数
# docker images 镜像名[root@VM-8-9-centos ~]# docker images nginxREPOSITORY TAG IMAGE ID CREATED SIZEnginx 1.21.3 f8f4ffc8092c 13 days ago 133MB
删除镜像
# docker rmi 镜像名/镜像ID[root@VM-8-9-centos ~]# docker rmi hello-worldUntagged: hello-world:latestUntagged: hello-world@sha256:9ade9cc2e26189a19c2e8854b9c8f1e14829b51c55a630ee675a5a9540ef6ccfDeleted: sha256:feb5d9fea6a5e9606aa995e879d862b825965ba48de054caab5ef356dc6b3412Deleted: sha256:e07ee1baac5fae6a26f30cabfe54a36d3402f96afda318fe0a96cec4ca393359[root@VM-8-9-centos ~]# docker images -aREPOSITORY TAG IMAGE ID CREATED SIZEnginx 1.21.3 f8f4ffc8092c 13 days ago 133MBmysql latest 2fe463762680 13 days ago 514MBcentos latest 5d0da3dc9764 3 weeks ago 231MB
删除全部镜像:
docker rmi -f $(docker images -aq);docker images -q | xargs docker rmi。容器命令
运行容器
镜像类比为一个安装包,是一个静态的概念,容器类比为一个运行的应用,是一个动态的概念。每个容器都有一个唯一的容器名,可以通过—name指定容器名,如果不指定,会使用随机的名称。# 基础用法:docker run -d -p 宿主机端口:容器端口 --name="容器名" 镜像名:版本# docker run -d -p 8080:80 --name="mynginx" nginx:1.21.3
当我们运行容器之后,容器是一个单独的环境,理解为Linux中又启动了一个Linux。所以容器开启的端口不是宿主机的端口,上面的命令表示,容器本身开启了一个80端口,宿主机开启了一个8080端口映射到容器,所以如果需要从客户端访问到容器内的服务,需要使用8080端口。不能使用80端口。
默认容器的启动是以前台方式进行的,-d可选项表示容器以后台方式运行。 ```bash [root@VM-8-9-centos ~]# docker run -d -p 8080:80 —name=”mynginx” nginx:1.21.3 d0de55896281ead7c0cab5596ff884d0bd849965147a4d02cbc6cb013692c459 [root@VM-8-9-centos ~]# docker ps CONTAINER ID IMAGE COMMAND CREATED STATUS PORTS NAMES d0de55896281 nginx:1.21.3 “/docker-entrypoint.…” 2 seconds ago Up 2 seconds 0.0.0.0:8080->80/tcp, :::8080->80/tcp mynginx [root@VM-8-9-centos ~]# curl localhost:8080 <!DOCTYPE html>Welcome to nginx!
If you see this page, the nginx web server is successfully installed and working. Further configuration is required.
For online documentation and support please refer to
nginx.org.
Commercial support is available at
nginx.com.
Thank you for using nginx.
[root@VM-8-9-centos ~]# curl localhost:80 curl: (7) Failed to connect to localhost port 80: Connection refused [root@VM-8-9-centos ~]#<a name="i3ytJ"></a>
### 进入容器
上面讲到,容器本身就是一个linux,所以我们自然可以登录到容器中。bash
# docker exec -i -t 容器名/容器ID shell
# docker exec 是在容器中运行命令,通过我们会通过这个命令开一个shell终端,再在shell终端中执行业务命令
# -i : Keep STDIN open even if not attached
# -t : Allocate a pseudo-TTY,分配一个伪终端。为啥是”伪”呢,暂不明白。
docker exec -i -t mynginx /bin/bash
[root@VM-8-9-centos ~]# docker exec -i -t mynginx /bin/bash
root@d0de55896281:/# ll
bash: ll: command not found
root@d0de55896281:/# ls
bin boot dev docker-entrypoint.d docker-entrypoint.sh etc home lib lib64 media mnt opt proc root run sbin srv sys tmp usr var
root@d0de55896281:/# exit;
exit
[root@VM-8-9-centos ~]# docker exec -i -t mynginx /bin/bash
root@d0de55896281:/# ls -a
. .dockerenv boot docker-entrypoint.d etc lib media opt root sbin sys usr
.. bin dev docker-entrypoint.sh home lib64 mnt proc run srv tmp var
root@d0de55896281:/# curl localhost:80
<!DOCTYPE html>
Welcome to nginx!
If you see this page, the nginx web server is successfully installed and working. Further configuration is required.
For online documentation and support please refer to
nginx.org.
Commercial support is available at
nginx.com.
Thank you for using nginx.
root@d0de55896281:/# exit exit进入到正在运行的容器之后,我们就可以执行我们想要的指令。因为它本身就可以理解为一个Linux系统,但是这个Linux系统通常很简单,很多指令都不支持。<br />退出容器使用exit。<br />如果想运行容器时立刻打开一个此容器的shell终端,可以在docker run上增加可选项-it。bash
[root@VM-8-9-centos ~]# docker run -it nginx:1.21.3 /bin/bash
root@1e9fdc40a104:/# ls -a
. .dockerenv boot docker-entrypoint.d etc lib media opt root sbin sys usr
.. bin dev docker-entrypoint.sh home lib64 mnt proc run srv tmp var
root@1e9fdc40a104:/# curl localhost
curl: (7) Failed to connect to localhost port 80: Connection refused
root@1e9fdc40a104:/# exit
exit
但进入之后我们会发现nginx没有启动,这是因为docker run命令携带的参数/bin/bash覆盖了启动nginx的命令。前面提到过,docker容器可以理解为一个小型的linux,在制作docker镜像的时候,通过会写一些启动命令,这样在容器启动之后服务就会启动了。这些启动命令是可以被替换的,上面我们就是用/bin/bash替换了默认的命令,导致nginx无法启动。所以通过想进入容器,都会选择先启动容器,在docker exec执行/bin/bash开启一个能和docker交互的终端。
<a name="r30CB"></a>
### 查看容器
bash
查看正在运行的容器
docker ps
# 查看全部容器 -a
docker pa -a
[root@VM-8-9-centos ~]# docker ps -a
CONTAINER ID IMAGE COMMAND CREATED STATUS PORTS NAMES
1e9fdc40a104 nginx:1.21.3 “/docker-entrypoint.…” 37 minutes ago Exited (7) 36 minutes ago confident_hofstadter
d0de55896281 nginx:1.21.3 “/docker-entrypoint.…” About an hour ago Up About an hour 0.0.0.0:8080->80/tcp, :::8080->80/tcp mynginx
[root@VM-8-9-centos ~]# docker ps
CONTAINER ID IMAGE COMMAND CREATED STATUS PORTS NAMES
d0de55896281 nginx:1.21.3 “/docker-entrypoint.…” About an hour ago Up About an hour 0.0.0.0:8080->80/tcp, :::8080->80/tcp mynginx
容器是有生命状态的,包含:Stop、Running和Pause三个状态。docker ps只能看见处于Running和Pause状态的容器,看不见处于Stop状态的容器。bash
[root@VM-8-9-centos ~]# docker ps
CONTAINER ID IMAGE COMMAND CREATED STATUS PORTS NAMES
1fb0fd6f5272 nginx:1.21.3 “/docker-entrypoint.…” 2 minutes ago Up 2 minutes (Paused) 0.0.0.0:8082->80/tcp, :::8082->80/tcp mynginx3
d0de55896281 nginx:1.21.3 “/docker-entrypoint.…” 20 hours ago Up 20 hours 0.0.0.0:8080->80/tcp, :::8080->80/tcp mynginx
[root@VM-8-9-centos ~]# docker ps -a
CONTAINER ID IMAGE COMMAND CREATED STATUS PORTS NAMES
1fb0fd6f5272 nginx:1.21.3 “/docker-entrypoint.…” 2 minutes ago Up 2 minutes (Paused) 0.0.0.0:8082->80/tcp, :::8082->80/tcp mynginx3
d6051e48450c nginx:1.21.3 “/docker-entrypoint.…” 3 minutes ago Exited (0) 43 seconds ago mynginx2
d0de55896281 nginx:1.21.3 “/docker-entrypoint.…” 20 hours ago Up 20 hours 0.0.0.0:8080->80/tcp, :::8080->80/tcp mynginx
<a name="COJ6J"></a>
### 停止容器 & 暂停容器
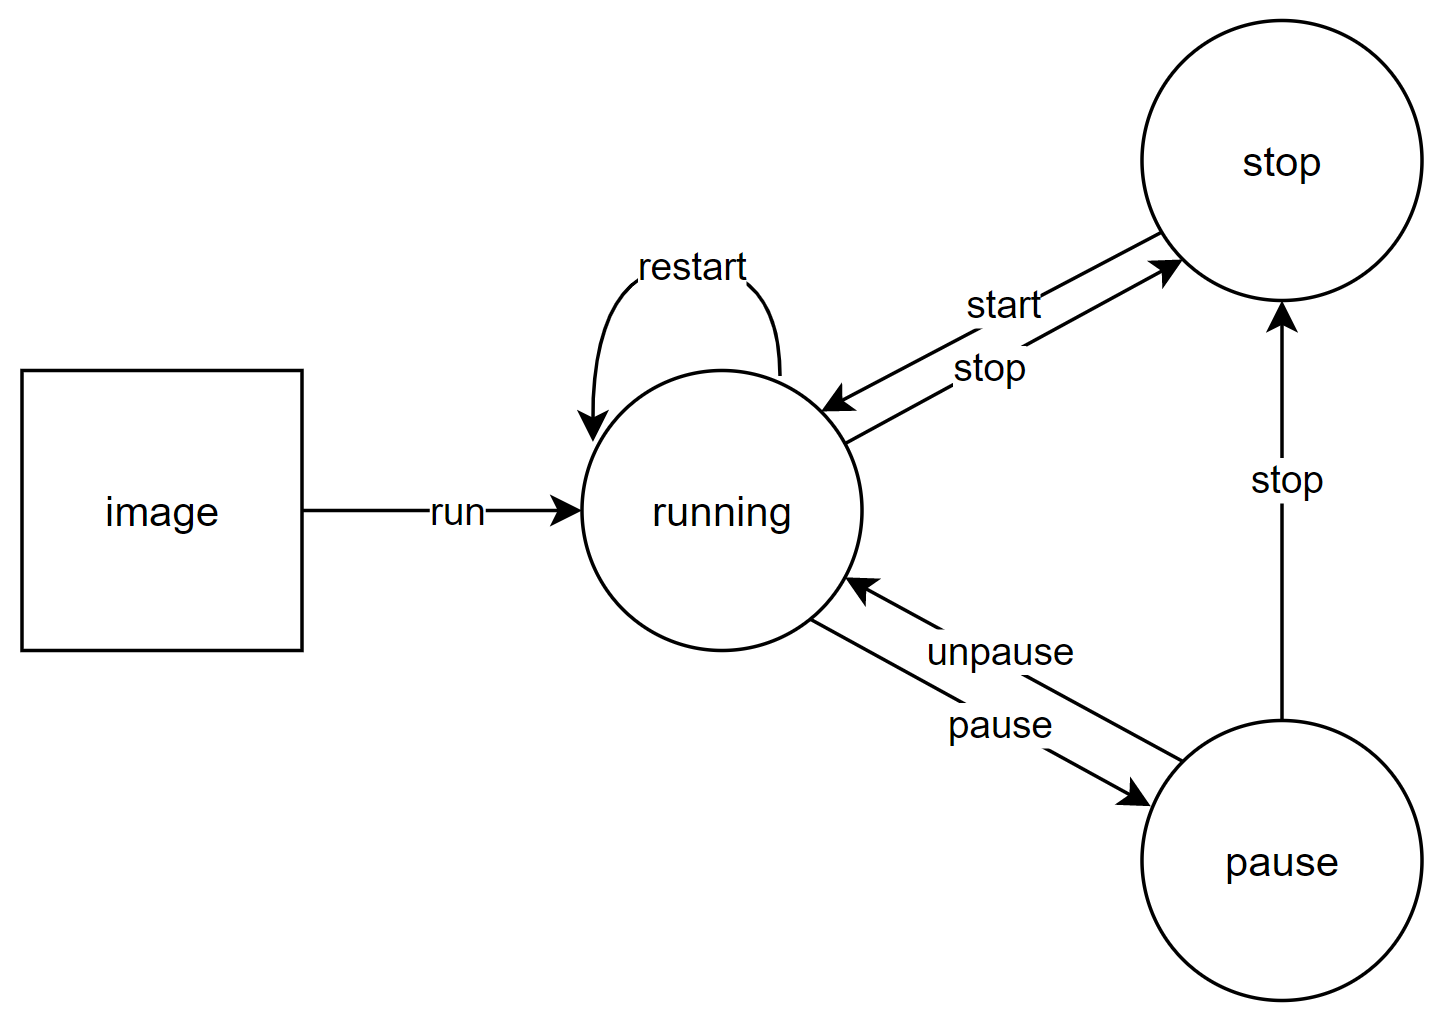<br />暂停容器、启动容器、停止容器、重启容器的命令都很简单:docker pause、docker start、docker stop和docker restart。<br />Pause状态和Stop状态类似于电脑关机和电脑休眠,Pause时不消耗CPU,但是依然占据内存,Stop时CPU和内存都不再占据。所以对于被pause的容器,unpause之后,容器内部服务的Context不会改变。但是对于start或restart的容器,容器内部服务的Context会改变。<br />我们请求一下容器内部的服务看看。bash
[root@VM-8-9-centos ~]# docker ps -a
CONTAINER ID IMAGE COMMAND CREATED STATUS PORTS NAMES
b38784365688 nginx:1.21.3 “/docker-entrypoint.…” 13 seconds ago Up 13 seconds 0.0.0.0:8080->80/tcp, :::8080->80/tcp mynginx1
1fb0fd6f5272 nginx:1.21.3 “/docker-entrypoint.…” 31 minutes ago Up 11 minutes (Paused) 0.0.0.0:8082->80/tcp, :::8082->80/tcp mynginx3
d6051e48450c nginx:1.21.3 “/docker-entrypoint.…” 31 minutes ago Exited (0) 29 minutes ago mynginx2
# 处于running状态的容器正常返回
[root@VM-8-9-centos ~]# curl localhost:8080
<!DOCTYPE html>
Welcome to nginx!
If you see this page, the nginx web server is successfully installed and working. Further configuration is required.
For online documentation and support please refer to
nginx.org.
Commercial support is available at
nginx.com.
Thank you for using nginx.
处于Stop状态的容器拒绝服务
[root@VM-8-9-centos ~]# curl localhost:8081 curl: (7) Failed to connect to localhost port 8081: Connection refused
处于Pause状态的服务可以接受请求但是不返回结果,因为它申请不到CPU资源。
[root@VM-8-9-centos ~]# curl localhost:8082 ^C
<a name="sC1mj"></a>### 输出容器状态**查看容器内部进程**```bash# docker top 容器ID[root@VM-8-9-centos ~]# docker top 1fUID PID PPID C STIME TTY TIME CMDroot 3731429 3731409 0 18:33 ? 00:00:00 nginx: master process nginx -g daemon off;101 3731473 3731429 0 18:33 ? 00:00:00 nginx: worker process101 3731474 3731429 0 18:33 ? 00:00:00 nginx: worker process
从docker top的输出中看出一些容器的进程信息,比如进程的个数,进程的PID以及PPID,进程的创建时间以及创建命令。从上图可以看出nginx创建了一个主进程(用于接收请求),两个工作进程(用于处理请求)。
查看容器状态
# docker stats 容器IDCONTAINER ID NAME CPU % MEM USAGE / LIMIT MEM % NET I/O BLOCK I/O PIDSb38784365688 mynginx1 0.00% 2.676MiB / 3.649GiB 0.07% 2.53kB / 2.55kB 0B / 8.19kB 3
docker stats可以查看容器的资源使用情况,并且可以动态刷新,类似于Linux的top命令。
删除容器
删除容器使用docker rm命令。与删除镜像容器类似。
[root@VM-8-9-centos ~]# docker ps -aCONTAINER ID IMAGE COMMAND CREATED STATUS PORTS NAMESb38784365688 nginx:1.21.3 "/docker-entrypoint.…" 51 minutes ago Up 51 minutes 0.0.0.0:8080->80/tcp, :::8080->80/tcp mynginx11fb0fd6f5272 nginx:1.21.3 "/docker-entrypoint.…" About an hour ago Up About an hour (Paused) 0.0.0.0:8082->80/tcp, :::8082->80/tcp mynginx3d6051e48450c nginx:1.21.3 "/docker-entrypoint.…" About an hour ago Exited (0) About an hour ago mynginx2[root@VM-8-9-centos ~]# docker rm 1fError response from daemon: You cannot remove a paused container 1fb0fd6f5272ef99249ce6effccf5be5a50ddcb887c388a045e4e812b015bf06. Unpause and then stop the container before attempting removal or force remove[root@VM-8-9-centos ~]# docker stop 1fd1f[root@VM-8-9-centos ~]# docker rm 1f1f[root@VM-8-9-centos ~]# docker ps -aCONTAINER ID IMAGE COMMAND CREATED STATUS PORTS NAMESb38784365688 nginx:1.21.3 "/docker-entrypoint.…" 52 minutes ago Up 52 minutes 0.0.0.0:8080->80/tcp, :::8080->80/tcp mynginx1d6051e48450c nginx:1.21.3 "/docker-entrypoint.…" About an hour ago Exited (0) About an hour ago mynginx2
需要注意的是,当容器处于Running或Pause状态时,是不能删除容器的,需要先停止再删除或者加上可选项-f来强制删除。
删除全部容器:
rm -f docker rm -f $(dockerps -aq);docker ps -a -q | xargs docker rm -f。
容器是依托镜像存在的,所以当一个镜像被用于生成容器之后,这个镜像是不能删除的,得等到依托它创建的容器都被删除之后才能删除或者在docker rmi命令上增加-f可选项来强制删除。
后台运行
之前知道,使用docker run -d是后台运行。但是需要注意一点,如果你启动的镜像里没有一个守护进程(能持续对外提供服务),此镜像是会自动stop的。
[root@VM-8-9-centos ~]# docker images -aREPOSITORY TAG IMAGE ID CREATED SIZEnginx 1.21.3 87a94228f133 37 hours ago 133MBcentos centos8.4.2105 5d0da3dc9764 3 weeks ago 231MB[root@VM-8-9-centos ~]# docker run -d 5d9b3783f131d33926ca0b1096951490f078c6427f709c092a19cebcffd01f14c8[root@VM-8-9-centos ~]# docker run -d 87376f0e7db9c6dc7d22b92db3b1120835cd1c0b24fa9e1ba42a0c30e407e2719e[root@VM-8-9-centos ~]# docker ps -aCONTAINER ID IMAGE COMMAND CREATED STATUS PORTS NAMES376f0e7db9c6 87 "/docker-entrypoint.…" 4 seconds ago Up 3 seconds 80/tcp amazing_yalow9b3783f131d3 5d "/bin/bash" 14 seconds ago Exited (0) 13 seconds ago eloquent_feynman
上图我们启动了一个centos8和一个nginx,由于centos8里没有守护进程,所以它自动stop了。而nginx有处于用户态的进程,所以,处于Running的状态。
执行如下命令:
docker run -d centos /bin/sh -c "for i in {1..50}; do echo $i; sleep 1; done"
启动之后,我们使用watch -n 1 ‘docker ps -a’。
就可以发现,在前50秒,此容器是处于Up状态的,50秒后容器就Exit了。

怎么解决这个问题呢?很简单,以交互模式开启一个shell进程就可以了。
[root@VM-8-9-centos ~]# docker run -d -it 5d /bin/bashf976950a42b4e2fb699cde3076146e77dd2f68e0d10c486ae38722a2aedde084[root@VM-8-9-centos ~]# docker ps -aCONTAINER ID IMAGE COMMAND CREATED STATUS PORTS NAMESf976950a42b4 5d "/bin/bash" 4 seconds ago Up 3 seconds silly_nobela025d52202d7 5d "/bin/bash" 23 seconds ago Exited (0) 22 seconds ago reverent_snyder376f0e7db9c6 87 "/docker-entrypoint.…" 11 minutes ago Up 11 minutes 80/tcp amazing_yalow9b3783f131d3 5d "/bin/bash" 11 minutes ago Exited (0) 11 minutes ago eloquent_feynman
此时就可以看见,f9这个容器是正常启动的。所以我的理解就是如果既没有用户态进程,又没有可交互的终端,docker会认为这个容器没有价值,就给它停了。
我们再看一个细节,就是docker ps的输出中COMMAND这一列。
[root@VM-8-9-centos ~]# docker ps -aCONTAINER ID IMAGE COMMAND CREATED STATUS PORTS NAMES89ad4394806c hello-world "/hello" 4 seconds ago Exited (0) 3 seconds ago loving_morsecc357ba877a3 5d "/bin/bash" 20 minutes ago Up 20 minutes eloquent_sahaf976950a42b4 5d "/bin/bash" 35 minutes ago Up 35 minutes silly_nobela025d52202d7 5d "/bin/bash" 35 minutes ago Exited (0) 35 minutes ago reverent_snyder376f0e7db9c6 87 "/docker-entrypoint.…" 46 minutes ago Up 46 minutes 80/tcp amazing_yalow9b3783f131d3 5d "/bin/bash" 46 minutes ago Exited (0) 46 minutes ago eloquent_feynman
可以发现每个容器启动之后都会执行一个命令,centos8容器是一个bash窗口,nginx容器是一个nginx的启动脚本。
[root@VM-8-9-centos ~]# docker run -it 5d /bin/bash[root@ade15ea3850d /]#
如果我们使用前台命令运行,也需要以交互模式运行,否则容器会自动stop,因为即使是以前台方式运行,但是无法进行交互,容器也是无价值的。
查看控制台输出
上面提到,每个容器在启动之后都会执行一个命令,那么这个命名在执行的时候是可能在控制台上打印一些日志的。查看这些输出需要使用docker logs命令。
[root@VM-8-9-centos ~]# docker ps -aCONTAINER ID IMAGE COMMAND CREATED STATUS PORTS NAMES10d71843a63f nginx:1.21.3 "/docker-entrypoint.…" 7 minutes ago Up 4 minutes 80/tcp awesome_hopper2f20c79ffaf2 centos "/bin/sh -c 'while t…" 11 minutes ago Up 11 minutes zealous_brattain# -t 行前输出日志打印的时间# -f 以follow模式运行# --tail n 显示末尾n行[root@VM-8-9-centos ~]# docker logs -t -f --tail 12 102021-10-14T10:40:03.745367518Z 10-listen-on-ipv6-by-default.sh: info: IPv6 listen already enabled2021-10-14T10:40:03.745500346Z /docker-entrypoint.sh: Launching /docker-entrypoint.d/20-envsubst-on-templates.sh2021-10-14T10:40:03.748270887Z /docker-entrypoint.sh: Launching /docker-entrypoint.d/30-tune-worker-processes.sh2021-10-14T10:40:03.749476173Z /docker-entrypoint.sh: Configuration complete; ready for start up2021-10-14T10:40:03.753653093Z 2021/10/14 10:40:03 [notice] 1#1: using the "epoll" event method2021-10-14T10:40:03.753666392Z 2021/10/14 10:40:03 [notice] 1#1: nginx/1.21.32021-10-14T10:40:03.753690583Z 2021/10/14 10:40:03 [notice] 1#1: built by gcc 8.3.0 (Debian 8.3.0-6)2021-10-14T10:40:03.753695450Z 2021/10/14 10:40:03 [notice] 1#1: OS: Linux 4.18.0-305.3.1.el8.x86_642021-10-14T10:40:03.753699459Z 2021/10/14 10:40:03 [notice] 1#1: getrlimit(RLIMIT_NOFILE): 1048576:10485762021-10-14T10:40:03.753752419Z 2021/10/14 10:40:03 [notice] 1#1: start worker processes2021-10-14T10:40:03.754481107Z 2021/10/14 10:40:03 [notice] 1#1: start worker process 252021-10-14T10:40:03.754494278Z 2021/10/14 10:40:03 [notice] 1#1: start worker process 26
上面是我启动了一个nginx,nginx启动的时候会执行docker-entrypoint.sh脚本,脚本执行的时候会在控制台上打印一些日志。
文件拷贝
控制台的日志一般是一些基本的服务启动信息,完整的日志会写在日志文件中,所以一种看日志的方式就是进入容器看,因为容器就是一个Linux。但是容器本身的Linux功能很少,所以一般还是将日志拷贝出来比较方便。
从容器内部拷贝文件出来的命令是docker cp。
[root@VM-8-9-centos ~]# docker run -d -it --name="mycentos" centos:centos8.4.2105 /bin/bashc57aaf10844578bb1165a675fcb81e399603c8c67f979ecc7ec852fd806be69a[root@VM-8-9-centos ~]# docker exec -i -t mycentos /bin/bash[root@c57aaf108445 /]# echo "1">test[root@c57aaf108445 /]# cat test1[root@c57aaf108445 /]# exitexit[root@VM-8-9-centos ~]# docker ps -aCONTAINER ID IMAGE COMMAND CREATED STATUS PORTS NAMESc57aaf108445 centos:centos8.4.2105 "/bin/bash" About a minute ago Up About a minute mycentos671a4427be55 nginx:1.21.3 "/docker-entrypoint.…" 4 minutes ago Up 4 minutes 0.0.0.0:8080->80/tcp, :::8080->80/tcp mynginx# docker cp 容器ID:绝对路径 绝对路径[root@VM-8-9-centos ~]# docker cp c57aaf10844:/test /test2[root@VM-8-9-centos ~]# cat /test21
容器启动的思考
docker镜像可以理解为一个安装了应用的Linux系统,docker容器可以理解为一个运行了服务的Linux系统。容器的启动应该是一个Linux的内核和一个Linux终端,然后在终端上执行一个命令或脚本来启动服务。从之前的测试中可以看出来,centos8容器启动之后会启动/bin/bash这个应用,nginx容器启动之后会执行docker-entrypoint.sh来启动nginx。
如果启动容器之后既没有用户态进程,又没有可交互的终端,docker会认为这个容器没有价值,就给它停了。
启动应用的终端除了使用之前提到过的docker logs查看输出以外,还可以使用docker attach连接到这个终端上。
[root@VM-8-9-centos ~]# docker run -d centos /bin/sh -c "while true;do echo 6666;sleep 1;done"17144183aec951ed19b825ba35e6bd28ae8e8bbfaa761ecf467fca7b73aee34e[root@VM-8-9-centos ~]# docker ps -aCONTAINER ID IMAGE COMMAND CREATED STATUS PORTS NAMES17144183aec9 centos "/bin/sh -c 'while t…" 2 seconds ago Up 1 second busy_benze042f05fae1f centos "/bin/sh 'while true…" 24 seconds ago Exited (127) 23 seconds ago modest_gould671a4427be55 nginx:1.21.3 "/docker-entrypoint.…" 53 minutes ago Up 53 minutes 0.0.0.0:8080->80/tcp, :::8080->80/tcp mynginx[root@VM-8-9-centos ~]# docker attach 1716666666666666666
连接到这个终端上感觉也没什么价值。毕竟可以使用docker logs查看终端的输出。
镜像制作
容器提交为镜像
nginx有一个默认的启动页面,我们将其修改为Hello World。
[root@VM-8-9-centos ~]# docker ps -aCONTAINER ID IMAGE COMMAND CREATED STATUS PORTS NAMES671a4427be55 nginx:1.21.3 "/docker-entrypoint.…" About an hour ago Up About an hour 0.0.0.0:8080->80/tcp, :::8080->80/tcp mynginx[root@VM-8-9-centos ~]# docker exec -it 67 /bin/bashroot@671a4427be55:/# cd /usr/share/nginx/htmlroot@671a4427be55:/usr/share/nginx/html# ls -a -ltotal 16drwxr-xr-x 2 root root 4096 Oct 12 02:03 .drwxr-xr-x 3 root root 4096 Oct 12 02:03 ..-rw-r--r-- 1 root root 497 Sep 7 15:21 50x.html-rw-r--r-- 1 root root 615 Sep 7 15:21 index.htmlroot@671a4427be55:/usr/share/nginx/html# echo "Hello World" > index.htmlroot@671a4427be55:/usr/share/nginx/html# curl localhostHello World
如果换了新的服务器,那么还需要修改这个文件,所以为了能方便ship,这个容器可以被提交为镜像。
# -a author# -m commit message[root@VM-8-9-centos ~]# docker commit -a "addenda" -m "index page change" 671a4427be55 addenda_nginx:v1.0sha256:9e07a3f2860b1e904dc6c740c26fdf6fdb56ea5075d500025969b255df052d15[root@VM-8-9-centos ~]# docker imagesREPOSITORY TAG IMAGE ID CREATED SIZEaddenda_nginx v1.0 9e07a3f2860b 5 seconds ago 133MBnginx 1.21.3 87a94228f133 2 days ago 133MBhello-world latest feb5d9fea6a5 2 weeks ago 13.3kBcentos centos8.4.2105 5d0da3dc9764 4 weeks ago 231MBcentos latest 5d0da3dc9764 4 weeks ago 231MB[root@VM-8-9-centos ~]# docker run -d -p 8081:80 addenda_nginx:v1.0b05ad7d463503f72e59da6efec812ceb20538d64589be8868923d1f292ed0a71[root@VM-8-9-centos ~]# docker ps -aCONTAINER ID IMAGE COMMAND CREATED STATUS PORTS NAMESb05ad7d46350 addenda_nginx:v1.0 "/docker-entrypoint.…" 2 seconds ago Up 2 seconds 0.0.0.0:8081->80/tcp, :::8081->80/tcp beautiful_greider671a4427be55 nginx:1.21.3 "/docker-entrypoint.…" 2 hours ago Up 6 minutes 0.0.0.0:8080->80/tcp, :::8080->80/tcp mynginx[root@VM-8-9-centos ~]# curl localhost:8081Hello World
镜像打包 & 镜像加载
[root@VM-8-9-centos ~]# docker imagesREPOSITORY TAG IMAGE ID CREATED SIZEaddenda_nginx v1.0 9e07a3f2860b About an hour ago 133MBnginx 1.21.3 87a94228f133 2 days ago 133MBhello-world latest feb5d9fea6a5 2 weeks ago 13.3kBcentos centos8.4.2105 5d0da3dc9764 4 weeks ago 231MBcentos latest 5d0da3dc9764 4 weeks ago 231MB# docker save,默认的输出流是STDOUT,-o可选项是输出到文件[root@VM-8-9-centos ~]# docker save -o addenda_nginx.tar addenda_nginx:v1.0[root@VM-8-9-centos ~]# lltotal 134344-rw------- 1 root root 137564672 Oct 14 21:47 addenda_nginx.tar[root@VM-8-9-centos ~]# docker rmi addenda_nginx:v1.0Untagged: addenda_nginx:v1.0Deleted: sha256:9e07a3f2860b1e904dc6c740c26fdf6fdb56ea5075d500025969b255df052d15Deleted: sha256:d758613c98a6b43089bf68ddd7d847604c5a37c800c3a3615f06d621bcf36a5e[root@VM-8-9-centos ~]# docker imagesREPOSITORY TAG IMAGE ID CREATED SIZEnginx 1.21.3 87a94228f133 2 days ago 133MBhello-world latest feb5d9fea6a5 2 weeks ago 13.3kBcentos centos8.4.2105 5d0da3dc9764 4 weeks ago 231MBcentos latest 5d0da3dc9764 4 weeks ago 231MB# docker load,默认的输入流是STDIN,-i可选项是从文件夹读取[root@VM-8-9-centos ~]# docker load -i addenda_nginx.tar59d19ee14d22: Loading layer [==================================================>] 17.41kB/17.41kBLoaded image: addenda_nginx:v1.0[root@VM-8-9-centos ~]# docker imagesREPOSITORY TAG IMAGE ID CREATED SIZEaddenda_nginx v1.0 9e07a3f2860b About an hour ago 133MBnginx 1.21.3 87a94228f133 2 days ago 133MBhello-world latest feb5d9fea6a5 2 weeks ago 13.3kBcentos centos8.4.2105 5d0da3dc9764 4 weeks ago 231MBcentos latest 5d0da3dc9764 4 weeks ago 231MB[root@VM-8-9-centos ~]# docker run -d -p 8081:80 addenda_nginx:v1.0ffbc8db810514d1f569535385c1cd827be7fc3b85db4bb159f77ee99f31ad288[root@VM-8-9-centos ~]# curl localhost:8081Hello World
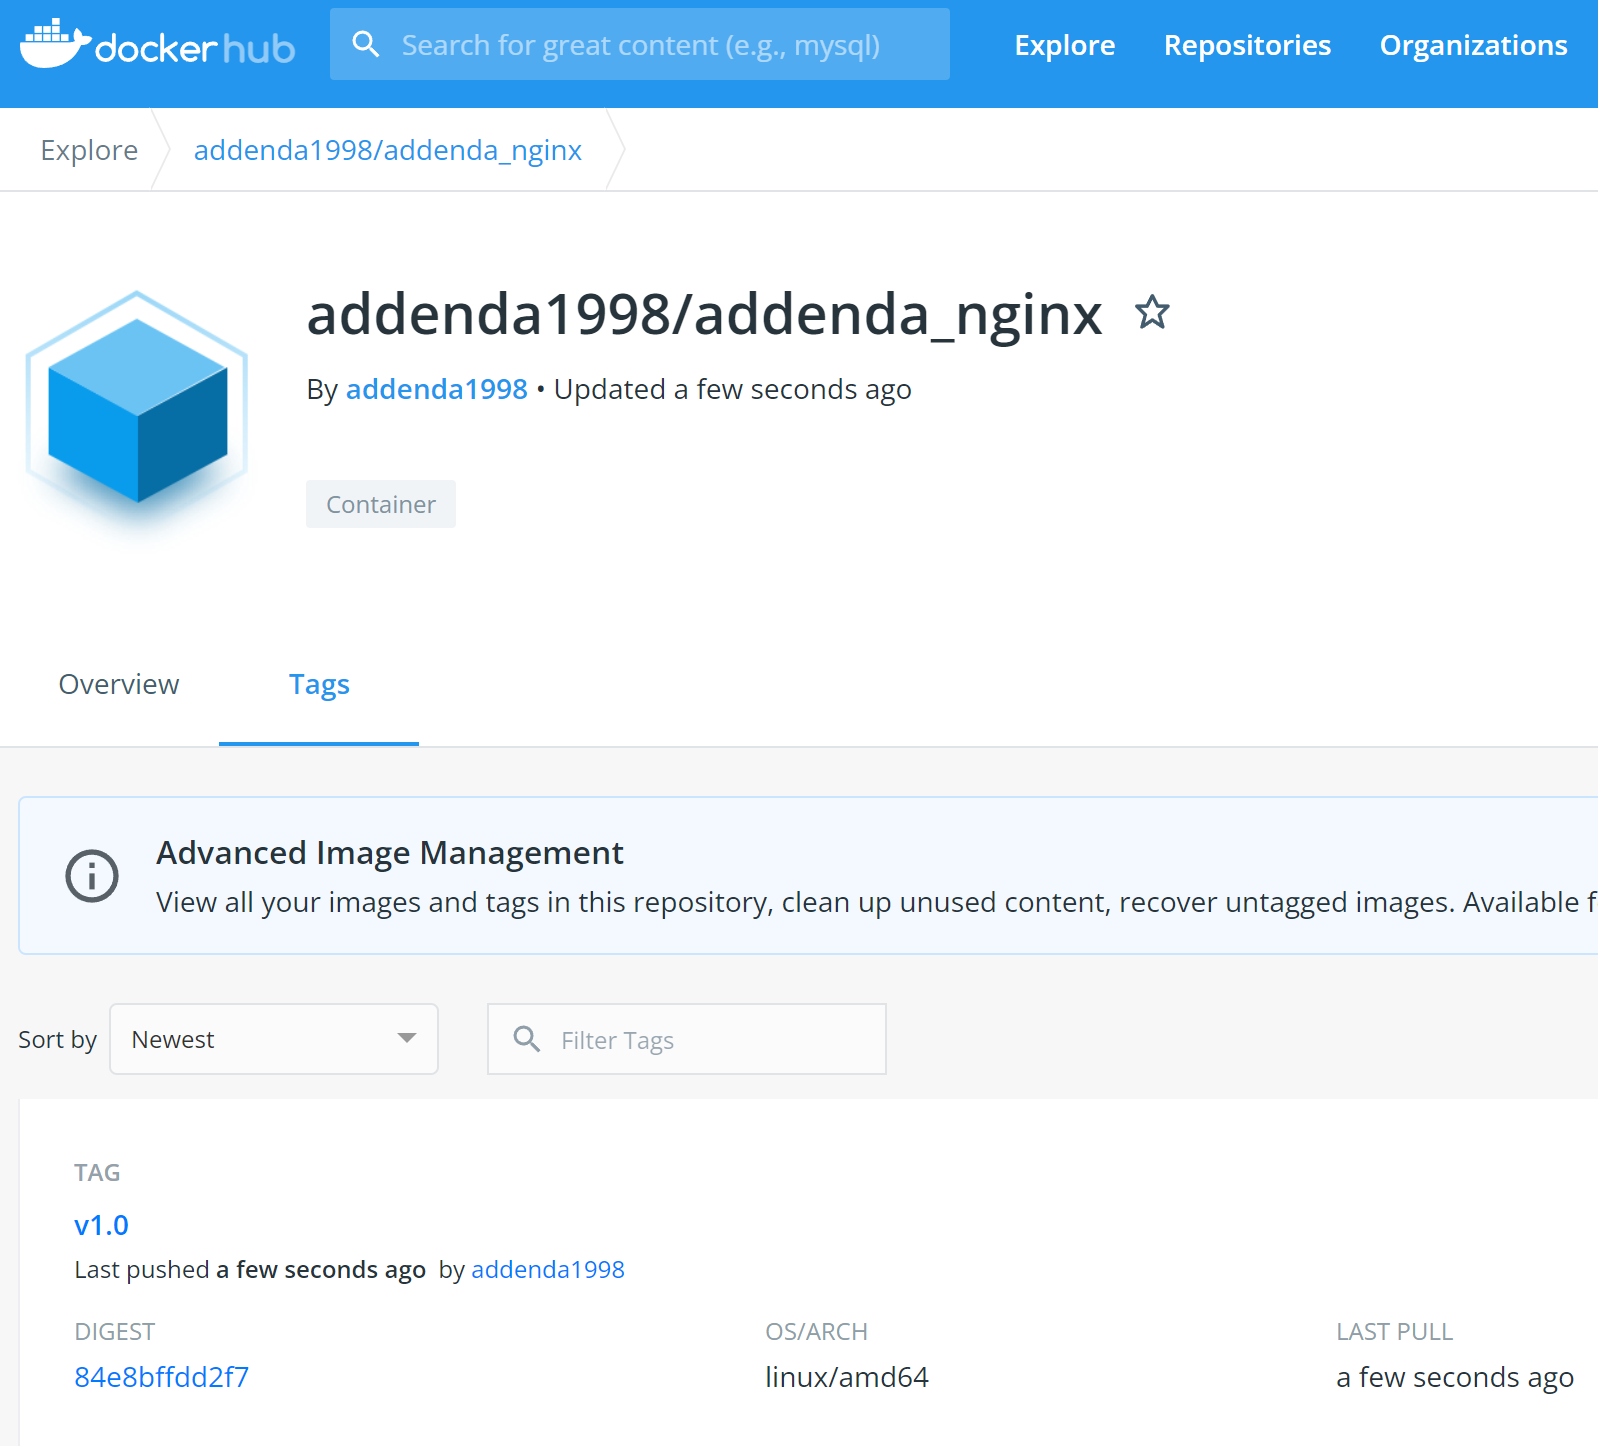
镜像发布到docker hub
镜像发布需要先去docker hub上注册一个账户。
然后需要将本地的镜像打一个tag。
# docker tag local-image:tagname new-repo:tagname[root@VM-8-9-centos ~]# docker tag addenda_nginx:v1.0 addenda1998/addenda_nginx:v1.0
登录
[root@VM-8-9-centos ~]# docker login -u addenda1998 -p passwordWARNING! Using --password via the CLI is insecure. Use --password-stdin.WARNING! Your password will be stored unencrypted in /root/.docker/config.json.Configure a credential helper to remove this warning. Seehttps://docs.docker.com/engine/reference/commandline/login/#credentials-storeLogin Succeeded
推送
[root@VM-8-9-centos ~]# docker push addenda1998/addenda_nginx:v1.0The push refers to repository [docker.io/addenda1998/addenda_nginx]59d19ee14d22: Pushed9959a332cf6e: Mounted from library/nginxf7e00b807643: Mounted from library/nginxf8e880dfc4ef: Mounted from library/nginx788e89a4d186: Mounted from library/nginx43f4e41372e4: Mounted from library/nginxe81bff2725db: Mounted from library/nginxv1.0: digest: sha256:84e8bffdd2f727db1d05421bc3d32ab743fd6b10acd8b8f926ff619416ae59eb size: 1778
退出
[root@VM-8-9-centos ~]# docker logoutRemoving login credentials for https://index.docker.io/v1/
镜像发布到腾讯云
由于在国内docker hub不好用,所以我们一般将镜像推送到阿里云或腾讯云的镜像仓库,由于写测试的服务器是腾讯云的,所以这里就以腾讯云仓库镜像来演示了。
[root@VM-8-9-centos ~]# docker tag addenda_nginx:v1.0 ccr.ccs.tencentyun.com/addenda/addenda_learn:v1.0[root@VM-8-9-centos ~]# docker login --username=100003170363 ccr.ccs.tencentyun.comPassword:WARNING! Your password will be stored unencrypted in /root/.docker/config.json.Configure a credential helper to remove this warning. Seehttps://docs.docker.com/engine/reference/commandline/login/#credentials-storeLogin Succeeded[root@VM-8-9-centos ~]# docker push ccr.ccs.tencentyun.com/addenda/addenda_learn:v1.0The push refers to repository [ccr.ccs.tencentyun.com/addenda/addenda_learn]59d19ee14d22: Pushed9959a332cf6e: Pushedf7e00b807643: Pushedf8e880dfc4ef: Pushed788e89a4d186: Pushed43f4e41372e4: Pushede81bff2725db: Pushedv1.0: digest: sha256:84e8bffdd2f727db1d05421bc3d32ab743fd6b10acd8b8f926ff619416ae59eb size: 1778[root@VM-8-9-centos ~]# docker logoutRemoving login credentials for https://index.docker.io/v1/
唯一的区别就是docker镜像的地址不同。其他步骤和docker hub一致。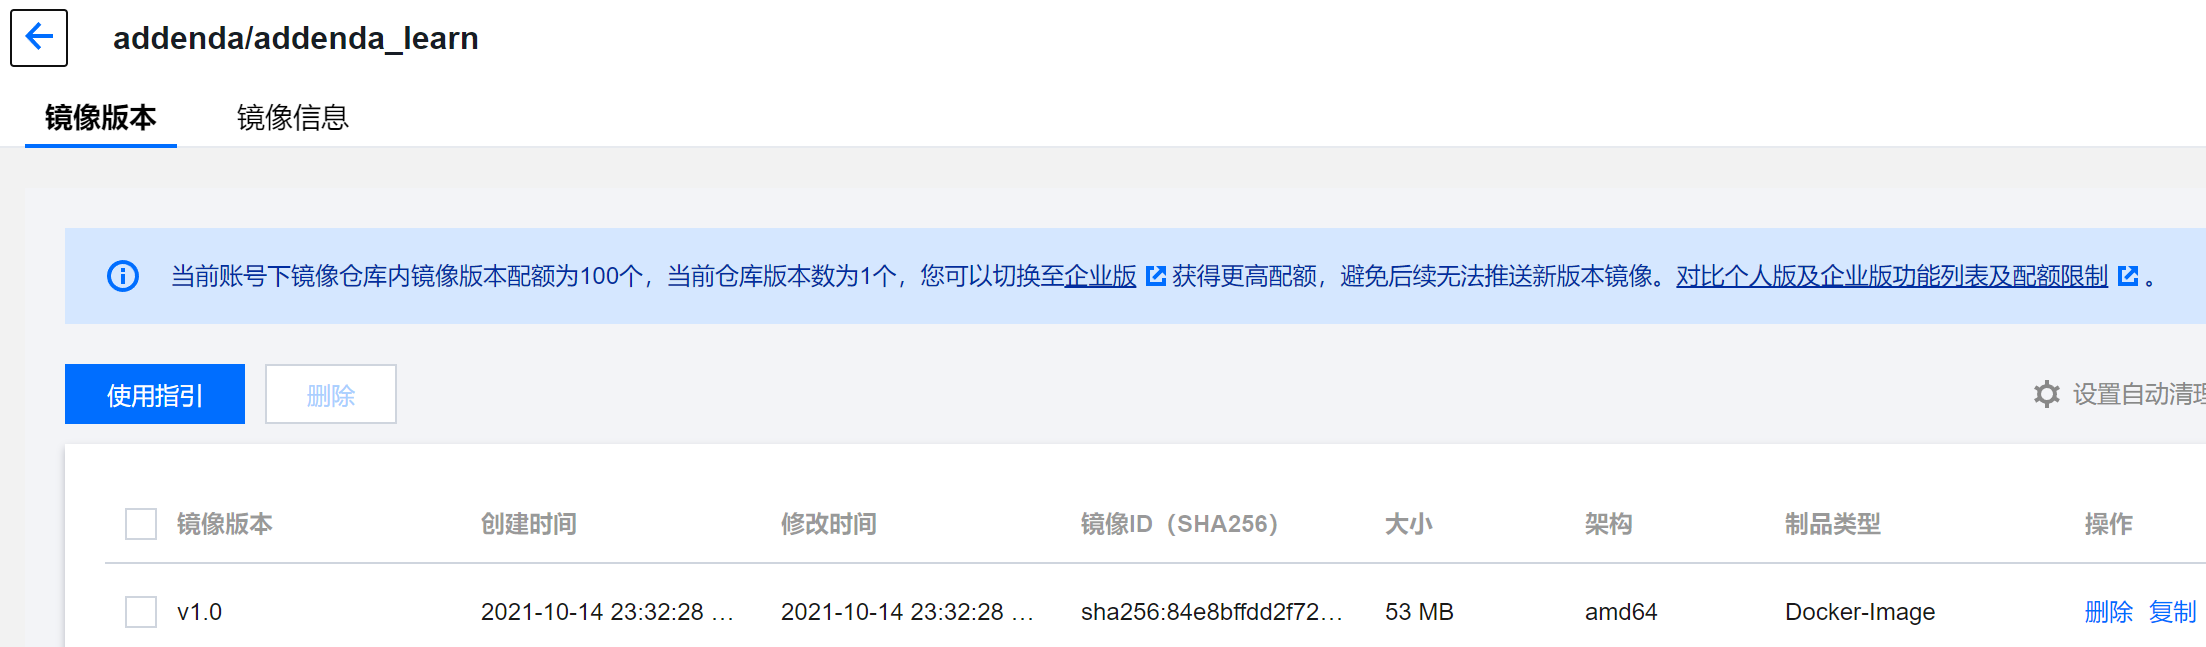
推送成功之后就可以在腾讯云上看见了。
需要注意,如果设置为私有镜像,那么需要登录后才能docker pull。
Docker基础命令总结


若有收获,就点个赞吧
0 人点赞
