- 安装要求
- 脚本自动配置安装
- 准备工作
- 官方镜像
- 清华镜像
- 华为镜像
- 查看可用版本
- yum list available —showduplicates —disablerepo=”*” —enablerepo=kubernetes
- kubeVersion=1.19.12
- sudo yum install -y kubelet-${kubeVersion} kubeadm-${kubeVersion} kubectl-${kubeVersion} —disableexcludes=kubernetes
- 节点加入集群
- 配置 flannel 网络
- 配置 Calico网络
- 修改 kube-proxy 实现 ipvsadm
- 测试集群
- 安装面板
- 常用命令
- 自动补全
- Helm
参考文档
https://kubernetes.io/zh/docs/setup/production-environment/tools/kubeadm/install-kubeadm/
安装要求
- 至少 2CPU 和 2GB 的内存
- 所有机器的网络彼此均能相互连接
- 不可以有重复的主机名、MAC 地址或 product_uuid
- 使用命令 ip link 或 ifconfig -a 来获取网络接口的 MAC 地址
- 使用 sudo cat /sys/class/dmi/id/product_uuid 命令对 product_uuid 校验
- 禁用交换分区
脚本自动配置安装
#!/usr/bin/env sh# author: acdiost# desc: 安装 kubernetes 脚本,按需修改function initial(){modprobe br_netfilterif [[ $? -ne 0 ]];thenecho '未找到 br_netfilter 模块,退出安装'exitfitimedatectl set-timezone Asia/Shanghaiyum install chrony -ysystemctl start chronyd && systemctl enable chronydchronyc sourcessystemctl stop firewalld && systemctl disable firewalldswapoff -ased -ri 's/.*swap.*/#&/' /etc/fstabHARBOR_IP=""default_nic=`ip route | grep '^default' | awk '{print $5}'`default_ip=`ip addr show ${default_nic} | grep inet | grep -v "inet6" | grep brd | awk '{print $2}' | cut -f 1 -d /`cat <<EOF | tee >> /etc/hosts# 若有私有仓库# $HARBOR_IP docker.io gcr.io k8s.gcr.io quay.io registry-1.docker.io$default_ip `hostname`EOFsetenforce 0sed -i 's/^SELINUX=enforcing$/SELINUX=permissive/' /etc/selinux/config}function update_kernel(){kernelVersion=$(uname -r | cut -b 1-4)if [ $(echo "${kernelVersion} > 4.19" | bc) -eq 1 ];thenecho '内核大于 4.19 不进行升级'return 0firpm --import https://www.elrepo.org/RPM-GPG-KEY-elrepo.orgyum install -y https://www.elrepo.org/elrepo-release-7.el7.elrepo.noarch.rpmyum --enablerepo=elrepo-kernel install -y kernel-mlkernelId=$(awk -F\' '$1=="menuentry " {print i++ " : " $2}' /etc/grub2.cfg | grep "5.12" | grep -vi rescue | awk '{print $1}')grub2-set-default ${kernelId}echo '5 秒后将重启系统,注意保存资料,完成后再执行该脚本'sleep 5reboot}function install_ipvs(){yum install socat ipvsadm ipset -yresult=$(echo "$(uname -r | cut -b 1-4) > 4.19" | bc)if [ ${result} -eq 1 ];thenecho '内核版本大于 4.19'cat <<EOF | tee /etc/sysconfig/modules/ipvs.modules#!/bin/bashmodprobe -- ip_vsmodprobe -- ip_vs_rrmodprobe -- ip_vs_wrrmodprobe -- ip_vs_shmodprobe -- nf_conntrackEOFelseecho '内核版本小于 4.19'cat <<EOF | tee /etc/sysconfig/modules/ipvs.modules#!/bin/bashmodprobe -- ip_vsmodprobe -- ip_vs_rrmodprobe -- ip_vs_wrrmodprobe -- ip_vs_sh# 4.19内核将 nf_conntrack_ipv4 更名为 nf_conntrackmodprobe -- nf_conntrack_ipv4EOFfichmod 755 /etc/sysconfig/modules/ipvs.modulesbash /etc/sysconfig/modules/ipvs.modules}function install_containerd(){curl -o /etc/yum.repos.d/docker-ce.repo https://download.docker.com/linux/centos/docker-ce.repocat <<EOF | tee /etc/modules-load.d/containerd.confoverlaybr_netfilterEOFmodprobe overlaymodprobe br_netfiltercat <<EOF | tee /etc/sysctl.d/99-kubernetes-cri.confnet.bridge.bridge-nf-call-iptables = 1net.ipv4.ip_forward = 1net.bridge.bridge-nf-call-ip6tables = 1EOFsysctl --systemyum makecache fastyum install containerd.io -ymkdir -p /etc/containerdcontainerd config default | tee /etc/containerd/config.tomlsed -i '/containerd.runtimes.runc.options/a\ \ \ \ \ \ \ \ \ \ \ \ SystemdCgroup = true' /etc/containerd/config.tomlsystemctl daemon-reloadsystemctl enable containerdsystemctl restart containerd}function install_k8s(){cat <<EOF | tee /etc/modules-load.d/k8s.confbr_netfilterEOFcat <<EOF | tee /etc/sysctl.d/k8s.confnet.bridge.bridge-nf-call-ip6tables = 1net.bridge.bridge-nf-call-iptables = 1vm.swappiness = 0EOFsysctl --systemcat <<EOF | tee /etc/yum.repos.d/kubernetes.repo[kubernetes]name=Kubernetesbaseurl=https://packages.cloud.google.com/yum/repos/kubernetes-el7-\$basearchenabled=1gpgcheck=1repo_gpgcheck=1gpgkey=https://packages.cloud.google.com/yum/doc/yum-key.gpg https://packages.cloud.google.com/yum/doc/rpm-package-key.gpgexclude=kubelet kubeadm kubectlEOFyum install -y kubelet kubeadm kubectl --disableexcludes=kubernetessystemctl enable --now kubelet}function kubeadm_init(){echo '镜像下载中...'kubeadm config images pullcrictl config runtime-endpoint /run/containerd/containerd.sockkubeadm init --pod-network-cidr=192.168.0.0/16mkdir -p $HOME/.kubecp -i /etc/kubernetes/admin.conf $HOME/.kube/configchown $(id -u):$(id -g) $HOME/.kube/configecho 'export KUBECONFIG=/etc/kubernetes/admin.conf'echo '执行 crictl 命令'echo 'crictl config runtime-endpoint /run/containerd/containerd.sock'}function clean(){# 初始化清理kubeadm reset -fipvsadm -C# docker rmi $(docker images -q)# yum list installed | grep kube | awk '{print $1}' | xargs yum -y remove# yum list installed | grep docker | awk '{print $1}' | xargs yum -y remove}function auto_completion(){yum install bash-completion -yecho 'source <(kubectl completion bash)' >> ~/.bashrc}function main(){initial# update_kernelinstall_ipvsinstall_containerdinstall_k8sauto_completionecho '初始化主节点取消注释脚本的内容'# kubeadm_initecho -e '若未初始化网络则可执行如下命令\n'echo '大于 50 节点执行:kubectl create -f https://docs.projectcalico.org/manifests/calico-typha.yaml'echo '少于 50 节点执行:kubectl create -f https://docs.projectcalico.org/manifests/calico.yaml'}main
准备工作
确保 br_netfilter 模块被加载
- 可以通过运行 lsmod | grep br_netfilter 来完成。若要显式加载该模块,可执行 sudo modprobe br_netfilter
时间同步
yum install chrony -y
systemctl start chronyd && systemctl enable chronyd
chronyc sources
配置 sysctl
cat <<EOF | sudo tee /etc/modules-load.d/k8s.conf
br_netfilter
EOF

cat <<EOF | sudo tee /etc/sysctl.d/k8s.conf
net.bridge.bridge-nf-call-ip6tables = 1
net.bridge.bridge-nf-call-iptables = 1
vm.swappiness = 0
EOF
modprobe br_netfilter
sudo sysctl --system
配置 hosts
添加 hostname 和 IP
cat <<EOF | sudo tee >> /etc/hosts
# 若有私有仓库
# $HARBOR_IP docker.io gcr.io k8s.gcr.io quay.io registry-1.docker.io
`hostname -i` `hostname`
`hostname -I` `hostname`
EOF
检查所需端口
关闭防火墙
systemctl stop firewalld && systemctl disable firewalld
关闭 swap 分区
swapoff -a
sed -ri 's/.*swap.*/#&/' /etc/fstab
关闭 selinux
# 将 SELinux 设置为 permissive 模式(相当于将其禁用)
sudo setenforce 0
sudo sed -i 's/^SELINUX=enforcing$/SELINUX=permissive/' /etc/selinux/config
IPVS
cat > /etc/sysconfig/modules/ipvs.modules <<EOF
#!/bin/bash
modprobe -- ip_vs
modprobe -- ip_vs_rr
modprobe -- ip_vs_wrr
modprobe -- ip_vs_sh
modprobe -- nf_conntrack_ipv4
EOF
chmod 755 /etc/sysconfig/modules/ipvs.modules
bash /etc/sysconfig/modules/ipvs.modules

yum install ipvsadm ipset -y
安装 runtime
https://kubernetes.io/docs/setup/production-environment/container-runtimes/
Docker
wget -O /etc/yum.repos.d/docker-ce.repo https://download.docker.com/linux/centos/docker-ce.repo
sudo sed -i 's+download.docker.com+mirrors.tuna.tsinghua.edu.cn/docker-ce+' /etc/yum.repos.d/docker-ce.repo
sudo yum makecache fast
sudo yum install -y docker-ce-19.03.15 # -version

mkdir /etc/docker

cat <<EOF | tee /etc/docker/daemon.json
{
  "insecure-registries": ["harbor.address", "gcr.io", "docker.io", "k8s.gcr.io", "registry-1.docker.io"],
  "registry-mirrors": ["https://registry.docker-cn.com"],
  "registry-mirrors": ["https://docker.mirrors.ustc.edu.cn"],
  "exec-opts": ["native.cgroupdriver=systemd"],
  "log-driver": "json-file",
  "log-opts": {
    "max-size": "100m"
  },
  "storage-driver": "overlay2"
}
EOF

systemctl daemon-reload
systemctl enable docker
systemctl start docker
containerd
cat <<EOF | sudo tee /etc/modules-load.d/containerd.conf
overlay
br_netfilter
EOF

sudo modprobe overlay
sudo modprobe br_netfilter

cat <<EOF | sudo tee /etc/sysctl.d/99-kubernetes-cri.conf
net.bridge.bridge-nf-call-iptables  = 1
net.ipv4.ip_forward                 = 1
net.bridge.bridge-nf-call-ip6tables = 1
EOF

sudo sysctl --system

yum install containerd.io -y
sudo mkdir -p /etc/containerd
containerd config default | sudo tee /etc/containerd/config.toml

sed -i '/containerd.runtimes.runc.options/a\ \ \ \ \ \ \ \ \ \ \ \ SystemdCgroup = true' /etc/containerd/config.toml
# sed -i "s#k8s.gcr.io#registry.cn-hangzhou.aliyuncs.com/google_containers#g"  /etc/containerd/config.toml
# sed -i "s#https://registry-1.docker.io#https://registry.cn-hangzhou.aliyuncs.com#g"  /etc/containerd/config.toml

systemctl daemon-reload
systemctl enable containerd
systemctl restart containerd
# 初始化前须设置容器运行时
crictl config runtime-endpoint /run/containerd/containerd.sock
containerd 导出镜像
kubeadm config images list

ctr images pull k8s.gcr.io/coredns/coredns:v1.8.0
ctr images pull k8s.gcr.io/etcd:3.4.13-0
ctr images pull k8s.gcr.io/kube-controller-manager:v1.21.1
ctr images pull k8s.gcr.io/kube-proxy:v1.21.1
ctr images pull k8s.gcr.io/kube-apiserver:v1.21.1
ctr images pull k8s.gcr.io/kube-scheduler:v1.21.1
ctr images pull k8s.gcr.io/pause:3.4.1
ctr images pull k8s.gcr.io/pause:3.2

ctr images pull docker.io/calico/cni:v3.19.1
ctr images pull docker.io/calico/kube-controllers:v3.19.1
ctr images pull docker.io/calico/node:v3.19.1
ctr images pull docker.io/calico/pod2daemon-flexvol:v3.19.1

ctr images pull docker.io/kubernetesui/dashboard:v2.2.0
ctr images pull docker.io/kubernetesui/metrics-scraper:v1.0.6

# ctr image export <output-filename> <image-name>
ctr images ls | grep -v REF | awk '{print $1}' | tr '\n' ' ' | xargs ctr images export k8sImage.tar

ctr -n=k8s.io images import k8sImage.tar
问题:
节点初始化完成后,执行 crictl ps 命令遇到该错
FATA[0010] failed to connect: failed to connect: context deadline exceeded
执行: crictl config runtime-endpoint /run/containerd/containerd.sock
cri-o
curl -L -o /etc/yum.repos.d/devel:kubic:libcontainers:stable.repo https://download.opensuse.org/repositories/devel:/kubic:/libcontainers:/stable/$OS/devel:kubic:libcontainers:stable.repo
curl -L -o /etc/yum.repos.d/devel:kubic:libcontainers:stable:cri-o:$VERSION.repo https://download.opensuse.org/repositories/devel:kubic:libcontainers:stable:cri-o:$VERSION/$OS/devel:kubic:libcontainers:stable:cri-o:$VERSION.repo
yum install cri-o
安装 kubeadm、kubelet 和 kubectl
- kubeadm:用来初始化集群的指令。
- kubelet:在集群中的每个节点上用来启动 Pod 和容器等。
- kubectl:用来与集群通信的命令行工具。
```bash
官方镜像
cat <<EOF | sudo tee /etc/yum.repos.d/kubernetes.repo [kubernetes] name=Kubernetes baseurl=https://packages.cloud.google.com/yum/repos/kubernetes-el7-\$basearch enabled=1 gpgcheck=1 repo_gpgcheck=1 gpgkey=https://packages.cloud.google.com/yum/doc/yum-key.gpg https://packages.cloud.google.com/yum/doc/rpm-package-key.gpg exclude=kubelet kubeadm kubectl EOF
清华镜像
cat <<EOF | sudo tee /etc/yum.repos.d/kubernetes.repo [kubernetes] name=kubernetes baseurl=https://mirrors.tuna.tsinghua.edu.cn/kubernetes/yum/repos/kubernetes-el7-\$basearch enabled=1 gpgcheck=0 EOF
华为镜像
cat <<EOF | sudo tee /etc/yum.repos.d/kubernetes.repo [kubernetes] name=Kubernetes baseurl=https://repo.huaweicloud.com/kubernetes/yum/repos/kubernetes-el7-\$basearch enabled=1 gpgcheck=1 repo_gpgcheck=0 gpgkey=https://repo.huaweicloud.com/kubernetes/yum/doc/yum-key.gpg https://repo.huaweicloud.com/kubernetes/yum/doc/rpm-package-key.gpg EOF
查看可用版本
yum list available —showduplicates —disablerepo=”*” —enablerepo=kubernetes
kubeVersion=1.19.12
sudo yum install -y kubelet-${kubeVersion} kubeadm-${kubeVersion} kubectl-${kubeVersion} —disableexcludes=kubernetes
sudo yum install -y kubelet kubeadm kubectl —disableexcludes=kubernetes # —nogpgcheck
sudo systemctl enable —now kubelet
<a name="jBv2L"></a>
### 初始化集群
```bash
# 初始化之前准备好镜像
kubeadm config images pull

# 可以通过如下命令导出默认的初始化配置,然后根据我们自己的需求修改配置
kubeadm config print init-defaults > kubeadm.yaml
# 使用上面的配置文件进行初始化
kubeadm init --config=kubeadm.yaml


kubeadm init \
--image-repository registry.aliyuncs.com/google_containers #\
# --apiserver-advertise-address=1.2.3.4 \
# --service-cidr=10.96.0.0/12 \
# --kubernetes-version v1.20.0 \
# --pod-network-cidr=10.244.0.0/16 # 不推荐 flannel 网络

# 初始化完成后
mkdir -p $HOME/.kube
sudo cp -i /etc/kubernetes/admin.conf $HOME/.kube/config
sudo chown $(id -u):$(id -g) $HOME/.kube/config

# root 用户
export KUBECONFIG=/etc/kubernetes/admin.conf

# 初始化失败可执行如下命令
kubeadm reset -f
# docker rmi $(docker images -q)
# yum list installed | grep kube | awk '{print $1}' | xargs yum -y remove
# yum list installed | grep docker | awk '{print $1}' | xargs yum -y remove
遇到的错误
[wait-control-plane] Waiting for the kubelet to boot up the control plane as static Pods from directory “/etc/kubernetes/manifests”. This can take up to 4m0s [kubelet-check] Initial timeout of 40s passed.
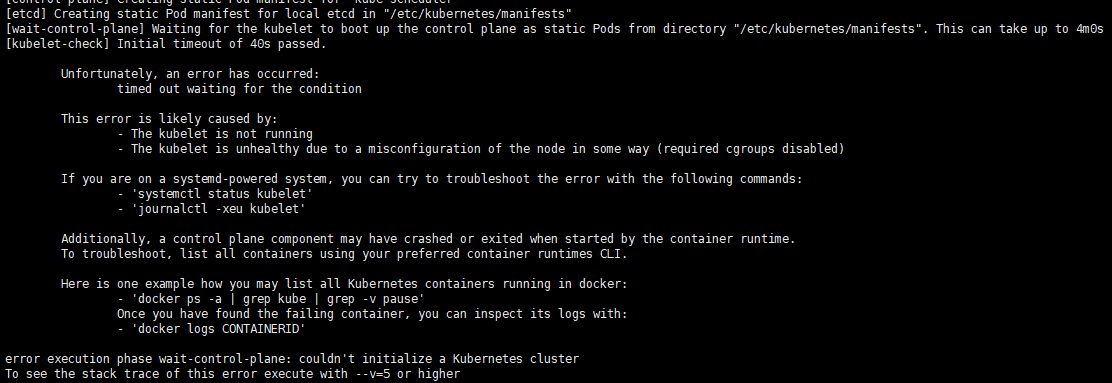
移除初始化参数 --apiserver-advertise-address 或者将其改为内网 IP
1.21.0 的高版本问题,用 containerd 作为运行时可正常初始化
The HTTP call equal to ‘curl -sSL http://localhost:10248/healthz‘ failed with error: Get “http://localhost:10248/healthz“: dial tcp 127.0.0.1:10248: connect: connection refused.
"exec-opts": ["native.cgroupdriver=systemd"], 移除 docker 的此项配置,1.19 以下版本正常
或者
# 创建文件夹
mkdir /etc/systemd/system/kubelet.service.d
# 创建文件
vim /etc/systemd/system/kubelet.service.d/10-kubeadm.conf
# 添加如下内容
Environment="KUBELET_SYSTEM_PODS_ARGS=--pod-manifest-path=/etc/kubernetes/manifests --allow-privileged=true --fail-swap-on=false"
# 重置
kubeadm reset -f
节点加入集群
kubeadm join <control-plane-host>:<control-plane-port> --token <token> --discovery-token-ca-cert-hash sha256:<hash>

# 主节点运行
kubeadm token create --print-join-command
# echo "kubeadm join $(hostname -i):6443 --discovery-token $(kubeadm token list | grep -v TTL | awk '{print $1}') --discovery-token-ca-cert-hash sha256:$(openssl x509 -pubkey -in /etc/kubernetes/pki/ca.crt | openssl rsa -pubin -outform der 2>/dev/null | openssl dgst -sha256 -hex | sed 's/^.* //')"
单节点执行如下命令
kubectl taint nodes --all node-role.kubernetes.io/master-
配置 flannel 网络
不再推荐
docker pull quay.io/coreos/flannel:version
# https://github.com/flannel-io/flannel/blob/master/Documentation/kube-flannel.yml
kubectl apply -f https://raw.githubusercontent.com/coreos/flannel/master/Documentation/kube-flannel.yml
配置 Calico网络
curl https://docs.projectcalico.org/manifests/calico.yaml -O
# 超过 50 节点:curl https://docs.projectcalico.org/manifests/calico-typha.yaml -o calico.yaml
kubectl apply -f calico.yaml
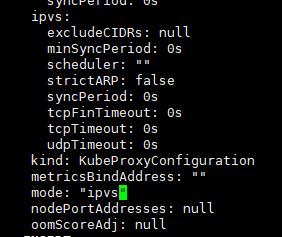
修改 kube-proxy 实现 ipvsadm
yum install ipvsadm -y
# 修改 kube-proxy
kubectl edit configmap -n kube-system kube-proxy
# !!! 找到 mode: "" 修改为 mode: "ipvs"
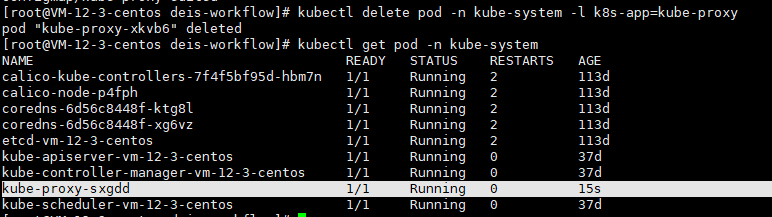
# 修改后删除正在运行的 kube-proxy
kubectl delete pod -n kube-system -l k8s-app=kube-proxy
# 检查
ipvsadm -l -n
测试集群
kubectl create deployment nginx --image=nginx
kubectl expose deployment nginx --port=80 --type=NodePort
kubectl get pod,svc
安装面板
kubectl apply -f https://raw.githubusercontent.com/kubernetes/dashboard/v2.2.0/aio/deploy/recommended.yaml

# 外部访问
kubectl get pods -n kubernetes-dashboard
kubectl patch svc kubernetes-dashboard -p '{"spec":{"type":"NodePort"}}' -n kubernetes-dashboard
kubectl get svc -n kubernetes-dashboard

# 访问 https://ip:port

# 创建 token
kubectl create serviceaccount dashboard -n kubernetes-dashboard
kubectl create rolebinding def-ns-admin --clusterrole=admin --serviceaccount=default:def-ns-admin
kubectl create clusterrolebinding dashboard-cluster-admin --clusterrole=cluster-admin --serviceaccount=kubernetes-dashboard:dashboard

# 令牌
kubectl -n kubernetes-dashboard describe secret `kubectl describe sa dashboard -n kubernetes-dashboard | grep Tokens | awk '{print $2}'`
常用命令
kubectl get nodes
# 生成 token
kubeadm token list
kubeadm token create
openssl x509 -pubkey -in /etc/kubernetes/pki/ca.crt | openssl rsa -pubin -outform der 2>/dev/null | \
openssl dgst -sha256 -hex | sed 's/^.* //'

# 删除节点
kubectl drain <node name> --delete-local-data --force --ignore-daemonsets
kubeadm reset
iptables -F && iptables -t nat -F && iptables -t mangle -F && iptables -X
ipvsadm -C
kubectl delete node <node name>

# 证书过期查询
kubeadm certs check-expiration

# 证书续期
kubeadm certs renew all
自动补全
yum install bash-completion -y

echo 'source <(kubectl completion bash)' >> ~/.bashrc
source <(kubeadm completion bash)
Helm
curl https://raw.githubusercontent.com/helm/helm/master/scripts/get-helm-3 | bash
helm repo add aliyun https://kubernetes.oss-cn-hangzhou.aliyuncs.com/charts
helm repo add hc https://charts.helm.sh/stable

若有收获,就点个赞吧
0 人点赞
