codis
下载
cd app/codis
安装
Codis Dashboard 集群管理(只能部署 1 个)
- 集群管理工具,支持 codis-proxy、codis-server 的添加、删除,以及据迁移等操作。
- 在集群状态发生改变时,codis-dashboard 维护集群下所有 codis-proxy 的状态的一致性。
- 注意事项
- 对于同一个业务集群而言,同一个时刻 codis-dashboard 只能有 0个或者1个;
- 所有对集群的修改都必须通过 codis-dashboard 完成。
1. 生成/修改配置文件# 生成配置mkdir -p config./bin/codis-dashboard --default-config > config/dashboard.toml# 编辑配置vim ./config/dashboard.toml#coordinator_name = "filesystem"#coordinator_addr = "/tmp/codis"# 外部存储类型,接受 zookeeper/etcdcoordinator_name = "zookeeper"# 外部存储地址coordinator_addr = "zookeeper-1:2181,zookeeper-2:2181,zookeeper-3:2181"#coordinator_auth = ""# 集群名称 Set Codis Product Name/Auth.product_name = "codis-infrastructure"# 集群密码,默认为空product_auth = "codis-123456"# RESTful API 端口# Set bind address for admin(rpc), tcp only.admin_addr = "0.0.0.0:18080"# Set arguments for data migration (only accept 'sync' & 'semi-async').migration_method = "semi-async"migration_parallel_slots = 100migration_async_maxbulks = 200migration_async_maxbytes = "32mb"migration_async_numkeys = 500migration_timeout = "30s"# Set configs for redis sentinel.sentinel_client_timeout = "10s"sentinel_quorum = 2sentinel_parallel_syncs = 1sentinel_down_after = "30s"sentinel_failover_timeout = "5m"sentinel_notification_script = ""sentinel_client_reconfig_script = ""2. 查看命令$ ./codis-dashboard -hUsage:codis-dashboard [--ncpu=N] [--config=CONF] [--log=FILE] [--log-level=LEVEL] [--host-admin=ADDR]codis-dashboard --default-configcodis-dashboard --versionOptions:--ncpu=N 最大使用 CPU 个数-c CONF, --config=CONF 指定启动配置文件-l FILE, --log=FILE 设置 log 输出文件--log-level=LEVEL 设置 log 输出等级:INFO,WARN,DEBUG,ERROR;默认INFO,推荐WARN3. 启动# 创建日志目录sudo mkdir -p /opt/logs/codissudo chown hadoop:hadoop /opt/logs/codis# 后台启动./codis-dashboard --ncpu=1 --config=config/dashboard.toml \--log=/opt/logs/codis/dashboard.log --log-level=WARN &# 查看日志tail -f /logs/codis/dashboard.log.[日期]# 查看启动状态netstat -tunlp | grep 18080
Codis Proxy 代理服务
- 客户端连接的 Redis 代理服务, 实现了 Redis 协议。
1. 生成/修改配置./codis-proxy --default-config > config/proxy.tomlvim config/proxy.toml## 集群名称,参考 dashboard 参数说明# Set Codis Product Name/Auth.product_name = "codis-infrastructure"# 集群密码,默认为空product_auth = "codis-123456"# Set auth for client session# 1. product_auth is used for auth validation among codis-dashboard,# codis-proxy and codis-server.# 2. session_auth is different from product_auth, it requires clients# to issue AUTH <PASSWORD> before processing any other commands.session_auth = ""# RESTful API 端口, Set bind address for admin(rpc), tcp only.admin_addr = "0.0.0.0:11080"## 设置代理端口类型,接受 tcp/tcp4/tcp6/unix/unixpacket# Set bind address for proxy, proto_type can be "tcp", "tcp4", "tcp6", "unix" or "unixpacket".proto_type = "tcp4"# 设置代理绑定的端口地址或者路径proxy_addr = "0.0.0.0:19000"# Set jodis address & session timeout# 1. jodis_name is short for jodis_coordinator_name, only accept "zookeeper" & "etcd".# 2. jodis_addr is short for jodis_coordinator_addr# 3. jodis_auth is short for jodis_coordinator_auth, for zookeeper/etcd, "user:password" is accepted.# 4. proxy will be registered as node:# if jodis_compatible = true (not suggested):# /zk/codis/db_{PRODUCT_NAME}/proxy-{HASHID} (compatible with Codis2.0)# or else# /jodis/{PRODUCT_NAME}/proxy-{HASHID}## 设置 jodis 地址和会话超时# Jodis 外部存储类型,接受 zookeeper/etcdjodis_name = "zookeeper"# Jodis 注册 zookeeper 地址jodis_addr = "zookeeper-1:2181,zookeeper-2:2181,zookeeper-3:2181"jodis_auth = ""# Jodis 注册 session timeout 时间,单位 secondjodis_timeout = "20s"jodis_compatible = false# Set datacenter of proxy.proxy_datacenter = "Codis Dashboard"# 设置最大会话数# Set max number of alive sessions.proxy_max_clients = 1000# 设置最大内存# Set max offheap memory size. (0 to disable)proxy_max_offheap_size = "10240mb"# 设置堆占位符以降低 GC 频率。# Set heap placeholder to reduce GC frequency.proxy_heap_placeholder = "256mb"# 代理将在预定义的时间间隔内 ping 后端 redis(并清除'MASTERDOWN'状态)。 (0表示禁用)# Proxy will ping backend redis (and clear 'MASTERDOWN' state) in a predefined interval. (0 to disable)backend_ping_period = "5s"# 设置后端recv缓冲区大小和超时。# Set backend recv buffer size & timeout.backend_recv_bufsize = "128kb"backend_recv_timeout = "30s"# 设置后端发送缓冲区和超时。# Set backend send buffer & timeout.backend_send_bufsize = "128kb"backend_send_timeout = "30s"# 设置后端管道缓冲区大小。# Set backend pipeline buffer size.backend_max_pipeline = 20480# 设置后端从不读取副本组,默认为 false# Set backend never read replica groups, default is falsebackend_primary_only = false# 为每个服务器设置后端并行连接# Set backend parallel connections per serverbackend_primary_parallel = 1backend_replica_parallel = 1# 设置后端 tcp keepalive 周期。(0禁用)# Set backend tcp keepalive period. (0 to disable)backend_keepalive_period = "75s"# 设置后台数据库数量# Set number of databases of backend.backend_number_databases = 16# 如果长时间没有来自客户端的请求,连接将被关闭。(0禁用)# If there is no request from client for a long time, the connection will be closed. (0 to disable)# Set session recv buffer size & timeout.session_recv_bufsize = "128kb"session_recv_timeout = "30m"# 设置会话发送缓冲区大小和超时。# Set session send buffer size & timeout.session_send_bufsize = "64kb"session_send_timeout = "30s"# 确保这高于每个管道请求的最大请求数量,否则您的客户机可能被阻塞。# Make sure this is higher than the max number of requests for each pipeline request, or your client may be blocked.# Set session pipeline buffer size.session_max_pipeline = 10000# 设置会话 tcp keepalive 周期。(0禁用)# Set session tcp keepalive period. (0 to disable)session_keepalive_period = "75s"# 将会话设置为对失败敏感。默认为false,代理将向客户端发送错误响应,而不是关闭套接字。# Set session to be sensitive to failures. Default is false, instead of closing socket, proxy will send an error response to client.session_break_on_failure = false# 设置 metrics server, proxy 将在预定义的时间内向指定的服务器报告json格式的度量。# Set metrics server (such as http://localhost:28000), proxy will report json formatted metrics to specified server in a predefined period.metrics_report_server = ""metrics_report_period = "1s"# Set influxdb server (such as http://localhost:8086), proxy will report metrics to influxdb.metrics_report_influxdb_server = ""metrics_report_influxdb_period = "1s"metrics_report_influxdb_username = ""metrics_report_influxdb_password = ""metrics_report_influxdb_database = ""# Set statsd server (such as localhost:8125), proxy will report metrics to statsd.metrics_report_statsd_server = ""metrics_report_statsd_period = "1s"metrics_report_statsd_prefix = ""2. 查看命令$ ./codis-proxy -hUsage:codis-proxy [--ncpu=N] [--config=CONF] [--log=FILE] [--log-level=LEVEL] [--host-admin=ADDR] [--host-proxy=ADDR] [--ulimit=NLIMIT]codis-proxy --default-configcodis-proxy --versionOptions:--ncpu=N 最大使用 CPU 个数-c CONF, --config=CONF 指定启动配置文件-l FILE, --log=FILE 设置 log 输出文件--log-level=LEVEL 设置 log 输出等级:INFO,WARN,DEBUG,ERROR;默认INFO,推荐WARN--ulimit=NLIMIT 检查 ulimit -n 的结果,确保运行时最大文件描述不少于 NLIMIT3. 启动服务# 后台启动nohup ./codis-proxy --ncpu=4 --config=config/proxy.toml \--log=/opt/logs/codis/proxy.log --log-level=WARN &# 查看日志tail -f /opt/logs/codis/proxy.log.[日期]# 查看启动状态netstat -tunlp | grep 19000
Codis Server 基于 redis-3.2.8 分支开发
- 基于 redis-3.2.8 分支开发。增加了额外的数据结构,以支持 slot 有关的操作以及数据迁移指令。
Codis Server 只负责发送 slave of 指令,具体行为取决于 redis 自身
redis.conf 解压获取配置文件 redis.conf
1. 编辑/修改配置文件vim redis.conf# 注释掉# bind 127.0.0.1# Redis默认不是以守护进程的方式运行,可以通过该配置项修改,使用yes启用守护进程,设置为nodaemonize no# 关闭保护模式protected-mode no# 配置 redies 密码requirepass codis-1234562. 查看命令./codis-server --helpUsage: ./redis-server [/path/to/redis.conf] [options]./redis-server - (read config from stdin)./redis-server -v or --version./redis-server -h or --help./redis-server --test-memory <megabytes>Examples:./redis-server (run the server with default conf)./redis-server /etc/redis/6379.conf./redis-server --port 7777./redis-server --port 7777 --slaveof 127.0.0.1 8888./redis-server /etc/myredis.conf --loglevel verboseSentinel mode:./redis-server /etc/sentinel.conf --sentinel3. 启动# 与启动普通 redis 的方法一致。 启动完成后,可以通过 codis-fe 提供的界面或者 codis-admin 命令行工具添加到集群中。./codis-server config/redis.conf --port 6379 &# 查看端口netstat -tunlp | grep 6379
Codis FE 集群管理界面
1. 查看命令$ ./codis-fe -hUsage:codis-fe [--ncpu=N] [--log=FILE] [--log-level=LEVEL] [--assets-dir=PATH] (--dashboard-list=FILE|--zookeeper=ADDR|--etcd=ADDR|--filesystem=ROOT) --listen=ADDRcodis-fe --versionOptions:--ncpu=N 最大使用 CPU 个数-d LIST, --dashboard-list=LIST 配置文件,能够自动刷新-l FILE, --log=FILE 设置 log 输出文件--log-level=LEVEL 设置 log 输出等级:INFO,WARN,DEBUG,ERROR;默认INFO,推荐WARN--listen=ADDR HTTP 服务端口2. 启动服务# 后台启动./codis-fe --ncpu=1 --log=/opt/logs/codis/fe.log --log-level=WARN \--zookeeper=zookeeper-1:2181,zookeeper-2:2181,zookeeper-3:2181 --listen=0.0.0.0:21050 &# 查看日志tail -f /opt/logs/codis/fe.log# 查看端口netstat -tunlp | grep 21050# 查看 Codis Dashboard 信息./codis-admin --dashboard-list --zookeeper=zookeeper-1:2181,zookeeper-2:2181,zookeeper-3:2181 | tee codis.json3. 打开 Codis FE 服务http://host-name:21050
集群管理
1. 添加组 Group输入组 ID(1) -> 点击(New Group)2. 添加 Codis Server(Redis) 到指定组输入 Codis Server 实际部署地址和端口(xxx.xxx.xxx.xxx:6379) -> to -> 到指定组(1) -> 点击(Add Server)PS: 一组 Codis-Group 一般为 3 个 Codis Server, 1 主 2 从.
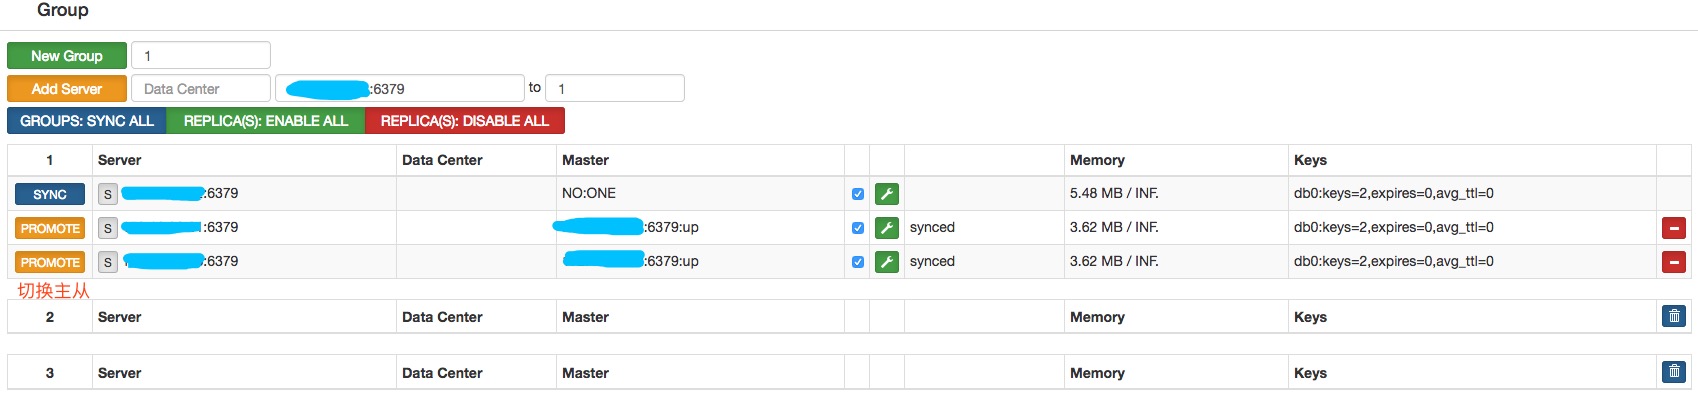
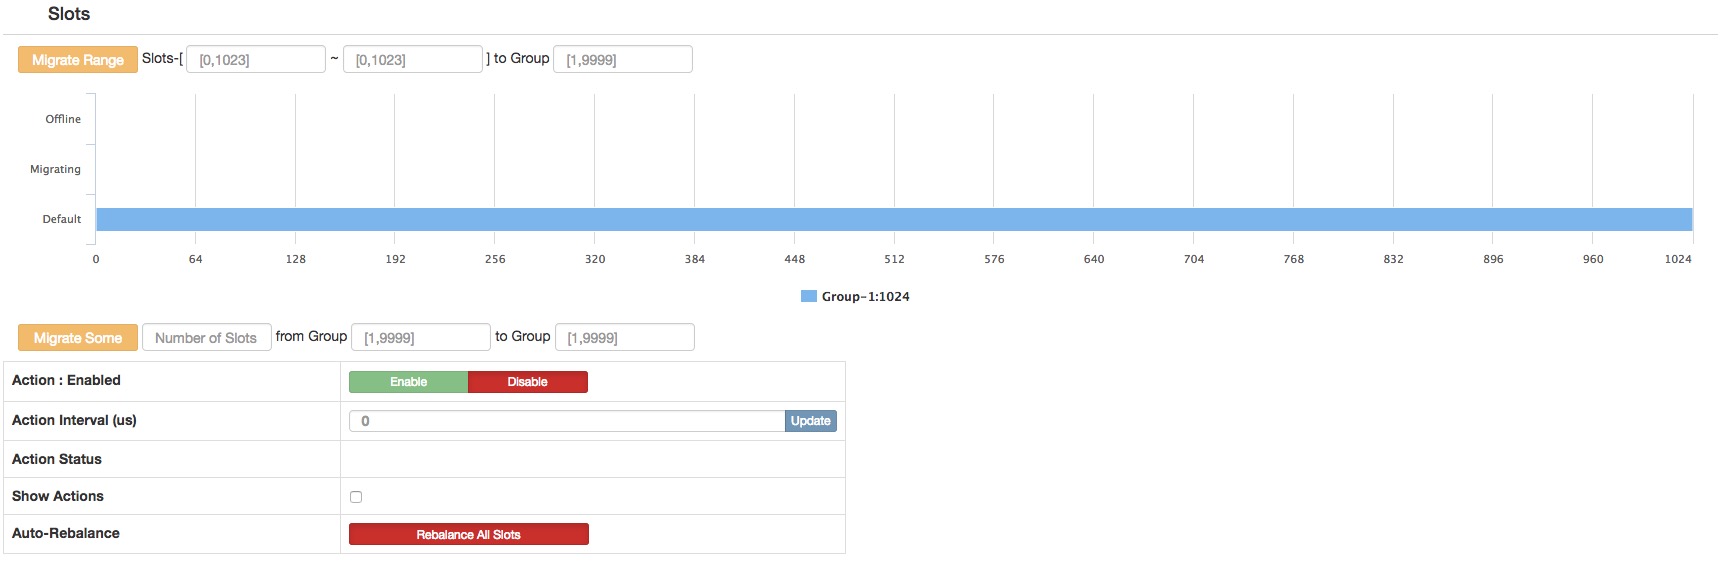
- 分配 slot 到组中
新增的集群 slot 状态是 offline,因此我们需要对它进行初始化(将 1024 个 slot 分配到各个 group),而初始化最快的方法可通过 fe 提供的 rebalance all slots 按钮来做,如下图所示,点击此按钮,我们即快速完成了一个集群的搭建。
- 上线 Codis Proxy 节点
Codis Proxy 节点启动后,处于 waiting 状态,监听 proxy_addr 地址,但是不会 accept 连接,添加到集群并完成集群状态的同步,才能改变状态为 online。添加的方法有以下两种方法 1. 通过 codis-fe 添加:通过 Add Proxy 按钮,将 admin_addr 加入到集群中(建议)输入 Codis Proxy 配置 admin_addr 参数的地址(xxx.xxx.xxx.xxx:18080 ) -> 点击(New Proxy 添加即可)PS: Codis Proxy 的代理地址为 admin_addr 参数. 默认 11080 端口方法 2. 通过 codis-admin 命令行工具添加:codis-admin --dashboard=127.0.0.1:18080 --create-proxy -x 127.0.0.1:11080# Codis Dashboard 地址127.0.0.1:18080# Codis Proxy 代理的地址, 用于添加 Codis Proxy 代理. RESTful API 端口127.0.0.1:11080添加过程中,dashboard 会完成如下一系列动作1. 获取 proxy 信息,对集群 name 以及 auth 进行验证,并将其信息写入到外部存储中;2. 同步 slots 状态;3. 标记 proxy 状态为 online,此后 proxy 开始 accept 连接并开始提供服务;

- HA
对下层的 redis 实例来说,当一个 group 的 master 挂掉的时候,应该让管理员清楚,并手动的操作,因为这涉及到了数据一致性等问题(redis的主从同步是最终一致性的)。因此 codis 不会自动的将某个 slave 升级成 master。关于外部 codis-ha 工具(具体可以参考之前的章节),这是一个通过 codis-dashboard 开放的 RESTful API 实现自动切换主从的工具。该工具会在检测到 master 挂掉的时候主动应用主从切换策略,提升单个 slave 成为新的 master。需要注意,codis 将其中一个 slave 升级为 master 时,该组内其他 slave 实例是不会自动改变状态的,这些 slave 仍将试图从旧的 master 上同步数据,因而会导致组内新的 master 和其他 slave 之间的数据不一致。因此当出现主从切换时,需要管理员手动创建新的 sync action 来完成新 master 与 slave 之间的数据同步(codis-ha 不提供自动操作的工具,因为这样太不安全了)。

若有收获,就点个赞吧
0 人点赞
