![]()
Chrome packaged apps
Codelab at DevFest 2013 Season
介绍
欢迎来到 chrome 打包应用 的开发练习!这是一个自学课程(self-paced codelab),在这里你将完成 chrome 打包应用 开发的基本练习并学习 API 中的一部分。 你可以在 官方文档 中找到本教程中大部分概念的详细描述。之后的每一个练习环节都会包含该练习所用到的 API 文档链接。
在第一章节中你将学习开发 chrome 打包应用 所需的基本构建部分,以及如何运行和调试你的 chrome 打包应用。
第二章节中我们引入一个众所周知的开源 web 应用,ToDoMVC,通过移除一些不支持的特性(比如 localStorage)并遵从 CSP(Content Security Policy - 内容安全政策),来学习如何让该 web 应用成为 chrome 应用。
之后的第三章节,我们会使用 chrome 应用独有的 API 为 ToDoMVC 添加一些功能。
最后,你能够开发出一个具有离线能力、可安装的并功能完善的 ToDoMVC 应用。通过整个学习过程,你会学到:
- chrome 应用(chrome platform)的基础构件以及开发流程
- 如何将已有的 web 应用打包成可在 chrome 平台上运行的应用
- chrome.storage.local storage,一个异步的本地存储
- 提醒和通知的 API
- 如何通过 webview 标签来显示外部的、无限制的网页内容
- 如何从外部来源加载资源文件(如图片)
- 使用扩展的文件系统 API 向本地的文件系统写入文件
准备工作
本课程假定你已具备 web 编程的基础知识。你应该已经知道基本 HTML 和 CSS,并且你应该熟悉 javascript。
你应该安装了 Chrome Dev。在 chrome 的地址栏中输入 chrome://version 来查看你的 “Google Chrome” 浏览器的版本为 28 或者更高。如果不是,请根据此链接的引导操作:https://www.google.com/intl/en/chrome/browser/index.html?extra=devchannel#eula
PIXEL 用户:如果你想使用你那闪亮的 Pixel Chromebook(你应该使用它!),请查看第 1 步中的指导。(just follow the instructions at the beginning of Step 1.)
如果你真的很想使用 Chrome 27,请注意第 3 步中的通知是无法使用的。
如何使用本资料
新建一个文件夹。每一步的练习都建立在之前的练习成果之上。每个练习都有一个参考时间,如果你的练习时间超过了参考时间并想进入下一阶段的练习,每一步都会有 “cheat” 链接,通过这个链接你可以获取从上一步相关代码。(from the previous step.)
下载所有的练习代码:http://goo.gl/KJIihd
安装并运行本课程的应用: http://goo.gl/9zCZQM
第 1 步 - 创建并运行一个最小的应用
目标:掌握开发流程
完成本练习的建议时间:10 分钟
除了你的应用本身所需要的代码,一个 chrome 应用还需要两个文件:
- 一个 manifest,用来指定你的应用的元信息(meta information)
- 一个 event page,该文件也叫 background page,通常在此文件中注册指定事件的监听器,如打开应用窗口的启动监听器
闪亮的 chromebook 使用指导部分,这部分翻译就交给有 chromebook 的高富帅吧。
打开你最喜爱的 代码/文本 编辑器并在一个空的目录下创建以下文件:
manifest.json:
{"manifest_version": 2,"name": "I/O Codelab","version": "1","permissions": [],"app": {"background": {"scripts": ["background.js"]}},"minimum_chrome_version": "28"}
background.js:
chrome.app.runtime.onLaunched.addListener(function() {chrome.app.window.create('index.html', {id: 'main',bounds: { width: 620, height: 500 }});});
index.html:
<!DOCTYPE html><html><head><meta charset="utf-8"></head><body><h1>Hello, let's code!</h1></body></html>
恭喜,你刚刚已经创建了一个新的 chrome 应用。如果你复制了 cheats 里的代码,确保你也复制了 icon_128.png,因为在 manifest.json 中关联了这个文件。
现在你可以运行它了: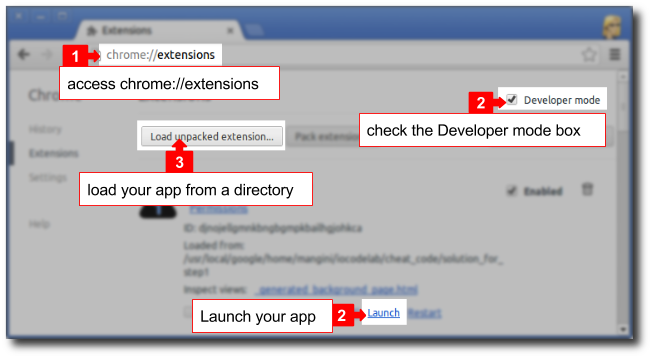
如何调试 Chrome 应用
如果你熟悉 Chrome 开发者工具,你就知道你可以使用开发者工具来查看、调试、审计以及测试你的应用,就像你在普通的 web 页面上所做的一样。
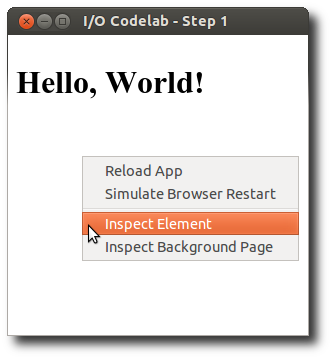
通常的开发方式是:
- 写一段代码
- 重新加载应用(右击鼠标,重新加载应用)
- 测试
- 查看开发者工具控制台中是否有错误
- 重复以上部分
开发者工具的控制台具有与你的应用相同的权限来使用你应用中的 API。这样,你就可以在加入一个 API 到你的代码中之前方便的测试它: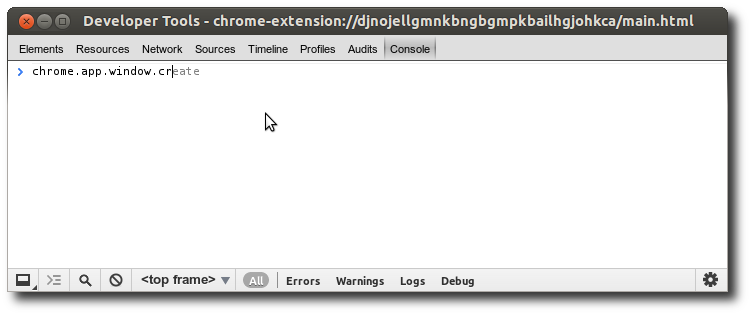
第 2 步 - 引入 ToDoMVC 应用并使之适应 Chrome(Import and adapt ToDoMVC app)
想从这一步重新开始?可以在 solution_for_step1 子目录下找到之前练习的代码!
目标:
- 学习如何将一个现有的应用适用于 Chrome 应用平台
- 学习 chrome.storage.local API
- 为下一个练习做准备
完成本练习的建议时间:10 分钟
我们引入一个已有的常见 web 应用到我们的项目,作为练习的开始,我们会使用一个非常主流(benchmark)的应用,ToDoMVC:
我们会引入 ToDoMVC 应用的一个版本(a version of the ToDoMVC app)(相关代码的压缩包)。请复制所有的内容,包括其中的子目录,从压缩包里的 todomvc 文件夹到你的应用所在的文件夹。
完成后你的应用所在的文件夹里应该有一下文件结构:manifest.json(来自第 1 步)background.js(来自第 1 步)icon_128.png(可选,来自第 1 步)index.html(来自 todomvc)bower.json(来自 todomvc)bower_components/(来自 todomvc)js/(来自 todomvc)
现在重新加载你的应用。你应该可以看到基本的界面,但没有什么东西可以工作(but nothing else will work)。如果你打开控制台(右击,审查元素,控制台),你会发现这样的错误:
Refused to execute inline script because it violates the following Content Security Policy directive: “default-src ‘self’ chrome-extension-resource:”. Note that ‘script-src’ was not explicitly set, so ‘default-src’ is used as a fallback. index.html:42
遵从 CSP
让我们通过让应用 遵从 CSP 来修复这个错误。造成不符合 CSP 的一个常见原因是内联的 Javascript,比如 DOM 属性上的事件处理(
<button onclick=''>)以及 HTML 中的<script>标签。解决此问题的方法很简单:只要把那些内联的内容移动到新的文件中:a. 编辑
index.html并把内联的 Javascript 移动到一个新文件js/bootstrap.js:<!--<script>// Bootstrap app datawindow.app = {};</script>--><script src="js/bootstrap.js"></script>
b. 创建
js/bootstrap.js,内容为:// Bootstrap app datawindow.app = {};
重新加载你的应用,是不是仍然报错?只是之前的错误已经不见了,但有了另一个错误:
Uncaught window.localStorage is not available in packaged apps. Use chrome.storage.local instead. platformApp:16
这个错误需要更多的步骤来修复
把 localStorage 变为 chrome.storage.local
Chrome 应用不支持 LocalStorage。为什么呢?因为 LocalStorage 是同步的,而同步获取块资源(I/O)的方式在单线程的运行环境中通常不是一个好主意。如果你的存储延迟很高,那你的应用可能变得毫无响应。
Chrome 应用拥有一个等价的异步存储来直接存放对象,避免了某些时候 对象 -> 字符串 -> 对象 的序列化过程所造成的代价。
为了修复刚才的问题,我们需要将 localStorage 转换为 chrome.storage.local。这需要许多步骤,不过这些步骤对于 API 调用和修复 ToDoMVC 异步支持的改动都很小(but they are all small changes to the API calls or fixes on the ToDoMVC async support)。
注意:修改 ToDoMVC 中所有用到 localStorage 的地方是很耗时的而且容易出错,尽管这对于你的学习很必要。为了最大化你学习的乐趣,我们非常建议你:
- a. 看一下下方代码的改动。确认你是否能够理解它们,如果有问题请询问助教。
- b. 复制 cheat_code/solution_for_step_2 下的文件并进入下一步练习。我们已经搞定了下面的步骤,以便你继续学习。( We’ve kept all the steps below for learning purposes)
在
manifest.json中,加入 “storage” 权限:···"permissions": ["storage"],···
在
store.js中,修复构造器:function Store(name, callback) {var data;var dbName;callback = callback || function() {};dbName = this._dbName = name;/* if (!localStorage[dbName]) {data = {todos: []};localStorage[dbName] = JSON.stringify(data);}callback.call(this, JSON.parse(localStorage[dbName])); */chrome.storage.local.get(dbName, function(storage) {if ( dbName in storage ) {callback.call(this, storage[dbName].todos);} else {storage = {};storage[dbName] = { todos: [] };chrome.storage.local.set( storage, function() {callback.call(this, storage[dbName].todos);}.bind(this));}}.bind(this));}
修复 find 方法:
Store.prototype.find = function (query, callback) {if (!callback) {return;}/* var todos = JSON.parse(localStorage[this._dbName]).todos;callback.call(this, todos.filter(function (todo) {for (var q in query) {return query[q] === todo[q];}})); */chrome.storage.local.get(this._dbName, function(storage) {var todos = storage[this._dbName].todos.filter(function (todo) {for (var q in query) {return query[q] === todo[q];}});callback.call(this, todos);}.bind(this));};
修复 findAll 方法:
Store.prototype.findAll = function (callback) {callback = callback || function () {};/* callback.call(this, JSON.parse(localStorage[this._dbName]).todos); */chrome.storage.local.get(this._dbName, function(storage) {callback.call(this, storage[this._dbName].todos);}.bind(this));};
save 方法提出了新的挑战:因为它依赖了两个异步操作(get 和 set),这两个操作每次都会操作整个 JSON 存储,在对一个以上的 ToDos 进行任何一种批量操作都会造成称之为 Read-After-Write 的数据冒险(数据冲突)。有一些办法可以解决这个问题,但是我们会利用之后的机会来稍稍重构它(代码),通过使用一个含有 ToDo id 的数组来进行单次更新。请注意如果我们使用像索引数据库这样的更加合适的数据存储,就不会发生这样的问题了。不过我们正在努力减少转换工作(minimize the conversion effort)(TODO: 这段语句不通):
Store.prototype.save = function (id, updateData, callback) {chrome.storage.local.get(this._dbName, function(storage) {/* var data = JSON.parse(localStorage[this._dbName]); */var data = storage[this._dbName];var todos = data.todos;callback = callback || function () {};// If an ID was actually given, find the item and update each propertyif ( typeof id !== 'object' || Array.isArray(id) ) {var ids = [].concat( id );ids.forEach(function(id) {for (var i = 0; i < todos.length; i++) {if (todos[i].id == id) {for (var x in updateData) {todos[i][x] = updateData[x];}}}});/* localStorage[this._dbName] = JSON.stringify(data);callback.call(this, JSON.parse(localStorage[this._dbName]).todos); */chrome.storage.local.set(storage, function() {chrome.storage.local.get(this._dbName, function(storage) {callback.call(this, storage[this._dbName].todos);}.bind(this));}.bind(this));} else {callback = updateData;updateData = id;// Generate an IDupdateData.id = new Date().getTime();todos.push(updateData);/* localStorage[this._dbName] = JSON.stringify(data);callback.call(this, [updateData]); */chrome.storage.local.set(storage, function() {callback.call(this, [updateData]);}.bind(this));}}.bind(this));};
我们也需要改写客户端的 save 方法,使它能够在一次调用中包含所有的 ID。(it can include all IDs in one call)
a.
controller.js中 toggleComplete 的 update 方法:Controller.prototype.toggleComplete = function (ids, checkbox, silent) {var completed = checkbox.checked ? 1 : 0;this.model.update(ids, { completed: completed }, function () {if ( ids.constructor != Array ) {ids = [ ids ];}ids.forEach( function(id) {var listItem = $$('[data-id="' + id + '"]');if (!listItem) {return;}listItem.className = completed ? 'completed' : '';// In case it was toggled from an event and not by clicking the checkboxlistItem.querySelector('input').checked = completed;});if (!silent) {this._filter();}}.bind(this));};
b.
controller.js中 toggleAll 的 update 方法:Controller.prototype.toggleAll = function (e) {var completed = e.target.checked ? 1 : 0;var query = 0;if (completed === 0) {query = 1;}this.model.read({ completed: query }, function (data) {var ids = [];data.forEach(function (item) {ids.push(item.id);/* this.toggleComplete(item.id, e.target, true); */}.bind(this));this.toggleComplete(ids, e.target, false);}.bind(this));this._filter();};
现在让我们来修复 ToDoMVC 代码中的两个小 bug,当使用异步存储时它们就会出现:
c. 在
controller.js中的 removeItem 方法,把调用 _filter 的语句移动到回调函数里:Controller.prototype.removeItem = function (id) {this.model.remove(id, function () {this.$todoList.removeChild($$('[data-id="' + id + '"]'));this._filter();}.bind(this));/* this._filter(); */};
d. 还是在
controller.js中,使 _updateCount 变为异步执行:Controller.prototype._updateCount = function () {/* var todos = this.model.getCount(); */this.model.getCount(function(todos) {this.$todoItemCounter.innerHTML = this.view.itemCounter(todos.active);this.$clearCompleted.innerHTML = this.view.clearCompletedButton(todos.completed);this.$clearCompleted.style.display = todos.completed > 0 ? 'block' : 'none';this.$toggleAll.checked = todos.completed === todos.total;this._toggleFrame(todos);}.bind(this));};
e. 现在
model.js中对应的 getCount 方法需要接受回调函数:Model.prototype.getCount = function (callback) {var todos = {active: 0,completed: 0,total: 0};this.storage.findAll(function (data) {data.each(function (todo) {if (todo.completed === 1) {todos.completed++;} else {todos.active++;}todos.total++;});if (callback) callback(todos);});/* return todos; */};
我们快要完成了。如果现在重新加载应用,你能够插入新的 Todo 了,但是你还不能移除它们。现在让我们来修复
store.js中的 remove 方法。同样,之前在 save 方法中提到的数据冒险(数据冲突)问题也存在于这里,因此我们需要改写 remove 方法使其允许批量操作:f. 修复
store.js中的 remove 方法:Store.prototype.remove = function (id, callback) {chrome.storage.local.get(this._dbName, function(storage) {/* var data = JSON.parse(localStorage[this._dbName]); */var data = storage[this._dbName];var todos = data.todos;var ids = [].concat(id);ids.forEach( function(id) {for (var i = 0; i < todos.length; i++) {if (todos[i].id == id) {todos.splice(i, 1);break;}}});/* localStorage[this._dbName] = JSON.stringify(data);callback.call(this, JSON.parse(localStorage[this._dbName]).todos); */chrome.storage.local.set(storage, function() {callback.call(this, todos);}.bind(this));}.bind(this));};
g. 现在改写
controller.js中的 removeCompletedItems 使其对所有的 id 调用一次 removeItem:Controller.prototype.removeCompletedItems = function () {this.model.read({ completed: 1 }, function (data) {var ids = [];data.forEach(function (item) {ids.push(item.id);/* this.removeItem(item.id); */}.bind(this));this.removeItem(ids);}.bind(this));this._filter();};
h. 最后改写
controller.js中的 removeItem 以支持一次性从 DOM 移除多个条目:Controller.prototype.removeItem = function (id) {this.model.remove(id, function () {var ids = [].concat(id);ids.forEach( function(id) {this.$todoList.removeChild($$('[data-id="' + id + '"]'));}.bind(this));this._filter();}.bind(this));};
完成了!重新加载你的应用(右击,重新加载应用),好好享受吧!
其实 store.js 中还有另一个方法使用了 localStorage:drop。但因为整个项目都没有用到它,所以我们决定让你之后修复它来作为练习。
现在你应该拥有了如下面截图一样的一个酷炫的 Chrome 打包版 ToDoMVC:
遇到问题了?
记住保持开发者工具的控制台处于打开状态,观察 Javascript 的错误信息:
- 打开开发者工具(应用窗口内右击,点击查看元素)
- 选择 Console 标签
- 你可以在其中看到运行时的错误信息
第 3 步 - 提醒和通知:提醒你打开 To Do’s
想从这一步重新开始?可以在 solution_for_step2 子目录下找到之前练习的代码!
目标:
- 学习如何用提醒功能指定一个间隔时间来唤醒你的应用
- 学习如何使用通知功能来提示用户一些重要的信息(something important)
完成本练习的建议时间:20 分钟
现在我们要改写这个应用,让它能够在需要你打开 To Do’s 的时候提醒你,即使在应用关闭的时候。应用将会使用 Alarm API 来设置一个唤醒应用的间隔时间,只要 Chrome 一直在运行,提醒监听器就会在接近于所设置的间隔时间被调用。
Part 1 - 提醒
在
manifest.json文件中,加入 “alarms” 权限:···"permissions": ["storage", "alarms"],···
在
background.js中,加入 onAlarm 监听器,目前,每当 storage 中有一个 To Do 的项目时向控制台发送一个 log 消息即可:···chrome.app.runtime.onLaunched.addListener(function() {chrome.app.window.create('index.html', {id: 'main',bounds: { width: 620, height: 500 }});});chrome.alarms.onAlarm.addListener(function( alarm ) {console.log("Got an alarm!", alarm);});
在
index.html中,添加一个 “Activate alarm” 按钮并引入我们之后要创建的脚本:···<footer id="info"><button id="toggleAlarm">Activate alarm</button><p>Double-click to edit a todo</p>···<script src="js/store.js"></script><script src="js/model.js"></script><script src="js/view.js"></script><script src="js/controller.js"></script><script src="js/app.js"></script><script src="js/alarms.js"></script></body></html>
创建一个新的脚本 js/alarms.js:
添加 checkAlarm, createAlarm, cancelAlarm 和 toggleAlarm 方法:
(function () {'use strict';var alarmName = 'remindme';function checkAlarm(callback) {chrome.alarms.getAll(function(alarms) {var hasAlarm = alarms.some(function(a) {return a.name == alarmName;});var newLabel;if (hasAlarm) {newLabel = 'Cancel alarm';} else {newLabel = 'Activate alarm';}document.getElementById('toggleAlarm').innerText = newLabel;if (callback) callback(hasAlarm);})}function createAlarm() {chrome.alarms.create(alarmName, {delayInMinutes: 0.1, periodInMinutes: 0.1});}function cancelAlarm() {chrome.alarms.clear(alarmName);}function doToggleAlarm() {checkAlarm( function(hasAlarm) {if (hasAlarm) {cancelAlarm();} else {createAlarm();}checkAlarm();});}$$('#toggleAlarm').addEventListener('click', doToggleAlarm);checkAlarm();})();
注意:
- 观察调用 chrome.alarms.create 时的参数,这些非常小的值(0.1 of a minute) 只是为了用来测试。在发布的应用中,这些值不会被接受,它们会被四舍五入到接近 1 分钟。在你的测试环境中,一个简单的警告被发送到了控制台 - 你可以忽略它。
- 当日志信息被发送到事件(背景)页的控制台中(参见上面的第 2 步),你需要检查背景页来查看那个日志信息: 打开开发者工具(在应用窗口上右击,点击检查背景页,选择控制台标签)。每当你激活了一个提醒,你应该会在控制台里看到日志信息 “rings” 被显示出来。
part 2 - 通知
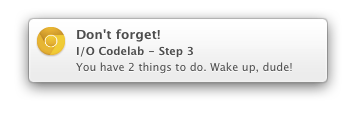
现在让我们把提醒通知变成能让用户更容易注意到的东西。为了达到这个目的,我们要使用 chrome notifications API。我们将显示一个像下面这样桌面通知,并且当用户点击通知后,弹出 To Do 窗口到最上层。(to the top)
在
manifest.json中,加入 “notifications” 权限:···"permissions": ["storage", "alarms", "notifications"],···
在
background.js中:把 chrome.app.window.create 的调用移动到一个方法中,为了让我们可以重用它:
...function launch() {chrome.app.window.create('index.html', {id: 'main',bounds: { width: 620, height: 500 }});}/*chrome.app.runtime.onLaunched.addListener(function() {chrome.app.window.create('index.html', {id: 'main',bounds: { width: 620, height: 500 }});});*/chrome.app.runtime.onLaunched.addListener(launch);...
创建一个 showNotification 方法(注意下面的样例代码关联了 icon_128.png。如果你希望你的通知拥有一个图标,记得也把图标从作弊代码(TODO: cheat code)复制过来或创建一个你自己的图标):
...var dbName = 'todos-vanillajs';function showNotification(storedData) {var openTodos = 0;if ( storedData[dbName].todos ) {storedData[dbName].todos.forEach(function(todo) {if ( !todo.completed ) {openTodos++;}});}if (openTodos>0) {// Now create the notificationchrome.notifications.create('reminder', {type: 'basic',iconUrl: 'icon_128.png',title: 'Don\'t forget!',message: 'You have '+openTodos+' things to do. Wake up, dude!'}, function(notificationId) {})}}// When the user clicks on the notification,// we will open the To Do list and dismiss the notificationchrome.notifications.onClicked.addListener(function( notificationId ) {launch();chrome.notifications.clear(notificationId, function() {});});...
改写 onAlarm 监听器,把向控制台输出简单的新提醒信息变成存储数据并调用 showNotification:
...chrome.alarms.onAlarm.addListener(function( alarm ) {/* console.log("Got an alarm!", alarm); */chrome.storage.local.get(dbName, showNotification);});...
现在重启你的应用并花一些使用它。你会注意到:
- 即使你关闭了应用的窗口,提醒还是会出现
- 如果你关闭了所有 Chrome 窗口,提醒就不会出现(非 ChromeOS 平台)
- 当你的应用关闭后,你点击通知会打开应用窗口
遇到问题了?
如果通知没有显示,检查一下你的 Chrome 版本是不是 28 或更高。chrome 通知是 Chrome 28 引进的,所以你可能想要使用标准的 web 通知 API,我们把改写代码的挑战留个你。W3C 的规范在这里。
如果你的 Chrome 是 28 但是通知还是没有显示,检查控制台中主窗口(右击 -> 审查元素)和背景页(右击 -> 审查背景页)的错误信息
第 4 步 - 解析 URL 并在 Webview 中打开
想从这一步重新开始?可以在 solution_for_step3 子目录下找到之前练习的代码!
目标:
- 学习在安全的沙箱模式下通过 webview 标签 在你的应用中加载并显示大部分的外部内容。 // TODO
完成本练习的建议时间:10 分钟
一些应用需要直接向用户展示一些外部的 web 内容,同时保持用户在应用的体验内(TODO: but keep him inside the application experience)。举例来说,一个新闻汇集应用(TODO: a news aggregator)可能想要从外部站点嵌入各种新闻且希望与原网站的格式、图片和行为保持一致。为完成这一点或其他用途,Chrome 打包应用拥有一个叫做 webview 的自定义的标签。它是一个非常强大的组建,但其最基础的用法事实上是非常简单的,你接下来将会学习它。
我们现在要改写我们的例子让其能够在 ToDo 内容中搜索网址,当找到搜索结果时添加一个链接。当点击该链接时将用一个 webview 打开一个新的应用窗口(不是浏览器标签)来展示内容。
在
manifest.json中,加入 “webview” 权限:···"permissions": ["storage", "alarms", "notifications", "webview"],···
使用一个简单的
<webview>标签创建一个新文件webview.html:<!DOCTYPE html><html><head><meta charset="utf-8"></head><body><webview style="width: 100%; height: 100%;"></webview></body></html>
在
controller.js中:添加一个方法用来解析 To Do 内容中的链接地址。一旦找到地址,用一个锚点来替换它:
Controller.prototype._parseForURLs = function (text) {var re = /(https?:\/\/[^\s"<>,]+)/g;return text.replace(re, '<a href="$1" data-src="$1">$1</a>');};
添加一个方法来打开一个带有 webview 的新窗口并给 webview.src 设置一个地址:
Controller.prototype._doShowUrl = function(e) {// only applies to elements with data-src attributesif (!e.target.hasAttribute('data-src')) {return;}e.preventDefault();var url = e.target.getAttribute('data-src');chrome.app.window.create('webview.html',{hidden: true}, // only show window when webview is configuredfunction(appWin) {appWin.contentWindow.addEventListener('DOMContentLoaded',function(e) {// when window is loaded, set webview sourcevar webview = appWin.contentWindow.document.querySelector('webview');webview.src = url;// now we can show it:appWin.show();});});};
每当显示代办项(TODO: items)的时候进行链接解析:
/*** An event to fire on load. Will get all items and display them in the* todo-list*/Controller.prototype.showAll = function () {this.model.read(function (data) {this.$todoList.innerHTML =this._parseForURLs(this.view.show(data));}.bind(this));};/*** Renders all active tasks*/Controller.prototype.showActive = function () {this.model.read({ completed: 0 }, function (data) {this.$todoList.innerHTML =this._parseForURLs(this.view.show(data));}.bind(this));};/*** Renders all completed tasks*/Controller.prototype.showCompleted = function () {this.model.read({ completed: 1 }, function (data) {this.$todoList.innerHTML =this._parseForURLs(this.view.show(data));}.bind(this));};
解析编辑项中的链接。同样的,修复代码让其使用 input 元素的 innerText 来代替它的 innerHTML:
Controller.prototype.editItem = function (id, label) {...var onSaveHandler = function () {...// Instead of re-rendering the whole view just update// this piece of it/* label.innerHTML = value; */label.innerHTML = this._parseForURLs(value);...// Get the innerHTML of the label instead of requesting the data from the// ORM. If this were a real DB this would save a lot of time and would avoid// a spinner gif./* input.value = label.innerHTML; */input.value = label.innerText;...
最后,在 Controller 构造器中添加一个点击事件监听器,当用户点击链接时调用 doShowUrl 方法:
function Controller(model, view) {this.model = model;this.view = view;this.ENTER_KEY = 13;this.ESCAPE_KEY = 27;this.$main = $$('#main');this.$toggleAll = $$('#toggle-all');this.$todoList = $$('#todo-list');this.$todoItemCounter = $$('#todo-count');this.$clearCompleted = $$('#clear-completed');this.$footer = $$('#footer');this.router = new Router();this.router.init();this.$todoList.addEventListener('click', this._doShowUrl);...
现在,如果你重载你的应用,你看到的应该如下图: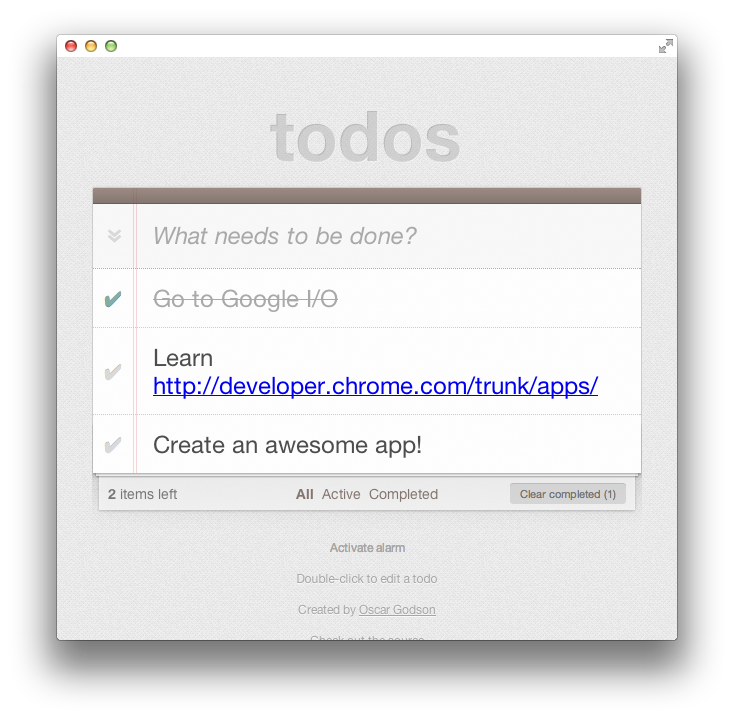
点击链接后:
注意:一个 webview 就是一个沙箱进程。你只能通过使用其 API 与其交互。嵌入的应用(你的应用)无法简单的获取直接访问 webview 的权限,如示例(TODO: for example)。
高级:如果你提前完成了,浏览一下 webview 的文档并运行其中一些方法,让 webview 在加载时显示一个小的状态信息或状态指示器。
第 5 步 - 从 web 添加图片
想从这一步重新开始?可以在 solution_for_step4 子目录下找到之前练习的代码!
目标:
- 学习如何通过 XHR 和 ObjectURLs 加载你的应用的外部资源并添加到 DOM 中。
完成本练习的建议时间:20 分钟
Chrome 打包应用平台要求你的应用必须完全遵从内容安全政策。其中包括不能够直接加载 DOM 资源,如那些在你应用外部的图片、字体和 CSS。如果你想要在你的应用中显示一张外部图片,你需要通过 XHR 来请求,将它放进一个 Blob(TODO: Blob 怎么翻译 = =)并创建一个 ObjectURL。该 ObjectURL 之后能够被添加进 DOM,因为它与应用的上下文中的一个内存项相关(TODO: it refers to an in-memory item in the context of the app)。
让我们改写我们的应用来查找 To Do 内容中的图片链接。如果地址看上去像一个图片(以 .png, .jpg, .svg 或 .gif 结尾),我们会下载该图片并将其作为缩略图放在锚点中显示在一侧。
在
manifest.json中,加入 “<all_url>“ 权限。在一个 Chrome 打包应用中你可以让 XMLRequest 请求发向任意地址,只要你在 manifest 中把该域名设为白名单。我们不设置指定的域名,而是要求开启访问 ““(所有地址)的权限,是因为我们无法提前知道使用我们应用的用户将会在 To Do 的内容中输入什么图片地址: ···"permissions": ["storage", "alarms","notifications", "webview", "<all_urls>"],···
在
js/controller.js中:a. 添加一个方法来从 Blob(TODO: 怎么翻译?) 创建 ObjectURLs。ObjectURLs 会保持在内存中,在你不需要它们时需释放它们,所以也要增加一个 clear 方法:
Controller.prototype._clearObjectURL = function() {if (this.objectURLs) {this.objectURLs.forEach(function(objURL) {URL.revokeObjectURL(objURL);});this.objectURLs = null;}};Controller.prototype._createObjectURL = function(blob) {var objURL = URL.createObjectURL(blob);this.objectURLs = this.objectURLs || [];this.objectURLs.push(objURL);return objURL;};
b. 添加一个方法来执行 XMLRequest 的 URL(TODO: execute a XMLHttpRequest on a URL),根据 XHR 的 response 创建一个 ObjectURLs 并用该 ObjectURLs 创建一个
元素添加到 DOM 中:
Controller.prototype._requestRemoteImageAndAppend =function(imageUrl, element) {var xhr = new XMLHttpRequest();xhr.open('GET', imageUrl);xhr.responseType = 'blob';xhr.onload = function() {var img = document.createElement('img');img.setAttribute('data-src', imageUrl);img.className = 'icon';var objURL = this._createObjectURL(xhr.response);img.setAttribute('src', objURL);element.appendChild(img);}.bind(this);xhr.send();};
c. 现在添加一个方法,用来找到所有未处理的链接并检查它们。对于每个看上去像图片的链接地址,执行 _requestRemoteImageAndAppend:
Controller.prototype._parseForImageURLs = function () {// remove old blobs to avoid memory leak:this._clearObjectURL();var links = this.$todoList.querySelectorAll('a[data-src]:not(.thumbnail)');var re = /\.(png|jpg|jpeg|svg|gif)$/;for (var i = 0; i<links.length; i++) {var url = links[i].getAttribute('data-src');if (re.test(url)) {links[i].classList.add('thumbnail');this._requestRemoteImageAndAppend(url, links[i]);}}};
d. 在 showAll、showActive、showCompleted 和 eidtItem 中合适(TODO: appropriately)的地方调用它:
Controller.prototype.showAll = function () {this.model.read(function (data) {this.$todoList.innerHTML =this._parseForURLs(this.view.show(data));this._parseForImageURLs();}.bind(this));};/*** Renders all active tasks*/Controller.prototype.showActive = function () {this.model.read({ completed: 0 }, function (data) {this.$todoList.innerHTML =this._parseForURLs(this.view.show(data));this._parseForImageURLs();}.bind(this));};/*** Renders all completed tasks*/Controller.prototype.showCompleted = function () {this.model.read({ completed: 1 }, function (data) {this.$todoList.innerHTML =this._parseForURLs(this.view.show(data));this._parseForImageURLs();}.bind(this));};...Controller.prototype.editItem = function (id, label) {var li = label;// This finds the <label>'s parent <li>while (li.nodeName !== 'LI') {li = li.parentNode;}var onSaveHandler = function () {var value = input.value.trim();var discarding = input.dataset.discard;if (value.length && !discarding) {this.model.update(id, { title: input.value });// Instead of re-rendering the whole view just update// this piece of itlabel.innerHTML = this._parseForURLs(value);this._parseForImageURLs();...
最后,在
bower_components/todomvc-common/base.css中,添加一条 CSS 规则来限制图片的尺寸:.thumbnail img[data-src] {max-width: 100px;max-height: 28px;}
现在重新加载你的应用,打开 Google 图片搜索,找一些图片链接地址并把它们添加到 ToDo 的内容中。一些例子:
http://goo.gl/lftY4r#.jpg
http://goo.gl/YCBJz1#.png
然后看起来会是这样: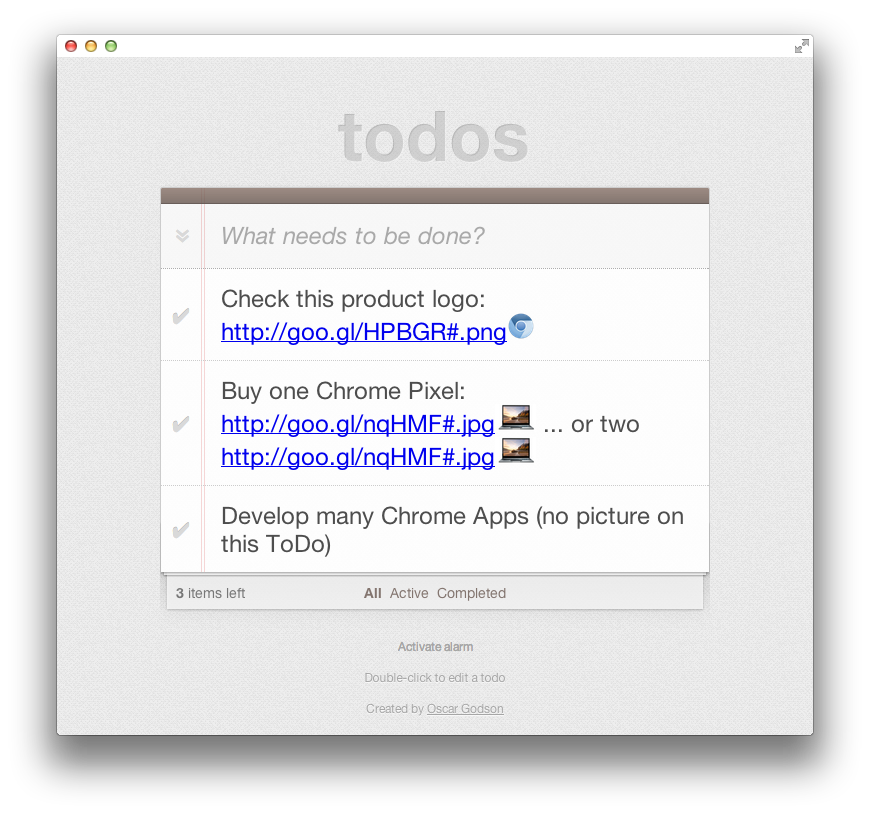
提示:在真实环境的情况下,当你需要控制离线缓存并同时下载多个资源时,我们创建了一个 帮助库 来处理一些常见用例。
第 6 步 - 导出 ToDo 到文件系统
想从这一步重新开始?可以在 solution_for_step5 子目录下找到之前练习的代码!
目标:
- 学习如何获取外部文件系统中的文件的引用,并使用 FileSystem API 在应用的生命周期中写入该文件。
完成本练习的建议时间:20 分钟
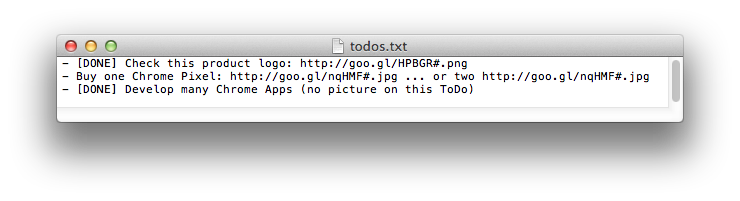
在这一步中,我们将在应用里添加一个导出按钮。点击后,当前的 To Do 项会保存到一个用户选择的文本文件中。如果文件存在,则会替换此文件。否则,会创建一个新文件。值得注意的是在表示文件实体的对象的生命周期内,用户仅需要选择文件一次。在我们的例子中,我们把它绑定到应用窗口上 - 因此只要用户保持窗口打开,Javascript 代码就能无需任何用户交互来写入选择的文件。
在
manifest.json中,添加{fileSystem: [ "write" ] }授权。注意该授权的语法要比其他的更复杂,我们不仅需要获取外部文件系统,也需要向其写入:..."permissions": ["storage", "alarms", "notifications", "webview","<all_urls>", { "fileSystem": ["write"] } ],...
在
index.html中,添加一个 “导出到磁盘” 按钮以及一个 div,用来让我们显示状态信息。另外,加载我们之后会创建的脚本:...<footer id="info"><button id="toggleAlarm">Activate alarm</button><button id="exportToDisk">Export to disk</button><div id="status"></div><p>Double-click to edit a todo</p><p>Created by <a href="http://twitter.com/oscargodson">Oscar Godson</a></p></footer><script src="bower_components/todomvc-common/base.js"></script><script src="bower_components/director/build/director.js"></script><script src="js/bootstrap.js"></script><script src="js/helpers.js"></script><script src="js/store.js"></script><script src="js/model.js"></script><script src="js/view.js"></script><script src="js/controller.js"></script><script src="js/app.js"></script><script src="js/alarms.js"></script><script src="js/export.js"></script></body></html>
按照以下步骤创建一个新 Javascript 脚本,
js/export.js:- 一个 getTodosAsText 方法用来从 chrome.storage.local 读取 ToDos 并生成相应的文本内容;
- 一个 exportToFileEntry 方法,给定一个文件实体,会保存 To Do 的文本到那个文件;
- 一个 doExportToDisk 方法,在我们已有一个保存过的文件实体时,执行上面添加的 exportToFileEntry 方法,在没有的时候让用户选择一个;
- 监听 “导出到磁盘” 按钮的点击事件
(function() {var dbName = 'todos-vanillajs';var savedFileEntry, fileDisplayPath;function getTodosAsText(callback) {chrome.storage.local.get(dbName, function(storedData) {var text = '';if ( storedData[dbName].todos ) {storedData[dbName].todos.forEach(function(todo) {text += '- ';if ( todo.completed ) {text += '[DONE] ';}text += todo.title;text += '\n';}, '');}callback(text);}.bind(this));}// Given a FileEntry,function exportToFileEntry(fileEntry) {savedFileEntry = fileEntry;var status = document.getElementById('status');// Use this to get a pretty name appropriate for displayingchrome.fileSystem.getDisplayPath(fileEntry, function(path) {fileDisplayPath = path;status.innerText = 'Exporting to '+path;});getTodosAsText( function(contents) {fileEntry.createWriter(function(fileWriter) {fileWriter.onwriteend = function(e) {status.innerText = 'Export to '+fileDisplayPath+' completed';};fileWriter.onerror = function(e) {status.innerText = 'Export failed: '+e.toString();};var blob = new Blob([contents]);fileWriter.write(blob);// You need to explicitly set the file size to truncate// any content that might was there beforefileWriter.truncate(blob.size);});});}function doExportToDisk() {if (savedFileEntry) {exportToFileEntry(savedFileEntry);} else {chrome.fileSystem.chooseEntry( {type: 'saveFile',suggestedName: 'todos.txt',accepts: [ { description: 'Text files (*.txt)',extensions: ['txt']} ],acceptsAllTypes: true}, exportToFileEntry);}}document.getElementById('exportToDisk').addEventListener('click', doExportToDisk);})()
高级:文件实体无法持久化,这意味着每次启动你的应用都需要让用户选择文件。但是,如果你的应用被强制重启(比如运行环境崩溃、应用升级或运行环境升级),那么 这里有一个选项 来还原文件实体。如果你提前完成,尝试一下保存 retainEntry 返回的 ID 并且在应用重启时恢复它(提示:为 背景页的 onRestarted 事件添加一个监听器)
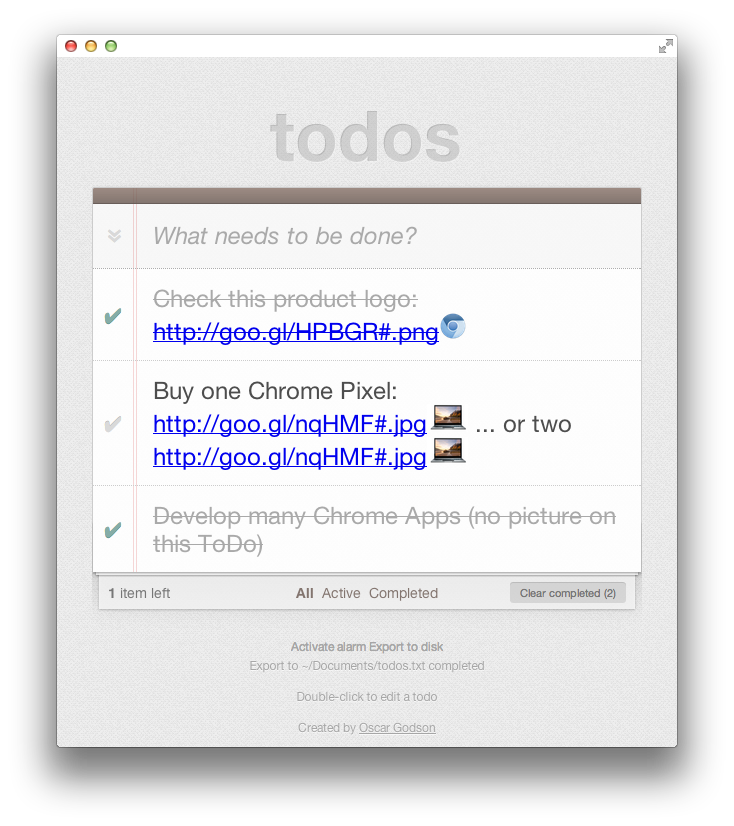
恭喜你!如果你完成了所有的步骤,你应该有了一个如下图所示的完整的 ToDoMVC 打包应用:
进阶的奖励挑战:添加语音指令
想从这一步重新开始?可以在 solution_for_step6 子目录下找到之前练习的代码!
如果你已经进行到这一步并且还有多余的时间,你可能会想要尝试一下非常高级的挑战:让你的应用能够通过说话来添加 ToDos,这个怎么样?使用 HTML 5 WebSpeech API 并按照以下高阶步骤(TODO: high-level step)来做:
- 在
manifest.json中添加 “audioCapture” 授权 - 当用户点击激活按钮时开始语音识别
- 在 “add note” 命令之后、”end note” 之前,获取任意文本并保存它们到 To Do 项中
这部分挑战没有作弊用的代码,自己来 hack 吧!
[1] http://developer.chrome.com/trunk/apps/manifest.html
[2] http://developer.chrome.com/trunk/apps/app_lifecycle.html#eventpage
[3] http://goo.gl/u9sRAL
[4] http://developer.chrome.com/trunk/apps/storage.html
[5] If you know the ToDoMVC web app (http://todomvc.com), we have copied its vanilla JavaScript version to be used as a starting point.
[6] http://developer.chrome.com/trunk/apps/app_csp.html
[7] http://en.wikipedia.org/wiki/Hazard_(computer_architecture)#Read_After_Write_.28RAW.29
[8] http://www.w3.org/TR/notifications/
[9] http://developer.chrome.com/trunk/apps/webview_tag.html
[10] https://github.com/GoogleChrome/apps-resource-loader#readme
[11] http://developer.chrome.com/trunk/apps/fileSystem.html#method-restoreEntry
[12] http://www.google.com/intl/en/chrome/demos/speech.html

若有收获,就点个赞吧
0 人点赞
