一、字符集处理
POST请求中的字符集处理
以前的方法:
1.自己定义一个过滤器,配置过滤器进行字符集处理
2.使用spring提供的字符集过滤器。
这两种方式都需要配置在web.xml中进行配置。但是springboot都不是web项目,没有web.xml文件,所以提供了更简单的配置方式.
SpringBoot的spring-boot-starter-web默认配置处理了请求的字符集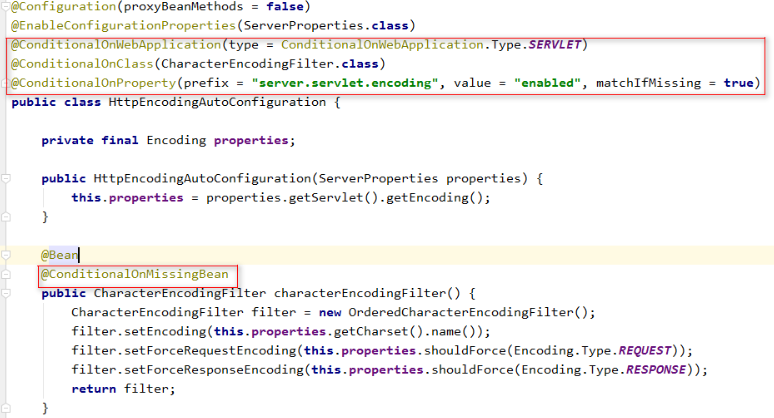
上面是自动配置的,可以在核心配置文件中指定不使用自动配置:
server: port: 8080 servlet: encoding: enabled: false
如果自己给spring容器添加字符集过滤器CharacterEncodingFilter,springboot也不会自动配置。
使用springboot自动配置的字符集处理器需要设置自己的字符编码:
springboot默认配置的字符集是:utf-8,可以修改
server: port: 8080 servlet: encoding: enabled: false charset: utf-8
二、日期格式的转换
springMVC默认请求参数接收的日期格式是:dd/MM/yy
如果使用格式:yyyy-MM-dd,可以使用:@DateTimeFormat(pattern="``yyyy-MM-dd``")
@RequestMapping("/save")@ResponseBodypublic String saveUser(String uname, @DateTimeFormat(pattern = "yyyyy-MM-dd") Date birth){System.out.println("接收的数据:"+uname);return "user-save";}
更好的办法就是配置一个格式转换器。springboot可以自动添加一个格式转换器:
在WebMvc的自动配置类中添加的配置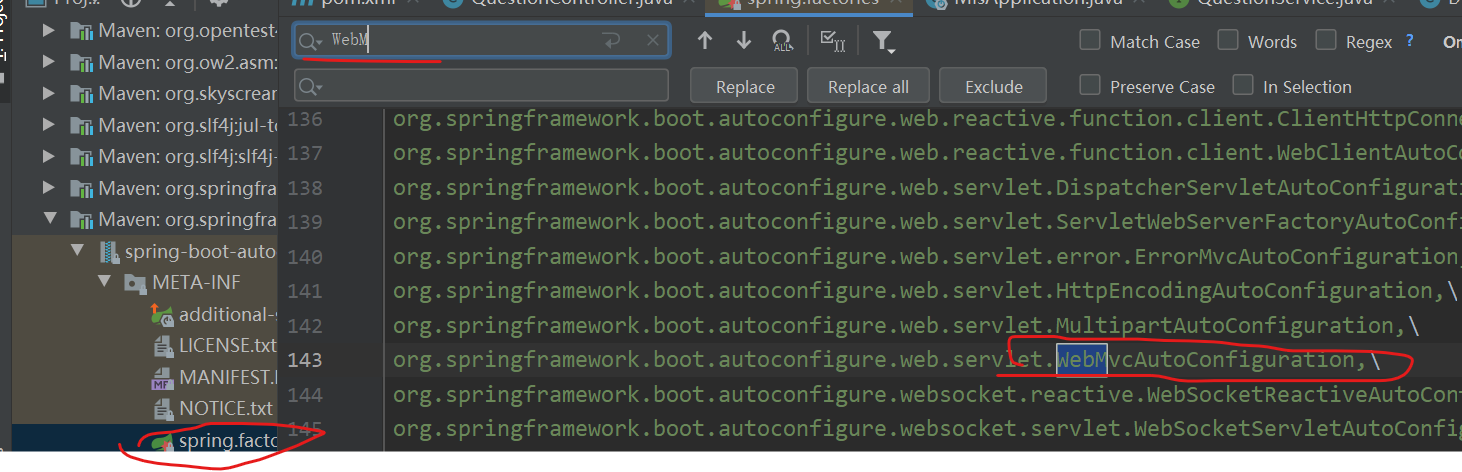
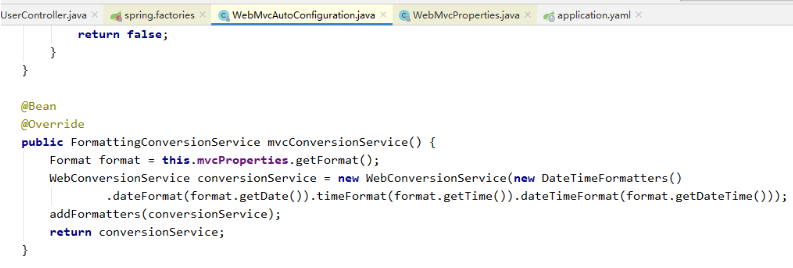
只要webMVC生效,那么这个日期转换器直接生效。就可以在配置文件配置自定义的日期格式
thymeleaf的配置
spring thymeleaf: prefix: classpath:/templates #模板前缀,默认就是这个配置 suffix: .html #模板后缀,默认就是这个配置 encoding: utf-8 #字符集,默认就是utf-8
数据源的配置,使用默认spring提供测试使用的数据源
mvc: format: date: yyyy-MM-dd date-time: yyyy-MM-dd HH:mm:ss time: HH:mm:ss
三、静态资源的映射
静态资源:css,js,图片,html等
springMVC中可以使用静态资源映射器完成静态资源映射。
在spring配置文件中使用:
<!-- 配置静态资源映射,告诉springMVC核心控制器,不要拦截这些资源 -->
<mvc:resources mapping="/css/**" location="/css/"/>
<mvc:resources mapping="/images/**" location="/images/"/>
<mvc:resources mapping="/js/**" location="/js/"/>
webjars添加静态资源
springboot中有一个自动配置类:WebMvcAutoConfiguration
部分源码如下:
public void addResourceHandlers(ResourceHandlerRegistry registry) {
    if (!this.resourceProperties.isAddMappings()) {
        logger.debug("Default resource handling disabled");
    } else {
        Duration cachePeriod = this.resourceProperties.getCache().getPeriod();
        CacheControl cacheControl = this.resourceProperties.getCache().getCachecontrol().toHttpCacheControl();
        if (!registry.hasMappingForPattern("/webjars/**")) {
            this.customizeResourceHandlerRegistration(registry.addResourceHandler(new String[]{"/webjars/**"}).addResourceLocations(new String[]{"classpath:/META-INF/resources/webjars/"}).setCachePeriod(this.getSeconds(cachePeriod)).setCacheControl(cacheControl));
        }
        //注册META-INF/resources/webjars/**
        String staticPathPattern = this.mvcProperties.getStaticPathPattern();
        if (!registry.hasMappingForPattern(staticPathPattern)) {
            this.customizeResourceHandlerRegistration(registry.addResourceHandler(new String[]{staticPathPattern}).addResourceLocations(WebMvcAutoConfiguration.getResourceLocations(this.resourceProperties.getStaticLocations())).setCachePeriod(this.getSeconds(cachePeriod)).setCacheControl(cacheControl));
        }
    }
}
webjars可以以maven的形式添加前端资源
资源网站:https://www.webjars.com/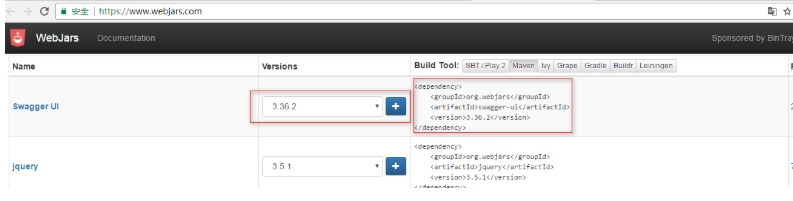
添加jQuery:
   <!-- jQuery的依赖 -->
        <dependency>
            <groupId>org.webjars</groupId>
            <artifactId>jquery</artifactId>
            <version>3.5.1</version>
        </dependency>
依赖项目: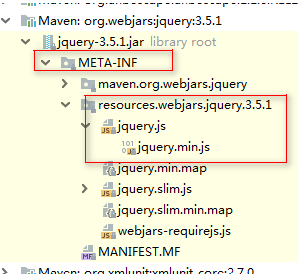
在页面进行的使用的时候:
<script src="wabjars/jquery/3.5.1/jquery.min.js"></script>
注:springboot首先会默认认为webjars/下的资源都是静态的不过滤。
其他静态资源处理
ResourceProperties有静态资源的处理配置:
源码:
@ConfigurationProperties(
    prefix = "spring.resources",
    ignoreUnknownFields = false
)
public class ResourceProperties {
    //默认的静态资源的位置
    private static final String[] CLASSPATH_RESOURCE_LOCATIONS = new String[]{"classpath:/META-INF/resources/", "classpath:/resources/", "classpath:/static/", "classpath:/public/"};
    //可以通过spring.resources.staticLocations配置自定义的静态资源的位置
    private String[] staticLocations;
    private boolean addMappings;
    private final ResourceProperties.Chain chain;
    private final ResourceProperties.Cache cache;
    //无参数的构造方法
    public ResourceProperties() {
        //将默认的路径数组赋值给staticLocations
        this.staticLocations = CLASSPATH_RESOURCE_LOCATIONS;
        this.addMappings = true;
        this.chain = new ResourceProperties.Chain();
        this.cache = new ResourceProperties.Cache();
    }
    //其他内容
}
默认路径位置:
"classpath:/META-INF/resources/webjars",
"classpath:/resources/",
"classpath:/static/",
"classpath:/public/"
classpath的位置: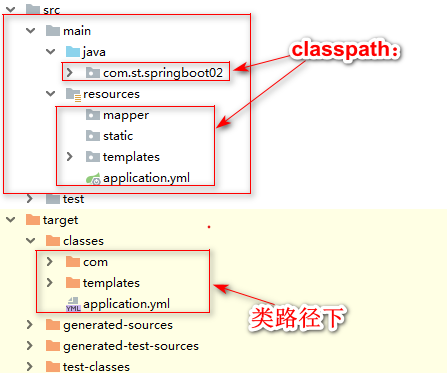
常见的处理方式: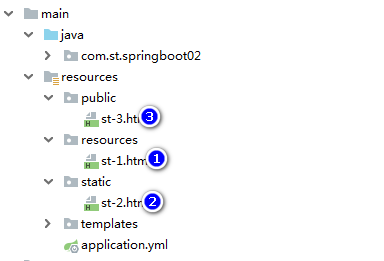
配置自己的静态资源目录:在application.yaml
#静态资源路径配置#
spring:
  resources:
    static-locations:
      - classpath:/st
      - classpath:/abc
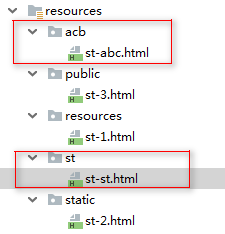
默认的静态资源的路径就会被覆盖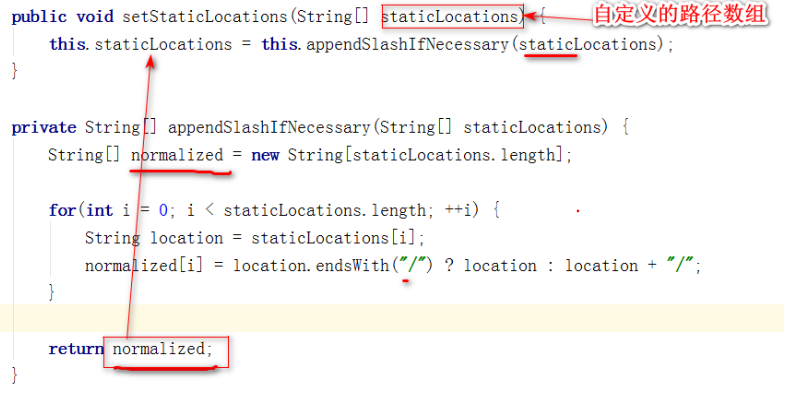
所以一般不建议配置自己的静态资源路径,如果要配置,建议把默认的静态资源路径加上去。
默认首页的处理
springboot处理欢迎页面
 @Bean
        public WelcomePageHandlerMapping welcomePageHandlerMapping(ApplicationContext applicationContext, FormattingConversionService mvcConversionService, ResourceUrlProvider mvcResourceUrlProvider) {
            WelcomePageHandlerMapping welcomePageHandlerMapping = new WelcomePageHandlerMapping(new TemplateAvailabilityProviders(applicationContext), applicationContext, this.getWelcomePage(), this.mvcProperties.getStaticPathPattern());
            welcomePageHandlerMapping.setInterceptors(this.getInterceptors(mvcConversionService, mvcResourceUrlProvider));
            welcomePageHandlerMapping.setCorsConfigurations(this.getCorsConfigurations());
            return welcomePageHandlerMapping;
        }
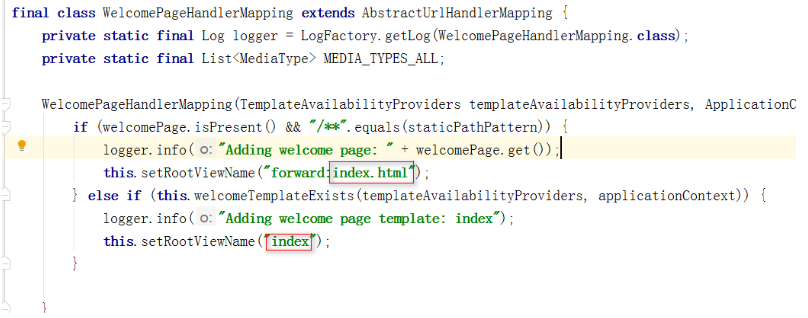
测试:
在静态资源文件中放一个index.html
/resource/static/index.html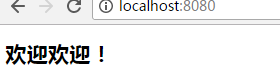
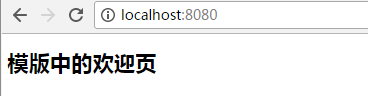
去掉静态的index.html,添加一个index的url,转发到index.html模板
添加模板:/resource/templates/index.html
在任意一个controller中添加index url
  @RequestMapping("/index")
    public String index(){
        return "index";
    }
四、统一的异常处理
springboot的默认错误处理:
在浏览器中访问一个不存在的页面(返回错误页面)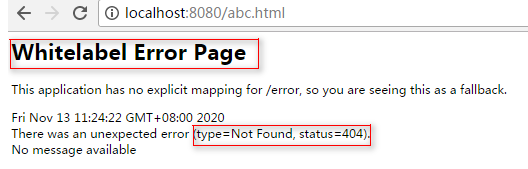
在postman中访问一个不存在的页面(返回一段json)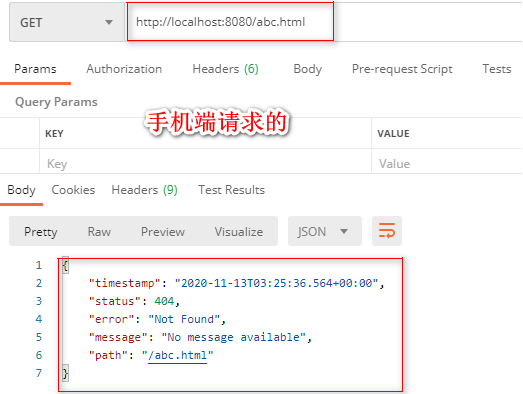
查看错误处理的自动配置:ErrorMvcAutoConfiguration
@configuration
public class ErrorMvcAutoConfiguration{
    @Bean  //给spring容器中添加了一个DefaultErrorAttributes
    @ConditionalOnMissingBean(
        value = {ErrorAttributes.class},  //条件:容器中不存在ErrorAttributes类型的bean
        search = SearchStrategy.CURRENT
    )
    public DefaultErrorAttributes errorAttributes() {
        //默认的异常属性
        return new DefaultErrorAttributes();
    }
    //....
}
在DefaultErrorAttributes中:
//返回一个map map中就包含了错误信息
public Map<String, Object> getErrorAttributes(WebRequest webRequest, ErrorAttributeOptions options) {
    Map<String, Object> errorAttributes = this.getErrorAttributes(webRequest, options.isIncluded(Include.STACK_TRACE));
    if (Boolean.TRUE.equals(this.includeException)) {
        options = options.including(new Include[]{Include.EXCEPTION});
    }
    if (!options.isIncluded(Include.EXCEPTION)) {
        errorAttributes.remove("exception");
    }
    if (!options.isIncluded(Include.STACK_TRACE)) {
        errorAttributes.remove("trace");
    }
    if (!options.isIncluded(Include.MESSAGE) && errorAttributes.get("message") != null) {
        errorAttributes.put("message", "");
    }
    if (!options.isIncluded(Include.BINDING_ERRORS)) {
        errorAttributes.remove("errors");
    }
    return errorAttributes;
}
springboot内部定义的一个基本的异常处理controller:
@Controller
//系统一旦出现错误,就进入这个controller处理
@RequestMapping({"${server.error.path:${error.path:/error}}"})
public class BasicErrorController extends AbstractErrorController {
    private final ErrorProperties errorProperties;
    //构造方法
        public BasicErrorController(ErrorAttributes errorAttributes, ErrorProperties errorProperties) {
        this(errorAttributes, errorProperties, Collections.emptyList());
    }

    //响应HTML格式的错误信息
    @RequestMapping(
        produces = {"text/html"}
    )
    public ModelAndView errorHtml(HttpServletRequest request, HttpServletResponse response) {
        HttpStatus status = this.getStatus(request);
        Map<String, Object> model = Collections.unmodifiableMap(this.getErrorAttributes(request, this.getErrorAttributeOptions(request, MediaType.TEXT_HTML)));
        response.setStatus(status.value());
        ModelAndView modelAndView = this.resolveErrorView(request, response, status, model);
        //错误页面的url:error
        return modelAndView != null ? modelAndView : new ModelAndView("error", model);
    }
    //响应json格式的错误信息
    @RequestMapping
    public ResponseEntity<Map<String, Object>> error(HttpServletRequest request) {
        HttpStatus status = this.getStatus(request);
        if (status == HttpStatus.NO_CONTENT) {
            return new ResponseEntity(status);
        } else {
            Map<String, Object> body = this.getErrorAttributes(request, this.getErrorAttributeOptions(request, MediaType.ALL));
            return new ResponseEntity(body, status);
        }
    }
}
错误视图解析器:DefaultErrorViewResolver
public class DefaultErrorViewResolver implements ErrorViewResolver, Ordered {
    //有明确的错误视图的名称,进入error/视图名称的视图
    private ModelAndView resolve(String viewName, Map<String, Object> model) {
        //默认SpringBoot可以去找到一个页面? error/404
        String errorViewName = "error/" + viewName;
        //模板引擎可以解析这个页面地址就用模板引擎解析
        TemplateAvailabilityProvider provider = this.templateAvailabilityProviders.getProvider(errorViewName, this.applicationContext);
           //模板引擎可用的情况下返回到errorViewName指定的视图地址
        return provider != null ? new ModelAndView(errorViewName, model) :
        //模板引擎不可用,就在静态资源文件夹下找errorViewName对应的页面 error/404.html
        this.resolveResource(errorViewName, model);
    }
    //有明确的错误视图的名称,在静态资源路径下找视图名称的视图
    private ModelAndView resolveResource(String viewName, Map<String, Object> model) {
        String[] var3 = this.resourceProperties.getStaticLocations();
        int var4 = var3.length;

        for(int var5 = 0; var5 < var4; ++var5) {
            String location = var3[var5];

            try {
                Resource resource = this.applicationContext.getResource(location);
                resource = resource.createRelative(viewName + ".html");
                if (resource.exists()) {
                    return new ModelAndView(new DefaultErrorViewResolver.HtmlResourceView(resource), model);
                }
            } catch (Exception var8) {
            }
        }
    //静态代码块处理的数据 错误视图名称模版
    static {
        Map<Series, String> views = new EnumMap(Series.class);
        views.put(Series.CLIENT_ERROR, "4xx");
        views.put(Series.SERVER_ERROR, "5xx");
        SERIES_VIEWS = Collections.unmodifiableMap(views);
    }
}
步骤:
一但系统出现4xx或者5xx之类的错误;ErrorPageCustomizer就会生效(定制错误的响应规则);
就会来到/error请求;就会被BasicErrorController处理;
1)响应页面:去哪个页面时由DefaultErrorViewResolver解析得到的
根据上面的分析可以定制自己的错误页面
在项目的classpath下或者templates下添加一个目录:error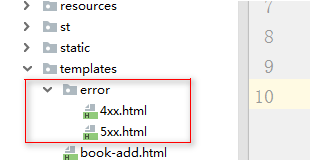
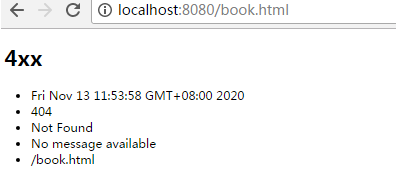
在页面输出错误信息:
    <ul>
        <li th:text="${timestamp}"></li>
        <li th:text="${status}"></li>
        <li th:text="${error}"></li>
        <li th:text="${message}"></li>
        <li th:text="${path}"></li>
    </ul>
定制错误信息
spring在ErrorMvcAutoConfiguration给spring的容器中注入了:DefaultErrorAttributes
条件就是:spring容器中没有ErrorAttributes类型的bean.
我们自己给spring容器添加了一个ErrorAttributes类型的bean,spring就不会再添加DefaultErrorAttributes。
自己定义一个类继承ErrorAttributes
@Component //交个spring管理
public class StErrorAttributes  extends DefaultErrorAttributes {
    @Override
    public Map<String, Object> getErrorAttributes(WebRequest webRequest, ErrorAttributeOptions options) {
        //获取父类中的错误信息
        Map<String,Object> errors = super.getErrorAttributes(webRequest, options);
        //在map中添加自定义的错误信息
        errors.put("author","Cherry");
        errors.put("version","1.1.0");
        return errors;
    }
}
页面中取出信息
<ul>
    <li th:text="${timestamp}"></li>
    <li th:text="${status}"></li>
    <li th:text="${error}"></li>
    <li th:text="${message}"></li>
    <li th:text="${path}"></li>
    <li th:text="${author}"></li>
    <li th:text="${version}"></li>
</ul>
五、springBoot的web项目配置拦截器
配置拦截器本身和springboot没有关系,因为之前只是将拦截器的xml配置方式,现在使用注解的方式配置拦截。
首先定义拦截器
/**
 * @author:Cherry
 * @createTime:2021-03-31
 */
@Component
public class StInterceptor implements HandlerInterceptor {
    @Override
    public boolean preHandle(HttpServletRequest request, HttpServletResponse response, Object handler) throws Exception {
        System.out.println("拦截器的前置处理preHandle");
        return true;//放行
    }

    @Override
    public void postHandle(HttpServletRequest request, HttpServletResponse response, Object handler, ModelAndView modelAndView) throws Exception {
        System.out.println("拦截器的后置处理postHandle");
    }

    @Override
    public void afterCompletion(HttpServletRequest request, HttpServletResponse response, Object handler, Exception ex) throws Exception {
        System.out.println("拦截器的最终处理afterCompletion");
    }
}
添加一个web配置类,这个配置类略有区别:需要实现接口WebMvcConfigurer
/**
 * @author:Cherry
 * @createTime:2021-03-31
 */
@Configuration
public class WebConfig implements WebMvcConfigurer {
    //注入自定义的拦截器
    @Autowired
    private StInterceptor interceptor;

    /**
     * 注册拦截器,spring会自动执行这个方法
     * @param registry 专门用来注册拦截器
     */
    public void addInterceptors(InterceptorRegistry registry){
        //注册拦截器(可以使用方法链)addPathPatterns添加要拦截的路径 - excludePathPatterns配置不拦截的路径
        registry.addInterceptor(interceptor).addPathPatterns("/*","/user/*").excludePathPatterns("/stage/*");
    }
}
六、配置嵌入式servlet容器
SpringBoot默认使用Tomcat作为嵌入式的Servlet容器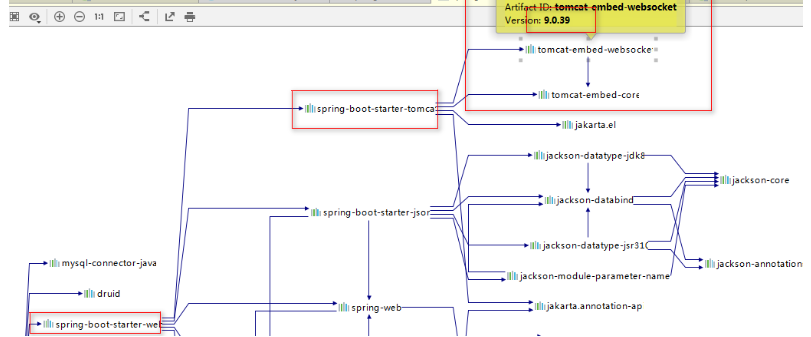
定制和修改servlet的相关配置:
server:
  servlet:
    encoding:
      charset: utf-8 #字符集#
    context-path: /lqy #访问路径#
  port: 8989  #端口#
  tomcat:
    threads:
      max: 500 #最大线程数#
这些配置全部在:ServerProperties类中绑定。
七、在springBoot工程中注册web组件
web的三大组件:servlet,filter,listener
由于SpringBoot默认是以jar包的方式启动嵌入式的Servlet容器来启动SpringBoot的web应用,没有web.xml文件。
三大组件用以下方式
【1】servlet
自定义一个servlet类
/**
 * @author:Cherry
 * @createTime:2021-03-31
 */
public class StServlet extends HttpServlet {
    @Override
    protected void doGet(HttpServletRequest req, HttpServletResponse resp) throws ServletException, IOException {
        this.doPost(req,resp);
    }

    @Override
    protected void doPost(HttpServletRequest req, HttpServletResponse resp) throws ServletException, IOException {
        System.out.println("StServlet-service");
        resp.getWriter().write("stServlet-ok");
    }
}
在我们的任何一个配置类中添加一个servlet注册的方法:
ServletRegistrationBean
@Configuration
public class WebElementConfig {

    @Bean
    public ServletRegistrationBean stServlet(){
        ServletRegistrationBean registrationBean = new ServletRegistrationBean();
        //创建自己的servlet对象
        StServlet stServlet = new StServlet();
        //注册
        registrationBean.setServlet(stServlet);
        //设置servlet的请求路径(这里是可变参数,可以写多个)
        registrationBean.addUrlMappings("/st");
//        registrationBean.setLoadOnStartup(1);
//        registrationBean.setInitParameters();
        return registrationBean;
    }
}
注册原理:我们不能直接将servlet注册在spring中,因为servlet是由tomcat解释运行的。最终spring是要将servlet放入tomcat。springboot提供了一个bean:ServletRegistrationBean。这个bean的作用就是将我们的servlet注册在tomcat中。
我们要做的事情就是将servlet类对象创建好,并且交给ServletRegistrationBean对象,将ServletRegistrationBean交给spring。spring会自动进行servlet注册。
【2】注册filter
public class StFilter implements Filter {
    @Override
    public void doFilter(ServletRequest servletRequest, ServletResponse servletResponse, FilterChain filterChain) throws IOException, ServletException {
        System.out.println("execute MyFilter doFilter");
        filterChain.doFilter(servletRequest, servletResponse);
    }
}
配置类添加:
    @Bean
    public FilterRegistrationBean stFilter(){
        //一样的操作方式
        FilterRegistrationBean registrationBean = new FilterRegistrationBean();
        registrationBean.setFilter(new StFilter());
        registrationBean.addUrlPatterns("/st");
        return registrationBean;
    }
【3】注册listener
public class StServletContentListener implements ServletContextListener {
    @Override
    public void contextInitialized(ServletContextEvent sce) {
        System.out.println("创建了ServletContext对象");
    }
}
 @Bean
    public ServletListenerRegistrationBean stListener(){
        ServletListenerRegistrationBean bean = new ServletListenerRegistrationBean();
        bean.setListener(new StServletContentListener());
        return  bean;
    }
八、使用外置的servlet容器
我们这里就是使用外置的tomcat。
嵌入式Servlet容器:应用打成可执行的jar
优点:简单、便携;
缺点:默认不支持JSP、优化定制比较复杂
外置的Servlet容器:外面安装Tomcat—-应用war包的方式打包;
步骤:
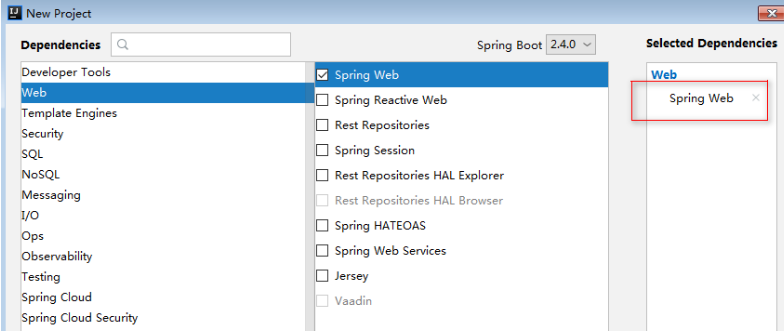
1)创建一个war项目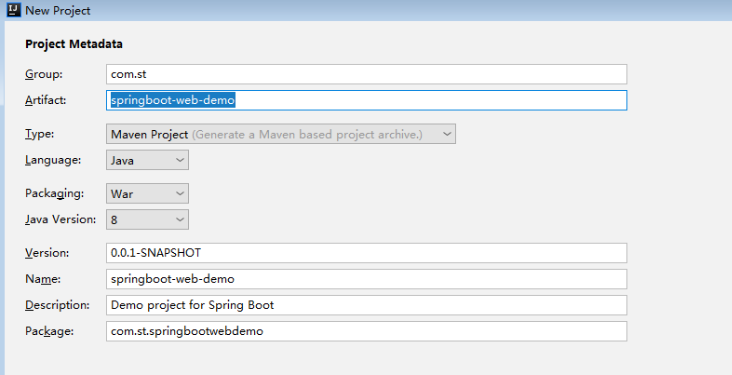
新项目没有web目录,需要自己添加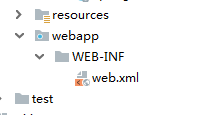
2)依赖的spring-boot-web-starter传递依赖了starter-tomcat
将嵌入式的Tomcat指定为provided
<!-- 嵌入式的tomcat设置为provided -->
        <dependency>
            <groupId>org.springframework.boot</groupId>
            <artifactId>spring-boot-starter-tomcat</artifactId>
            <scope>provided</scope>
        </dependency>
3)必须编写一个SpringBootServletInitializer的子类,调用configure方法
public class ServletInitializer extends SpringBootServletInitializer {
    @Override
    protected SpringApplicationBuilder configure(SpringApplicationBuilder application) {
        return application.sources(SpringbootWebDemoApplication.class);
    }
}
4)在idea中配置外置Tomcat
注:编译使用springboot2.2.2中的Tomcat9,所以外面运行的Tomcat也必须为9,不然会出现jar包冲突。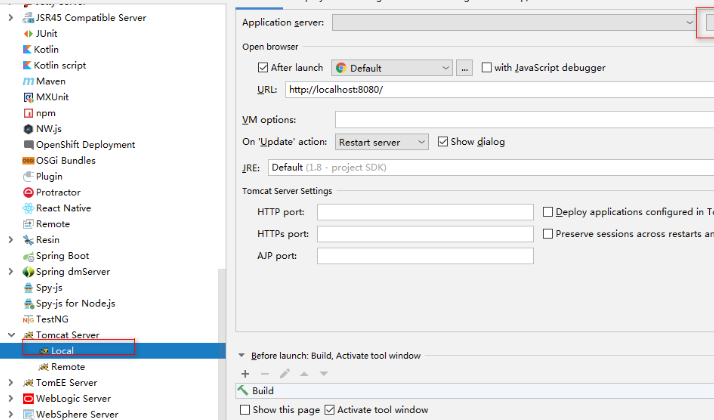
5)在webapp下添加一个jsp文件夹
测试:

若有收获,就点个赞吧
0 人点赞
