- 1. 深入 Hystrix 断路器执行原理
- 1.1 状态机
- 1.2 Enabled
- circuitBreaker.requestVolumeThreshold">1.3 circuitBreaker.requestVolumeThreshold
- circuitBreaker.errorThresholdPercentage">1.4 circuitBreaker.errorThresholdPercentage
- circuitBreaker.sleepWindowInMilliseconds">1.5 circuitBreaker.sleepWindowInMilliseconds
- ForceOpen">1.6 ForceOpen
- ForceClosed">1.7 ForceClosed
- 1.8 Metrics 统计器
- 2. 深入 Hystrix 线程池隔离与接口限流
- 3. 基于 timeout 机制为服务接口调用超时提供安全保护
- 3.3 实例 Demo
1. 深入 Hystrix 断路器执行原理
1.1 状态机
Hystrix 断路器有三种状态,分别是关闭(Closed)、打开(Open)与半开(Half-Open),三种状态转化关系如下: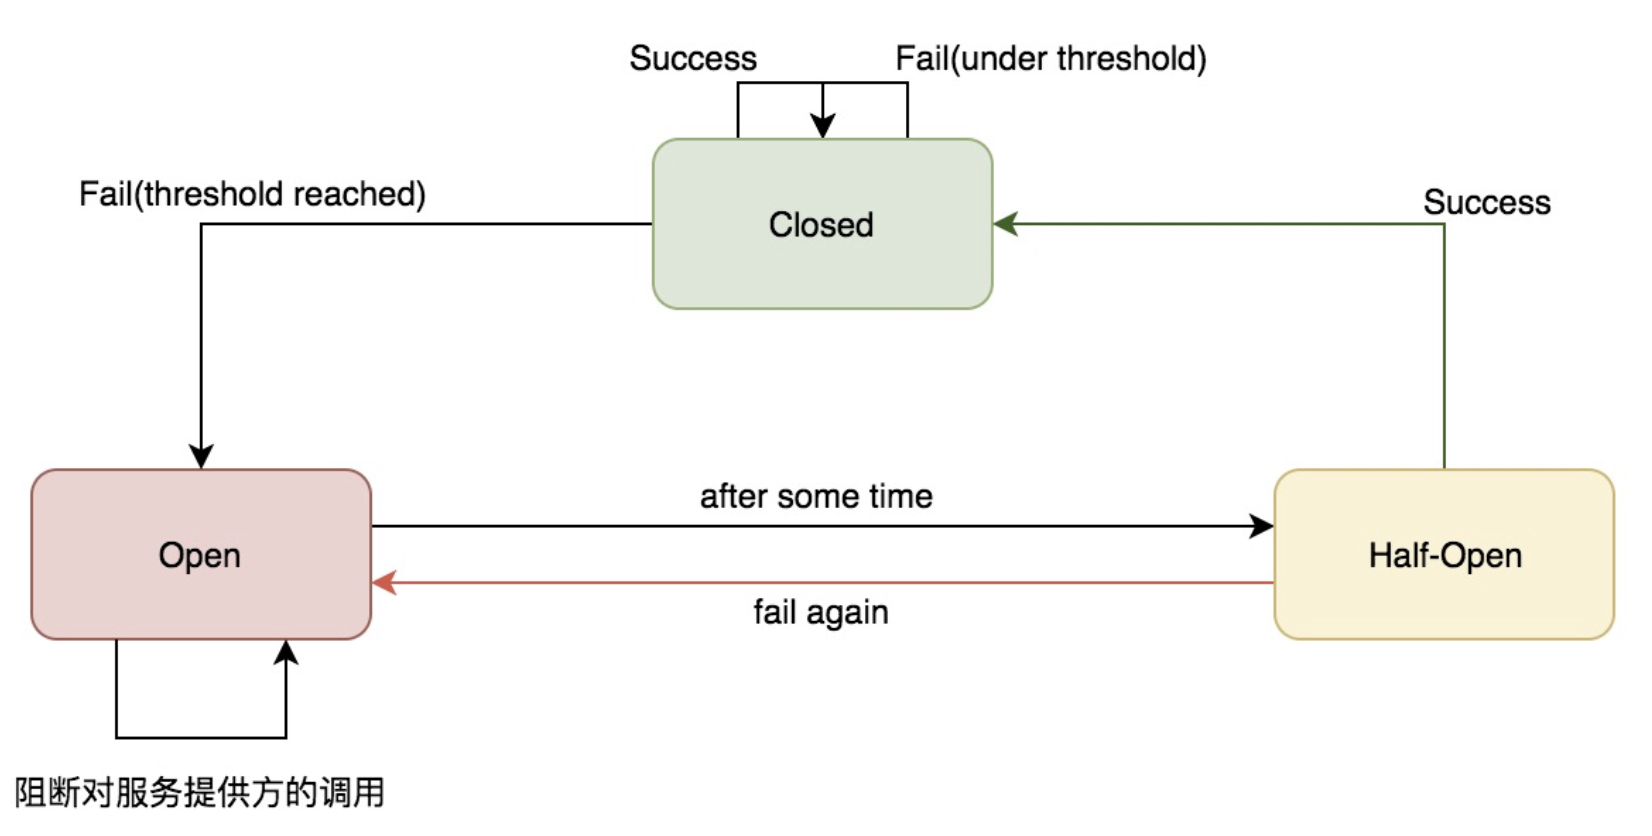
Closed断路器关闭:调用下游的请求正常通过Open断路器打开:阻断对下游服务的调用,直接走 Fallback 逻辑Half-Open断路器处于半开状态:SleepWindowInMilliseconds
1.2 Enabled
HystrixCommandProperties.Setter().withCircuitBreakerEnabled(boolean)
控制断路器是否工作,包括跟踪依赖服务调用的健康状况,对异常情况过多时是否允许触发断路。默认值 true。
1.3 circuitBreaker.requestVolumeThreshold
HystrixCommandProperties.Setter().withCircuitBreakerRequestVolumeThreshold(int)
表示在一次统计的时间滑动窗口中(这个参数也很重要,下面有说到),至少经过多少个请求,才可能触发断路,默认值 20。经过 Hystrix 断路器的流量只有在超过了一定阈值后,才有可能触发断路。比如说,要求在 10s 内经过断路器的流量必须达到 20 个,而实际经过断路器的请求有 19 个,即使这 19 个请求全都失败,也不会去判断要不要断路。
1.4 circuitBreaker.errorThresholdPercentage
HystrixCommandProperties.Setter().withCircuitBreakerErrorThresholdPercentage(int)
表示异常比例达到多少,才会触发断路,默认值是 50(%)。
1.5 circuitBreaker.sleepWindowInMilliseconds
HystrixCommandProperties.Setter().withCircuitBreakerSleepWindowInMilliseconds(int)
断路器状态由 Close 转换到 Open,在之后 SleepWindowInMilliseconds 时间内,所有经过该断路器的请求会被断路,不调用后端服务,直接走 Fallback 降级机制,默认值 5000(ms)。
而在该参数时间过后,断路器会变为 Half-Open 半开闭状态,尝试让一条请求经过断路器,看能不能正常调用。如果调用成功了,那么就自动恢复,断路器转为 Close 状态。
1.6 ForceOpen
HystrixCommandProperties.Setter().withCircuitBreakerForceOpen(boolean)
如果设置为 true 的话,直接强迫打开断路器,相当于是手动断路了,手动降级,默认值是 false。
1.7 ForceClosed
HystrixCommandProperties.Setter().withCircuitBreakerForceClosed(boolean)
如果设置为 true,直接强迫关闭断路器,相当于手动停止断路了,手动升级,默认值是 false。
1.8 Metrics 统计器
与 Hystrix 断路器紧密协作的,还有另一个重要组件 —— 统计器(Metrics)。统计器中最重要的参数要数滑动窗口(metrics.rollingStats.timeInMilliseconds)以及桶(metrics.rollingStats.numBuckets)了,这里引用一段博文来解释滑动窗口(默认值是 10000 ms):
一位乘客坐在正在行驶的列车的靠窗座位上,列车行驶的公路两侧种着一排挺拔的白杨树,随着列车的前进,路边的白杨树迅速从窗口滑过。我们用每棵树来代表一个请求,用列车的行驶代表时间的流逝,那么,列车上的这个窗口就是一个典型的滑动窗口,这个乘客能通过窗口看到的白杨树就是 Hystrix 要统计的数据。
Hystrix 并不是只要有一条请求经过就去统计,而是将整个滑动窗口均分为 numBuckets 份,时间每经过一份就去统计一次。在经过一个时间窗口后,才会判断断路器状态要不要开启,请看下面的例子。
**
1.8.1实例 Demo
HystrixCommand 配置参数
在 GetProductInfoCommand 中配置 Setter 断路器相关参数。
- 滑动窗口中,最少 20 个请求,才可能触发断路。
- 异常比例达到 40% 时,才触发断路。
- 断路后 3000ms 内,所有请求都被 reject,直接走 fallback 降级,不会调用
run()方法。3000ms 过后,变为half-open状态。
run() 方法中,我们判断一下 productId 是否为 -1,是的话,直接抛出异常。这么写,我们之后测试的时候就可以传入 productId=-1,模拟服务执行异常了。
在降级逻辑中,我们直接给它返回降级商品就好了。
public class GetProductInfoCommand extends HystrixCommand<ProductInfo> {private Long productId;private static final HystrixCommandKey KEY = HystrixCommandKey.Factory.asKey("GetProductInfoCommand");public GetProductInfoCommand(Long productId) {super(Setter.withGroupKey(HystrixCommandGroupKey.Factory.asKey("ProductInfoService")).andCommandKey(KEY).andCommandPropertiesDefaults(HystrixCommandProperties.Setter()// 是否允许断路器工作.withCircuitBreakerEnabled(true)// 滑动窗口中,最少有多少个请求,才可能触发断路.withCircuitBreakerRequestVolumeThreshold(20)// 异常比例达到多少,才触发断路,默认50%.withCircuitBreakerErrorThresholdPercentage(40)// 断路后多少时间内直接reject请求,之后进入half-open状态,默认5000ms.withCircuitBreakerSleepWindowInMilliseconds(3000)));this.productId = productId;}@Overrideprotected ProductInfo run() throws Exception {System.out.println("调用接口查询商品数据,productId=" + productId);if (productId == -1L) {throw new Exception();}String url = "http://localhost:8081/getProductInfo?productId=" + productId;String response = HttpClientUtils.sendGetRequest(url);return JSONObject.parseObject(response, ProductInfo.class);}@Overrideprotected ProductInfo getFallback() {ProductInfo productInfo = new ProductInfo();productInfo.setName("降级商品");return productInfo;}}
断路测试类
我们在测试类中,前 30 次请求,传入 productId=-1,然后休眠 3s,之后 70 次请求,传入 productId=1。
@SpringBootTest@RunWith(SpringRunner.class)public class CircuitBreakerTest {@Testpublic void testCircuitBreaker() {String baseURL = "http://localhost:8080/getProductInfo?productId=";for (int i = 0; i < 30; ++i) {// 传入-1,会抛出异常,然后走降级逻辑HttpClientUtils.sendGetRequest(baseURL + "-1");}TimeUtils.sleep(3);System.out.println("After sleeping...");for (int i = 31; i < 100; ++i) {// 传入1,走服务正常调用HttpClientUtils.sendGetRequest(baseURL + "1");}}}
测试结果
测试结果,我们可以明显看出系统断路与恢复的整个过程。
调用接口查询商品数据,productId=-1
ProductInfo(id=null, name=降级商品, price=null, pictureList=null, specification=null, service=null, color=null, size=null, shopId=null, modifiedTime=null, cityId=null, cityName=null, brandId=null, brandName=null)// ...// 这里重复打印了 20 次上面的结果ProductInfo(id=null, name=降级商品, price=null, pictureList=null, specification=null, service=null, color=null, size=null, shopId=null, modifiedTime=null, cityId=null, cityName=null, brandId=null, brandName=null)// ...// 这里重复打印了 8 次上面的结果// 休眠 3s 后调用接口查询商品数据,productId=1ProductInfo(id=1, name=iphone7手机, price=5599.0, pictureList=a.jpg,b.jpg, specification=iphone7的规格, service=iphone7的售后服务, color=红色,白色,黑色, size=5.5, shopId=1, modifiedTime=2017-01-01 12:00:00, cityId=1, cityName=null, brandId=1, brandName=null)// ...// 这里重复打印了 69 次上面的结果
前 30 次请求,我们传入的 productId 为 -1,所以服务执行过程中会抛出异常。我们设置了最少 20 次请求通过断路器并且异常比例超出 40% 就触发断路。因此执行了 21 次接口调用,每次都抛异常并且走降级,21 次过后,断路器就被打开了。之后的 9 次请求,都不会执行 run()方法,直接走降级逻辑,调用 getFallback() 执行。
休眠了 3s 后,我们在之后的 70 次请求中,都传入 productId 为 1。由于我们前面设置了 3000ms 过后断路器变为 half-open 状态。因此 Hystrix 会尝试执行请求,发现成功了,那么断路器关闭,之后的所有请求也都能正常调用了。
2. 深入 Hystrix 线程池隔离与接口限流
前面讲了 Hystrix 的 request cache 请求缓存、fallback 优雅降级、circuit breaker 断路器快速熔断,这一讲,我们来详细说说 Hystrix 的线程池隔离与接口限流。
Hystrix 通过判断线程池或者信号量是否已满,超出容量的请求,直接 Reject 走降级,从而达到限流的作用。
限流是限制对后端的服务的访问量,比如说你对 MySQL、Redis、Zookeeper 以及其它各种后端中间件的资源的访问的限制,其实是为了避免过大的流量直接打死后端的服务。
2.1 线程池隔离技术的设计
Hystrix 采用了 Bulkhead Partition 舱壁隔离技术,来将外部依赖进行资源隔离,进而避免任何外部依赖的故障导致本服务崩溃。
舱壁隔离,是说将船体内部空间区隔划分成若干个隔舱,一旦某几个隔舱发生破损进水,水流不会在其间相互流动,如此一来船舶在受损时,依然能具有足够的浮力和稳定性,进而减低立即沉船的危险。
Hystrix 对每个外部依赖用一个单独的线程池,这样的话,如果对那个外部依赖调用延迟很严重,最多就是耗尽那个依赖自己的线程池而已,不会影响其他的依赖调用。
2.2 Hystrix 应用线程池机制的场景
- 每个服务都会调用几十个后端依赖服务,那些后端依赖服务通常是由很多不同的团队开发的。
- 每个后端依赖服务都会提供它自己的 client 调用库,比如说用 thrift 的话,就会提供对应的 thrift 依赖。
- client 调用库随时会变更。
- client 调用库随时可能会增加新的网络请求的逻辑。
- client 调用库可能会包含诸如自动重试、数据解析、内存中缓存等逻辑。
- client 调用库一般都对调用者来说是个黑盒,包括实现细节、网络访问、默认配置等等。
- 在真实的生产环境中,经常会出现调用者,突然间惊讶的发现,client 调用库发生了某些变化。
- 即使 client 调用库没有改变,依赖服务本身可能有会发生逻辑上的变化。
- 有些依赖的 client 调用库可能还会拉取其他的依赖库,而且可能那些依赖库配置的不正确。
- 大多数网络请求都是同步调用的。
- 调用失败和延迟,也有可能会发生在 client 调用库本身的代码中,不一定就是发生在网络请求中。
简单来说,就是你必须默认 client 调用库很不靠谱,而且随时可能发生各种变化,所以就要用强制隔离的方式来确保任何服务的故障不会影响当前服务。
2.3 线程池机制的优点
- 任何一个依赖服务都可以被隔离在自己的线程池内,即使自己的线程池资源满了,也不会影响其他的服务调用。
- 服务可以随时引入一个新的依赖服务,因为即使这个新的依赖服务有问题,也不会影响其他任何服务的调用。
- 当一个故障的依赖服务重新变好的时候,可以通过清理掉线程池,瞬间恢复该服务的调用,而如果是 tomcat 线程池被占满,再恢复就很麻烦。
- 如果一个 client 调用库配置有问题,线程池的健康状况随时会报告,比如成功/失败/拒绝/超时的次数统计,然后可以近实时热修改依赖服务的调用配置,而不用停机。
- 基于线程池的异步本质,可以在同步的调用之上,构建一层异步调用层。
简单来说,最大的好处,就是资源隔离,确保说任何一个依赖服务故障,不会拖垮当前的这个服务。
2.4 线程池机制的缺点
- 线程池机制最大的缺点就是增加了 CPU 的开销。
除了 tomcat 本身的调用线程之外,还有 Hystrix 自己管理的线程池。 - 每个 command 的执行都依托一个独立的线程,会进行排队,调度,还有上下文切换。
- Hystrix 官方自己做了一个多线程异步带来的额外开销统计,通过对比多线程异步调用+同步调用得出,用 Hystrix 的额外开销,就是给请求带来了 3ms 左右的延时,最多延时在 10ms 以内,相比于可用性和稳定性的提升,这是可以接受的。
我们可以用 Hystrix semaphore 技术来实现对某个依赖服务的并发访问量的限制,而不是通过线程池/队列的大小来限制流量。
- semaphore 技术可以用来限流和削峰,但是不能用来对调用延迟的服务进行 timeout 和隔离。
execution.isolation.strategy设置为SEMAPHORE,那么 Hystrix 就会用 semaphore 机制来替代线程池机制,来对依赖服务的访问进行限流。如果通过 semaphore 调用的时候,底层的网络调用延迟很严重,那么是无法 timeout 的,只能一直 block 住。一旦请求数量超过了 semaphore 限定的数量之后,就会立即开启限流。
2.5 接口限流 Demo
假设一个线程池大小为 8,等待队列的大小为 10。timeout 时长我们设置长一些,20s。
在 command 内部,写死代码,做一个 sleep,比如 sleep 3s。
- withCoreSize:设置线程池大小。
- withMaxQueueSize:设置等待队列大小。
- withQueueSizeRejectionThreshold:这个与 withMaxQueueSize 配合使用,等待队列的大小,取得是这两个参数的较小值。
如果只设置了线程池大小,另外两个 queue 相关参数没有设置的话,等待队列是处于关闭的状态。
public class GetProductInfoCommand extends HystrixCommand<ProductInfo> {private Long productId;private static final HystrixCommandKey KEY = HystrixCommandKey.Factory.asKey("GetProductInfoCommand");public GetProductInfoCommand(Long productId) {super(Setter.withGroupKey(HystrixCommandGroupKey.Factory.asKey("ProductInfoService")).andCommandKey(KEY)// 线程池相关配置信息.andThreadPoolPropertiesDefaults(HystrixThreadPoolProperties.Setter()// 设置线程池大小为8.withCoreSize(8)// 设置等待队列大小为10.withMaxQueueSize(10).withQueueSizeRejectionThreshold(12)).andCommandPropertiesDefaults(HystrixCommandProperties.Setter().withCircuitBreakerEnabled(true).withCircuitBreakerRequestVolumeThreshold(20).withCircuitBreakerErrorThresholdPercentage(40).withCircuitBreakerSleepWindowInMilliseconds(3000)// 设置超时时间.withExecutionTimeoutInMilliseconds(20000)// 设置fallback最大请求并发数.withFallbackIsolationSemaphoreMaxConcurrentRequests(30)));this.productId = productId;}@Overrideprotected ProductInfo run() throws Exception {System.out.println("调用接口查询商品数据,productId=" + productId);if (productId == -1L) {throw new Exception();}// 请求过来,会在这里hang住3秒钟if (productId == -2L) {TimeUtils.sleep(3);}String url = "http://localhost:8081/getProductInfo?productId=" + productId;String response = HttpClientUtils.sendGetRequest(url);System.out.println(response);return JSONObject.parseObject(response, ProductInfo.class);}@Overrideprotected ProductInfo getFallback() {ProductInfo productInfo = new ProductInfo();productInfo.setName("降级商品");return productInfo;}}
我们模拟 25 个请求。前 8 个请求,调用接口时会直接被 hang 住 3s,那么后面的 10 个请求会先进入等待队列中等待前面的请求执行完毕。最后的 7 个请求过来,会直接被 reject,调用 fallback 降级逻辑。
@SpringBootTest@RunWith(SpringRunner.class)public class RejectTest {@Testpublic void testReject() {for (int i = 0; i < 25; ++i) {new Thread(() -> HttpClientUtils.sendGetRequest("http://localhost:8080/getProductInfo?productId=-2")).start();}// 防止主线程提前结束执行TimeUtils.sleep(50);}}
从执行结果中,我们可以明显看出一共打印出了 7 个降级商品。这也就是请求数超过线程池+队列的数量而直接被 reject 的结果。
ProductInfo(id=null, name=降级商品, price=null, pictureList=null, specification=null, service=null, color=null, size=null, shopId=null, modifiedTime=null, cityId=null, cityName=null, brandId=null, brandName=null)ProductInfo(id=null, name=降级商品, price=null, pictureList=null, specification=null, service=null, color=null, size=null, shopId=null, modifiedTime=null, cityId=null, cityName=null, brandId=null, brandName=null)ProductInfo(id=null, name=降级商品, price=null, pictureList=null, specification=null, service=null, color=null, size=null, shopId=null, modifiedTime=null, cityId=null, cityName=null, brandId=null, brandName=null)ProductInfo(id=null, name=降级商品, price=null, pictureList=null, specification=null, service=null, color=null, size=null, shopId=null, modifiedTime=null, cityId=null, cityName=null, brandId=null, brandName=null)ProductInfo(id=null, name=降级商品, price=null, pictureList=null, specification=null, service=null, color=null, size=null, shopId=null, modifiedTime=null, cityId=null, cityName=null, brandId=null, brandName=null)ProductInfo(id=null, name=降级商品, price=null, pictureList=null, specification=null, service=null, color=null, size=null, shopId=null, modifiedTime=null, cityId=null, cityName=null, brandId=null, brandName=null)调用接口查询商品数据,productId=-2调用接口查询商品数据,productId=-2调用接口查询商品数据,productId=-2调用接口查询商品数据,productId=-2调用接口查询商品数据,productId=-2调用接口查询商品数据,productId=-2调用接口查询商品数据,productId=-2调用接口查询商品数据,productId=-2ProductInfo(id=null, name=降级商品, price=null, pictureList=null, specification=null, service=null, color=null, size=null, shopId=null, modifiedTime=null, cityId=null, cityName=null, brandId=null, brandName=null){"id": -2, "name": "iphone7手机", "price": 5599, "pictureList":"a.jpg,b.jpg", "specification": "iphone7的规格", "service": "iphone7的售后服务", "color": "红色,白色,黑色", "size": "5.5", "shopId": 1, "modifiedTime": "2017-01-01 12:00:00", "cityId": 1, "brandId": 1}// 后面都是一些正常的商品信息,就不贴出来了//...
3. 基于 timeout 机制为服务接口调用超时提供安全保护
一般来说,在调用依赖服务的接口的时候,比较常见的一个问题就是超时。超时是在一个复杂的分布式系统中,导致系统不稳定,或者系统抖动。出现大量超时,线程资源会被 hang 死,从而导致吞吐量大幅度下降,甚至服务崩溃。
3.1 TimeoutMilliseconds
在 Hystrix 中,我们可以手动设置 timeout 时长,如果一个 command 运行时间超过了设定的时长,那么就被认为是 timeout,然后 Hystrix command 标识为 timeout,同时执行 fallback 降级逻辑。
TimeoutMilliseconds 默认值是 1000,也就是 1000ms。
HystrixCommandProperties.Setter().withExecutionTimeoutInMilliseconds(int)
3.2 TimeoutEnabled
这个参数用于控制是否要打开 timeout 机制,默认值是 true。
HystrixCommandProperties.Setter().withExecutionTimeoutEnabled(boolean)
3.3 实例 Demo
我们在 command 中,将超时时间设置为 500ms,然后在 run()方法中,设置休眠时间 1s,这样一个请求过来,直接休眠 1s,结果就会因为超时而执行降级逻辑。
public class GetProductInfoCommand extends HystrixCommand<ProductInfo> {private Long productId;private static final HystrixCommandKey KEY = HystrixCommandKey.Factory.asKey("GetProductInfoCommand");public GetProductInfoCommand(Long productId) {super(Setter.withGroupKey(HystrixCommandGroupKey.Factory.asKey("ProductInfoService")).andCommandKey(KEY).andThreadPoolPropertiesDefaults(HystrixThreadPoolProperties.Setter().withCoreSize(8).withMaxQueueSize(10).withQueueSizeRejectionThreshold(8)).andCommandPropertiesDefaults(HystrixCommandProperties.Setter().withCircuitBreakerEnabled(true).withCircuitBreakerRequestVolumeThreshold(20).withCircuitBreakerErrorThresholdPercentage(40).withCircuitBreakerSleepWindowInMilliseconds(3000)// 设置是否打开超时,默认是true.withExecutionTimeoutEnabled(true)// 设置超时时间,默认1000(ms).withExecutionTimeoutInMilliseconds(500).withFallbackIsolationSemaphoreMaxConcurrentRequests(30)));this.productId = productId;}@Overrideprotected ProductInfo run() throws Exception {System.out.println("调用接口查询商品数据,productId=" + productId);// 休眠1sTimeUtils.sleep(1);String url = "http://localhost:8081/getProductInfo?productId=" + productId;String response = HttpClientUtils.sendGetRequest(url);System.out.println(response);return JSONObject.parseObject(response, ProductInfo.class);}@Overrideprotected ProductInfo getFallback() {ProductInfo productInfo = new ProductInfo();productInfo.setName("降级商品");return productInfo;}}
在测试类中,我们直接发起请求。
@SpringBootTest@RunWith(SpringRunner.class)public class TimeoutTest {@Testpublic void testTimeout() {HttpClientUtils.sendGetRequest("http://localhost:8080/getProductInfo?productId=1");}}
结果中可以看到,打印出了降级商品相关信息。
ProductInfo(id=null, name=降级商品, price=null, pictureList=null, specification=null, service=null, color=null, size=null, shopId=null, modifiedTime=null, cityId=null, cityName=null, brandId=null, brandName=null){"id": 1, "name": "iphone7手机", "price": 5599, "pictureList":"a.jpg,b.jpg", "specification": "iphone7的规格", "service": "iphone7的售后服务", "color": "红色,白色,黑色", "size": "5.5", "shopId": 1, "modifiedTime": "2017-01-01 12:00:00", "cityId": 1, "brandId": 1}

若有收获,就点个赞吧
0 人点赞
