创建
npx react-native init native01
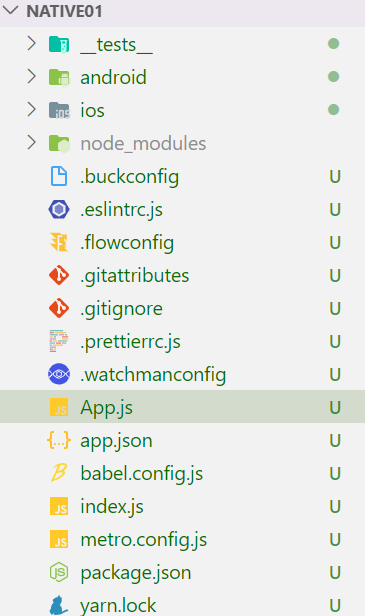
目录结构 我们只在App.js进行编码 //启动项目 react-native run-android
ui框架
一、基本语法
1.hello world
import React, { Component } from 'react';import {Text,View,Button} from 'react-native' //要使用标签,第一步必须导入class App extends Component {render() {return (<View style={{flex:1,justifyContent:"center",alignItems:"center"}}><Text>hello world</Text><Button title="登录"color="#ff2d51"></Button></View>);}}export default App;
2.图片
网络图片
先引入import {Image} from ‘react-native’
<Image style={{width:100,height:100}} source={{uri:"xxx"}}/> //图片相关的资源一定要加样式宽和高
本地图片
<Image style={{width:200,height:200}} source={require('./assets/1.jpg')}/>
3.文字
<View><Text>我爱鹿晗</Text> //文字必须包含在Text标签里</View>
4.state属性
class App extends Component {state={msg:"hello world"}render() {return (<View><Text>{this.state.msg}</Text></View>);}}
5.样式
import {StyleSheet} from 'react-native' //先导入class App extends Component {render() {return (<View style={styles.container}><Text style={styles.txt,styles.bg}>Hello world</Text> //多样式</View>);}}const styles = StyleSheet.create({container:{backgroundColor:"red",width:200,height:200},txt:{color:"blue"},bg:{backgroundColor:"#fff"}})
//transform:[{translateX:-50},{translateY:-50}],transform:[{translate:[-50,-50]}]
6.Dimensions
获取屏幕高度,宽度,缩放
import React, { Component } from 'react';import {Dimensions} from 'react-native' //引入const {width,height,scale} =Dimensions.get('window')class App extends Component {render() {return (<View><Text>{width}</Text><Text>{height}</Text><Text>{scale}</Text></View>);}}export default App;
7.布局
默认View是flex布局
class App extends Component {render() {return (<View style={styles.container}><View style={styles.child}></View><View style={styles.child}></View><View style={styles.child}></View></View>);}}const styles = StyleSheet.create({container:{backgroundColor:"red",flexDirection:"row", //列justifyContent:"space-around", //水平居中alignItems:"center" //垂直居中},child:{width:100,height:100,backgroundColor:"blue"}})
定位
class App extends Component {render() {return (<View style={styles.container}><View style={styles.child}></View></View>);}}const styles = StyleSheet.create({container:{width:420,height:400,backgroundColor:"red",position:"relative",backgroundColor:"red"},child:{width:100,height:100,backgroundColor:"blue",position:"absolute",left:30,top:30}})
8.TextInput
import {TextInput} from 'react-native' //引入class App extends Component {render() {return (<View><TextInput style={styles.input}/></View>);}}const styles = StyleSheet.create({input:{borderColor:"#333",borderWidth:2}})
9.事件
import {Text,View,Button,Alert} from 'react-native'class App extends Component {render() {return (<View style={styles.container}><Button title="事件" onPress={()=>{Alert.alert("good")}}></Button></View>);}}
Touchable 系列组件
这个组件的样式是固定的。所以如果它的外观并不怎么搭配你的设计,那就需要使用TouchableOpacity或是TouchableNativeFeedback组件来定制自己所需要的按钮,视频教程如何制作一个按钮讲述了完整的过程。或者你也可以在 github.com 网站上搜索 ‘react native button’ 来看看社区其他人的作品。
具体使用哪种组件,取决于你希望给用户什么样的视觉反馈:
- 一般来说,你可以使用TouchableHighlight来制作按钮或者链接。注意此组件的背景会在用户手指按下时变暗。
- 在 Android 上还可以使用TouchableNativeFeedback,它会在用户手指按下时形成类似墨水涟漪的视觉效果。
- TouchableOpacity会在用户手指按下时降低按钮的透明度,而不会改变背景的颜色。
- 如果你想在处理点击事件的同时不显示任何视觉反馈,则需要使用TouchableWithoutFeedback。
某些场景中你可能需要检测用户是否进行了长按操作。可以在上面列出的任意组件中使用onLongPress属性来实现
10.FlatList
纵向列表
import {Text,View,FlatList} from 'react-native' //引入class App extends Component {state={arr:["html","css","javascript"]}render() {return (<View><FlatListdata={this.state.arr}renderItem={({item})=> <Text key={item}>{item}</Text>}></FlatList></View>);}}
11.SectionList
12.Http请求
componentDidMount() {// ctrl+shift+jvar url = "http://192.168.14.15:5000/dj/program?rid=336355127"fetch(url).then(res => res.json()).then(resJson => {console.log(resJson.programs)this.setState({movies: resJson.programs})})}//支持async awaitasync componentDidMount() {// ctrl+shift+jvar url = "http://192.168.14.15:5000/dj/program?rid=336355127"var data = await fetch(url);var resJson = await data.json();console.log(resJson)}
实例
import React, { Component } from 'react';import {Text,View,StyleSheet,FlatList,Image} from 'react-native'class App extends Component {state={movies:[]}render() {return (<View style={styles.container}><FlatListdata={this.state.movies}renderItem={({item})=> <View><Text>{item.name}</Text><Image style={styles.img} source={{uri:item.coverImgUrl}}/></View>}></FlatList></View>);}componentDidMount(){var url ="http://192.168.14.15:5000/top/playlist";fetch(url).then(res=>res.json()).then(resJson=>{this.setState({movies:resJson.playlists})})}}const styles = StyleSheet.create({container: {flex: 1,paddingTop: 22},img:{width:100,height:100}})export default App;

