1. Leaf 介绍
Leaf 最早期需求是各个业务线的订单 ID 生成需求。
在美团早期,有的业务直接通过 DB 自增的方式生成 ID,有的业务通过 redis 缓存来生成 ID,也有的业务直接用 UUID 这种方式来生成 ID。以上的方式各自有各自的问题,因此我们决定实现一套分布式 ID 生成服务来满足需求。具体 Leaf 设计文档见:leaf 美团分布式ID生成服务
目前 Leaf 覆盖了美团点评公司内部金融、餐饮、外卖、酒店旅游、猫眼电影等众多业务线。在 4C8G VM 基础上,通过公司 RPC 方式调用,QPS 压测结果近 5w/s,TP 999 1ms。
2. SpringBoot 整合 leaf
官方文档中建议,使用 SpringBoot 整合 leaf 做一个 leaf server,对外提供 api 生成 ID 的服务。
这里 SpringBoot 整合 leaf 的示例,是参考 github 源码中 leaf server 项目,这个官方提供的一个生成 ID SpringBoot 服务,可以直接运行使用。
2.1 拉取项目源码编译
Leaf 目前还没有将 jar 包上传到 maven 仓库,所以需要将 Github 项目源码拉取下来进行本地编译打包。
git clone git@github.com:Meituan-Dianping/Leaf.gitcd Leaf/git checkout feature/spring-boot-startermvn clean install -Dmaven.test.skip=true
2.2 在 SpringBoot 项目中整合 leaf
目前 SpringBoot 2.x 与 leaf 有兼容性问题,会报错。
这里使用 SpringBoot 1.5.18。
引入依赖
<?xml version="1.0" encoding="UTF-8"?><project xmlns="http://maven.apache.org/POM/4.0.0"xmlns:xsi="http://www.w3.org/2001/XMLSchema-instance"xsi:schemaLocation="http://maven.apache.org/POM/4.0.0 http://maven.apache.org/xsd/maven-4.0.0.xsd"><modelVersion>4.0.0</modelVersion><groupId>org.example</groupId><artifactId>distributed-id</artifactId><version>1.0-SNAPSHOT</version><parent><groupId>org.springframework.boot</groupId><artifactId>spring-boot-starter-parent</artifactId><version>1.5.18.RELEASE</version></parent><dependencies><dependency><groupId>org.springframework.boot</groupId><artifactId>spring-boot-starter-web</artifactId></dependency><dependency><artifactId>leaf-boot-starter</artifactId><groupId>com.sankuai.inf.leaf</groupId><version>1.0.1-RELEASE</version></dependency><!--zk--><dependency><groupId>org.apache.curator</groupId><artifactId>curator-recipes</artifactId><version>2.6.0</version><exclusions><exclusion><artifactId>log4j</artifactId><groupId>log4j</groupId></exclusion></exclusions></dependency></dependencies></project>
创建 /resource/leaf.properties ```xml leaf.name=com.sankuai.leaf.opensource.test leaf.segment.enable=true leaf.segment.url=jdbc:mysql://127.0.0.1:3306/leaf leaf.segment.username=root leaf.segment.password=xxxx
leaf.snowflake.enable=true leaf.snowflake.address=zk.springboot.cn leaf.snowflake.port=2181
- **配置介绍:**- Leaf 提供两种生成的 ID 的方式(号段模式和 snowflake 模式),你可以同时开启两种方式,也可以指定开启某种方式(默认两种方式为关闭状态)。- Leaf Server 的配置都在 leaf-server/src/main/resources/leaf.properties 中- **在启动类上开启 leaf**```java@SpringBootApplication@EnableLeafServerpublic class DistributedIdApplication {public static void main(String[] args) {SpringApplication.run(DistributedIdApplication.class, args);}}
创建一个 Controller,对外提供 api 生成分布式 ID
@RestControllerpublic class IdContoller {@Autowiredprivate SegmentService segmentService;@Autowiredprivate SnowflakeService snowflakeService;//基于号段模式生成 ID@GetMapping("/segment")public Long segment() {return segmentService.getId("leaf-segment-test").getId();}//基于雪花算法生成 ID@GetMapping("/snowflake")public Result snowflake() {return snowflakeService.getId("leaf-segment-test");}}
3. 使用号段模式
如果使用号段模式,需要建立 DB 表,并配置 leaf.jdbc.url, leaf.jdbc.username, leaf.jdbc.password。
如果不想使用该模式配置 leaf.segment.enable=false 即可。
3.1 创建数据表
CREATE DATABASE leafCREATE TABLE leaf.`leaf_alloc` (`biz_tag` varchar(128) NOT NULL DEFAULT '',`max_id` bigint(20) NOT NULL DEFAULT '1',`step` int(11) NOT NULL,`description` varchar(256) DEFAULT NULL,`update_time` timestamp NOT NULL DEFAULT CURRENT_TIMESTAMP ON UPDATE CURRENT_TIMESTAMP,PRIMARY KEY (`biz_tag`)) ENGINE=InnoDB;insert into leaf.leaf_alloc(biz_tag, max_id, step, description) values('leaf-segment-test', 1, 2000, 'Test leaf Segment Mode Get Id')
3.2 配置相关数据项
在 leaf.properties 中配置 leaf.jdbc.url, leaf.jdbc.username, leaf.jdbc.password 参数。
3.3 启动服务并测试
访问:http://localhost:8080/segment
测试结果:
- 首次请求生成 ID 时,会访问数据库,获得 max_id=1, step=2000,获得 ID 从 1 开始,同时会更新数据表 max_id=2001;
- leaf server 首次访问数据表之后,拿到属于自己进程的号段 [1,2001],这期间发送到这个 server 进程的生成 ID 请求都会由 leaf server 在内存中自增返回,性能较高,且不用频繁访问数据库;
- 在 leaf server 多个实例高可用的场景下,其他 server 进程访问数据库获得 max_id=2001,step=2000,则它会更新数据表 max_id=4001,且在 {2001,4001] 号段内自增返回 ID;
- 由于 server 每次拿到的号段都是唯一的,不会和其他 server 冲突,所以在号段内自增产生的 ID 也可保证唯一性。 :::info 号段内的 ID 并不是等自增到 max_id 时才会再次访问数据表更新号段,而是在 ID 快要接近 max_id 时就会再次访问数据表更新号段。 :::
4. 使用 Snowflake 模式
算法取自 twitter 开源的 snowflake 算法。
如果不想使用该模式配置 leaf.snowflake.enable=false 即可。
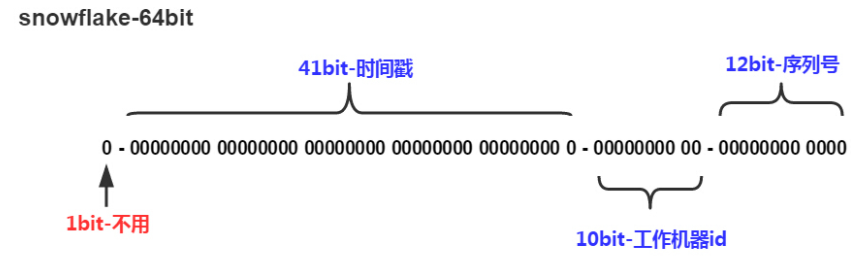
雪花算法生成 ID 的难点就是需要记录工作机器 id,所以这里使用 zookeeper 来保存工作机器 id。
4.1 准备 zookeeper 服务
这里使用别人提供的 zookeeper 服务来进行测试:
## zkuihttp://zk.springboot.cn:9090admine3e3r3rwsdwdf## zookeeperzk.springboot.cn:2181
4.2 配置 zookeeper 地址
在 leaf.properties 中配置 leaf.snowflake.zk.address,配置 leaf 服务监听的端口 leaf.snowflake.port。
4.3 启动服务并测试
访问:http://localhost:8080/snowflake
测试结果:
{"id":1397478669383000093,"status":"SUCCESS"}- leaf server 启动后会将自己的 ip + port 保存在 zookeeper,并检查自己是否已注册过;
- 如果有注册过直接取回自己的 workID(zk 顺序节点生成的 int 类型 ID 号);
- 且会在 server 本地缓存一个 workID 文件,当 zookeeper 不可用时,能保证服务正常启动,若依赖 zookeeper;
- 为了解决时钟回拨导致重复 ID 问题,leaf server 启动时会在 zookeeper 中校验是否存在时钟回拨问题,发现后会报警,且在 zookeeper 中删除本节点,最终启动失败;
参考: https://tech.meituan.com/2017/04/21/mt-leaf.html https://github.com/Meituan-Dianping/Leaf/blob/feature/spring-boot-starter/README_CN.md

若有收获,就点个赞吧
0 人点赞
