主要内容:
- 基于 Kubernetes,安装 Istio;
- 通过官方提供的示例 Bookinfo 了解 Istio 的主要功能特性;
- 文中不记录安装使用的命令步骤,而着重于梳理 Istio 知识点;
1. 环境准备
- Istio 安装:
- Bookinfo 示例安装:
- 官方指南:https://istio.io/latest/docs/examples/bookinfo/
- Github 中 Bookinfo Sample 源码:https://github.com/istio/istio/tree/master/samples/bookinfo;
2. Bookinfo Sample
2.1 介绍
Bookinfo Sample 是由四个单独的微服务构成的,提供了类似在线书店的书籍信息展示的功能。页面上会显式一本书的描述,书籍的细节(ISBN、页数等),以及关于这本书的一些评论。
Bookinfo 应用分为四个单独的微服务:
- productpage:这个微服务会调用 details 和 reviews 两个微服务,用来生成页面。
- details:这个微服务中包含了书籍的信息。
- reviews:这个微服务中包含了书籍相关的评论,它还会调用 ratings 微服务。
- reviews 微服务有 3 个版本:
- v1 版本不会调用 ratings 服务。
- v2 版本会调用 ratings 服务,并使用 1 到 5 个黑色星形图标来显示评分信息。
- v3 版本会调用 ratings 服务,并使用 1 到 5 个红色星形图标来显示评分信息。
- reviews 微服务有 3 个版本:
- ratings:这个微服务中包含了由书籍评价组成的评级信息。

上图展示了使用 istio 后,整个应用实际的结构。所有的微服务都和一个 Envoy sidecar 封装到一起,sidecar 拦截所有到达和离开服务的请求。
2.2 部署 bookinfo,istio 注入 sidercar
Istio 有两种方式对部署的服务注入 sidercar
自动注入:使用命令对指定的
namespace开启自动注入,部署在此namespace下的服务都会注入 sidercar;$ kubectl label namespace default istio-injection=enabled
手动注入:使用
istioctl kube-inject在 k8s yaml 资源清单的基础上,向其中的 Deployment 追加一个镜像为docker.io/istio/proxyv2:1.6.1的 sidercar 容器;$ kubectl apply -f <(istioctl kube-inject -f samples/bookinfo/platform/kube/bookinfo.yaml)
Bookinfo 部署成功后,集群外访问应用,需要添加一个 istio gateway,且修改 istio 提供的 Istio-ingressgateway 这个 Service 对象类型为 NodePort
- gateway 相当于 k8s 的 Ingress Controller 和 ingress,为 HTTP/TCP 流量配置负载均衡
- 通常在服务网格边缘作为应用的 Ingress 流量管理
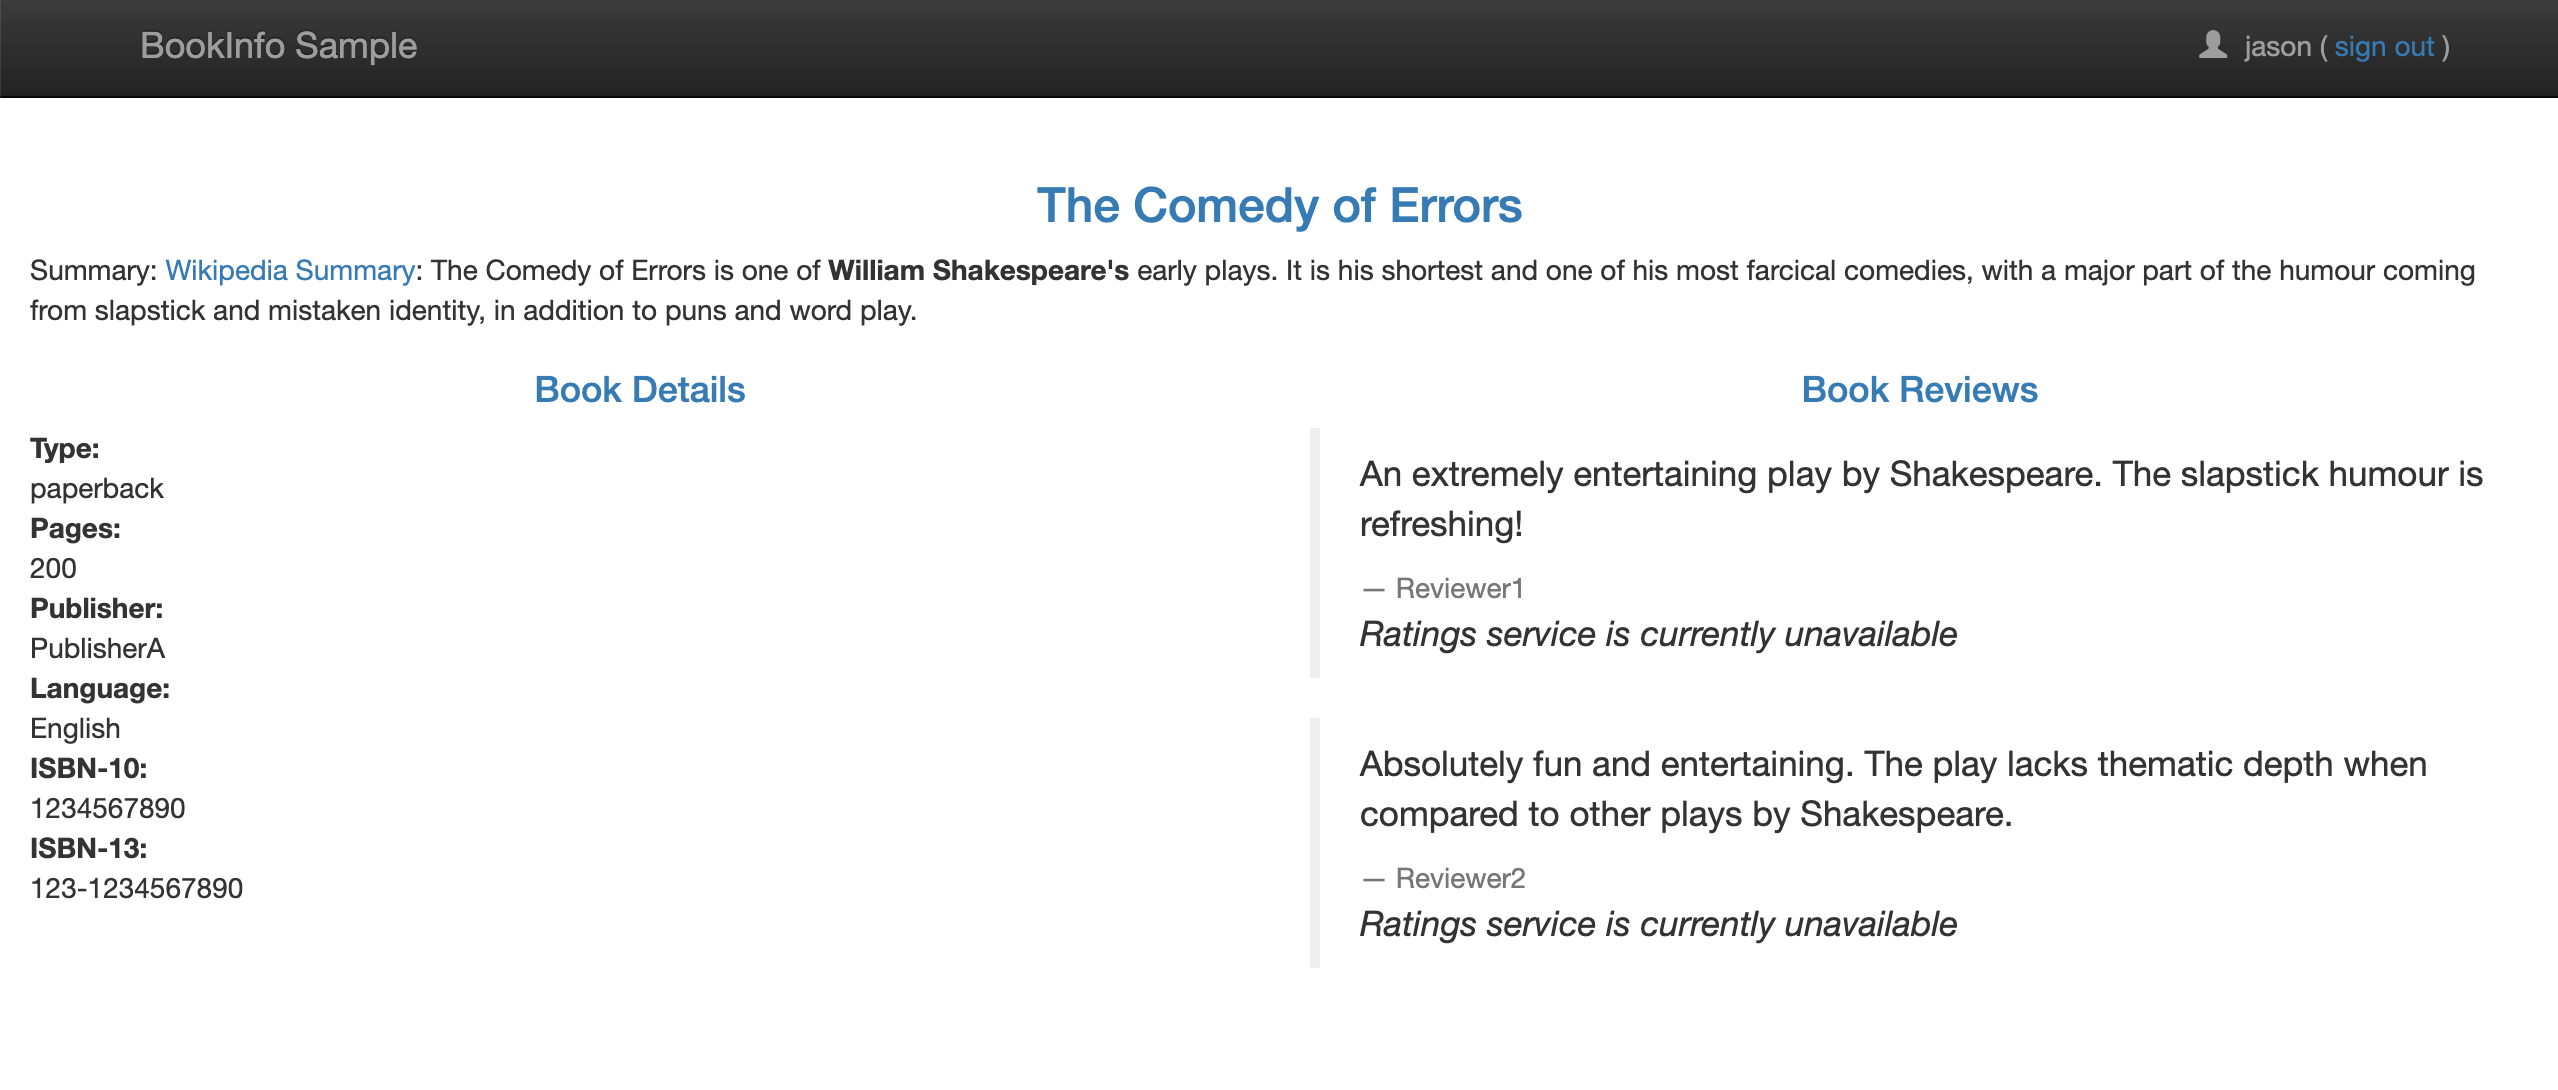
2.3 访问服务页面
通过 http://<NodeIP>:<nodePort>/productpage 访问应用: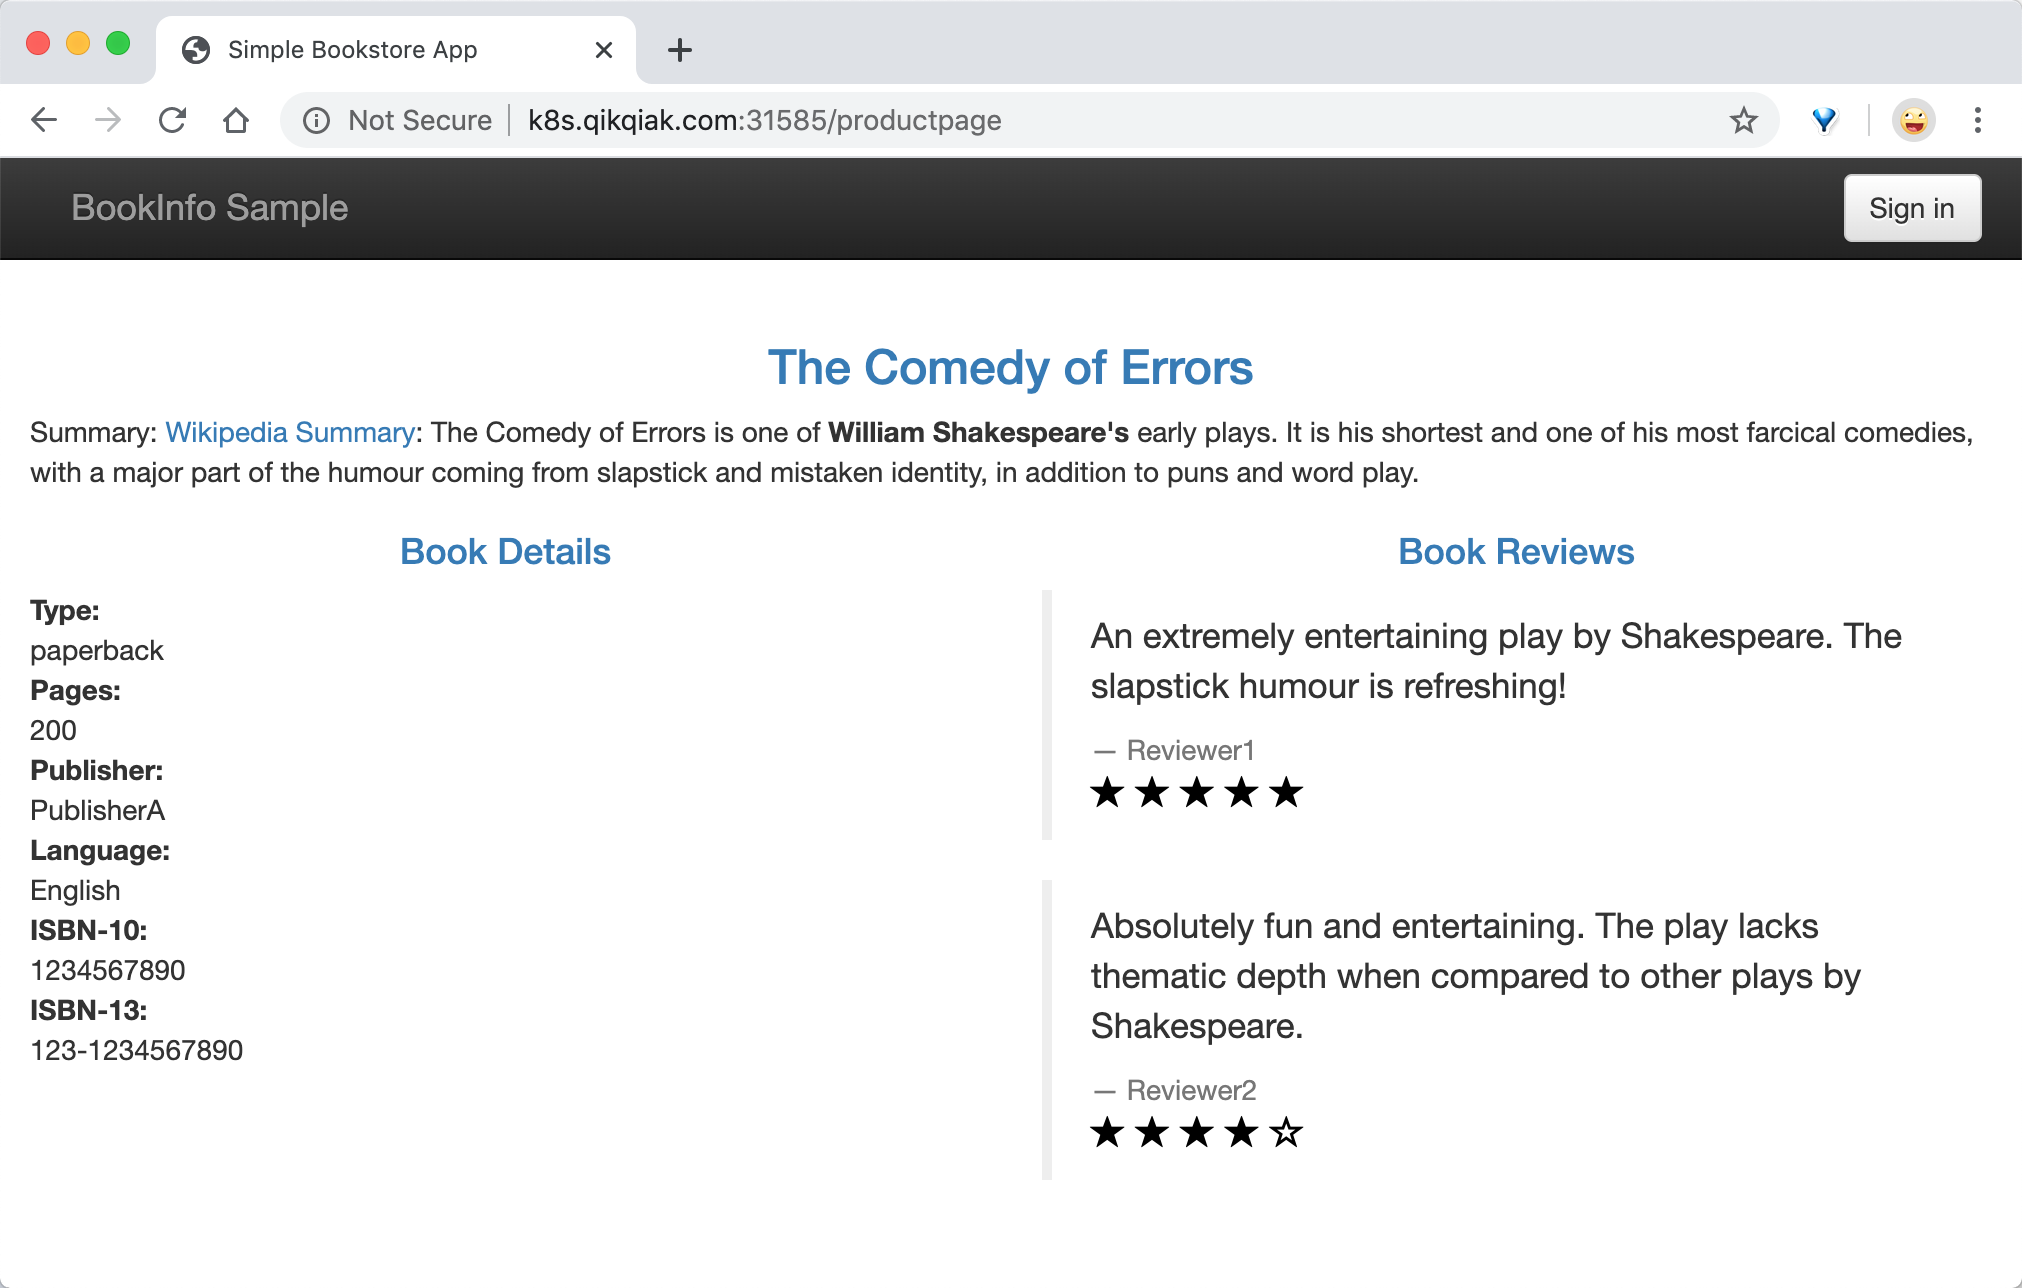
刷新页面可以看到 Book Reviews 发生了改变,因为每次请求会被路由到到了不同的 Reviews 服务版本去: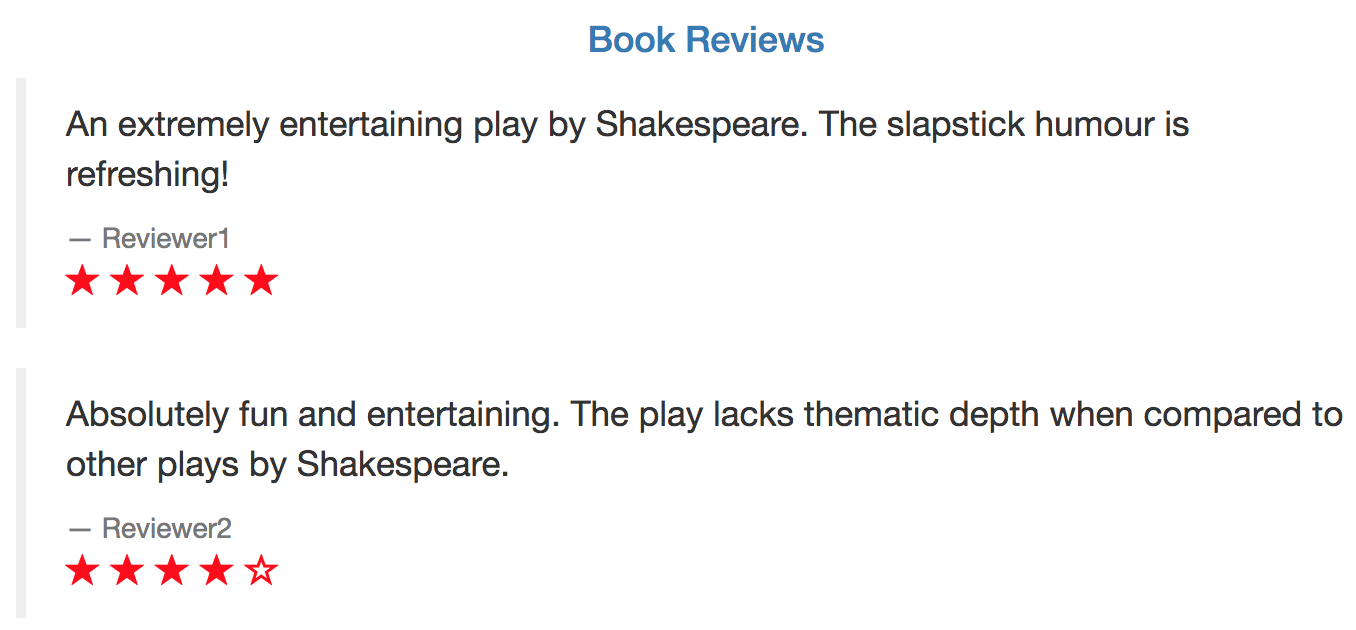
3. 流量管理
3.1 重要的 Istio 资源对象
VirtualService 和 Gateway 是 Istio 中两个非常重要的流量管理的资源对象:
- VirtualService:用来在 Istio 中定义路由规则、控制流量路由到服务上的各种行为;
- Gateway:为 HTTP/TCP 流量配置负载均衡器;
- DestinationRule:VirtualService 路由生效后,将它作为配置应用与请求的策略集,用来将 VirtualService 中指定的 subnet 与对应的 Pod 关联起来;
- ServiceEntry:将外部的访问引入到服务网格中,将外部服务的 URL 注册到 istio 内部的 service registry 中,网格服务才将这些外部服务的流量纳入管理;
我们使用下面的两个资源文件部署后,访问页面时,每次请求都会被路由到不同的 Reviews 服务版本上去:
samples/bookinfo/platform/kube/bookinfo.yamlsamples/bookinfo/networking/bookinfo-gateway.yaml
下面对两个资源文件进行分析:
- bookinfo.yaml 主要定义了四个服务的 Deployment、Service: ```yaml Service: details (selector labels: {app: details}) -> Deployment: details-v1 (Pod labels: {app: details, version: v1})
Service: ratings (selector labels: {app: ratings}) -> Deployment: ratings-v1 (Pod labels: {app: ratings, version: v1})
Service: reviews (selector labels: {app: reviews}) -> Deployment: reviews-v1 (Pod labels: {app: reviews, version: v1}) -> Deployment: reviews-v2 (Pod labels: {app: reviews, version: v2}) -> Deployment: reviews-v3 (Pod labels: {app: reviews, version: v3})
Service: productpage (selector labels: {app: productpage}) -> Deployment: productpage-v1 (Pod labels: {app: productpage, version: v1})
- bookinfo-gateway.yaml```yamlVirtualService: bookinfohost: '*' (match all Domain name or Service name)http:match:uri: /productpage、/static、/login、/logout、/api/v1/productsroute:destination:host: productpage (match Service)gateway:--> Gateway: bookinfo-gatewayselector:istio: ingressgateway # use istio default controllerservers:port: 80protocol: HTTPhosts: * (match 所有域名地址)
之前只是定义了外部访问入口 Gateway (bookinfo-gateway),以及 productpage 服务的 VirtualService (bookinfo),而其他服务的访问规则还没有被定义。
所以,当我们访问 /productpage 时,请求通过 ingressgateway 路由到 productpage Service,然后 productpage 调用各个服务,对于多版本 review 服务的访问,则是通过 Service 随机选择;
接下来通过对访问规则的修改,来实验 Istio 流量管理的特性。
3.2 服务网格内的 HTTP 流量管理
(1)访问指定版本服务的路由规则
之前 productpage 对 review 的访问,是基于 Service 在三个不同版本间随机访问,那么如果想只访问指定版本的 reviews 服务,怎么做呢?
通过定义 VirtualService 路由规则和 DestinationRule 策略集:
使用以下两个资源文件:
samples/bookinfo/networking/virtual-service-reviews-v3.yamlsamples/bookinfo/networking/destination-rule-all.yaml
文件主要内容如下:
VirtualService: reviewshosts: reviews (需要拦截的 Service name)http:route: (将流量路由到 reivews service 及 v3 subset 所关联的 Pod)destination:host: reviewssubset: v3
DestinationRule: reviewshosts: reviews (Service)subsets:- name: v1labels:version: v1...- name: v3labels:version: v3 --> match (Pod label: {app: reviews, version: v3})
DestinationRule 中定义了 subsets 集合,其中的 subset 通过 labels 匹配对应的 Pod 集合 (version=v3),productpage 服务通过 reviews Service 访问 reviews 服务,但是被 reviews VirtualService 拦截(发往 reviews Service 中 Hosts 的流量都会被拦截),将流量重新路由到 subset v3,也就是 version=v3 的 Pod 集合。
测试结果:多次刷新页面,发现展示的都是带红色星的 v3 版本,说明路由规则配置成功。
总结:DestinationRule 将 VirtualService 与 Service 中具有指定 labels 的 Pods 关联了起来,达到实现访问指定 Pod 服务的路由规则。
(2)基于权重的服务访问路由规则
上面示例演示的是环境中一个服务部署了多个不同的版本,然后将流量路由到指定版本的服务网格的控制;
接下来,这个示例是基于权重的服务访问规则控制:
- 首先移除上面示例中部署的 VirtualService 路由规则,排除环境影响,但是保留 DestinationRule(关于 reviews 服务的 subsets 定义);
使用下面的资源文件:
samples/bookinfo/networking/virtual-service-reviews-80-20.yaml
文件主要内容:
VirtualService: reviewshosts: reviewshttp:route:- destination:host: reviewssubset: v1weight: 80- destination:host: reviewssubset: v2weight: 20
这个规则定义了 80% 的对 Reviews 的流量会落入 v1 这个 subset,就是没有 Ratings 的这个服务,20% 会落入 v2 带黑色 Ratings 的这个服务;
(3)基于请求内容的服务访问路由规则
除了上面基于服务版本和服务权重的方式控制服务访问之外,我们还可以基于请求内容来进行访问控制。
- 移除上面创建的 VirtualService;
使用下面的资源对象:
samples/bookinfo/networking/virtual-service-reviews-jason-v2-v3.yaml
文件主要内容:
- 关键点:
match: ... route: ...
这个 VirtualService 对象定义了对 reviews 服务访问的 match 规则。意思是如果当前请求的 header 中包含 jason 这个用户信息,则只会访问到 v2 的 reviews 这个服务版本,即都带黑星的样式,如果不包含该用户信息,则都直接将流量转发给 v3 这个 reviews 的服务。VirtualService: reviewshosts: reviewshttp:- match:- headers:end-user:exact: jasonroute: ----->注意这个route是与上面match一对的,header中匹配到json则路由到v2- destination:host: reviewssubset: v2- route: ----->这个route是默认路由规则,没有匹配到条件就走这个路由规则- destination:host: reviewssubset: v3
- 关键点:
测试结果:
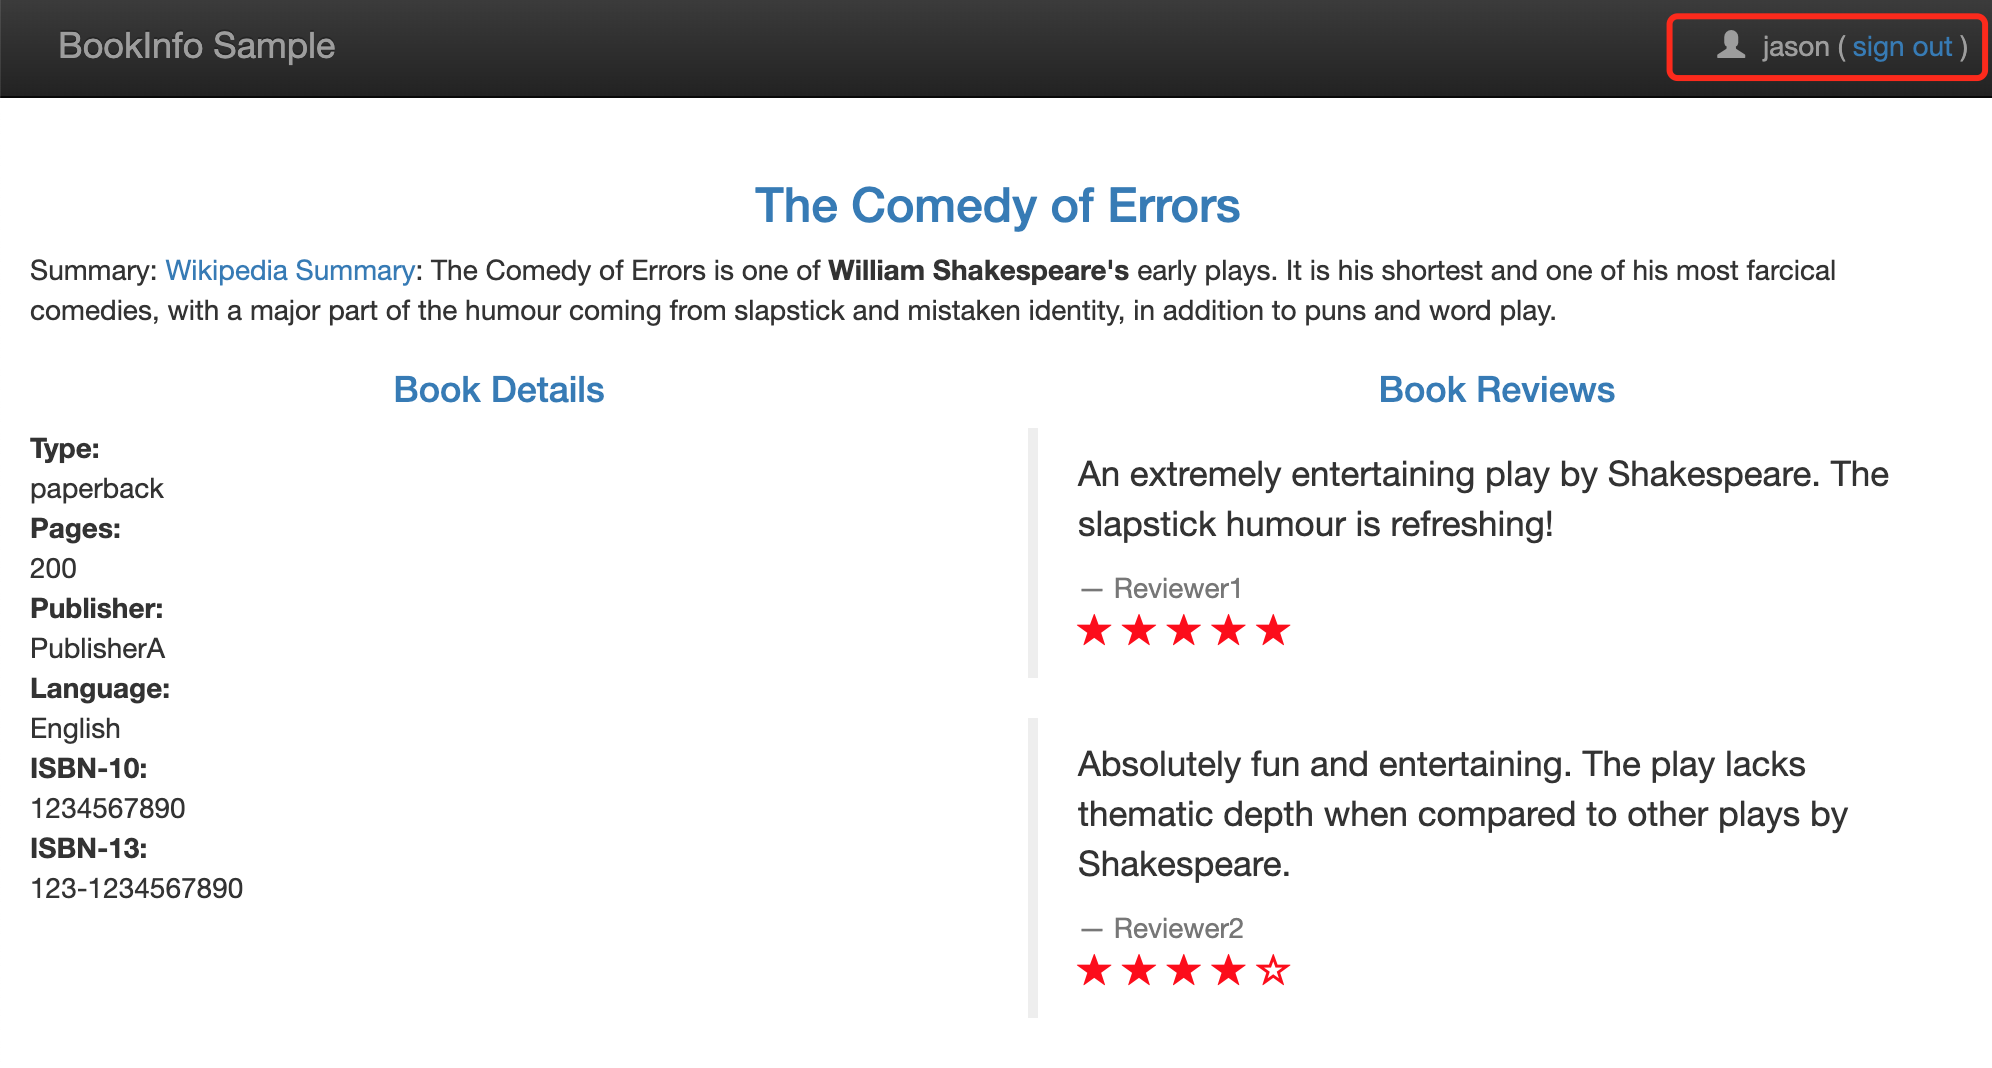
- 右上角有登录按钮,在没有登录的情况下刷新页面,reviews 服务是被随机访问的,可以看到有带星不带星的样式,点击登录,在弹窗中 User Name 输入 jason,Password 为空,登录;
- 此时再回去刷新页面,发现一直都是黑星的 Reviews 版本 (v2) 被访问到了。注销退出后再访问,此时又一直是红星的版本 (v3) 被访问了。
注意:
- match 的匹配规则:
- 一个 match 块里的条件是需要同时满足才算匹配成功的,如下面是 url 前缀和端口都必须都满足才算成功: ```yaml
match:
uri: prefix: “/wpcatalog” port: 443 ```
- 多个 match 块之间是只要有一个 match 匹配成功了,就会被路由到它指定的服务版本去,而忽略其他的;
- 如果没有 match 规则满足匹配,就走最后一个 route 规则;
(4)在路由规则中注入延迟访问故障
在路由规则中注入延迟故障,可以帮助我们模拟一些服务间访问的超时场景,找到潜在问题。
- 移除之前创建的 VirtualService;
使用资源文件:
samples/bookinfo/networking/virtual-service-ratings-test-delay.yaml
文件主要内容:
- 关键点:
match: ...fault: delay...route:...
这个 VirtualService 定义了一个在 jason 登录的情况下,访问 ratings 服务的 100% 的 7s 访问延迟。前面我们知道,Bookinfo 这个示例 productpage 服务调用 reviews,reviews 的不同版本会对 ratings 进行不同的调用,其中 reviews-v1 不调用 ratings,reviews-v2 和 reviews-v3 会调用 ratings,并做不同样式的渲染。并且在 productpage 访问 reviews 时,代码中有硬编码 6s 中的访问超时限制,而 reviews 访问 ratings 编码了 10s 的访问超时限制。VirtualService: ratingshosts: ratingshttp:- match:- headers:end-user:exact: jasonfault:delay:percentage:value: 100.0fixedDelay: 7sroute:- destination:host: ratingssubset: v1- route:- destination:host: ratingssubset: v1
- 关键点:
测试结果:
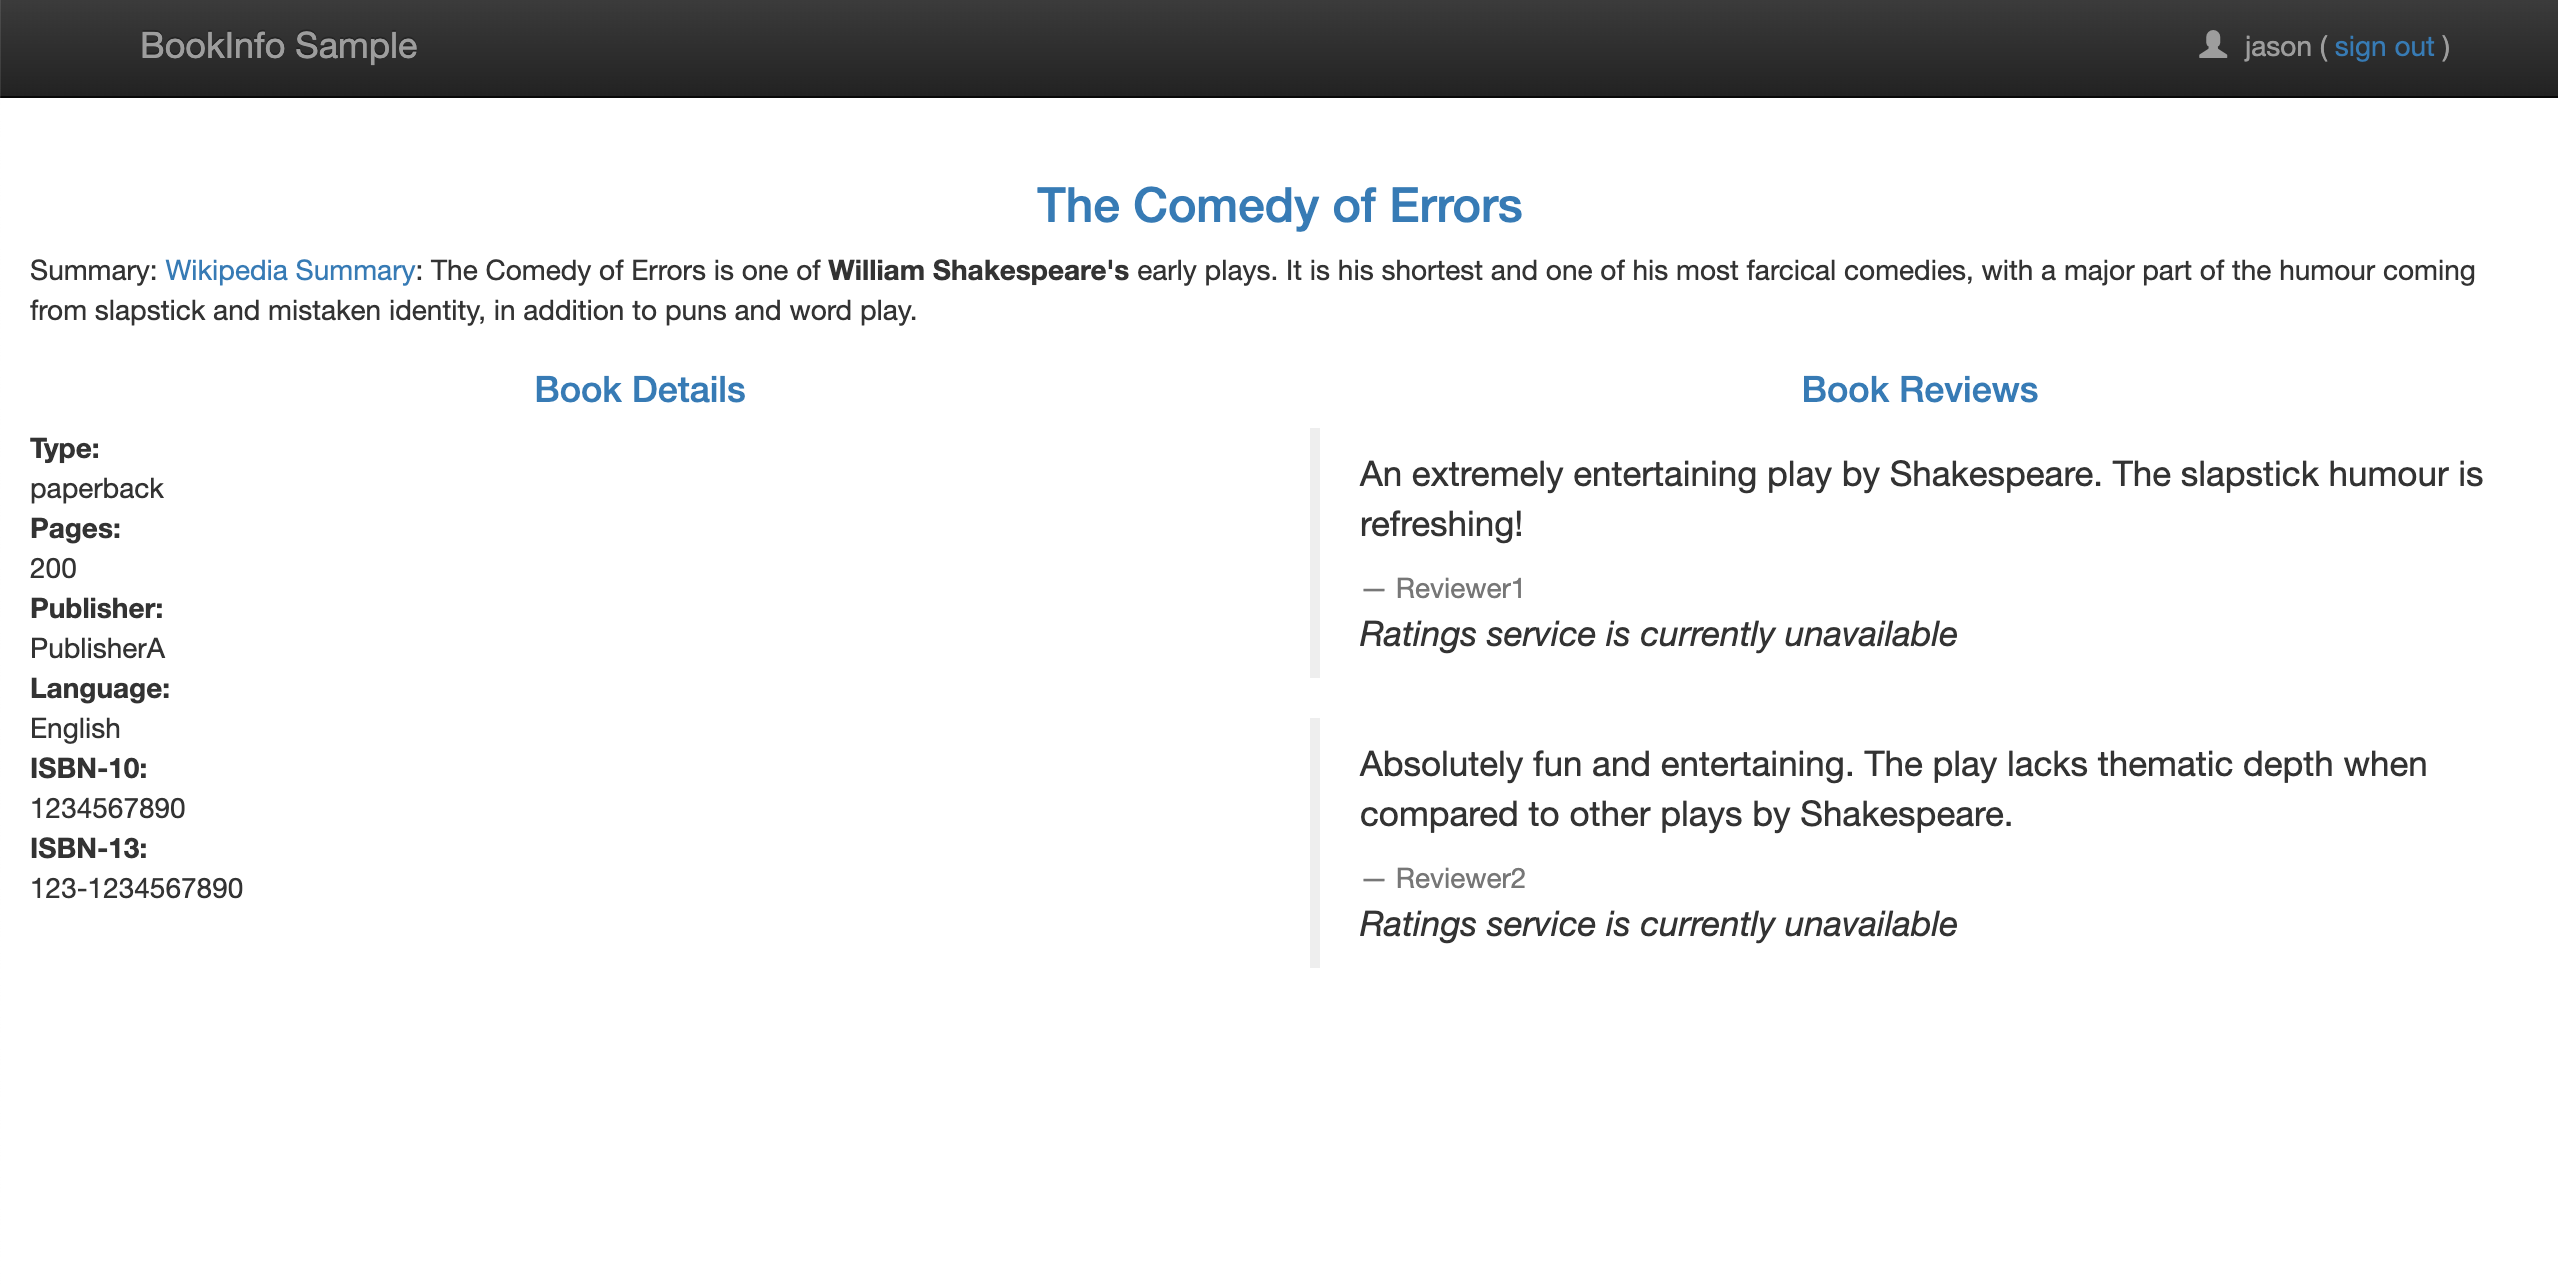
- 前往 Bookinfo 应用,登录 jason,打开浏览器的 Network,刷新页面,随机访问到 reviews-v1 版本时,一切正常,因为 reviews-v1 不会进一步访问 ratings 服务;
- 随机访问到 reviews-v2、reviews-v3 时,发现请求加载很慢,大约 6s 后,出现如下界面:
- 可以看到 Ratings 服务出现了 unavailable 的提示信息,这是因为此时 reviews 请求 ratings 的访问超过了 6s 还没有响应,使得 productpage 中的硬编码的超时设置生效了。
(5)在路由规则中注入中断访问故障
通过注入中断访问故障,可以帮助我们模拟服务间访问,返回一个500错误响应,找到潜在问题。
- 移除之前的 VirtualService;
使用资源文件:
samples/bookinfo/networking/virtual-service-ratings-test-abort.yaml
文件主要内容:
- 关键点:
fault: abort
通过上面的这个 yaml 文件我们可以看出这个 VirtualService 资源对象配置了在 jason 登录时,reviews 对 ratings 访问时 100% 的返回一个500错误响应。VirtualService: ratingshosts: ratingshttp:- match:- headers:end-user:exact: jasonfault:abort:percentage:value: 100.0httpStatus: 500route:- destination:host: ratingssubset: v1- route:- destination:host: ratingssubset: v1
- 关键点:
测试结果:
- 登录 jason,刷新页面,有时候可以很快就看到 Rating 服务不可用的提示信息:
3.3 服务网格外的流量管理
之前演示的示例都是在服务网格内部的服务相互间的调用,并通过配置路由规则来进行流量管理;
那如果服务网格内部的服务需要访问外部服务(那些没有在 Istio 的内部服务注册中定义的服务)的 URL 地址呢?
Istio 有一个配置项,
global.outboundTrafficPolicy.mode,它配置了 sidercar 对外部服务的处理方式:- mode: ALLOW_ANY(默认值),sidercar 不控制对外部服务的访问,允许调用未知服务;
- 缺点:访问外部的流量,没有统一的走 egressgateway 服务,丢失了对外部服务流量的 Istio 监控和控制,例如,外部服务的调用不会记录到 Mixer 的日志中。
- mode: REGISTRY_ONLY,sidercar 会阻止访问没有在网格中定义的 HTTP 服务或 ServiceEntry 的主机;
- mode: ALLOW_ANY(默认值),sidercar 不控制对外部服务的访问,允许调用未知服务;
为了控制服务网格外的服务的流量访问,外部的服务必须首先使用一个 ServiceEntry 对象加入到 istio 的内部 service registry 中,服务网格才会知道如何导向这些外部服务的流量。(有点类似 Service)
还可以进一步管理访问外部的流量,配置 egressgateway,使这些对外部的流量访问都经由 egress 去到外部,这样方便我们之后做一些安全和证数相关的控制;
(1) 用 Egress Gateway 处理 HTTP 请求
这里演示的示例不再是 bookinfo 应用,而是 sleep 应用:
samples/sleep/sleep.yaml
这个 sleep 应用很简单,没有什么功能,就是作为一个安装了 curl 工具的后台运行容器,可以进入容器中通过 curl 来访问外部服务来测试 Istio 外部流量管理的特性;
将 Istio 更改为 REGISTRY_ONLY 模式后,从 sleep 应用容器内部访问 http://edition.cnn.com/politics 进行测试:
$ export SLEEP_POD=$(kubectl get pod -l app=sleep -o jsonpath={.items..metadata.name})$ kubectl exec -it $SLEEP_POD -c sleep -- curl -sL -o /dev/null -D - http://edition.cnn.com/politicsHTTP/1.1 502 Bad Gatewaydate: Sun, 28 Jun 2020 08:46:26 GMTserver: envoycontent-length: 0
可以看到会返回 502 信息,因为该域名不在当前的服务网格中,因为现在我们不允许访问服务网格外部的 URL,服务网格中对未知的服务请求会丢弃。
这就需要我们来创建一个 ServiceEntry 对象,将外部的访问服务引入到服务网格中来。
例如,下面的规则定义了一个访问 edition.cnn.com 的服务的 ServiceEntry:
# cnn-service-entry.yamlapiVersion: networking.istio.io/v1alpha3kind: ServiceEntrymetadata:name: cnnspec:hosts:- edition.cnn.comports:- number: 80name: http-portprotocol: HTTP- number: 443name: httpsprotocol: HTTPSresolution: DNS
现在我们再去上面的 sleep 容器中执行上面的测试请求:
$ kubectl exec -it $SLEEP_POD -c sleep -- curl -sL -o /dev/null -D - http://edition.cnn.com/politicsHTTP/1.1 301 Moved Permanentlyserver: envoyretry-after: 0content-length: 0cache-control: public, max-age=600location: https://edition.cnn.com/politics......HTTP/2 200......vary: x-fastab-0, Accept-Encodingcontent-length: 1291663
测试结果:
发现可以正常返回内容了,返回200,证明请求成功了。
访问 edition.cnn.com 域名 http 80 端口,istio 会将请求跳转到 location https (http 301),所以需要在 ServiceEntry 中为外部域名配置 80 和 443 端口。
- 进一步配置 egress gateway,使这些对外部的流量访问经由 egress 去到外部。
- 为 edition.cnn.com 端口 80 创建 EgressGateway;
- 为指向 egress gateway 的流量创建一个 DestinationRule;
- 创建 VirtualService 资源对象,将流量从 sidecar 引导至 egress gateway,再从 egress gateway 引导至外部服务;
```yaml
过程:
Sleep Pod —>Sidercar Pod —>VirtualService (detination: edition.cnn.com)#其中配置了两个网关,会去 egressgateway controller中match host-->egress Pod--> route to ServiceEntry:edition.cnn.com
前提条件:
ServceEntry (host: edition.cnn.com)—>service registry Gateway (host: edition.cnn.com—>route to egress Pod)—>egressgateway controller Destination (定义subset)—>host: egress Pod -route-to-> ServiceEntry: edition.cnn.com
```yaml# 将edition.cnn.com:80这个host在engressgateway controller配置上,# egressgateway controller就可以允许访问edition.cnn.com:80端口的流量从这个出口出去Gateway: istio-engressgatewayselector:istio: engressgatewayservers:- port: 80protocol: HTTPhosts:- edition.cnn.com---# 定义一个subset, 将访问istio-egressgateway服务的流量将导向外部服务cnnDestinationRule: egressgateway-for-cnnhost: istio-egressgateway.istio-system.svc.cluster.localsubsets:- name: cnn---#将外部域名edition.cnn.com的80,443端口注册到istio内,运行访问ServiceEntry: cnnhosts:- edition.cnn.comport: 80, 443---#访问edition.cnn.com域名的流量被sidercar拦截,由于edition.cnn.com在egressgateway有过配置,#经由egressgataway将流量导向到 cnn subset对应的外部服务VirtualService: direct-cnn-through-egress-gatewayhosts:- edition.cnn.comgateways:- istion-egressgateway- mesh #mesh 表示网格中的所有 sidercar,如果没有指定 gateways,则默认 meshhttp:- match:- gateways:- meshport: 80route:- destination:host: istio-egressgateway.istio-system.svc.cluster.localsubset: cnnport: 80- match:- gateways:- istio-egressgatewayport: 80route:- destination:host: edition.cnn.comport: 80weigth: 100
测试结果:
正常输出结果和上面一次访问是一样的。但是去查看 egressgateway 的 Pod 中的容器日志时,可以看到有一条上面的 GET /politics 的日志信息,说明访问经过了 egress gateway 出去了。
(2) 用 Egress Gateway 处理 HTTPS 请求
为了保证传输数据的安全性,我们常常使用 HTTPS 进行传输,而为了让 HTTPS 请求经过 Egress Gateway 出站,我们需要在相应的 ServiceEntry、Egress Gateway 和 VirtualService 中指定 TLS 协议的端口 443。
大致过程与 HTTP 流量相似,只是端口号不一样:
ServiceEntry: cnnspec:hosts:- edition.cnn.comports:- number: 443name: tlsprotocol: TLSresolution: DNS
当创建了 ServiceEntry 就可以直接访问到 https 地址了,但是为了通过 egress gateway 与外部服务通信,我们还需要为 edition.cnn.com 创建一个 egress Gateway,以及创建一个 destination rule 和一个 virtual service 用来引导流量通过 egress gateway。
Gateway: istio-egressgatewayselector:istio: egressgatewayservers:- port:number: 443name: tlsprotocol: TLShosts:- edition.cnn.comtls: # PASSTHROUGH 表示 gateway 按原样通过入口流量,而不终止 TLSmode: PASSTHROUGH---DestinationRule: egressgateway-for-cnnhost: istio-egressgateway.istio-system.svc.cluster.localsubsets:- name: cnn---VirtualService: direct-cnn-through-egress-gatewayhosts:- edition.cnn.comgateways:- mesh- istio-egressgatewaytls:- match:- gateways:- meshport: 443sniHosts:- edition.cnn.comroute:- destination:host: istio-egressgateway.istio-system.svc.cluster.localsubset: cnnport:number: 443- match:- gateways:- istio-egressgatewayport: 443sniHosts:- edition.cnn.comroute:- destination:host: edition.cnn.comport:number: 443weight: 100
:::info 注意:
- 由于 Istio 无法强制让所有出站流量都经过 egress gateway,Istio 只是通过 sidecar 代理实现了这种流向。攻击者只要绕过 sidecar 代理,就可以不经 egress gateway 直接与网格外的服务进行通信,从而避开了 Istio 的控制和监控。
- 出于安全考虑,集群管理员和云供应商必须确保网格所有的出站流量都要经过 egress gateway。这需要通过 Istio 之外的机制来满足这一要求。例如:
- 集群管理员可以配置防火墙,拒绝 egress gateway 以外的所有流量;
- Kubernetes 网络策略也能禁止所有不是从 egress gateway 发起的出站流量;
- 此外,集群管理员和云供应商还可以对网络进行限制,让运行应用的节点只能通过 gateway 来访问外部网络。要实现这一限制,可以只给 gateway Pod 分配公网 IP,并且可以配置 NAT 设备,丢弃来自 egress gateway pod 之外的所有流量。 :::
3.4 TCP 流量管理
TCP 流量管理和上面的 HTTP 的流量管理大致相同,只是配置的端口和协议有所不同。
这里演示用的是 tcp-echo 示例,先将所有 TCP 请求路由到 tcp-echo:v1 服务,然后再通过配置 Istio 的路由权重把 20% 的流量分配到 tcp-echo:v2 这个版本的服务上:
samples/tcp-echo/tcp-echo-services.yam
Service: tcp-echoselector:app: tcp-echo #Service包含 v1、v2两个版本服务ports:- name: tcpport: 9000- name: tcp-otherport: 9001---# tcp请求会返回“one”Deployment: tcp-echo-v1template:labels:app: tcp-echoversion: v1---# tcp请求会返回“two”Deployment: tcp-echo-v1template:labels:app: tcp-echoversion: v2
(1) TCP 访问指定版本服务的路由规则
首先我们部署上面两个版本的 tcp-echo 服务,然后将所有的 tcp 流量引导向 v1 服务:
使用下面文件:
samples/tcp-echo/tcp-echo-all-v1.yaml
文件主要内容: ```yaml Gateway: tcp-echo-gateway selector:
istio: ingressgateway
servers:
port: 31400
protocol: TCP hosts: “*”
VirtualService: tcp-echo host: “*” gateway: tcp-echo-gateway tcp:
- match:
- port: 31400
route:
- destination: host: tcp-echo port: 9000 subset: v1
- port: 31400
route:
Destination: tcp-echo-destination host: tcp-echo subsets:
- name: v1
labels:
version: v1
- name: v2
labels:
``` 在 VirtualService 对象中声明的具体的路由规则,可以拦截从 ingress gateway 进入的 TCP 流量,全部都路由到了 v1 这个子集中去了version: v2
- 测试:向微服务 tcp-echo 发送一些 TCP 请求:
```shell
for i in {1..10};do \
docker run -e INGRESS_HOST=$INGRESS_HOST -e INGRESS_PORT=$INGRESS_PORT -it —rm busybox sh -c “(date; sleep 1) | nc $INGRESS_HOST $INGRESS_PORT”; \ done
one Thu Jul 2 07:20:20 UTC 2020 … one Thu Jul 2 07:20:50 UTC 2020
<a name="sGnvk"></a>#### (2) 基于权重的 TCP 服务访问路由规则使用新的路由规则将 20% 的流量从 tcp-echo:v1 转移到 tcp-echo:v2:- 使用文件:```yamlsamples/tcp-echo/tcp-echo-20-v2.yaml
- 主要内容:
VirtualService: tcp-echohost: "*"gateway: tcp-echo-gatewaytcp:- match:- port: 31400route:- destination:host: tcp-echoport: 9000subset: v1weight: 80- destination:host: tcp-echoport: 9000subset: v2weight: 20
实现对 TCP 流量的路由,和前面使用的 HTTP 服务非常类似。
3.5 熔断
熔断是创建弹性微服务应用程序的重要模式,熔断能够使我们的应用程序具备应对来自故障、潜在峰值和其他未知网络因素影响的能力,熔断在微服务框架中也是必备的一个功能。
同样在 Istio 中也是原生就支持熔断功能的,只需要创建一个 **DestinationRule** 对象来配置熔断设置,在调用目标服务时就会触发 DestinationRule 中设置的熔断策略。
这里用于演示的示例是:
samples/httpbin/httpbin.yaml
- 文件主要内容
```yaml
Service: httpbin
ports:
- name: http port: 8000 targetPort: 80 selector: app: httpbin
Deployment: httpbin template: labels: app: httpbin version: v1 containers:
- image: docker.io/kennethreitz/httpbin...
- 创建 DestinationRule 为目标服务配置熔断策略,等待调用时触发策略:```yamlDestination: httpbinhost: httpbin ---> 对应httpbin服务的servicetrafficPolicy:trafficPolicy:connectionPool:tcp:maxConnections: 1 # 最大连接数为1http:http1MaxPendingRequests: 1 # 最大请求数为1maxRequestsPerConnection: 1outlierDetection:consecutiveErrors: 1interval: 1sbaseEjectionTime: 3mmaxEjectionPercent: 100
测试:Istio 提供了一个 Fortio 测试客户端应用,该应用可以控制连接数、并发数及发送 HTTP 请求的延迟,通过 Fortio 能够有效的触发前面在 DestinationRule 中设置的熔断策略。
部署 Fortio 时也要注入 Sidercar 代理,以便 Istio 对其网络交互进行管理。
samples/httpbin/sample-client/fortio-deploy.yaml
部署完测试客户端,进入应用使用 Fortio 工具调用 httpbin 服务,比如这里我们发送并发数为 2 的连接(-c 2),请求 20 次(-n 20)来观察下现象:
$ kubectl exec -it $FORTIO_POD -c fortio /usr/bin/fortio -- load -c 2 -qps 0 -n 20 -loglevel Warning http://httpbin:8000/get15:59:27 I logger.go:97> Log level is now 3 Warning (was 2 Info)Fortio 1.3.1 running at 0 queries per second, 4->4 procs, for 20 calls: http://httpbin:8000/getStarting at max qps with 2 thread(s) [gomax 4] for exactly 20 calls (10 per thread + 0)15:59:27 W http_client.go:679> Parsed non ok code 503 (HTTP/1.1 503)15:59:27 W http_client.go:679> Parsed non ok code 503 (HTTP/1.1 503)15:59:27 W http_client.go:679> Parsed non ok code 503 (HTTP/1.1 503)15:59:27 W http_client.go:679> Parsed non ok code 503 (HTTP/1.1 503)15:59:27 W http_client.go:679> Parsed non ok code 503 (HTTP/1.1 503)Ended after 147.547078ms : 20 calls. qps=135.55Aggregated Function Time : count 20 avg 0.01428141 +/- 0.0143 min 0.000651885 max 0.061146337 sum 0.285628198# range, mid point, percentile, count>= 0.000651885 <= 0.001 , 0.000825943 , 5.00, 1> 0.002 <= 0.003 , 0.0025 , 10.00, 1> 0.003 <= 0.004 , 0.0035 , 15.00, 1> 0.005 <= 0.006 , 0.0055 , 30.00, 3> 0.006 <= 0.007 , 0.0065 , 50.00, 4> 0.008 <= 0.009 , 0.0085 , 55.00, 1> 0.011 <= 0.012 , 0.0115 , 60.00, 1> 0.012 <= 0.014 , 0.013 , 70.00, 2> 0.016 <= 0.018 , 0.017 , 75.00, 1> 0.018 <= 0.02 , 0.019 , 80.00, 1> 0.025 <= 0.03 , 0.0275 , 90.00, 2> 0.035 <= 0.04 , 0.0375 , 95.00, 1> 0.06 <= 0.0611463 , 0.0605732 , 100.00, 1# target 50% 0.007# target 75% 0.018# target 90% 0.03# target 99% 0.0609171# target 99.9% 0.0611234Sockets used: 7 (for perfect keepalive, would be 2)Code 200 : 15 (75.0 %)Code 503 : 5 (25.0 %)Response Header Sizes : count 20 avg 172.85 +/- 99.8 min 0 max 231 sum 3457Response Body/Total Sizes : count 20 avg 698.85 +/- 264.3 min 241 max 852 sum 13977All done 20 calls (plus 0 warmup) 14.281 ms avg, 135.5 qps
可以看到大部分请求还是都完成了,但是并不是一半的请求失败,这是因为 istio-proxy 并不是100%准确的:
Code 200 : 15 (75.0 %)Code 503 : 5 (25.0 %)
我们可以通过 istio-proxy 状态来了解更多关于熔断的详情,使用如下命令进行查看:
- 其中
upstream_rq_pending_overflow值为17,这表示目前为止已有17个调用被标记为熔断了。$ kubectl exec $FORTIO_POD -c istio-proxy -- pilot-agent request GET stats | grep httpbin | grep pendingcluster.outbound|8000||httpbin.default.svc.cluster.local.circuit_breakers.default.rq_pending_open: 0cluster.outbound|8000||httpbin.default.svc.cluster.local.circuit_breakers.high.rq_pending_open: 0cluster.outbound|8000||httpbin.default.svc.cluster.local.upstream_rq_pending_active: 0cluster.outbound|8000||httpbin.default.svc.cluster.local.upstream_rq_pending_failure_eject: 0cluster.outbound|8000||httpbin.default.svc.cluster.local.upstream_rq_pending_overflow: 17cluster.outbound|8000||httpbin.default.svc.cluster.local.upstream_rq_pending_total: 37
- 其中
3.6 流量镜像
流量镜像也称为影子流量,是一个以尽可能低的风险为生产带来变化的强大的功能,镜像会将实时流量的副本发送到镜像服务。
这里为了测试 Istio 的流量镜像的功能,还是使用 httpbin 这个服务。
部署 v1 版本的 httpbin 服务:
$ cat <<EOF | istioctl kube-inject -f - | kubectl apply -f -apiVersion: apps/v1kind: Deploymentmetadata:name: httpbin-v1spec:replicas: 1selector:matchLabels:app: httpbinversion: v1template:metadata:labels:app: httpbinversion: v1spec:containers:- image: docker.io/kennethreitz/httpbinimagePullPolicy: IfNotPresentname: httpbincommand: ["gunicorn", "--access-logfile", "-", "-b", "0.0.0.0:80", "httpbin:app"]ports:- containerPort: 80EOF
部署 v2 版本的 httpbin 服务:
$ cat <<EOF | istioctl kube-inject -f - | kubectl apply -f -apiVersion: apps/v1kind: Deploymentmetadata:name: httpbin-v2spec:replicas: 1selector:matchLabels:app: httpbinversion: v2template:metadata:labels:app: httpbinversion: v2spec:containers:- image: docker.io/kennethreitz/httpbinimagePullPolicy: IfNotPresentname: httpbincommand: ["gunicorn", "--access-logfile", "-", "-b", "0.0.0.0:80", "httpbin:app"]ports:- containerPort: 80EOF
创建一个 httpbin 的 Service 对象,关联上面的两个版本服务:
$ kubectl apply -f - <<EOFapiVersion: v1kind: Servicemetadata:name: httpbinlabels:app: httpbinspec:ports:- name: httpport: 8000targetPort: 80selector:app: httpbinEOF
然后再部署一个 sleep 服务,这样就可以使用 curl 来提供负载了:
$ cat <<EOF | istioctl kube-inject -f - | kubectl create -f -apiVersion: apps/v1kind: Deploymentmetadata:name: sleepspec:replicas: 1selector:matchLabels:app: sleeptemplate:metadata:labels:app: sleepspec:containers:- name: sleepimage: tutum/curlcommand: ["/bin/sleep","infinity"]imagePullPolicy: IfNotPresentEOF
创建一个路由规则,这个路由规则会发送 100% 流量到 v1 这个子集服务,然后通过 mirror 属性配置了将流量也 100% 镜像到了 httpbin:v2 服务:
- 当流量被镜像时,请求将发送到镜像服务中,并在 headers 中的 Host/Authority 属性值上追加 -shadow。
- 需要注意的是这些被镜像的流量是『 即发即弃』的,也就是说镜像请求的响应会被丢弃。
```yaml
$ kubectl apply -f - <<EOF
apiVersion: networking.istio.io/v1alpha3
kind: VirtualService
metadata:
name: httpbin
spec:
hosts:
- httpbin http:
- route:
- destination: host: httpbin subset: v1 weight: 100 mirror: host: httpbin subset: v2 mirror_percent: 100
apiVersion: networking.istio.io/v1alpha3 kind: DestinationRule metadata: name: httpbin spec: host: httpbin subsets:
- name: v1 labels: version: v1
- name: v2 labels: version: v2 EOF ```
- 测试:
- 可以看到 v1 和 v2 中都有了访问日志,v2 中的访问日志就是由镜像流量产生的,这些请求的实际目标是 v1。
```shell $ kubectl logs -f $V1_POD -c httpbin 127.0.0.1 - - “GET /headers HTTP/1.1” 200 553 “-“ “curl/7.35.0” 127.0.0.1 - - “GET /headers HTTP/1.1” 200 553 “-“ “curl/7.35.0”$ export SLEEP_POD=$(kubectl get pod -l app=sleep -o jsonpath={.items..metadata.name})$ kubectl exec -it $SLEEP_POD -c sleep -- sh -c 'curl http://httpbin:8000/headers' | python -m json.tool
- 可以看到 v1 和 v2 中都有了访问日志,v2 中的访问日志就是由镜像流量产生的,这些请求的实际目标是 v1。
$ kubectl logs -f $V2_POD -c httpbin 127.0.0.1 - - “GET /headers HTTP/1.1” 200 593 “-“ “curl/7.35.0” ```

若有收获,就点个赞吧
0 人点赞
