基本概念回顾
硬盘和分区
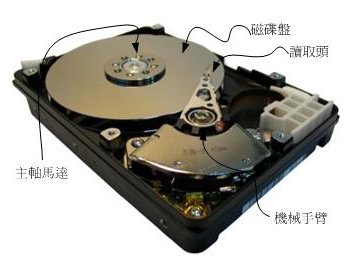
硬盘组成
- 主轴马达(驱动碟片转动)
- 碟片(记录数据)
- 机械手臂(伸展磁头)
- 磁头(写入数据到碟片)
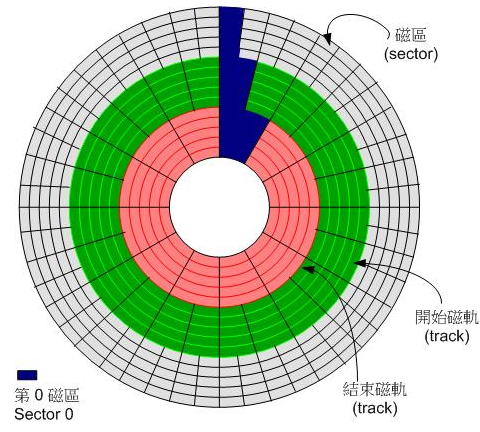
碟片的物理组成
- 扇区(sector)
磁盘的最小物理存储单位 - 磁道(track)
同一个同心圆的扇区组合成的圆就是所谓磁道 - 柱面(cylinder)
所有(多个)碟片上面的同一个磁道可以组合成所谓的柱面
- 磁盘分区表主要有两种格式,一种是限制比较多的MBR分区表,一种是较新且限制较少的GPT分区表
- MBR分区表第一个扇区最重要,含有:主引导记录及分区表,其中MBR占有446B,分区表占有64B
- GPT分区表除了分区数量扩充比较多之外,支持的磁盘容量也可以超过2TB
说明:外圈的扇区数量比较多,数据写入时转一圈能够读写的数据量比内圈多。因此通常数据的读写会由外圈开始往内写,这是默认方式。
认识linux文件系统
文件系统的特性
通常操作系统的文件除了文件数据外还有非常多的属性。文件系统通常会将这两部分的数据分别存放在不同的区块,权限与属性放置到inode中,实际数据则放置到数据区块中。另外,还有超级区块(superblock)会记录整个文件系统的整体信息,包括inode与数据区块的总量、使用量、剩余量等
- 超级区块:记录文件系统的整体信息,包括inode与数据区块的总量、使用量、剩余量以及文件系统的格式与相关信息等
- inode:记录文件的属性,一个文件占用一个inode,同时记录此文件的数据所在的区块号码
- 数据区块:实际记录文件的内容,若文件太大,会占用多个区块
Linux的ext2文件系统(inode)
ext2:Linux second Extended file system
文件系统一开始就讲inode与数据区块规划好了,除非重新格式化(或历用resize2fs等命令修改其大小),否则inode与数据区块固定后就不再变动
文件系统格式化的时候,其实是区分为多个区块群组(block group),每个区块群组都有独立的inode,数据区块,超级区块系统。
区块的主要内容:
数据区块(data block)
放置文件数据的地方,在ext2文件系统中所支持的区块大小有1k、2k及4k三种。区块的基本限制如下:1.原则上,区块的大小与数量子啊格式化完就不能再修改(除非重新格式化)2.每个区块最多只能放置一个文件的数据3.承上,如果问价大于区块的大小,则一个文件就占用多个区块数量4.承上,若文件小于区块,则该区块的剩余容量就不能再被利用了(磁盘空间浪费)
inode table(inode 表)
记录文件的属性以及实际文件是放置在哪几个区块内Super block(超级区块)
记录整个文件系统相关信息的地方,没有超级区块,就没有文件系统,记录的信息有:1.数据区块与inode的总量2.未使用与已使用的inode与数据区块数量3.数据区块与inode的大小(block为1、2、4k,inode为128B或256B)4.文件系统的挂载时间,最近一次写入数据的时间,最近一次检验磁盘的时间等文件系统相关的信息5.一个有效的数值,若文件系统已被挂载,则有效位为0,未被挂载则有效位为1
Filesystem Description(文件系统描述说明)
- 区块对照表(block bitmap)
新增文件会用到区块,那哪些区块是空的,就需要通过区块对照表来确定了。同样如果删除某些文件,那么原本占用的区块号码就要释放出来,区块对照表中的区块号码就要标记为【未使用中】 inode 对照表(inode bitmap)
同区块对照表类似,inode对照表记录使用与未使用的inode号码与目录树的关系
目录
当在linux系统下的ext2创建一个目录时,文件系统会分配一个inode与至少一块区块给该目录。
查看文件占用的inode号码:ls -li[root@cnsz92vl12951 shigl]# cd /[root@cnsz92vl12951 /]# ls -litotal 11216131 drwxr-xr-x. 8 rhlog root 4096 Aug 5 19:52 app154 lrwxrwxrwx 1 root root 7 Mar 11 09:27 bin -> usr/bin128 dr-xr-xr-x. 5 root root 4096 Mar 11 09:39 boot
文件
当在linux系统下的ext2创建一个一般文件时,ext2会分配一个inode与相对该文件大小的区块数量给该文件。例如:假设一个区块为4k,要建立的文件大小为100k,那么linux讲分配一个inode与25个区块来存储文件。ext2/ext3/ext4文件的存取与日志式文件系统的功能
我们将inode对照表与数据区块称为数据存放区域,其他如超级区块、区块对照表与inode对照表等区段就被称为元数据(metadata)
日志式文件系统出现的背景:解决元数据与实际数据存放产生不一致的情况。
通过日志文件记录对文件的操作,当出现数据不一致的情况只需要检查日志记录的区块
linux文件系统的运行
我们都知道,数据都要加载到内存中cpu才能够进行处理。因此linux系统上面的文件系统与内存有非常大的关系
- 系统会将常用的数据放置到内存缓冲区,以加速文件系统的读写操作
- 承上,Linux的物理内存最后都会被用光,这是正常情况,可加速系统性能
- 你可以手动使用sync来强制内存中设置为dirty的文件回写到磁盘中
- 若正常关机时,关机命令会主动调用sync来将内存的数据回写到磁盘中
若非正常关机时,由于数据尚未写入到磁盘,重新启动后,可能会花很多时间进行磁盘校验,甚至可能导致文件系统损坏。
挂载点的意义(mount point)
将文件系统与目录树结合的操作称为【挂载】。挂载点一定是目录,该目录为进入文件系统的入口。
其他linux支持的文件系统与VFS
linux常见的支持文件系统
传统文件系统:ext2、minx、FAT、iso9660(光盘)等
- 日志式文件系统:ext3、ext4、NTFS(Windows)、JFS(IBM)、XFS(SGI)、ZFS
- 网络文件系统:NFS、SMBFS
查看当前linux系统支持的文件系统有哪些
[root@cnsz92vl12951 /]# ls -l /lib/modules/3.10.0-693.17.1.el7.x86_64/kernel/fs/total 20-rw-r--r-- 1 root root 5916 Jan 26 2018 binfmt_misc.ko.xzdrwxr-xr-x 2 root root 24 Mar 9 2018 btrfsdrwxr-xr-x 2 root root 29 Mar 9 2018 cachefilesdrwxr-xr-x 2 root root 23 Mar 9 2018 cephdrwxr-xr-x 2 root root 23 Mar 9 2018 cifs...
查看系统目前已加载到内存中支持的文件系统有哪些
[root@cnsz92vl12951 /]# cat /proc/filesystemsnodev sysfsnodev rootfsnodev ramfsnodev bdev...
A:linux系统如何管理这些文件系统呢?
Q:通过名为Virtual Filesystem Switch的内核功能去读取文件系统。整个linux识别的文件系统其实都是VFS进行管理。
XFS文件系统简介
Centos7开始,默认的文件系统已经由原本的ext4变成了xfs文件系统。原因如下:
-
文件系统的简单操作
磁盘与目录的容量
df 列出文件系统的整体磁盘使用量
df [-ahikHTm] [目录或文件名]
选项与参数-a:列出所有文件系统,包括系统特有的/proc等文件系统-k:以KByte的容量显示各文件系统-m:以MByte的容量显示各文件系统-h:以人类容易阅读的GByte MByte KByte等格式自行展示-H:以M=1000K替换M=1024K的进位方式-T:连同该硬盘分区的文件系统名称也列出-i:不用磁盘容量,而以inode的数量来显示
基本使用 ```shell [root@cnsz92vl12951 shigl]# df Filesystem 1K-blocks Used Available Use% Mounted on devtmpfs 3994468 0 3994468 0% /dev tmpfs 4005056 0 4005056 0% /dev/shm tmpfs 4005056 418344 3586712 11% /run tmpfs 4005056 0 4005056 0% /sys/fs/cgroup
[root@cnsz92vl12951 shigl]# df -h Filesystem Size Used Avail Use% Mounted on devtmpfs 3.9G 0 3.9G 0% /dev tmpfs 3.9G 0 3.9G 0% /dev/shm tmpfs 3.9G 409M 3.5G 11% /run tmpfs 3.9G 0 3.9G 0% /sys/fs/cgroup
说明:
Filesystem:该文件系统是哪一个硬盘分区,所有列出设备名称 Size:磁盘空间大小 Used:已使用的磁盘空间 Avail:剩余可用磁盘空间 Use%:磁盘使用率 Mounted on:磁盘挂载目录(挂载点)
- du 查看文件系统的磁盘使用量(常用查看目录所占用磁盘空间)<br />du [-ahskm] 文件或目录名称<br />选项与参数
-a:列出所有文件与目录的容量,默认仅统计目录下面的文件量 -h:以人们较容易读的容量格式(G/M)显示 -s:仅列出总量,而不列出每个目录占用容量 -S:不包括子目录下的总计,与-s的差别 -k:以KByte列出容量显示 -m:以MByte列出容量显示
<a name="pdZ8i"></a>### 硬链接与符号链接ln [-sf] 源文件 目标文件<br />选项与参数
-s:不带任何参数也就是硬链接, -s就是符号(软)链接 -f:如果目标文件存在时,就主动将目标文件直接删除后再建立
- 硬链接(hard link 硬链接或实际链接)```shell[root@cnsz92vl12951 shigl]# cd /app/linux_basic/[root@cnsz92vl12951 linux_basic]# lltotal 16-rw-r--r-- 1 root root 0 Aug 6 10:33 dir.pyd--x--x--x 2 william william 54 Aug 5 19:58 test[root@cnsz92vl12951 linux_basic]# pwd/app/linux_basic[root@cnsz92vl12951 linux_basic]# cd test# 建立硬链接[root@cnsz92vl12951 test]# ln /app/linux_basic/dir.py dir.py[root@cnsz92vl12951 test]# lltotal 8-rw-r--r-- 2 root root 0 Aug 6 10:33 dir.py-rw-r--r-- 1 root root 0 Aug 5 19:53 test_01.py# 可用看到硬链接文件的inode完全一样[root@cnsz92vl12951 test]# ll -itotal 12956347 -rw-r--r-- 2 root root 15 Aug 15 17:41 dir.py1184011 -rw-r--r-- 1 root root 0 Aug 5 19:53 test_01.py[root@cnsz92vl12951 test]# ll -i /app/linux_basic/total 20956347 -rw-r--r-- 2 root root 15 Aug 15 17:41 dir.py
硬链接限制:
- 不能跨文件系统
- 不能链接目录
- 符号链接(Symbolic Link,亦称为快捷方式)
[root@cnsz92vl12951 test]# ln -s /app/linux_basic/dir.py dir_sf.py[root@cnsz92vl12951 test]# ll -i956347 -rw-r--r-- 2 root root 15 Aug 15 17:41 dir.py18660291 lrwxrwxrwx 1 root root 23 Aug 15 17:47 dir_sf.py -> /app/linux_basic/dir.py1184011 -rw-r--r-- 1 root root 0 Aug 5 19:53 test_01.py
磁盘分区、格式化、检验与挂载
观察磁盘分区状态
- 符号链接(Symbolic Link,亦称为快捷方式)
- lsblk 列出系统上的所有磁盘列表
lsblk [-dfimpt] [device]
选项与参数
基本使用 ```shell [root@cnsz92vl12951 shigl]# lsblk NAME MAJ:MIN RM SIZE RO TYPE MOUNTPOINT vda 252:0 0 60G 0 disk ├─vda1 252:1 0 476M 0 part /boot └─vda2 252:2 0 59.5G 0 part ├─vg00-root 253:0 0 10G 0 lvm / ├─vg00-home 253:1 0 20G 0 lvm /home ├─vg00-var 253:2 0 10G 0 lvm /var └─vg00-tmp 253:3 0 10G 0 lvm /tmp-d:仅列出磁盘本身,并不会列出该磁盘的分区数据-f:同时列出该磁盘的文件系统名称-i:使用ASCII的字符输出,不要使用复杂的编码-m:同时输出该设备在dev下面的权限信息-p:列出该设备的完整文件名,而不是仅列出最后的名字-t:列出该磁盘设备的详细数据,包括磁盘阵列机制,预读取的数据量大小等
[root@cnsz92vl12951 shigl]# lsblk -ip /dev/vda
NAME MAJ:MIN RM SIZE RO TYPE MOUNTPOINT
/dev/vda 252:0 0 60G 0 disk
|-/dev/vda1 252:1 0 476M 0 part /boot
-/dev/vda2               252:2    0 59.5G  0 part
  |-/dev/mapper/vg00-root 253:0    0   10G  0 lvm  /
  |-/dev/mapper/vg00-home 253:1    0   20G  0 lvm  /home
  |-/dev/mapper/vg00-var  253:2    0   10G  0 lvm  /var
-/dev/mapper/vg00-tmp 253:3 0 10G 0 lvm /tmp
[root@cnsz92vl12951 shigl]# lsblk -ip /dev/vda1
NAME MAJ:MIN RM SIZE RO TYPE MOUNTPOINT
/dev/vda1 252:1 0 476M 0 part /boot
- blkid 列出设备的UUID等参数```shell[root@cnsz92vl12951 shigl]# blkid/dev/vda1: UUID="72b87e35-1004-4bbe-bb84-b8628c925d22" TYPE="xfs"/dev/vda2: UUID="yNbIDB-y1ex-FYzm-r7Hs-lkSZ-MWIg-q3z6mD" TYPE="LVM2_member"/dev/mapper/vg00-root: UUID="ee45b026-267c-4b50-87d7-5078a0328b0e" TYPE="xfs"/dev/mapper/vg00-home: UUID="e328ce9c-f0de-44f9-8205-132b5b43c726" TYPE="xfs"/dev/mapper/vg00-var: UUID="603e1e7f-748f-43f1-a3f5-5d824b99d62c" TYPE="xfs"/dev/mapper/vg00-tmp: UUID="df1b4e9d-93b7-4824-90a0-8c4c9742a8c2" TYPE="xfs"
- parted 列出磁盘的分区表类型与分区信息 ```shell [root@cnsz92vl12951 shigl]# parted /dev/vda print Model: Virtio Block Device (virtblk) # 磁盘的模块名称(厂商) Disk /dev/vda: 64.4GB # 磁盘的总容量 Sector size (logical/physical): 512B/512B # 磁盘的每个逻辑/物理扇区容量 Partition Table: msdos # 分区表的格式 Disk Flags:
Number Start End Size Type File system Flags # 分区数据 1 1049kB 500MB 499MB primary xfs boot 2 500MB 64.4GB 63.9GB primary lvm
<a name="fcpsV"></a>### 磁盘分区gdisk/fdisk注意:MBR分区表请使用fdisk分区;GPT分区表请使用gdisk分区。这里不要搞错,否则会导致分区失败。<br />操作步骤1. lsblk -ip /dev/vda 找到磁盘1. parted /dev/vda print 找到分区表类型1. 使用gdisk/fdisk工具操作系统基本操作<br />root@localhost:/data01# gdisk /dev/vda<br />GPT fdisk (gdisk) version 1.0.31. Partition table scan:<br />MBR: protective<br />BSD: not present<br />APM: not present<br />GPT: presentFound valid GPT with protective MBR; using GPT.Command (? for help): ?<br />b back up GPT data to a file<br />c change a partition's name<br />**d delete a partition** # 删除一个分区<br />i show detailed information on a partition<br />l list known partition types<br />**n add a new partition** # 增加一个分区<br />o create a new empty GUID partition table (GPT)<br />**p print the partition table** # 打印出分区表<br />**q quit without saving changes** # 不保存分区就直接离开gdisk<br />r recovery and transformation options (experts only)<br />s sort partitions<br />t change a partition's type code<br />v verify disk<br />**w write table to disk and exit** # 保存分区后离开gdisk<br />x extra functionality (experts only)<br />? print this menu<br />Command (? for help):- 用gdisk新增分区```shellroot@localhost:/data01# gdisk /dev/vdaGPT fdisk (gdisk) version 1.0.3Partition table scan:MBR: protectiveBSD: not presentAPM: not presentGPT: presentFound valid GPT with protective MBR; using GPT.Command (? for help): pDisk /dev/vda: 125829120 sectors, 60.0 GiBSector size (logical/physical): 512/512 bytesDisk identifier (GUID): 9214D721-901D-4C88-98A7-43257008FA6EPartition table holds up to 128 entriesMain partition table begins at sector 2 and ends at sector 33First usable sector is 34, last usable sector is 125829086Partitions will be aligned on 2048-sector boundariesTotal free space is 1077181 sectors (526.0 MiB)Number Start (sector) End (sector) Size Code Name1 2048 4095 1024.0 KiB EF022 4096 1028095 500.0 MiB 83003 1028096 124753919 59.0 GiB 8300Command (? for help): nPartition number (4-128, default 4):First sector (34-125829086, default = 124753920) or {+-}size{KMGTP}:# 这里不手动填入,默认会用掉剩余所有容量Last sector (124753920-125829086, default = 125829086) or {+-}size{KMGTP}: +200MCurrent type is 'Linux filesystem'Hex code or GUID (L to show codes, Enter = 8300):Changed type of partition to 'Linux filesystem'# w:保存更新Command (? for help): wFinal checks complete. About to write GPT data. THIS WILL OVERWRITE EXISTINGPARTITIONS!!Do you want to proceed? (Y/N): yOK; writing new GUID partition table (GPT) to /dev/vda.Warning: The kernel is still using the old partition table.The new table will be used at the next reboot or after yourun partprobe(8) or kpartx(8)The operation has completed successfully.# 查看分区信息root@localhost:/data01# parted /dev/vda printModel: Virtio Block Device (virtblk)Disk /dev/vda: 64.4GBSector size (logical/physical): 512B/512BPartition Table: gptDisk Flags:Number Start End Size File system Name Flags1 1049kB 2097kB 1049kB bios_grub2 2097kB 526MB 524MB xfs3 526MB 63.9GB 63.3GB4 63.9GB 64.1GB 210MB Linux filesystem
partprobe更新linux内核的分区表信息
此时因为还在使用磁盘,担心系统出问题,所有分区表信息还未更新。解决方式:- 重启
- 通过partprobe命令更新 ```shell root@localhost:/data01# cat /proc/partitions major minor #blocks name
7 0 90604 loop0 252 0 62914560 vda 252 1 1024 vda1 252 2 512000 vda2 252 3 61862912 vda3 253 0 15728640 dm-0 253 1 512000 dm-1 253 2 10485760 dm-2 253 3 15728640 dm-3 253 4 19398656 dm-4
-s展示更新信息
root@localhost:/data01# partprobe -s /dev/mapper/ubuntu—vg-lvapp: loop partitions 1 /dev/mapper/ubuntu—vg-lvvar: loop partitions 1 /dev/mapper/ubuntu—vg-lvtmp: loop partitions 1 /dev/mapper/ubuntu—vg-lvhome: loop partitions 1 /dev/mapper/ubuntu—vg-lvroot: loop partitions 1 /dev/vda: gpt partitions 1 2 3 4 root@localhost:/data01# cat /proc/partitions major minor #blocks name
7 0 90604 loop0 252 0 62914560 vda 252 1 1024 vda1 252 2 512000 vda2 252 3 61862912 vda3 252 4 204800 vda4 253 0 15728640 dm-0 253 1 512000 dm-1 253 2 10485760 dm-2 253 3 15728640 dm-3 253 4 19398656 dm-4 ```
使用gdisk删除分区
```shell root@localhost:/data01# gdisk /dev/vda GPT fdisk (gdisk) version 1.0.3
Partition table scan: MBR: protective BSD: not present APM: not present GPT: present
Found valid GPT with protective MBR; using GPT.
Command (? for help): p Disk /dev/vda: 125829120 sectors, 60.0 GiB Sector size (logical/physical): 512/512 bytes Disk identifier (GUID): 9214D721-901D-4C88-98A7-43257008FA6E Partition table holds up to 128 entries Main partition table begins at sector 2 and ends at sector 33 First usable sector is 34, last usable sector is 125829086 Partitions will be aligned on 2048-sector boundaries Total free space is 667581 sectors (326.0 MiB)
Number Start (sector) End (sector) Size Code Name 1 2048 4095 1024.0 KiB EF02 2 4096 1028095 500.0 MiB 8300 3 1028096 124753919 59.0 GiB 8300 4 124753920 125163519 200.0 MiB 8300 Linux filesystem
Command (? for help): d Partition number (1-4): 4
Command (? for help): p Disk /dev/vda: 125829120 sectors, 60.0 GiB Sector size (logical/physical): 512/512 bytes Disk identifier (GUID): 9214D721-901D-4C88-98A7-43257008FA6E Partition table holds up to 128 entries Main partition table begins at sector 2 and ends at sector 33 First usable sector is 34, last usable sector is 125829086 Partitions will be aligned on 2048-sector boundaries Total free space is 1077181 sectors (526.0 MiB)
Number Start (sector) End (sector) Size Code Name 1 2048 4095 1024.0 KiB EF02 2 4096 1028095 500.0 MiB 8300 3 1028096 124753919 59.0 GiB 8300
Command (? for help): w
Final checks complete. About to write GPT data. THIS WILL OVERWRITE EXISTING PARTITIONS!!
Do you want to proceed? (Y/N): y OK; writing new GUID partition table (GPT) to /dev/vda. Warning: The kernel is still using the old partition table. The new table will be used at the next reboot or after you run partprobe(8) or kpartx(8) The operation has completed successfully.
<a name="PSqaN"></a>### 磁盘格式化- XFS文件系统 mkfs.xfs```shellroot@localhost:/data01# mkfs.xfs -f -d agcount=1 /dev/vda4meta-data=/dev/vda4 isize=512 agcount=1, agsize=25600 blks= sectsz=512 attr=2, projid32bit=1= crc=1 finobt=1, sparse=0, rmapbt=0, reflink=0data = bsize=4096 blocks=25600, imaxpct=25= sunit=0 swidth=0 blksnaming =version 2 bsize=4096 ascii-ci=0 ftype=1log =internal log bsize=4096 blocks=855, version=2= sectsz=512 sunit=0 blks, lazy-count=1realtime =none extsz=4096 blocks=0, rtextents=0
- XFS文件系统for RAID性能优化(Optional)
- ext4文件系统mkfs.ext4
```shell root@localhost:/data01# mkfs.ext4 /dev/vda5 mke2fs 1.44.1 (24-Mar-2018) Creating filesystem with 102400 1k blocks and 25688 inodes Filesystem UUID: 156d207f-8f22-438d-886f-97f30ec4e535 Superblock backups stored on blocks:8193, 24577, 40961, 57345, 73729
Allocating group tables: done Writing inode tables: done Creating journal (4096 blocks): done Writing superblocks and filesystem accounting information: done
root@localhost:/data01# parted /dev/vda print Model: Virtio Block Device (virtblk) Disk /dev/vda: 64.4GB Sector size (logical/physical): 512B/512B Partition Table: gpt Disk Flags:
Number Start End Size File system Name Flags 1 1049kB 2097kB 1049kB bios_grub 2 2097kB 526MB 524MB xfs 3 526MB 63.9GB 63.3GB 4 63.9GB 64.0GB 105MB xfs Linux filesystem 5 64.0GB 64.1GB 105MB ext4 Linux filesystem 6 64.1GB 64.2GB 105MB Linux filesystem
- 其他系统mkfs```shellroot@localhost:/data01# mkfs -t vfat /dev/vda6mkfs.fat 4.1 (2017-01-24)root@localhost:/data01# parted /dev/vda printModel: Virtio Block Device (virtblk)Disk /dev/vda: 64.4GBSector size (logical/physical): 512B/512BPartition Table: gptDisk Flags:Number Start End Size File system Name Flags1 1049kB 2097kB 1049kB bios_grub2 2097kB 526MB 524MB xfs3 526MB 63.9GB 63.3GB4 63.9GB 64.0GB 105MB xfs Linux filesystem5 64.0GB 64.1GB 105MB ext4 Linux filesystem6 64.1GB 64.2GB 105MB fat16 Linux filesystem
文件系统检验
- xfs_repair处理XFS文件系统
当xfs文件系统错乱才需要使用这个命令,所有这个命令最好是不要用到,除非真的需要。
```shell root@localhost:/data01# xfs_repair /dev/vda5 Phase 1 - find and verify superblock… bad primary superblock - bad magic number !!!
attempting to find secondary superblock… ……………………………………………………………………………..Sorry, could not find valid secondary superblock Exiting now.
- fsck.ext4处理ext4文件系统<br />fsck是一个综合命令,如果针对ext4的话,建议直接使用fsck.ext4来检测比较妥当<a name="GtCjz"></a>### 文件系统挂载与卸载文件系统挂载前,需要先确定几件事情:- 单一文件系统不应该被重复挂载在不同的挂载点(目录)中- 单一目录不应该重复挂载多个文件系统- 要作为挂载点的目录,理论上应该为空目录才行特别注意:如果要挂载的目录不是空的,当挂载了文件系统后,原目录下的文件就会**暂时消失**,待挂载的文件系统卸载后原内容会再次出现<br />**文件系统挂载**- 挂载xfs/ext4/vfat等文件系统```shellroot@localhost:/data01# blkid /dev/vda4/dev/vda4: UUID="a0325da5-6a0b-4597-9089-f9d13e24517e" TYPE="xfs" PARTLABEL="Linux filesystem" PARTUUID="86bb4da8-98ae-42ea-a6ee-7b8cc0d45c9e"root@localhost:/data01# mount UUID="a0325da5-6a0b-4597-9089-f9d13e24517e" /data/xfsmount: /data/xfs: mount point does not exist.root@localhost:/data01# mkdir -p /data/xfsroot@localhost:/data01# mount UUID="a0325da5-6a0b-4597-9089-f9d13e24517e" /data/xfsroot@localhost:/data01# df /data/xfsFilesystem 1K-blocks Used Available Use% Mounted on/dev/vda4 98980 5308 93672 6% /data/xfs
- 挂载CD或DVD光盘
- 挂载vfat中文移动磁盘(USB磁盘)
- 重新挂载根目录与挂载不特定目录
文件系统卸载
-
内存交换分区之创建
使用物理分区创建内存交换分区
建立交换分区步骤
分区:使用gdisk在磁盘中划分一个分区给下统作为内存交换分区
- 格式化:利用建立内存交换分区格式的 [mkswqp 设备名称] 格式化分区成为内存交换分区格式
- 使用:将swap设备启动 [swap 设备文件名]
- 观察:通过free与swapon -s 命令观察一下内存的使用量
# 创建swap格式root@host-100-75-29-107:~# mkswap /dev/vda7Setting up swapspace version 1, size = 100 MiB (104853504 bytes)no label, UUID=c9bc5cff-f40a-4f51-a48d-d43c6b6573c9root@host-100-75-29-107:~# blkid /dev/vda7/dev/vda7: UUID="c9bc5cff-f40a-4f51-a48d-d43c6b6573c9" TYPE="swap" PARTLABEL="Linux filesystem" PARTUUID="9039e697-5d5b-429d-9944-6374e2ccf8e3"root@host-100-75-29-107:~# freetotal used free shared buff/cache availableMem: 2040892 120404 1728492 964 191996 1774560Swap: 0 0 0# 启动swap设备root@host-100-75-29-107:~# swapon /dev/vda7root@host-100-75-29-107:~# freetotal used free shared buff/cache availableMem: 2040892 120464 1728344 964 192084 1774484Swap: 102396 0 102396# 列出目前使用交换分区的设备root@host-100-75-29-107:~# swapon -sFilename Type Size Used Priority/dev/vda7 partition 102396 0 -2
同样的如果要启动挂载交换分区,也需要写入到/etc/fstab配置文件中
# 配置内容UUID=c9bc5cff-f40a-4f51-a48d-d43c6b6573c9 swap swap defaults 0 0
使用文件创建内存交换文件
使用dd命令在/tmp下新增文件
root@host-100-75-29-107:~# dd if=/dev/zero of=/tmp/swap bs=1M count=1010+0 records in10+0 records out10485760 bytes (10 MB, 10 MiB) copied, 0.0139901 s, 750 MB/sroot@host-100-75-29-107:~# ll -h /tmp/swap-rw-r--r-- 1 root root 10M Aug 17 13:13 /tmp/swap
使用mkswqp将/tmp/swap文件格式化为内存交换文件的文件格式
root@host-100-75-29-107:~# mkswap /tmp/swapmkswap: /tmp/swap: insecure permissions 0755, 0600 suggested.Setting up swapspace version 1, size = 10 MiB (10481664 bytes)no label, UUID=df28d92c-0003-41d6-8bf9-906b9085b0f7
使用swapon将/tmp/swap启动
root@host-100-75-29-107:~# swapon /tmp/swap
使用swapoff关闭swap file并设置自启动
root@host-100-75-29-107:~# swapoff /tmp/swap /dev/vda8
文件系统的特殊观察与操作
磁盘空间浪费问题
ll -sh命令
total代表目录下所有文件消耗的容量(实际是已使用区块容量相加)利用GUN的parted进行分区操作
parted命令支持GPT分区表的gdisk,也支持MBR分区表的fdisk操作。
parted [设备] [命令 [参数]] ```shell列出目前本机分区表信息
root@host-100-75-29-107:~# parted /dev/vda print Model: Virtio Block Device (virtblk) Disk /dev/vda: 64.4GB Sector size (logical/physical): 512B/512B Partition Table: gpt Disk Flags:
Number Start End Size File system Name Flags 1 1049kB 2097kB 1049kB bios_grub 2 2097kB 526MB 524MB xfs 3 526MB 63.9GB 63.3GB 4 63.9GB 64.0GB 105MB xfs Linux filesystem 5 64.0GB 64.1GB 105MB ext4 Linux filesystem 6 64.1GB 64.2GB 105MB fat16 Linux filesystem 7 64.2GB 64.3GB 105MB linux-swap(v1) Linux filesystem
新建分区设备
root@host-100-75-29-107:~# parted /dev/vda mkpart primary fat32 64.3GB 64.4GB Information: You may need to update /etc/fstab.
root@host-100-75-29-107:~# parted /dev/vda print Model: Virtio Block Device (virtblk) Disk /dev/vda: 64.4GB Sector size (logical/physical): 512B/512B Partition Table: gpt Disk Flags:
Number Start End Size File system Name Flags 1 1049kB 2097kB 1049kB bios_grub 2 2097kB 526MB 524MB xfs 3 526MB 63.9GB 63.3GB 4 63.9GB 64.0GB 105MB xfs Linux filesystem 5 64.0GB 64.1GB 105MB ext4 Linux filesystem 6 64.1GB 64.2GB 105MB fat16 Linux filesystem 7 64.2GB 64.3GB 105MB linux-swap(v1) Linux filesystem 8 64.3GB 64.4GB 130MB primary msftdata
root@host-100-75-29-107:~# partprobe root@host-100-75-29-107:~# lsblk /dev/vda8 NAME MAJ:MIN RM SIZE RO TYPE MOUNTPOINT vda8 252:8 0 124M 0 part
同样的方式挂载磁盘到目录
```

若有收获,就点个赞吧
0 人点赞
