压缩文件的用途与技术
文件压缩的好处
压缩原理
方式一
计算机系统使用二进制记录数据,当一个字节的8位未全部使用,则会自动补0,计算节工程师通过复杂的计算方式将没用使用的空间取出,让文件占用的空间变小,这就是压缩技术。
方式二
将重复的数据统计记录,如:【111…】共有100个1时,那么压缩技术会记录【100个1】而不是真实的100个1的位,同样达到精简文件容量的效果
压缩比
压缩过的文件并无法直接被操作系统所使用,若要使用已压缩的文件,必须将它还原回未压缩前的模样,这就是解压缩
压缩后与压缩文件所占用的磁盘空间大小,称为压缩比
其他用途
网络数据传输中,由于数据量的降低,也会减少网络带宽的压力。目前很多的www网站也是利用文件压缩技术来进行数据的传送。即在传输过程中的数据是压缩过的,等达到目的计算机时再解压缩,提高数据传输速度。
linux系统常见的压缩命令
linux下常见的压缩文件扩展名有:.tar、.tar.gz、.tgz、.Z、.bz2、.xz等,通常情况linux文件的扩展名并不会决定文件的用途。但由于linux支持的压缩命令非常多,且压缩技术实现也不同。扩展名可以更方便使用者对照解压缩。
常见的扩展名
.Z: compress程序压缩的文件*.zip: zip程序压缩的文件*.gz: gzip程序压缩的文件*.bz2: bzip2程序压缩的文件*.xz: xz程序压缩的文件*.tar: tar程序打包的文件,并没有压缩过*.tar.gz: tar程序打包的文件,并且经过gzip的压缩*.tar.bz2: xz程序压缩的文件,并且经过bzip2的压缩*.tar.xz: xz程序压缩的文件,并且经过xz的压缩
说明:tar可以将多个文件打包成一个文件,甚至是目录。但tar功能仅是打包而已,并没有提供压缩功能。只有当tar与压缩功能结合才能起到压缩文件的效果。
gzip(zcat/zmore/zless/zgrep)
gzip是应用最广的压缩命令,目前gzip可以解开compress、zip与gzip等软件压缩的文件。
- gzip [-cdtv#] 文件名
- zcat 文件名.gz
选项与参数
基本使用
说明:
基本使用 ```shell [root@cnsz02vl29079 ~]# ll -Sdrh /etc/* … -rw-r—r—. 1 root root 12K Jul 28 2017 /etc/aliases.db -rw-r—r— 1 root root 27K Oct 3 2017 /etc/dnsmasq.conf -rw-r—r— 1 root root 30K Aug 17 01:48 /etc/ld.so.cache -rw-r—r—. 1 root root 51K May 15 2013 /etc/mime.types -rw-r—r—. 1 root root 655K Jun 7 2013 /etc/services-c:将压缩数据传输到屏幕上,可以通过数据流重定向来处理-d:解压缩参数-t:可以用来检查压缩文件的一致性,看文件有无错误-v:显示源文件/压缩文件的压缩比等信息-#:为数字,代表压缩等级,-1最快,但压缩比最差,-9最慢,但压缩效果最好,默认是-6
gzip压缩
[root@cnsz02vl29079 ~]# cd /tmp/ [root@cnsz02vl29079 tmp]# cp /etc/services ./ [root@cnsz02vl29079 tmp]# ll -h total 660K -rw-r—r— 1 root root 26 Aug 22 11:08 osw.hb -rw-r—r— 1 root root 655K Aug 22 11:08 services [root@cnsz02vl29079 tmp]# gzip -v services services: 79.7% — replaced with services.gz [root@cnsz02vl29079 tmp]# ll -h total 140K -rw-r—r— 1 root root 26 Aug 22 11:09 osw.hb -rw-r—r— 1 root root 133K Aug 22 11:08 services.gz
读取.gz压缩文件
[root@cnsz02vl29079 tmp]# zcat services.gz
/etc/services:
$Id: services,v 1.55 2013/04/14 ovasik Exp $
#
Network services, Internet style
IANA services version:
…
gzip解压缩
[root@cnsz02vl29079 tmp]# gzip -d services.gz [root@cnsz02vl29079 tmp]# ll -h total 660K -rw-r—r— 1 root root 26 Aug 22 11:15 osw.hb -rw-r—r— 1 root root 655K Aug 22 11:08 services
指定压缩等级 -c重定向到文件
[root@cnsz02vl29079 tmp]# gzip -9 -c services > services.gz [root@cnsz02vl29079 tmp]# ll -h total 796K -rw-r—r— 1 root root 26 Aug 22 11:16 osw.hb -rw-r—r— 1 root root 655K Aug 22 11:08 services -rw-r—r— 1 root root 133K Aug 22 11:16 services.gz
zgre搜索关键字
[root@cnsz02vl29079 tmp]# zgrep -n ‘http’ services.gz 14:# http://www.iana.org/assignments/port-numbers 89:http 80/tcp www www-http # WorldWideWeb HTTP 90:http 80/udp www www-http # HyperText Transfer Protocol 91:http 80/sctp # HyperText Transfer Protocol 197:https 443/tcp # http protocol over TLS/SSL …
1. gzip压缩时,**默认状态下原本的文件会被压缩成.gz后缀的文件,原文件就不再存在**。此外,gzip压缩文件再windows系统中,可以被WinRAR或7zip这些软件所解压缩。1. cat/less/more可以用不同的方式读取纯文本文件,zcat/zmore/zless则对应可以读取纯文本文件被压缩后的文件<a name="c4fb2b57"></a>### bzip2(bcat/bmore/bless/bgrep)如果gzip的出现是为了替换compress以提供更好压缩比,那么bzip2则是为了替换gzip并提供更好压缩比。- bzip2 [-cdkzv#] 文件名- bcat 文件名.bz2<br />选项与参数 <br />基本使用 <br />说明:bzip2压缩率比gzip更好,对于大容量文件,相对来说bzip2压缩时间会更久。
-c:将压缩过程产生的数据输出到屏幕上 -d:解压缩的参数 -k:保留原始文件,不会删除原始文件 -z:压缩的参数(默认值,可以不加) -v:可显示源文件/压缩文件的压缩比信息 -#:同gzip一样,可计算压缩比参数
基本使用```shell[root@cnsz02vl29079 tmp]# bzip2 -v servicesservices: 5.409:1, 1.479 bits/byte, 81.51% saved, 670293 in, 123932 out.[root@cnsz02vl29079 tmp]# ll -htotal 264K-rw-r--r-- 1 root root 26 Aug 22 11:28 osw.hb-rw-r--r-- 1 root root 122K Aug 22 11:08 services.bz2-rw-r--r-- 1 root root 133K Aug 22 11:16 services.gz[root@cnsz02vl29079 tmp]# bzip2 -d services.bz2[root@cnsz02vl29079 tmp]# lltotal 660-rw-r--r-- 1 root root 26 Aug 22 11:31 osw.hb-rw-r--r-- 1 root root 670293 Aug 22 11:08 services# 保留原文件[root@cnsz02vl29079 tmp]# bzip2 -k services[root@cnsz02vl29079 tmp]# lltotal 920-rw-r--r-- 1 root root 26 Aug 22 11:39 osw.hb-rw-r--r-- 1 root root 670293 Aug 22 11:08 services-rw-r--r-- 1 root root 123932 Aug 22 11:08 services.bz2-rw-r--r-- 1 root root 136088 Aug 22 11:39 services.gz# 查看.bz2文件[root@cnsz02vl29079 tmp]# bzcat services.bz2# /etc/services:# $Id: services,v 1.55 2013/04/14 ovasik Exp $
zx(zxcat/zxmore/zxless/zxgrep)
xz在bzip2基础上进一步提高了压缩率,使用命令几乎和gzip/bzip2一模一样。
- xz [-dtlkc#] 文件名
xcat 文件名.xz
选项与参数
基本使用-d:解压缩-t:测试压缩文件完整性,看有没有错误-l:列出压缩文件的信息-k:保留原文件-c:将数据在屏幕上输出
基本使用
[root@cnsz02vl29079 tmp]# xz -v servicesservices (1/1)100 % 97.3 KiB / 654.6 KiB = 0.149[root@cnsz02vl29079 tmp]# ll -htotal 364K-rw-r--r-- 1 root root 26 Aug 22 11:48 osw.hb-rw-r--r-- 1 root root 122K Aug 22 11:08 services.bz2-rw-r--r-- 1 root root 133K Aug 22 11:39 services.gz-rw-r--r-- 1 root root 98K Aug 22 11:08 services.xz# 加压缩文件[root@cnsz02vl29079 tmp]# xz -d services.xz[root@cnsz02vl29079 tmp]# ll -htotal 920K-rw-r--r-- 1 root root 26 Aug 22 11:49 osw.hb-rw-r--r-- 1 root root 655K Aug 22 11:08 services-rw-r--r-- 1 root root 122K Aug 22 11:08 services.bz2-rw-r--r-- 1 root root 133K Aug 22 11:39 services.gz# 保留原文件[root@cnsz02vl29079 tmp]# xz -c services > services.xz[root@cnsz02vl29079 tmp]# ll -htotal 1020K-rw-r--r-- 1 root root 26 Aug 22 11:50 osw.hb-rw-r--r-- 1 root root 655K Aug 22 11:08 services-rw-r--r-- 1 root root 122K Aug 22 11:08 services.bz2-rw-r--r-- 1 root root 133K Aug 22 11:39 services.gz-rw-r--r-- 1 root root 98K Aug 22 11:50 services.xz[root@cnsz02vl29079 tmp]# xz -k servicesxz: services.xz: File exists[root@cnsz02vl29079 tmp]# rm -rf services.xz[root@cnsz02vl29079 tmp]# xz -k services[root@cnsz02vl29079 tmp]# ll -htotal 1020K-rw-r--r-- 1 root root 26 Aug 22 11:50 osw.hb-rw-r--r-- 1 root root 655K Aug 22 11:08 services-rw-r--r-- 1 root root 122K Aug 22 11:08 services.bz2-rw-r--r-- 1 root root 133K Aug 22 11:39 services.gz-rw-r--r-- 1 root root 98K Aug 22 11:08 services.xz
打包命令:tar
将多个文件或目录打包成一个文件的命令功能,称为打包命令。linux下为tar命令,同时还可以通过gzip、bzip2、xz的支持,将文件同时进行压缩。由于tar命令使用太广泛,目前Windows的WinRAR也支持.tar.gz文件名的解压缩。
打包与压缩
tar [-z|-j|-J] [cv] [-f 待建立的新文件名] filename
查看文件名
tar [-z|-j|-J] [tv] [-f 已有的tar文件名]
解压缩
tar [-z|-j|-J] [xv] [-f 已有的tar文件名] [-C 目录]
选项与参数
-c:建立打包文件,可搭配-v查看过程中被打包的文件名-t:查看打包文件的内容含有哪些文件名-x:解包或解压缩的功能-z:通过gzip的支持进行压缩/解压缩,文件名最好为.tar.gz-j:通过bzip2的支持进行压缩/解压缩,文件名最好为.tar.bz2-J:通过xz的支持进行压缩/解压缩,文件名最好为.tar.xz-v:在压缩/解压缩过程中,将正在处理的文件名显示出来-f filename: -f后面要立刻接被处理文件名,建议-f 单独写成一项-C目录:在解压缩,若要在特定目录解压缩,可使用这个选项-p:保留备份的原本权限与属性,常用于备份(-c)重要的配置文件-P:保留绝对路径,允许备份中含有根目录存在--exclude=file:压缩过程中,不要将file打包
tar压缩文件
A:为什么压缩后的文件(etc/hostname)去掉了根目录/
Q:原因是为了安全,tar解压文件,如不保留/,当前目录在/tmp下则会解压到/tmp/etc/xxx下。如文件保留/则一定会解压到/etc下,此时就会覆盖/etc原文件# tar配合gzip压缩[root@cnsz02vl29079 etc]# time tar -zpcv -f /root/etc.tar.gz /etc/.../etc/hostnamereal 0m9.453s # time显示程序运行的时间user 0m1.350ssys 0m0.228s# tar配合bzip2压缩[root@cnsz02vl29079 etc]# time tar -jpcv -f /root/etc.tar.bz2 /etc/.../etc/hostnamereal 0m9.441suser 0m3.760ssys 0m0.100s# tar配合xz压缩[root@cnsz02vl29079 etc]# time tar -Jpcv -f /root/etc.tar.xz /etc/.../etc/hostnamereal 0m23.040suser 0m16.350ssys 0m0.326s# 查看压缩后文件大小[root@cnsz02vl29079 etc]# ll -h /root/etc.tar.gz /root/etc.tar.bz2 /root/etc.tar.xz-rw-r--r-- 1 root root 9.1M Aug 22 12:16 /root/etc.tar.bz2-rw-r--r-- 1 root root 11M Aug 22 12:12 /root/etc.tar.gz-rw-r--r-- 1 root root 7.2M Aug 22 12:17 /root/etc.tar.xz# 查看/etc目录的实际容量[root@cnsz02vl29079 etc]# du -sh /etc/36M /etc/# 查看tar文件内容[root@cnsz02vl29079 etc]# tar -jtv -f /root/etc.tar.bz2...-rw-r--r-- root/root 842 2016-11-06 04:29 etc/GeoIP.conf-rw-r--r-- root/root 858 2016-11-06 04:29 etc/GeoIP.conf.default-rw-r--r-- root/root 24 2021-08-16 20:13 etc/hostname
解压缩文件
# 解压缩文件[root@cnsz02vl29079 tmp]# cd /tmp/[root@cnsz02vl29079 tmp]# tar -zxv -f /root/etc.tar.gz...etc/hostname[root@cnsz02vl29079 tmp]# ll -htotal 1.1Mdrwxr-xr-x 93 root root 8.0K Aug 17 01:48 etc-rw-r--r-- 1 root root 26 Aug 22 12:30 osw.hb-rw-r--r-- 1 root root 655K Aug 22 11:08 services-rw-r--r-- 1 root root 122K Aug 22 11:08 services.bz2-rw-r--r-- 1 root root 133K Aug 22 11:39 services.gz-rw-r--r-- 1 root root 98K Aug 22 11:08 services.xz# -C指定解压后存放目录[root@cnsz02vl29079 tmp]# tar -zxv -f /root/etc.tar.gz -C /app/etc/GeoIP.conf.defaultetc/hostname[root@cnsz02vl29079 tmp]# ll -h /app/total 16Kdrwxr-xr-x 9 mwop mwop 149 Jan 22 2018 apache-tomcat-7.0.75drwxr-xr-x 93 root root 8.0K Aug 17 01:48 etcdrwxr-xr-x 8 mwop mwop 4.0K Nov 29 2017 jdk1.8.0_121
仅解压单个文件
# 过滤文件名
[root@cnsz02vl29079 ~]# tar -jtv -f etc.tar.bz2 | grep "shadow"
---------- root/root      1379 2021-08-16 20:13 etc/shadow-
---------- root/root       620 2017-07-28 12:52 etc/gshadow
---------- root/root      1384 2021-08-16 20:13 etc/shadow
# tar -jxv -f 打包文件 待解压文件名
[root@cnsz02vl29079 ~]# tar -jxv -f etc.tar.bz2 etc/shadow
etc/shadow
[root@cnsz02vl29079 ~]# ll -h etc
total 4.0K
---------- 1 root root 1.4K Aug 16 20:13 shadow
特殊应用:利用管道命令与数据流
# 将/etc整个目录一边打包一边在/tmp解开(类似cp -r /etc /tmp 操作)
[root@cnsz02vl29079 tmp]# tar -cvf - /etc | tar -xvf -
...
etc/GeoIP.conf.default
etc/hostname
[root@cnsz02vl29079 tmp]# ll -h
total 1.1M
drwxr-xr-x 93 root root 8.0K Aug 17 01:48 etc
-rw-r--r--  1 root root   26 Aug 22 12:45 osw.hb
-rw-r--r--  1 root root 655K Aug 22 11:08 services
-rw-r--r--  1 root root 122K Aug 22 11:08 services.bz2
-rw-r--r--  1 root root 133K Aug 22 11:39 services.gz
-rw-r--r--  1 root root  98K Aug 22 11:08 services.xz
XFS文件系统的备份与还原
tar通常是针对目录树系统来进行备份,如果想对整个文件系统来备份该如何做?由于centos7默认使用xfs文件系统,xfsdump与xfsrestore分别实现备份和还原
XFS文件系统备份xfsdump
xfsdump功能十分强大,不仅可以对文件系统完整备份,还能进行增量备份。
xfsdump备份示意图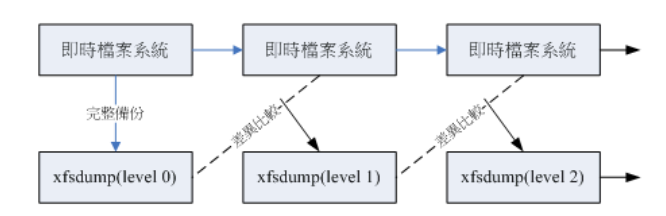
xfsdump使用限制条件
- xfsdump不支持没用挂载的文件系统备份,只能备份已挂载的文件系统
- xfsdump必须使用root身份才能执行操作
- xfsdump只能备份xfs文件系统
- xfsdump备份下的数据,只能xfsrestore解析
- xfsdump通过文件系统的UUID来辨别各备份文件,因此不能备份两个具有相同UUID的文件系统
xfsdump [-L S label] [-M M label] [-l #] [-f 备份文件] 待备份数据
选项与参数
-L:xfsdump会记录每次备份的session标头,
-M:xfsdump可以记录存储媒介的标头
-l:指定等级,有0~9共10个等级(默认0,即完整备份)
-f:类似tar,后面接产生的文件,也可接设备文件名或一版文件名等
-I:从/var/lib/xfsdump/inventory列出目前备份的信息状态
XFS文件系统还原xfsrestore
单一文件全系统恢复
xfsrestore [-f 备份文件] [-L S label] [-s] 待恢复目录
通过增量备份文件来恢复系统
xfsrestore [-f 备份文件] -r 待恢复目录
进入交互模式
xfsrestore [-f 备份文件] -i 待恢复目录
选项与参数
-L:跟xfsdump相同的输出,可查询备份数据,包括Label名称与备份时间等
-f:后面接的就是备份文件,企业可能会接/dev/st0等磁带机,我们这里接文件名
-L:就是session的Label name,可用-I查询到的数据,在这个选项后输入
-s:接特定目录,即仅恢复某个文件或目录
-r:如果用文件来存储备份数据,则不需要使用,如果是一个磁带内有多个文件,需要次选项来完成累计恢复
-i:进入交互模式,高级管理员使用的,一般不需要我们操作
光盘写入工具
mkisofs:建立镜像文件
cdrecord:光盘刻录工具
其他常见的压缩与备份工具
dd
dd可以读取磁盘设备的内容(几乎是直接读取扇区),将整个设备备份成一个文件。
dd if=’input_file’ of=’output_file’ bs=’block_size’ count=’number’
选项与参数
if:input_file,也可以是设备
of:output_file,也可以是设备
bs:设置的一个block的大小,若未指定则默认是512Bytes(一个扇区的大小)
count:多少个bs的意思
cpio
cpio可以备份任何东西,包括设备文件,不过cpio有个大问题,就是cpio不会主动地去找文件来备份。一般来说,cpio要配合类似find等查找文件的命令来告知cpio该备份的数据在哪里。
备份:cpio -ovcB > [file|device]
-o:将数据复制输出到文件或设备上
-B:让默认的blocks可以增加至5120字节,默认是512字节,好处:可以让大文件存储速度加快
还原:cpio -ivcdu < [file|device]
-i:将数据自文件或设备复制出来到系统当中
-d:自动创建目录,使用cpio所备份的内容不见得会在同一层目录中因此必须要让cpio在还原时可以建立新目录
-u:自动的将较新的文件覆盖较旧的文件
-t:需配合-i选项,可用在查看以cpio建立的文件或设备的内容
查看:cpio -ivct < [file|device]
-v:让存储的过程中文件名称可以在屏幕上显示
-c:一种较新的portable format方式存储

若有收获,就点个赞吧
0 人点赞
