Docker官方文档
Docker远程仓库
安装步骤以及命令
准备工作
# 1. 卸载已安装过的旧版本的docker [新服务器无需此操作]yum remove docker \docker-client \docker-client-latest \docker-common \docker-latest \docker-latest-logrotate \docker-logrotate \docker-engine# 2. 需要安装的包yum install -y yum-utils
开始docker安装命令
# 3. 设置镜像仓库# 官方镜像地址是比较慢,可以使用国内的,比如阿里的yum-config-manager \--add-repo \https://download.docker.com/linux/centos/docker-ce.repo#推荐使用国内的yum-config-manager \--add-repo \https://mirrors.aliyun.com/docker-ce/linux/centos/docker-ce.repo# 4. 更新yum索引,获取最新的索引yum makecache fastyum makecache fast# 5. 安装docker相关的 docker-ce 社区版 而ee是企业版,企业版是收费yum install docker-ce docker-ce-cli containerd.io# 6.启动dockersystemctl start docker# 7. 验证是否安装成功docker version
验证安装成功
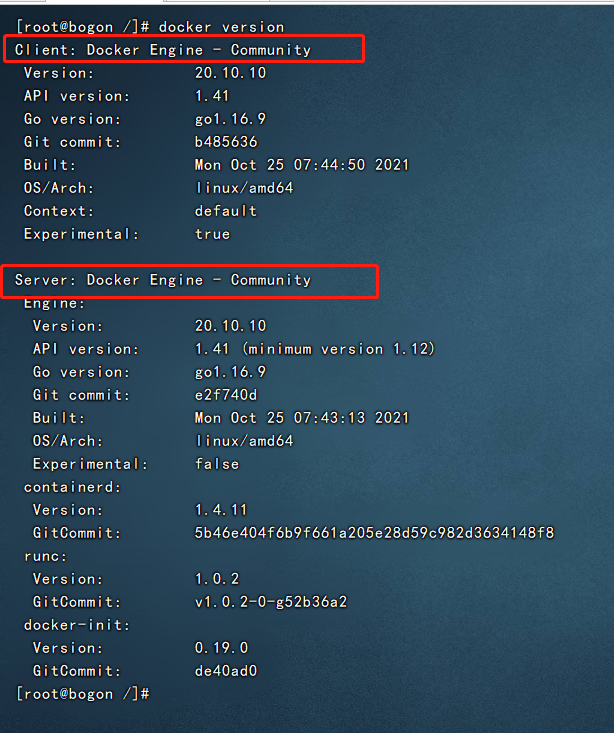
执行**version**命令,出现**docker**的版本信息,即为安装成功
Hollo-world
Hollo-word示例
测试docker环境是否正常,使用官方提供的hollo-word的示例
镜像运行命令
docker run hello-world # docker run 镜像
执行结果: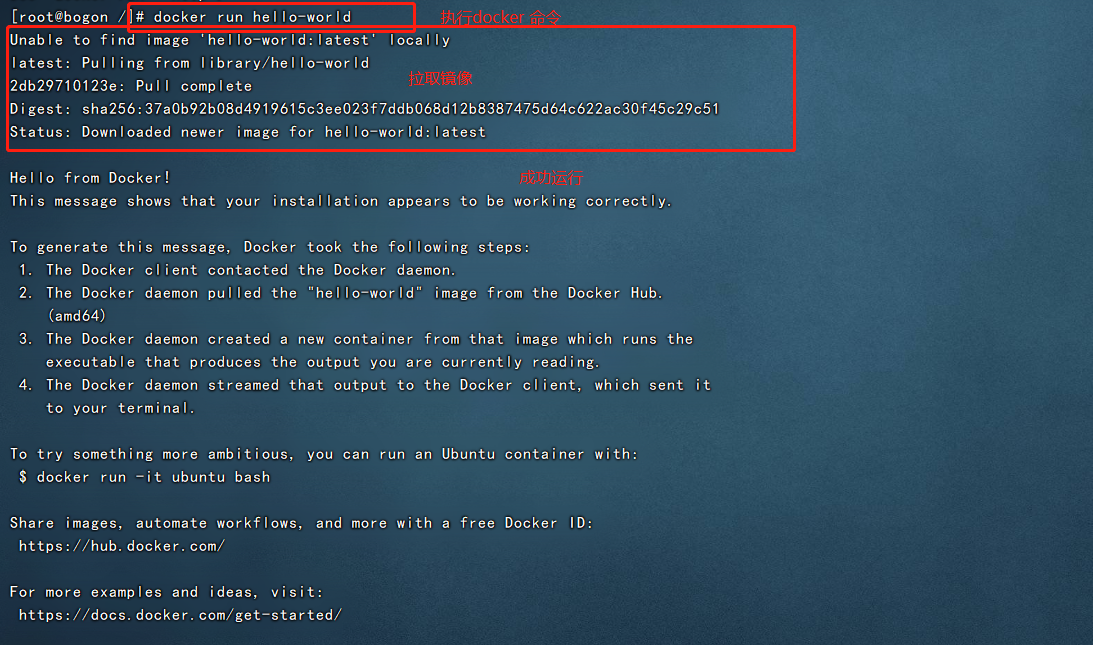
- 容器启动命令
```
docker run [可选参数] image | docker container run [可选参数] image
参书说明
—name=”Name” #容器名字 tomcat01 tomcat02 用来区分容器 -d #后台方式运行 -it #使用交互方式运行,进入容器查看内容 -p #指定容器的端口 -p 8080(宿主机):8080(容器)
-P(大写) 随机指定端口-p ip:主机端口:容器端口-p 主机端口:容器端口(常用)-p 容器端口容器端口
测试、启动并进入容器
[root@iz2zeak7sgj6i7hrb2g [root@iz2zeak7sgj6i7hrb2g862z ~]# docker run -it centos /bin/bash 【启动并进入容器】 [root@241b5abce65e /]# ls bin dev etc home lib lib64 lost+found media mnt opt proc root run sbin srv sys tmp usr var [root@241b5abce65e /]# exit 【从容器退回主机】 exit
**常见的坑:docker容器使用后台运行,就必须要有要一个前台进程,docker发现没有应用,就会自动停止**- 查看当前docker环境下的所有镜像```shelldocker images #查看当前docker环境下的所有镜像docker image ls[root@bogon /]# docker images# 镜像名称 镜像版本 唯一ID 时间 镜像大小REPOSITORY TAG IMAGE ID CREATED SIZEhello-world latest feb5d9fea6a5 6 weeks ago 13.3kB
搜索镜像 【建议少用,使用远程仓库可以查看镜像详情】
docker search #搜索镜像
下载镜像
docker pull #下载镜像 docker image pull
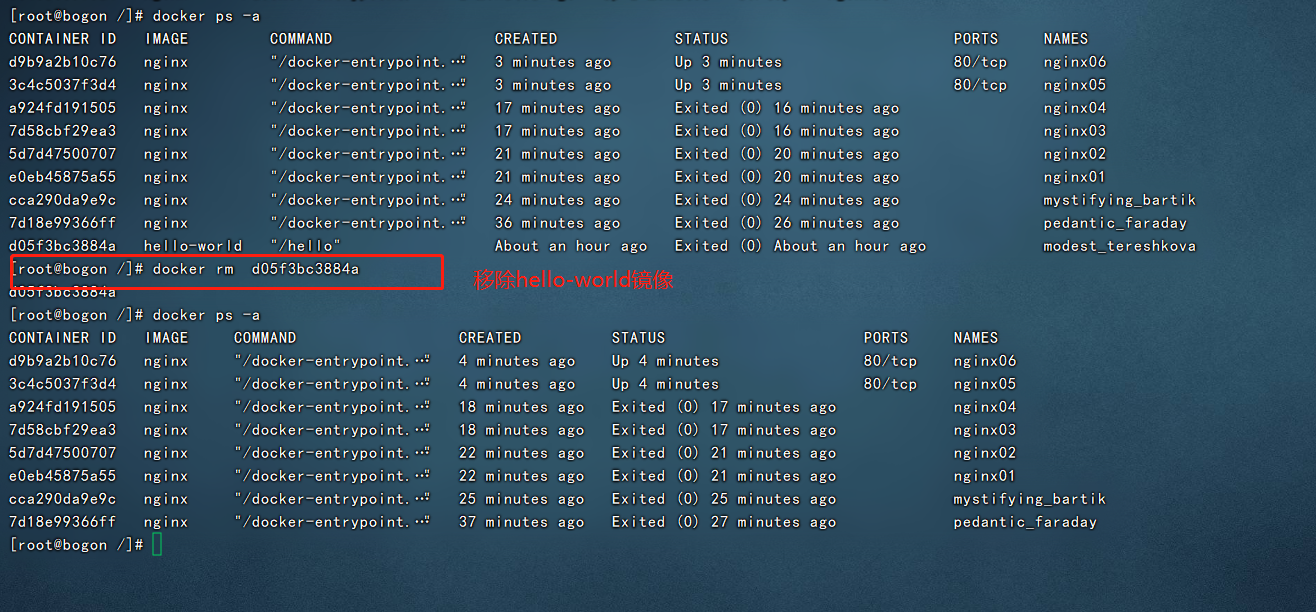
删除镜像
docker rmi #删除镜像 docker image rmdocker rmi -f $(docker images -aq) #删除全部的镜像
容器基本命令
查询容器 ```shell docker ps # 列出当前正在运行的容器 -a, —all #列出当前正在运行的容器 + 带出历史运行过的容器 -n=?, —last int #列出最近创建的?个容器 ?为1则只列出最近创建的一个容器,为2则列出2个 -q, —quiet #只列出容器的编号
[root@bogon /]# docker ps
容器唯一ID 镜像名 执行命令 时间 状态 暴露端口 容器名
CONTAINER ID IMAGE COMMAND CREATED STATUS PORTS NAMES
7d18e99366ff nginx “/docker-entrypoint.…” 2 minutes ago Up 2 minutes 80/tcp pedantic_faraday
[root@bogon /]# docker ps -a CONTAINER ID IMAGE COMMAND CREATED STATUS PORTS NAMES 7d18e99366ff nginx “/docker-entrypoint.…” 4 minutes ago Up 4 minutes 80/tcp pedantic_faraday【正在运行的容器】
d05f3bc3884a hello-world “/hello” 45 minutes ago Exited (0) 45 minutes ago modest_tereshkova【之前运行过的容器】
[root@bogon /]# docker ps -q d9b9a2b10c76
3c4c5037f3d4
[root@bogon /]# docker ps -n=2 CONTAINER ID IMAGE COMMAND CREATED STATUS PORTS NAMES d9b9a2b10c76 nginx “/docker-entrypoint.…” 36 seconds ago Up 35 seconds 80/tcp nginx06 3c4c5037f3d4 nginx “/docker-entrypoint.…” 41 seconds ago Up 40 seconds 80/tcp nginx05
- 容器停止命令```shelldocker stop 容器ID # 容器停止命令# 查询到正在运行的容器,# -q 仅展示容器ID[root@bogon /]# docker ps -qcca290da9e9c[root@bogon /]# docker stop cca290da9e9ccca290da9e9c 【容器停止成功】docker stop $(docker ps -aq) # 停止所有正在运行的容器 $ 代表取值[root@bogon /]# docker ps -q 【正在运行的容器】a924fd1915057d58cbf29ea3[root@bogon /]# docker stop $(docker ps -q)【停止所有正在运行的容器】a924fd1915057d58cbf29ea3
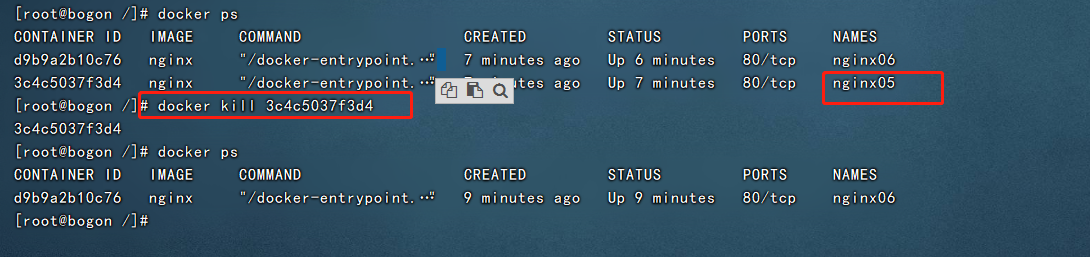
杀死正在运行的容器
docker kill 容器ID
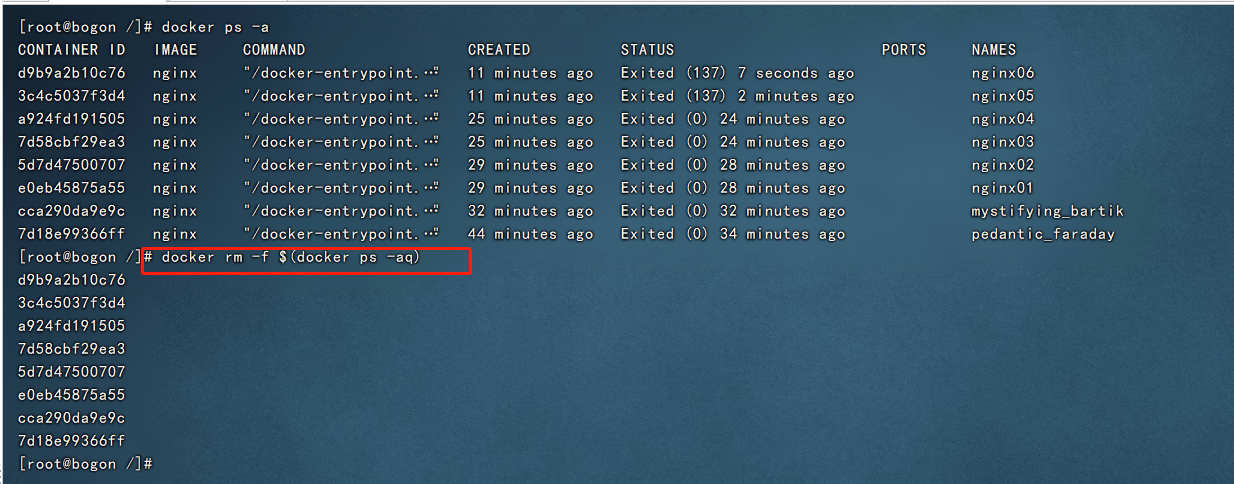
删除容器
docker rm 容器id #删除指定的容器,不能删除正在运行的容器,如果要强制删除 rm -rf
docker rm -f $(docker ps -aq) #删除所有的容器
启动和重启容器
docker start 容器id #启动容器docker restart 容器id #重启容器
进入容器
docker exec -it 容器ID /bin/bash #进入容器并且打开一个新的终端

docker attach 容器id #进入容器并且进入正在执行的终端

退出容器
exit #容器直接退出ctrl +P +Q #容器不停止退出 ---注意:这个很有用的操作
查看docker日志 ```shell docker logs —help Options:
--details Show extra details provided to logs
- -f, —follow Follow log output —since string Show logs since timestamp (e.g. 2013-01-02T13:23:37) or relative (e.g. 42m for 42 minutes)
- —tail string Number of lines to show from the end of the logs (default “all”)
- -t, —timestamps Show timestamps
—until string Show logs before a timestamp (e.g. 2013-01-02T13:23:37) or relative (e.g. 42m for 42 minutes)
➜ ~ docker run -d centos /bin/sh -c “while true;do echo 6666;sleep 1;done” #模拟日志
显示日志
-tf #显示日志信息(一直更新) —tail number #需要显示日志条数 docker logs -t —tail n 容器id #查看n行日志 docker logs -ft 容器id #跟着日志 ```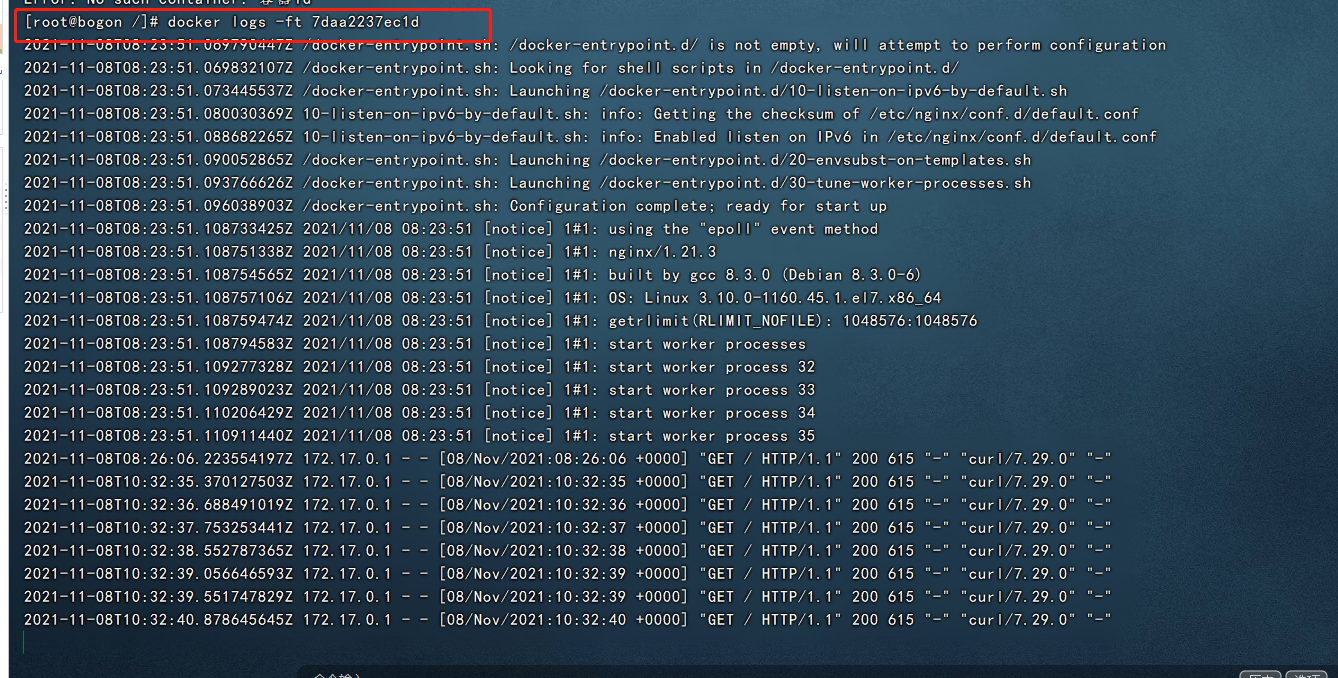

测试
[root@bogon /]# docker inspect 7daa2237ec1d [ { “Id”: “7daa2237ec1d92b8b4b850814e9c74bef8e48efc978aed7234c979594c88d07a”, “Created”: “2021-11-08T08:23:50.342564917Z”, “Path”: “/docker-entrypoint.sh”, “Args”: [ “nginx”, “-g”, “daemon off;” ], “State”: { “Status”: “running”, “Running”: true, “Paused”: false, “Restarting”: false, “OOMKilled”: false, “Dead”: false, “Pid”: 84968, “ExitCode”: 0, “Error”: “”, “StartedAt”: “2021-11-08T08:23:51.070809271Z”, “FinishedAt”: “0001-01-01T00:00:00Z” }, “Image”: “sha256:87a94228f133e2da99cb16d653cd1373c5b4e8689956386c1c12b60a20421a02”, “ResolvConfPath”: “/var/lib/docker/containers/7daa2237ec1d92b8b4b850814e9c74bef8e48efc978aed7234c979594c88d07a/resolv.conf”, “HostnamePath”: “/var/lib/docker/containers/7daa2237ec1d92b8b4b850814e9c74bef8e48efc978aed7234c979594c88d07a/hostname”, “HostsPath”: “/var/lib/docker/containers/7daa2237ec1d92b8b4b850814e9c74bef8e48efc978aed7234c979594c88d07a/hosts”, “LogPath”: “/var/lib/docker/containers/7daa2237ec1d92b8b4b850814e9c74bef8e48efc978aed7234c979594c88d07a/7daa2237ec1d92b8b4b850814e9c74bef8e48efc978aed7234c979594c88d07a-json.log”, “Name”: “/nginx02”, “RestartCount”: 0, “Driver”: “overlay2”, “Platform”: “linux”, “MountLabel”: “”, “ProcessLabel”: “”, “AppArmorProfile”: “”, “ExecIDs”: [ “4120fe6eff388f1ca32d9c09cce02c286e500ea0aca00e596ba590adfeac6ca7”, “ef7a9731d2bc08e70aef31905aba67028e8c85fa5e42ac0dc942dd9c03071cb4” ], “HostConfig”: { “Binds”: null, “ContainerIDFile”: “”, “LogConfig”: { “Type”: “json-file”, “Config”: {} }, “NetworkMode”: “default”, “PortBindings”: { “80/tcp”: [ { “HostIp”: “”, “HostPort”: “8000” } ] }, “RestartPolicy”: { “Name”: “no”, “MaximumRetryCount”: 0 }, “AutoRemove”: false, “VolumeDriver”: “”, “VolumesFrom”: null, “CapAdd”: null, “CapDrop”: null, “CgroupnsMode”: “host”, “Dns”: [], “DnsOptions”: [], “DnsSearch”: [], “ExtraHosts”: null, “GroupAdd”: null, “IpcMode”: “private”, “Cgroup”: “”, “Links”: null, “OomScoreAdj”: 0, “PidMode”: “”, “Privileged”: false, “PublishAllPorts”: false, “ReadonlyRootfs”: false, “SecurityOpt”: null, “UTSMode”: “”, “UsernsMode”: “”, “ShmSize”: 67108864, “Runtime”: “runc”, “ConsoleSize”: [ 0, 0 ], “Isolation”: “”, “CpuShares”: 0, “Memory”: 0, “NanoCpus”: 0, “CgroupParent”: “”, “BlkioWeight”: 0, “BlkioWeightDevice”: [], “BlkioDeviceReadBps”: null, “BlkioDeviceWriteBps”: null, “BlkioDeviceReadIOps”: null, “BlkioDeviceWriteIOps”: null, “CpuPeriod”: 0, “CpuQuota”: 0, “CpuRealtimePeriod”: 0, “CpuRealtimeRuntime”: 0, “CpusetCpus”: “”, “CpusetMems”: “”, “Devices”: [], “DeviceCgroupRules”: null, “DeviceRequests”: null, “KernelMemory”: 0, “KernelMemoryTCP”: 0, “MemoryReservation”: 0, “MemorySwap”: 0, “MemorySwappiness”: null, “OomKillDisable”: false, “PidsLimit”: null, “Ulimits”: null, “CpuCount”: 0, “CpuPercent”: 0, “IOMaximumIOps”: 0, “IOMaximumBandwidth”: 0, “MaskedPaths”: [ “/proc/asound”, “/proc/acpi”, “/proc/kcore”, “/proc/keys”, “/proc/latency_stats”, “/proc/timer_list”, “/proc/timer_stats”, “/proc/sched_debug”, “/proc/scsi”, “/sys/firmware” ], “ReadonlyPaths”: [ “/proc/bus”, “/proc/fs”, “/proc/irq”, “/proc/sys”, “/proc/sysrq-trigger” ] }, “GraphDriver”: { “Data”: { “LowerDir”: “/var/lib/docker/overlay2/0778d818ab0406f00a7ad651d9c70f1b586642fb92d468220a4b2d66ffdeecc6-init/diff:/var/lib/docker/overlay2/d58fab8d23dafafd6c7674ffac3dad8ed91b6515b413bdc128164d74482e63fd/diff:/var/lib/docker/overlay2/c7d9e2e744739c79e8ba575430ca0fb9e5cb5707309aaa3844ac4eec7800fd05/diff:/var/lib/docker/overlay2/bc03eef418af2d95e47e4a90db360d1195c84daada7133561f80384f366287bb/diff:/var/lib/docker/overlay2/4a0f6d30a8c3e58f8b01e2b5c964a7b4a9abc90a295cc74692ffc60ec6fbe125/diff:/var/lib/docker/overlay2/fb8c8d457fbd46f237da67fc31370d3449dd3104d872bdb888102e9c221ee44b/diff:/var/lib/docker/overlay2/efc57b47f664f34115950ea32175fcde004bf1c1fc758c6bdc39f45ae5abe13d/diff”, “MergedDir”: “/var/lib/docker/overlay2/0778d818ab0406f00a7ad651d9c70f1b586642fb92d468220a4b2d66ffdeecc6/merged”, “UpperDir”: “/var/lib/docker/overlay2/0778d818ab0406f00a7ad651d9c70f1b586642fb92d468220a4b2d66ffdeecc6/diff”, “WorkDir”: “/var/lib/docker/overlay2/0778d818ab0406f00a7ad651d9c70f1b586642fb92d468220a4b2d66ffdeecc6/work” }, “Name”: “overlay2” }, “Mounts”: [], “Config”: { “Hostname”: “7daa2237ec1d”, “Domainname”: “”, “User”: “”, “AttachStdin”: false, “AttachStdout”: true, “AttachStderr”: true, “ExposedPorts”: { “80/tcp”: {} }, “Tty”: false, “OpenStdin”: false, “StdinOnce”: false, “Env”: [ “PATH=/usr/local/sbin:/usr/local/bin:/usr/sbin:/usr/bin:/sbin:/bin”, “NGINX_VERSION=1.21.3”, “NJS_VERSION=0.6.2”, “PKG_RELEASE=1~buster” ], “Cmd”: [ “nginx”, “-g”, “daemon off;” ], “Image”: “nginx”, “Volumes”: null, “WorkingDir”: “”, “Entrypoint”: [ “/docker-entrypoint.sh” ], “OnBuild”: null, “Labels”: { “maintainer”: “NGINX Docker Maintainers docker-maint@nginx.com“ }, “StopSignal”: “SIGQUIT” }, “NetworkSettings”: { “Bridge”: “”, “SandboxID”: “de74adbe1f577f46455dac020aac4dd14c3bada9810ba35b06b710f0e0522374”, “HairpinMode”: false, “LinkLocalIPv6Address”: “”, “LinkLocalIPv6PrefixLen”: 0, “Ports”: { “80/tcp”: [ { “HostIp”: “0.0.0.0”, “HostPort”: “8000” }, { “HostIp”: “::”, “HostPort”: “8000” } ] }, “SandboxKey”: “/var/run/docker/netns/de74adbe1f57”, “SecondaryIPAddresses”: null, “SecondaryIPv6Addresses”: null, “EndpointID”: “3ffd53ff1bf337358adfcf1fd9a969c8ddd212ca887d38d46c19a758dd64ea6c”, “Gateway”: “172.17.0.1”, “GlobalIPv6Address”: “”, “GlobalIPv6PrefixLen”: 0, “IPAddress”: “172.17.0.2”, “IPPrefixLen”: 16, “IPv6Gateway”: “”, “MacAddress”: “02:42:ac:11:00:02”, “Networks”: { “bridge”: { “IPAMConfig”: null, “Links”: null, “Aliases”: null, “NetworkID”: “eec222979fd743eb8682227b74092fa21437ae7c785033443db4dcae88d93352”, “EndpointID”: “3ffd53ff1bf337358adfcf1fd9a969c8ddd212ca887d38d46c19a758dd64ea6c”, “Gateway”: “172.17.0.1”, “IPAddress”: “172.17.0.2”, “IPPrefixLen”: 16, “IPv6Gateway”: “”, “GlobalIPv6Address”: “”, “GlobalIPv6PrefixLen”: 0, “MacAddress”: “02:42:ac:11:00:02”, “DriverOpts”: null } } } } ] [root@bogon /]#
- 从容器内拷贝到主机上```shelldocker cp 容器id:容器内路径 主机目的路径

小结
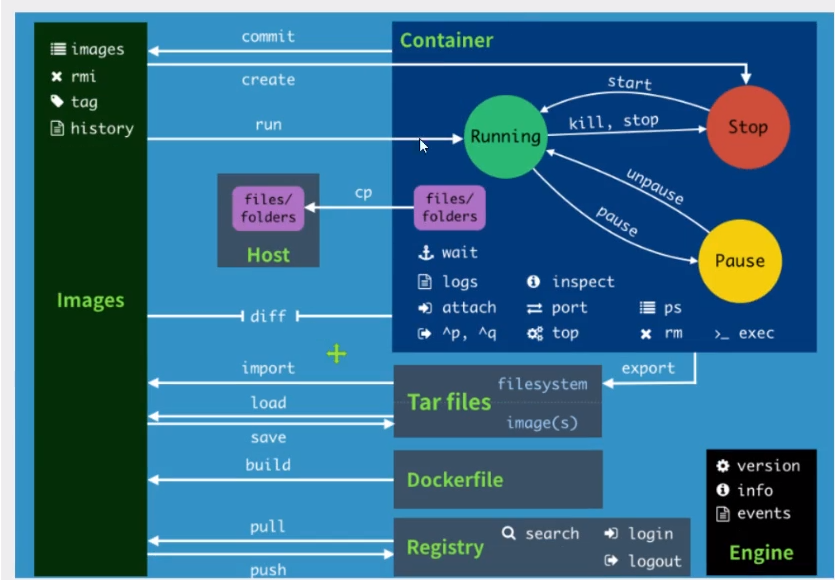
命令集合
attach Attach local standard input, output, and error streams to a running container#当前shell下 attach连接指定运行的镜像build Build an image from a Dockerfile # 通过Dockerfile定制镜像commit Create a new image from a container's changes #提交当前容器为新的镜像cp Copy files/folders between a container and the local filesystem #拷贝文件create Create a new container #创建一个新的容器diff Inspect changes to files or directories on a container's filesystem #查看docker容器的变化events Get real time events from the server # 从服务获取容器实时时间exec Run a command in a running container # 在运行中的容器上运行命令 打开一个新的终端export Export a container's filesystem as a tar archive #导出容器文件系统作为一个tar归档文件[对应import]history Show the history of an image # 展示一个镜像形成历史images List images #列出系统当前的镜像import Import the contents from a tarball to create a filesystem image #从tar包中导入内容创建一个文件系统镜像info Display system-wide information # 显示全系统信息inspect Return low-level information on Docker objects #查看容器详细信息kill Kill one or more running containers # kill指定docker容器load Load an image from a tar archive or STDIN #从一个tar包或标准输入中加载一个镜像[对应save]login Log in to a Docker registry # 登录远程仓库logout Log out from a Docker registry # 退出远程仓库logs Fetch the logs of a container # 查看docker 日志pause Pause all processes within one or more containersport List port mappings or a specific mapping for the containerps List containers # 列出正在运行的容器pull Pull an image or a repository from a registry # 拉取镜像push Push an image or a repository to a registry # 向远程推镜像rename Rename a containerrestart Restart one or more containers # 容器重启rm Remove one or more containers # 删除容器rmi Remove one or more images # 删除容器run Run a command in a new container # 启动一个容器save Save one or more images to a tar archive (streamed to STDOUT by default)search Search the Docker Hub for images # 搜索一个镜像start Start one or more stopped containers # 启动dockerstats Display a live stream of container(s) resource usage statistics # 镜像或docker 状态stop Stop one or more running containers # 停止容器/停止dockertag Create a tag TARGET_IMAGE that refers to SOURCE_IMAGE # 镜像tag版本top Display the running processes of a container# 查看一个容器的进程信息unpause Unpause all processes within one or more containersupdate Update configuration of one or more containersversion Show the Docker version information # docker 版本wait Block until one or more containers stop, then print their exit codes
其它
宿主机端口 和 容器内部端口 以及端口暴露:
容器内nginx启动后对外暴露端口号为80,宿主机通过-p命令将3344端口与容器的80端口映射
命令:
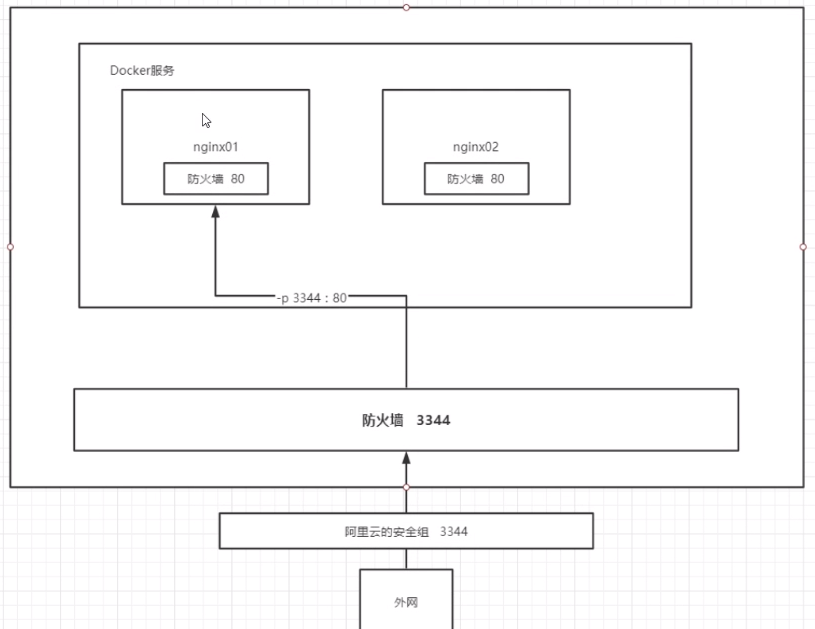
docker run -p 3344:80 镜像名 # -p小写为指定端口号的映射-P # 大写-P为宿主机任意端口号与容器暴露的端口号映射

若有收获,就点个赞吧
0 人点赞
