1. 自定义控件
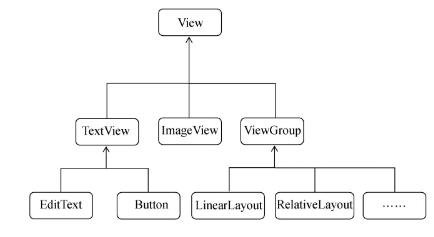
如下图所示,android中国所有控件都是直接或间接继承自View的,View是android中最基本的一种UI组件,它可以在屏幕上绘制一块矩形区域,并能响应这种区域的各种事件。
ViewGroup是一种特殊的View,它可以包含各种子View和子ViewGroup,是一个用于放置控件和布局的容器。
1. 引入布局
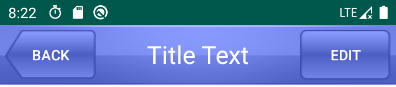
创建标题布局
title.xml
<?xml version="1.0" encoding="utf-8"?><LinearLayout xmlns:android="http://schemas.android.com/apk/res/android"android:layout_width="match_parent"android:layout_height="wrap_content"android:background="@drawable/title_bg"><Buttonandroid:id="@+id/title_back"android:layout_width="wrap_content"android:layout_height="wrap_content"android:layout_gravity="center"android:layout_margin="5dp"android:background="@drawable/back_bg"android:text="Back"android:textColor="#fff"></Button><TextViewandroid:id="@+id/title_text"android:layout_width="0dp"android:layout_height="wrap_content"android:layout_gravity="center"android:gravity="center"android:layout_weight="1"android:text="Title Text"android:textColor="#fff"android:textSize="24sp"></TextView><Buttonandroid:id="@+id/title_edit"android:layout_width="wrap_content"android:layout_height="wrap_content"android:layout_gravity="center"android:layout_margin="5dp"android:background="@drawable/edit_bg"android:text="Edit"android:textColor="#fff"></Button></LinearLayout>
引入标题布局
activity_main.xml
<?xml version="1.0" encoding="utf-8"?><LinearLayout xmlns:android="http://schemas.android.com/apk/res/android"android:layout_width="match_parent"android:layout_height="wrap_content"><include layout="@layout/title"/></LinearLayout>
隐藏标题栏
MainActivity
public class MainActivity extends AppCompatActivity {@Overrideprotected void onCreate(Bundle savedInstanceState) {super.onCreate(savedInstanceState);setContentView(R.layout.activity_main);ActionBar actionBar = getSupportActionBar();if(actionBar != null) {actionBar.hide();}}}
2. 创建自定义控件
com.example.uicustomviews.TitleLayout
public class TitleLayout extends LinearLayout {public TitleLayout(Context context, AttributeSet attrs) {super(context, attrs);LayoutInflater.from(context).inflate(R.layout.title, this);Button titleBack = (Button) findViewById(R.id.title_back);Button titleEdit = (Button) findViewById(R.id.title_edit);titleBack.setOnClickListener(new OnClickListener() {@Overridepublic void onClick(View v) {((Activity) getContext()).finish();}});titleEdit.setOnClickListener(new OnClickListener() {@Overridepublic void onClick(View v) {Toast.makeText(getContext(), "you clicked edit button ", Toast.LENGTH_SHORT).show();}});}}
activity_main.xml
<LinearLayout xmlns:android="http://schemas.android.com/apk/res/android"android:layout_width="match_parent"android:layout_height="wrap_content"><!--<include layout="@layout/title"/>--><com.example.uicustomviews.TitleLayoutandroid:layout_width="match_parent"android:layout_height="wrap_content"></com.example.uicustomviews.TitleLayout></LinearLayout>
2. ListView
1. 适配器
2. ListView的优化
3. RecycleView
1. 适配器
2. 水平布局

若有收获,就点个赞吧
0 人点赞
